Contribute
Register

NUC in a Mac Mini case

Status
Not open for further replies.
Found a picture from iFixit showing the amount of height in the case.

eq9n.jpg

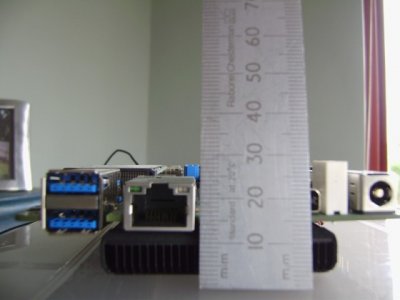
Here is now my measurement of the NUC with stock cooler.

lhk5.jpg

this is the worrying one though:

0p7w.jpg

The connector (for applying an external voltage source directly to the PCB) sticks up just too high. So if I keep the stock cooler and go for a slide in from the back method then it looks like this component will need to be de-soldered.

The other not so great issue will be that the on board Sata data connector will have to be incredibly slim line to allow things to work the way I would ideally like.

I will have to hold fire on any irreversible decisions until the actual case arrives as one option may be for me to remove the stock cooler for "slide in" assembly and then screw it back on again from underneath once everything is in place - as the well inside the Mac Mini plastic cover might just allow the crucial mm or 2 to make all of this fit without having to look at alternative cooler options.

Maybe this solution (adopted by the Brix Pro) is the answer to the Sata connector issue.
 

Attachments

  • img.x.jpg
    img.x.jpg
    18.9 KB · Views: 576
A couple of comments based on my iMac - nuc build.

The white plastic power connector was also an issue in my build, I just trimmed it a little of the plastic, so as not to need to risk desoldering.

For sata connector I used one rescued from powermac g5, they are right angle and quite slim.

Have you considered passive cooling with the Mac mini case acting as the heatsink ?
 
A couple of comments based on my iMac - nuc build.

Have you considered passive cooling with the Mac mini case acting as the heatsink ?

Hi Kiwi,

Yes that was my first thought actually, but reason I backed off that for the moment is because of the article referenced about the heat generated inside passively cooled cases for NUCs and the possible impact on mSATA life. I know the tdp is only 15w, but I am not keen on shortening mSATA life.

Currently I am considering using a thermal pad to connect the mSATA to the aluminium case and keeping the stock blower for the CPU. My reasoning is this might be a good route for component life.

The white plastic power connector was also an issue in my build, I just trimmed it a little of the plastic, so as not to need to risk desoldering.

For sata connector I used one rescued from powermac g5, they are right angle and quite slim.

If I hit a significant height issue then plan (b) will be to replace the stock cooler with a copper plate and use the casing as a larger passive heatsink.

This also would help with the SATA connector issue as I'd be inverting my tray configuration (CPU plate on top surface) and so the SATA connection would then be in the lid space underneath and would not be a problem anymore I think.

My OpenBeam stuff arrived today so I am playing with sliding tray configurations in acrylic.

I am also getting some more stuff done on some of my older neglected builds (which is nice!).

Suddenly that up to 5 week wait for stuff to arrive from the other side of the world seems longer than I'd like [ but you would know all about that! ].
 
Minihack,

In case you want to fit a second sata ssd or hdd.

http://www.overclockers.co.uk/showproduct.php?prodid=CC-006-AK

Cheers
F

Think I'll be keeping with mSATA plus a 2.5" HD (might try to fusion drive them together).

I have just bought one of these from eBay: http://www.ebay.com/itm/Back-IO-Pan...75-/221277857439?ssPageName=ADME:L:OC:GB:3160


Interestingly it would not let me buy if I selected economy shipping and would only let me proceed with the transaction is I selected "standard".

I think this is the part that features in Chiphell builds and so I am going to see if I can cut out the flat section and make my own replacement flat part to suit my NUC IO.


I expect it'll need to be blended in and then sprayed, but hopefully this panel will give me a good start point so ending up with a neat rear for this mod.
 
Hi MiniHack, I just read through this thread. The Openbeam mounting system looks absolutely terrific. I think I'll order a startup kit to see how it works. This project looks very interesting, will continue to follow the progress. I think its perhaps the first I've seen from you that didn't involve some form of precision crafted perspex parts! (At least not yet... ;))


Cheers!
 
I've got a pack of 4x200mm openbeam (15mm x 15mm black anodized) that I didn't use for my project. If someone wants them I'd pretty much give them away for shipping cost (although if you are outside of the US, you would have to explain the easiest way to post them to you).
 
I've got a pack of 4x200mm openbeam (15mm x 15mm black anodized) that I didn't use for my project. If someone wants them I'd pretty much give them away for shipping cost (although if you are outside of the US, you would have to explain the easiest way to post them to you).

I am sure there will always be a future project!
 
Hi MiniHack, I just read through this thread. The Openbeam mounting system looks absolutely terrific. I think I'll order a startup kit to see how it works. This project looks very interesting, will continue to follow the progress. I think its perhaps the first I've seen from you that didn't involve some form of precision crafted perspex parts! (At least not yet... ;))


Cheers!

Well, of course i will use some at some point (if only to make the rear IO pretty and easier!) but I don't want to be messing about with the look of the Mac Mini.

I now have some OpenBeam and MakerBeam parts and to my mind I much prefer OpenBeam - reasons: 1. Because of the threadable centre hole in the extrusion and 2. Because they can use standard M3 nuts and bolts. The sole advantage of maker beam is the smaller footprint - but if the project has 5mm of extra space then I say go for OB instead....

Other plus reasons for both systems - the lovely possibility of making sliding motherboard trays in easy fashion.

PS Just made a fusion drive from my 2.5" 1TB HD and 120GB SSD - surprisingly nippy!
EDIT: Hmm adding the Fusion Drive may have sped things up but seems to have broken proper wake from USB - wake from first sleep needs to be by power button and then subsequent sleeps are broken (does not sleep properly, wakes after a few seconds).
 
Status
Not open for further replies.
Back
Top