Contribute
Register

New G5 Mod MSI

Status
Not open for further replies.
Joined
Mar 3, 2010
Messages
75
Motherboard
Hack
CPU
Intel Core i5-2500K Sandy Bridge 3.3GHz
Graphics
HD3000 and/or 6870
Mac
  1. MacBook Pro
Classic Mac
  1. Power Mac
Mobile Phone
  1. iOS
New G5 Mod MSI Z77MA-G45 M/B

I will be posting rather slowly as I have time so bare with me please.
The build will be pretty much a repeat of many others and includes these parts as follows:

Intel Core i7-3770K Ivy Bridge
Vengeance® Low Profile — 16GB Dual Channel DDR3 Memory Kit PC3-12800 (1600MHz)
HD4000 and/or 6870

Other Hardware

MSI Z77MA-G45 m/b
2004 G5 case eBay
Thermaltake SMART Series SP-750M 750W power supply
G5 Optical Carrier/Optiarc DVD drive
Samsung Electronics 840 Pro Series 2.5-Inch 256 GB SATA 6GB/s SSD for OS drive
Wifi mod using mini pci apple wifi card
MacBook Bluetooth mod
Corsair Air Series AF120 Performance High Airflow Low Noise fans
Aaxeon FireWire 400(1394A)/800(1394B) 4 Port PCI Express Controller Card
Alohacab’s Front Panel ATX Cable
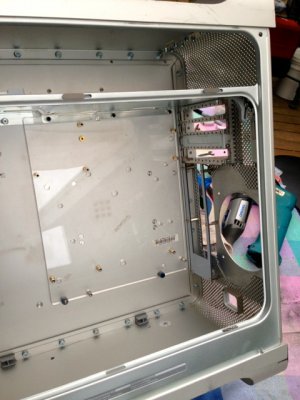
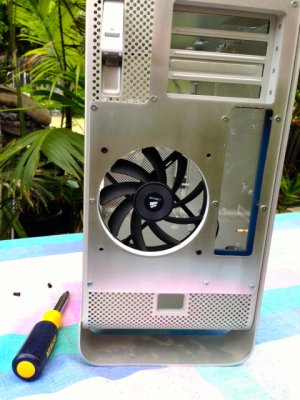
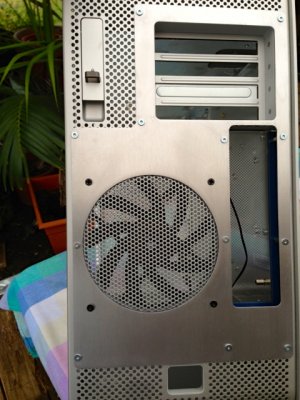
G5 mATX backplate conversion kit (120mm Fan)
Thermaltake TRX-650M power supply
Apple blue tooth keyboard
Apple Trackpad
Dell UltraSharp 2408WFP Widescreen 24in LCD Monitor
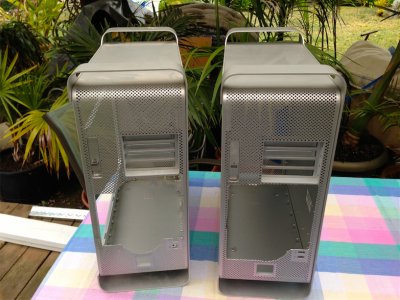
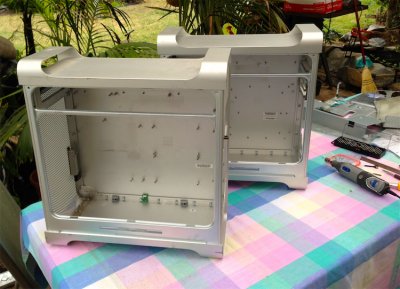
 
This will my 5th or 6th build:
My first was a The P5Q PRO is an Intel® P45 m/b and Tiger. Then a Asus Sabertooth p67 m/b and Leopard, Snow Leopard, lion, Mountain Lion.
Several Gigabyte m/b hacks for friends and 1 for myself with a GA-Z68MX-UD2H-b3 m/b.

This is will be the second Time I've used MSI Z77MA-G45 M/B the first went into a Mac pro case, as you can see I using a much easier method this time thanks to David at Laser Hive and all the great people here on this site.

I must also admit I was very anti Mac because of the crazy price point for their stuff, until the move to using BSD as the under lying OS I was not all that interested in the Mac OS... Now I own a working Late 2004 single processor G5, a Early 2011 MacBook Pro You see I'm an old UNIX guy previously working with Solaris, FreeBSD, some playing around with BEOS, Linux-starting with the kernel release by Linus Torvalds some time after 1991, not sure how soon after just remember it taking me a couple of months just to get a command prompt. I was a rather hard core beta tester for a while, evolving into a PC gaming beta tester/gamer. I even worked several San Diego Comic-Con conventions for various big name gaming companies (for free ;/) Now in my golden years so to speak I just fool around enough to satisfy my computer addiction. I no longer work in IT field, I'm currently working as Electrical technician at a Nuclear facility which pays way more than the IT jobs I've had and will be retiring in a little less then 2 years to spoil my Grandchildren. Sorry about turning this post into a sort of blog but that is my story and why this will be a on going drawn out thread.
 
I love my MSI board. Same as yours, micro ATX. I thought my original Gigabyte was OSX friendly, but this one really took Mtn Lion like a champ. Watch it with the update to 10.8.3 though if you run a 6870, the GPU idle temp (and fan speed with it) go WAY up. I actually restored back to 10.8.2 until its fixed.

Agree with you, LaserHives stuff is top notch all around. Worth every nickel.


Ersterhernd
 
My Bad, listed the wrong one, lol First post corrected, thanks for catching that.... BTW you can start with a MATX m/b plate and add a extention to full ATX, available from Laser Hive. I would like to add that is by far the easiest m/b I've used for a hack.
 
Ok got a few hours to work on my G5 hack here are some pictures of what I've done today.... cut and mounted m/b tray and back plate..... in wrong g5 case! lol, This is no problem and my friend will like it when he hears about it as this case is going to be his (he doesn't know that the hack I'm putting together for him will be in a G5 case) :) ....but only after I finish my G5. I will organize this thread better later and add more detail with more pictures. The cut outs are for Laser Hive matx kits mentioned in my first post. The left one is a 2004 G5 and right one is a 2005 G5. The 2005 G5 will be using a 2004 front panel board.
 

Attachments

  • 2G5-cases-cut-for-back-plate copy.jpg
    2G5-cases-cut-for-back-plate copy.jpg
    620.3 KB · Views: 644
  • 2G5-cases-cut-for-back-plate2 copy.jpg
    2G5-cases-cut-for-back-plate2 copy.jpg
    486.7 KB · Views: 298
Ok got a few hours to work on my G5 hack here are some pictures of what I've done today.... cut and mounted m/b tray and back plate..... in wrong g5 case! lol, This is no problem and my friend will like it when he hears about it as this case is going to him....but only after I finish my G5. I will organize this thread better later and add more detail with more pictures.
Here's some more pictures. If you follow G5 mods here on tonymac you might recognize that I'm using the same power supply install method as Ersterhernd see his G5's here.. http://www.tonymacx86.com/completed-mods/86702-ersterhernds-second-g5-project.html and here http://www.tonymacx86.com/completed-mods/86239-ersterhernds-first-g5-build.html. You gotta love the different ways we all approach these mods! Thanks for the idea Master Ersterhernd!
 

Attachments

  • Cutting-bottom-of-G5-power-supply-tray copy.jpg
    Cutting-bottom-of-G5-power-supply-tray copy.jpg
    622.2 KB · Views: 264
  • Cutting-bottom-of-G5-power-supply-tray2 copy.jpg
    Cutting-bottom-of-G5-power-supply-tray2 copy.jpg
    414.2 KB · Views: 261
Hi Montanamike, just to let you know, both my G5 builds continue to perform flawlessly with the Drop-Mounted PSU's. I have the machines sitting a piece of shelving material, and there is little if any dust buildup in either PSU to date. That said, make sure if using this method that you don't sit your system on carpet. It should be on a hardwood floor or some other hard surface to maintain breathing clearance.

Really, you don't even see the PSU's down there under the G5. With the recent posts about a modded PSU sparking or shorting, I have no regrets about playing it safe with a stock unmodified PSU; which was the main reason I did it that way to begin with.


Watching your build progress, keep the pics flowing!


Ersterhernd

Thank you Ersterhernd, it's always hard to do justice to a project when following up on such fine work as yours.... I really liked your different approach to mounting the psu. And here are some more photo's. The G5 mATX backplate conversion kit installed, fan test fit, fan and guard installed.
 

Attachments

  • photo-3.jpg
    photo-3.jpg
    259.6 KB · Views: 261
  • photo-2.jpg
    photo-2.jpg
    330.3 KB · Views: 301
  • photo-1.jpg
    photo-1.jpg
    305.9 KB · Views: 259
:thumbup:

Looks good Mike - don't forget to take the protective film off some of those perspex panels before the final fit up. Looks like it is still on on the trim plate. The rear of the hotswapper also the white protective film on it.

Also, don't know if I mentioned it but the hotswap is designed to work perfectly with the original G5 hard drive screws (the rubbery ones) but also with ordinary HDD screws if you pop a small washer between the screw and the hard drive.
 
Status
Not open for further replies.
Back
Top