
- Joined
- Mar 27, 2013
- Messages
- 3
- Motherboard
- Hackintosh G5
- CPU
- i5 3570k
- Graphics
- gtx 670
- Mac
- Classic Mac
- Mobile Phone
Hi everyone,
I recently finished my Hackintosh G5 case mod and just wanted to share the results
Sorry for my bad English.
I mainly use it as a gaming machine but sometimes i also use video editing or photoshop on it.
System Specs:
CPU: i5 3570K
Mainboard: MSI Big Bang z77 Mpower (awesome board)
RAM: 4x patriot 8gb 1866MHz (total 32gb of ram)
GPU: EVAGA GTX 670 FTW (gtx 670 on a gtx 680 board)
SSD: kingston SSD now 128GB
HDD: 500gb 2.5" hdd
DVD drive: ASUS
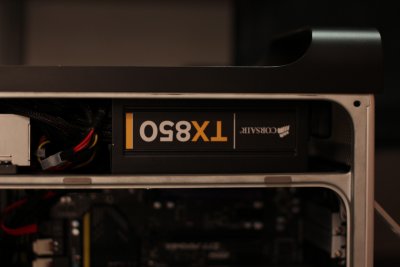
Power supply: Corsair TX850
CPU Heat sink: Alpenföhn Brocken
Cooling: 2x 180mm silverstone air penetrator
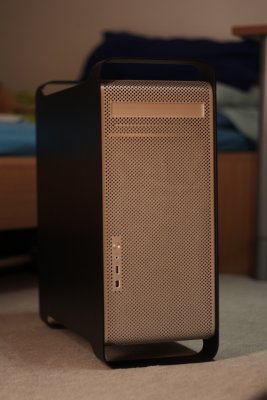
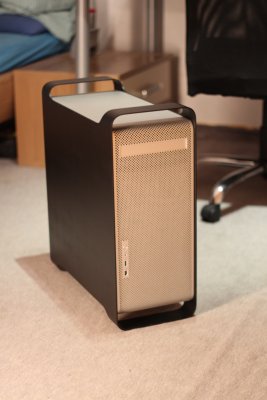
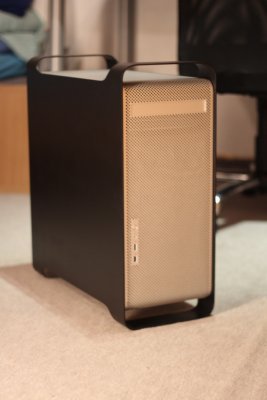
A few Pictures of the outside:


I decided to paint the outside part of the case black because it had a lot of scratches and dings on it. It was easily done with a matt black spray can. I love the result because it gives such a great contrast with the shiny silver mesh ...also the back pannel is black. The front I/O and the dvd drive are fully functional except for the firewire.
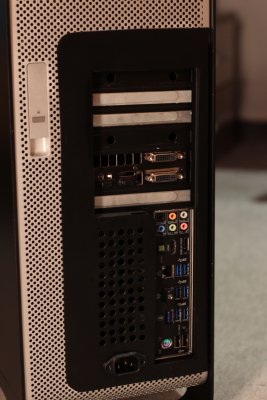
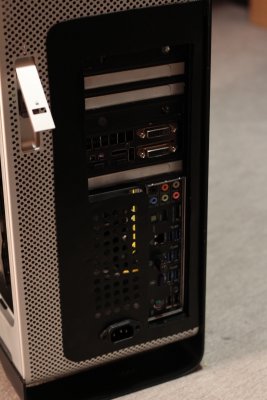
The back pannel:


Making the back pannel was the hardest part of the build in my opinion. You can see it's not perfect but I'm happy with the results I got.
I used a cheap atx case I bought for 10€ on ebay for the pci slots and I/O pannel. On top of that is the bezel I cut out from an old metal shelf I had laying around in the basement with an angle grinder... It's srcewed in with the original screws on the right and glued on to the original silver mesh on the left with epoxy glue. On the bottom is the power jack. The wire's were extended to the actual power supply.
The inside:


The inside looks great on the matt black back pannel. The CPU cooler fit in very nicely (only 5mm space)
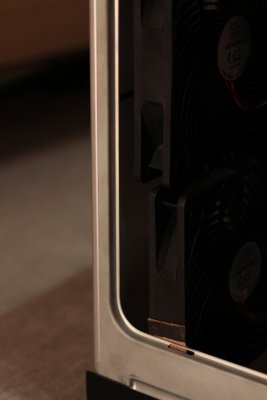
Fans + HDD mount + wiring:


I managed to fit two 180mm Fans behind the front mesh for maximum cooling from the front of the case to the back. They're held in just by tension at the moment but they don't go anywhere. I had to cut out the corner of the top fan to make space for the bar that hold's the mechanism for side pannel when it's closed. I still need a usb fan control because there quite loud when they're not under load. It's a bit hard to see on the picture but there's also an air filter in front of the fans wich this case needed desperately because my room is pretty dusty and I have to clean the filter every month.
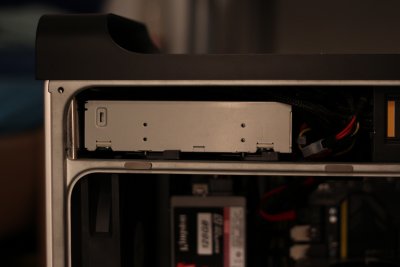
On the second picture you see the HDD mount also made from the old shelf's metal. The whole HDD assembly can be removed with 3 screws. They hold on to two aluminium bars epoxyed on to the back pannel with threads in them. The case currently only holds up to two 2.5 inch HDD's / SSD's but there would be more space for more on the bottom of the case. I don't see the need to put in 3.5's right now so that's ok...
Mainboard + Power Supply + wiring + Back pannel:


The Power Supply fit in perfectly there's about a 1mm gap between the top of the case and the P.S. As you can see the Power cables had to be rerouted to the botom of the case. The cooling solution is also pretty nice because it takes in air from the bottom (3. picture) compartment and the exhausts the hot air out of the back instead of back in the case. I took of the grill of the power supply fan and drilled
2cm holes in the original plate where the HDD's were mounted. It's held in by the screws from the grill. On the 2. picture you see how the I/O pannel is glued on to the original silver mesh.
My desk

Thank you for looking at my post and feel free to ask any questions.
I recently finished my Hackintosh G5 case mod and just wanted to share the results
Sorry for my bad English.
I mainly use it as a gaming machine but sometimes i also use video editing or photoshop on it.
System Specs:
CPU: i5 3570K
Mainboard: MSI Big Bang z77 Mpower (awesome board)
RAM: 4x patriot 8gb 1866MHz (total 32gb of ram)
GPU: EVAGA GTX 670 FTW (gtx 670 on a gtx 680 board)
SSD: kingston SSD now 128GB
HDD: 500gb 2.5" hdd
DVD drive: ASUS
Power supply: Corsair TX850
CPU Heat sink: Alpenföhn Brocken
Cooling: 2x 180mm silverstone air penetrator
A few Pictures of the outside:
I decided to paint the outside part of the case black because it had a lot of scratches and dings on it. It was easily done with a matt black spray can. I love the result because it gives such a great contrast with the shiny silver mesh ...also the back pannel is black. The front I/O and the dvd drive are fully functional except for the firewire.
The back pannel:
Making the back pannel was the hardest part of the build in my opinion. You can see it's not perfect but I'm happy with the results I got.
I used a cheap atx case I bought for 10€ on ebay for the pci slots and I/O pannel. On top of that is the bezel I cut out from an old metal shelf I had laying around in the basement with an angle grinder... It's srcewed in with the original screws on the right and glued on to the original silver mesh on the left with epoxy glue. On the bottom is the power jack. The wire's were extended to the actual power supply.
The inside:
The inside looks great on the matt black back pannel. The CPU cooler fit in very nicely (only 5mm space)
Fans + HDD mount + wiring:
I managed to fit two 180mm Fans behind the front mesh for maximum cooling from the front of the case to the back. They're held in just by tension at the moment but they don't go anywhere. I had to cut out the corner of the top fan to make space for the bar that hold's the mechanism for side pannel when it's closed. I still need a usb fan control because there quite loud when they're not under load. It's a bit hard to see on the picture but there's also an air filter in front of the fans wich this case needed desperately because my room is pretty dusty and I have to clean the filter every month.
On the second picture you see the HDD mount also made from the old shelf's metal. The whole HDD assembly can be removed with 3 screws. They hold on to two aluminium bars epoxyed on to the back pannel with threads in them. The case currently only holds up to two 2.5 inch HDD's / SSD's but there would be more space for more on the bottom of the case. I don't see the need to put in 3.5's right now so that's ok...
Mainboard + Power Supply + wiring + Back pannel:
The Power Supply fit in perfectly there's about a 1mm gap between the top of the case and the P.S. As you can see the Power cables had to be rerouted to the botom of the case. The cooling solution is also pretty nice because it takes in air from the bottom (3. picture) compartment and the exhausts the hot air out of the back instead of back in the case. I took of the grill of the power supply fan and drilled
2cm holes in the original plate where the HDD's were mounted. It's held in by the screws from the grill. On the 2. picture you see how the I/O pannel is glued on to the original silver mesh.
My desk
Thank you for looking at my post and feel free to ask any questions.
Attachments
-
 IMG_2538.jpg964 KB · Views: 436
 -
 IMG_2545.jpg960.4 KB · Views: 494
 -
 IMG_2564.jpg974 KB · Views: 393
 -
 IMG_2570.jpg986.8 KB · Views: 396
 -
 IMG_2572.jpg979.3 KB · Views: 407
 -
 IMG_2580.jpg962.3 KB · Views: 494
 -
 IMG_2586.jpg959.9 KB · Views: 422
 -
 IMG_2597.jpg964.9 KB · Views: 406
 -
 IMG_2598.jpg970.9 KB · Views: 430