- Joined
- Jan 28, 2012
- Messages
- 37
- Motherboard
- Gigabyte GA-Z77N-WIFI
- CPU
- Intel Core i7-3770T
- Graphics
- ASUS EAH6670/DIS/1GD5, Radeon HD 6670, 1GB GDDR5
- Mac
- Classic Mac
- Mobile Phone
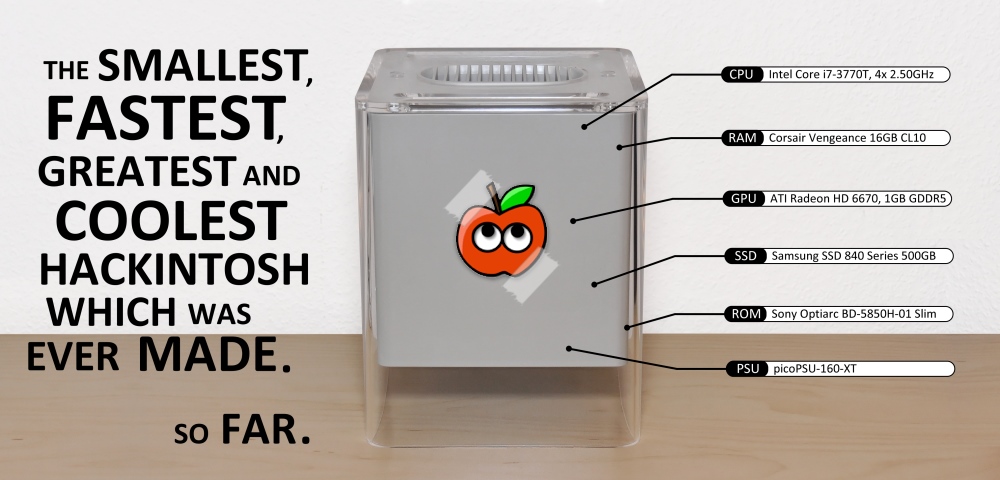
Cube 2.1 Case Mod
I just finished my “Cube 2.1” Project in which I used a Core i7 and a dedicated GPU (ATI 6670) inside a Cube G4 case. This topic should be about the case mod and not the system components. You find all details about the MacOS X Installation, Bios Settings, Problems etc are in the “User Builds” Section: http://www.tonymacx86.com/user-buil...16gb-ram-500gb-ssd-ati-6670-a.html#post588511
Components
- Intel Core i7-3770T, 4x 2.50GHz, LGA1155, 45W TDP
- Gigabyte GA-Z77N-WIFI, Z77
- Corsair Vengeance Low Profile black DIMM Kit 16GB PC3-12800U CL10-10-10-27
- ASUS EAH6670/DIS/1GD5, Radeon HD 6670, 1GB GDDR5, DVI, HDMI, DisplayPort
- Samsung SSD 840 Series 500GB, 2.5", SATA 6Gb/s
- Ituner picoPSU-160-XT + 192W external AC/DC Adapter
- Sony Optiarc BD-5850H, Slim, Slot-In, SATA
- Prolimatech Samuel 17
- be quiet! Silent Wings 2 PWM, 92x92x25mm, 470-1800rpm, 55.4m³/h, 16.9dB(A)
- be quiet! Shadow Wings SW1 Mid-Speed 92x92x25mm, 1800rpm, 54.4m³/h, 16.9dB(A)
- M-ware® PCIe 16X Raiser Riser 1x Flex Cable 15cm
- DeLock Slot intern USB 5pin to 2x USB2.0
- Papst 512F/2, 50x50x15mm, 5000rpm, 20m³/h, 30dB(A)
- Edison Sensor Systeme MT0.2-ST-NR-N
- Optek Technology OVLAW4CB7 White High-Intensity LED Lamp, 3 mm, 45° Viewing Angle, 3500mcd
The Story
Maybe you have seen my previous Cube project in the “Case Mod” section. A few months ago I bought another Cube on eBay for the second case mod. I wanna tell you shortly the story why I am so fascinated by that little computer. I read the Steve Jobs biography from Walter Isaacson around Christmas 2011. In the chapters about the early Apple computers I had my iPad ready to hand for checking pictures about the named devices. “Apple Lisa”… what’s that… “ah, okay.. I see”. Apple Cube, yeah, I know that… I searched on google and got a picture from the Cube fish tank! Then I found this forum and the great work from Tony and the others and decided to build my own “Apple Cube 2.0” (http://www.tonymacx86.com/powermac-...-0-i5-2500t-ga-h67n-usb3-b3-16gb-ram-ssd.html).
Not many computers were shown in the “Museum of Modern Art” in New York. The Apple Cube from Jonathan Ive is shown there. I visited the MoMA last year but it was not part of the exhibition to that time. That’s okay for me because I have my own Cube on my desk at home but not with parts from 2001.
Hardware Build
The “Gigabyte GA-Z77N-WIFI“ board has the identical layout to the previously used “Gigabyte GA-H67N-USB3-B3” so I can place the components in a similar way to reach all connectors on the board. This new build uses faster components and many things are improved compared to my first Cube 2.0. See the details in the following section:
The beginning…
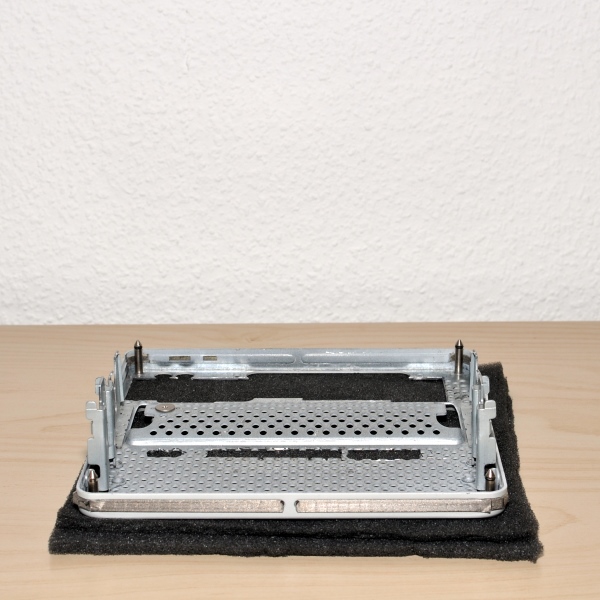
The disassembly went really fast because I know this small computer inside out in the meantime. After that step I cut the holes for the board and graphics card into the baseplate. The Dremel 300 is an excellent tool for that work.
Graphics card
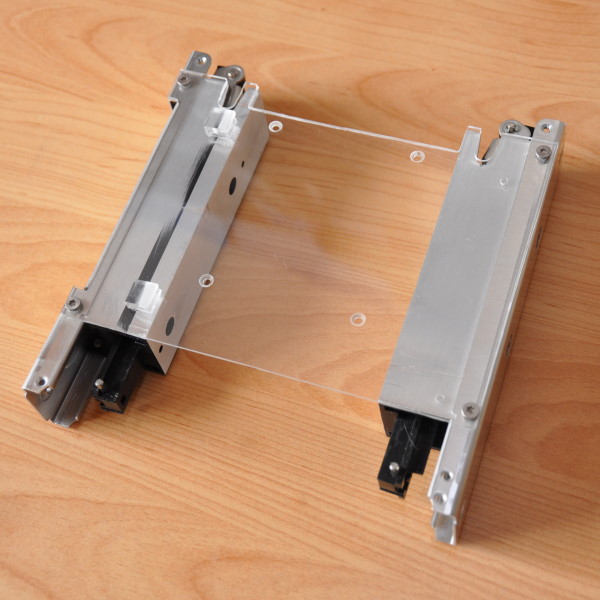
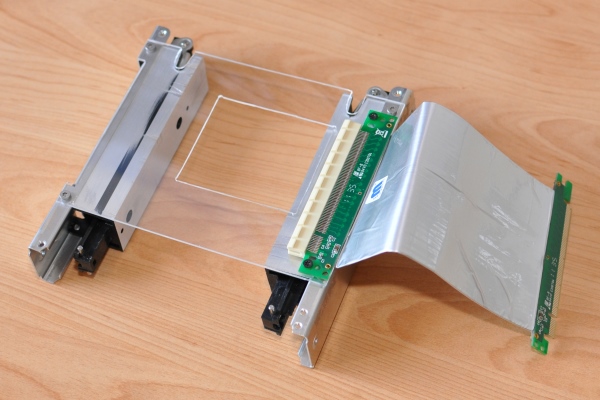
I decided to use the original holding mechanism but without the cooling fins. A plexiglas plate should provide the stability to the frame and a PCIe 16x riser card is used to be able to install a graphics card.

I chose the “AMD Radeon HD 6670” from ASUS because it provides a DisplayPort for my Apple Cinema display and runs without problems (See the “Problems” section for details). With a height of 16.8cm this card is absolutely on the limit what you can install in such small case. I have to use another riser card with smaller dimensions because the width of the ASUS is a few centimetres larger compared to my MSI 6670 card. I installed the card on the plexiglas plate and mounted everything on the Cube baseplate.
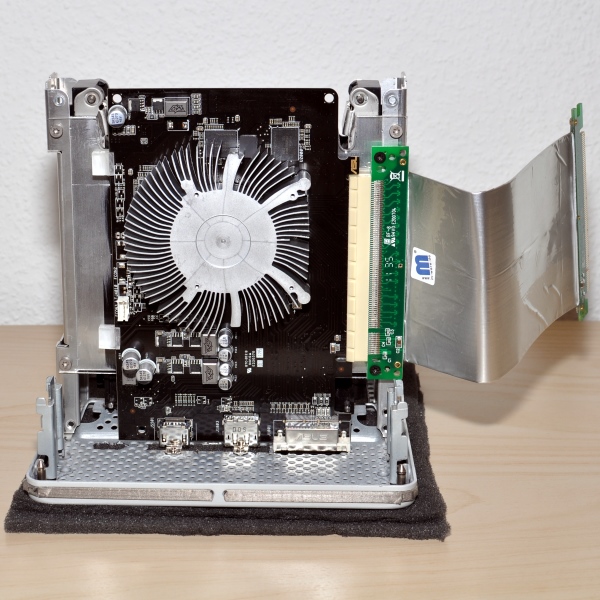
I used the “be quiet! Shadow Wings SW1 Mid-Speed” as GPU fan which is glued on the cooler and held by the frame on which the HDD was installed in the original Cube. I shortened the cable for a better air flow in the case.
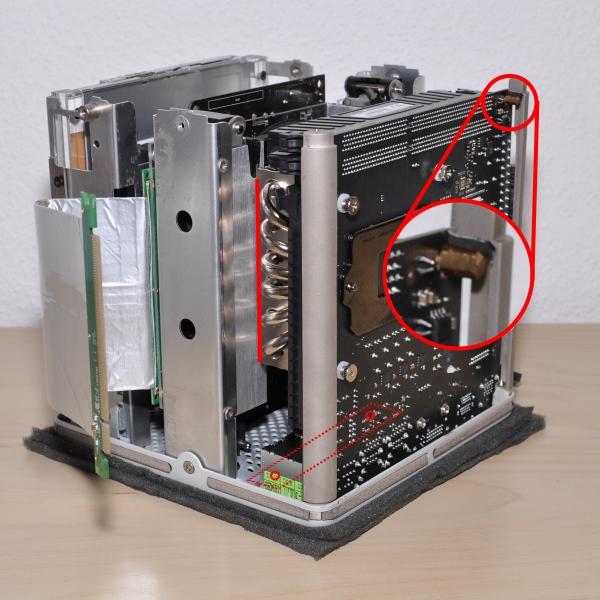
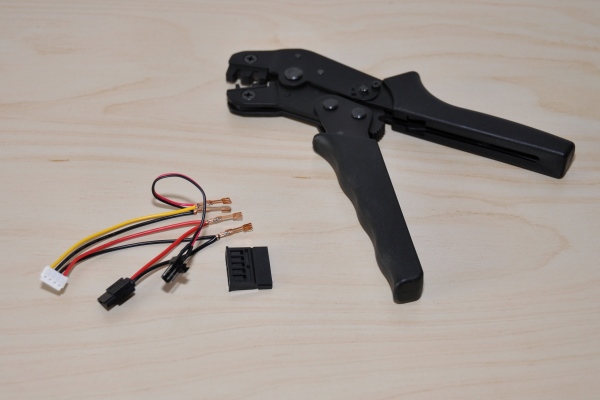
Power Supply
The picoPSU-160-XT is a great power supply when you have not much space in your case. I made my own 24pin ATX-Power cable but selected another position in the Cube. The blue fan connector is used for the touch sensor. It is crimped to +5VSB on pin 9 and provides the connection for the power switch on the motherboard.
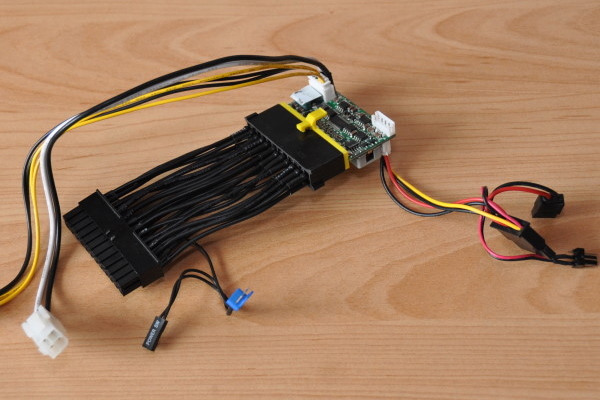
I also made my own 5V/12V molex connector cable set for a perfect fitting connection to the SSD and optical drive. It also provides the 12V for the GPU fan.
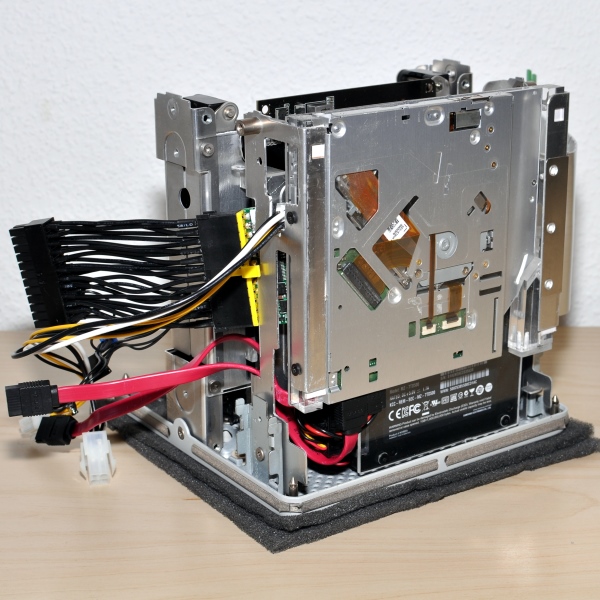
The next picture shows the installed picoPSU on the “HDD frame” in which I had to cut holes for the additional 12V power connector and the cable to the external AC/DC adapter. You can also see the additional USB2.0 port besides the graphics card.
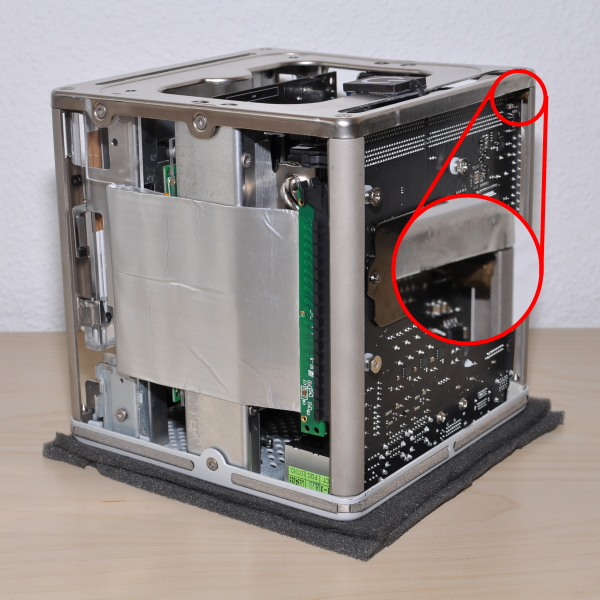
SSD & Optical drive
I deceived to use an optimized version of my well-proved plexiglas frame for the optical drive. The SSD is now at the bottom of the case to provide a better air flow to the graphics card and the fan.
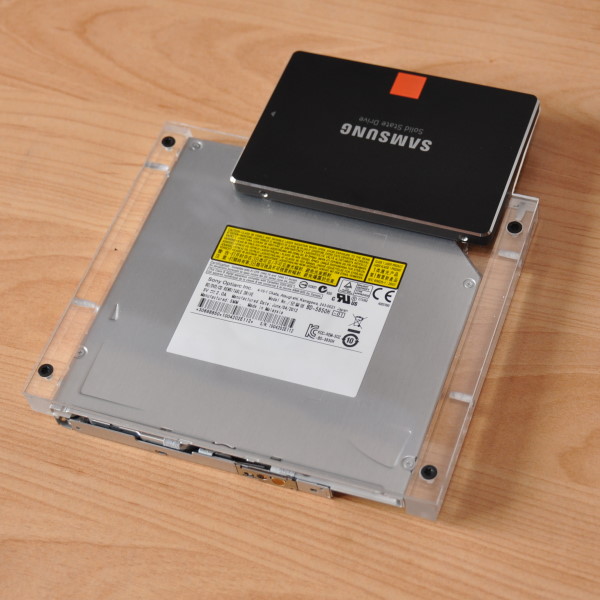
The shown section is then installed with 4 screws in the Cube. It gives back the stability of the “HDD frame” which is no longer one part because of the required hole for the GPU fan. The SATA connector for the SSD and the small 5V one to the drive are also connected.
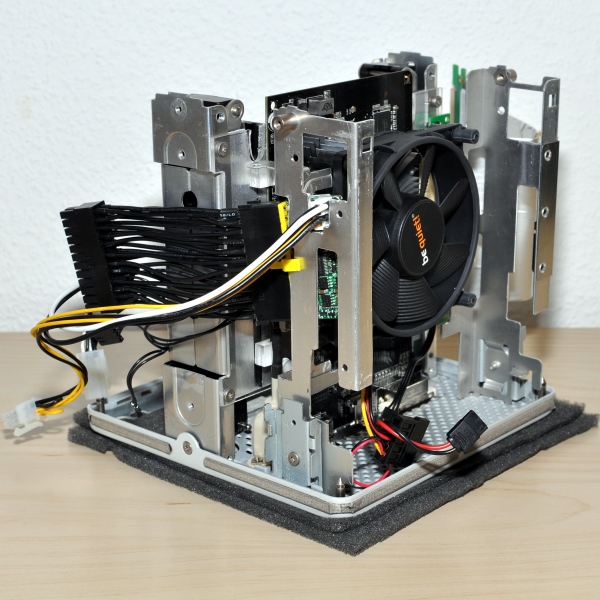
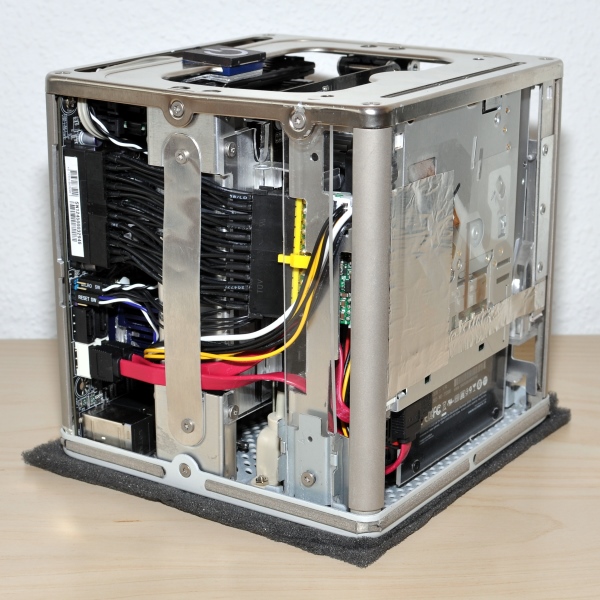
The Mainboard
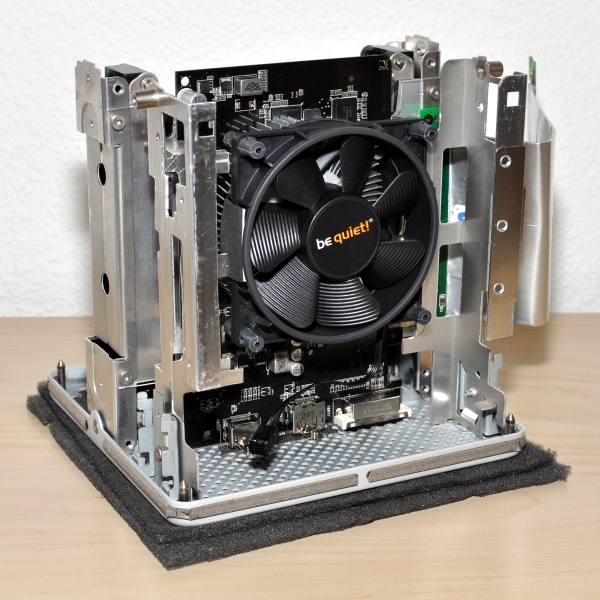
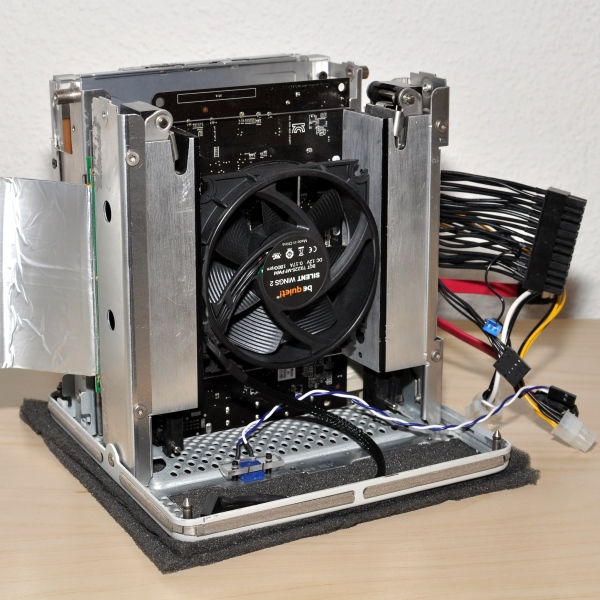
Let’s turn around the cube to install the “be quiet! Silent Wings 2 PWM” fan for CPU cooling. The resulting space between the two holing mechanism parts is exactly 92mm so this fan fits perfect. You can also see that I have installed a blue reset button.
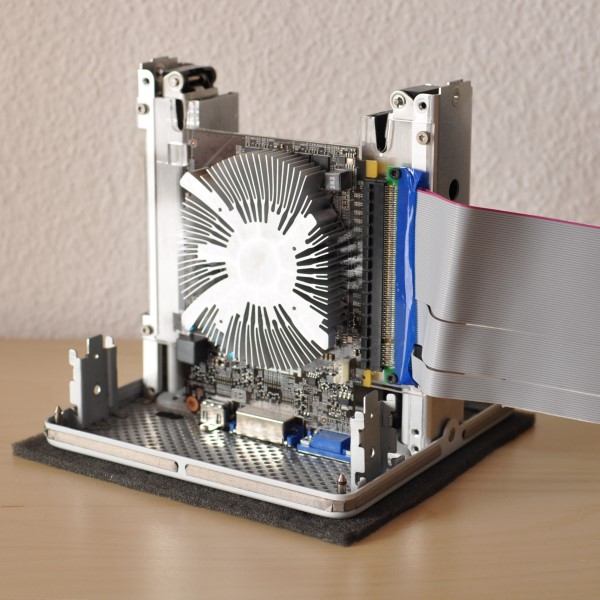
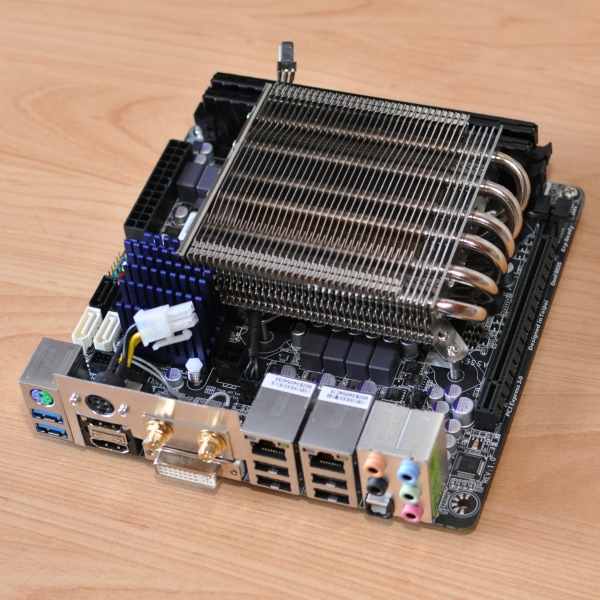
I installed the CPU and RAM on the “Gigabyte GA-Z77N-WIFI“ board and also used the “Samuel 17” cooler which needs to be shortened a little bit. During the tests I saw that the Z77 chip temperatures are very high so I decided to install a bigger cooler instead. This is the blue one on the picture. I used the WiFi antenna holes for my metal plate with the connector for the external adapter.
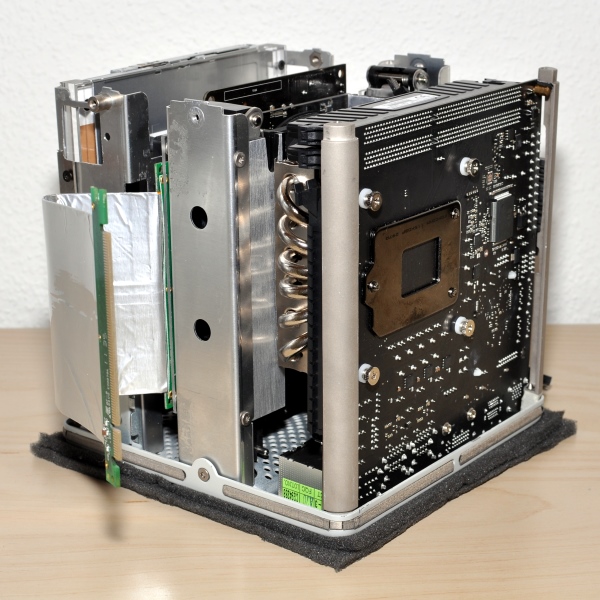
It’s nearly done. The mainboard is inside the Cube and the fan and power connections are already made. As you can see the Samuel 17 cooler suits on the metal holding part which gives stability to that section. The board is additionally held with the hexagonal bolts.
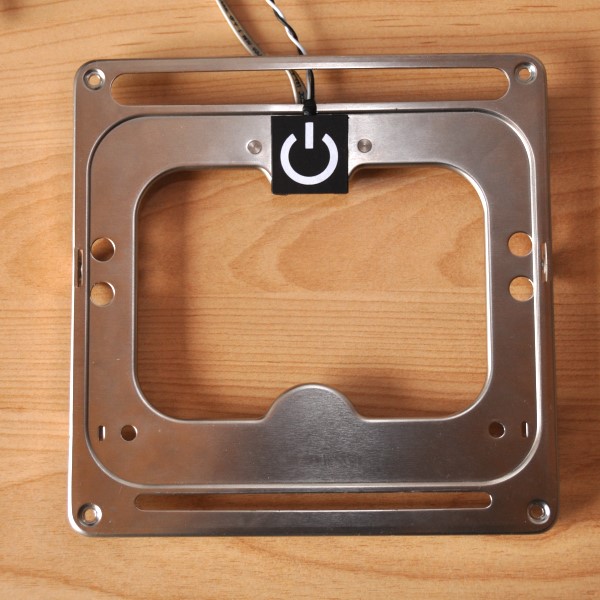
Touch Sensor
I replaced the original touch sensor with the “MT0.2-ST-NR-N” from Edison Sensor Systeme as I already did it for my first Cube. This time I used a 3mm plexiglas plate with the same dimensions of the sensor that is illuminated with a white LED. This plate is placed on top of the touch sensor.
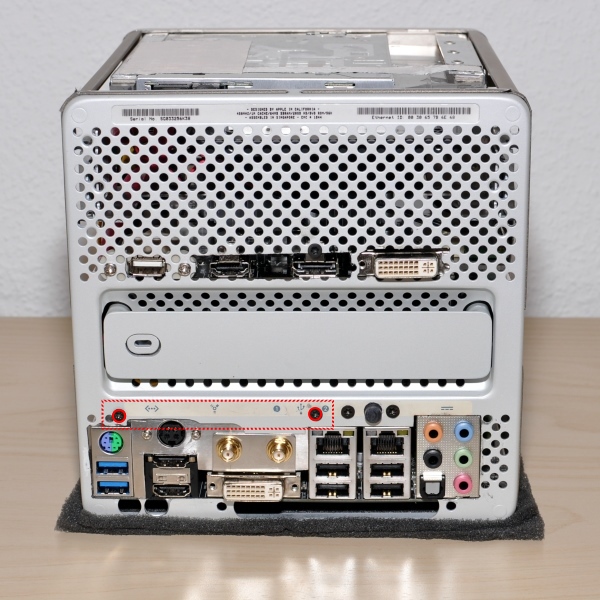
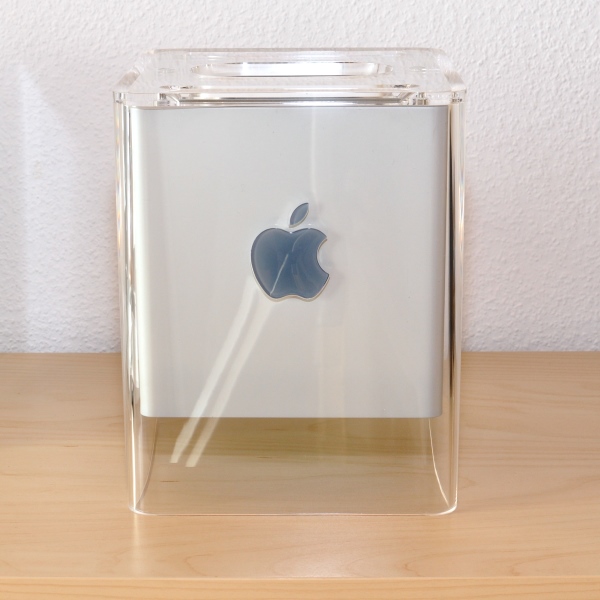
My second Cube 2.1
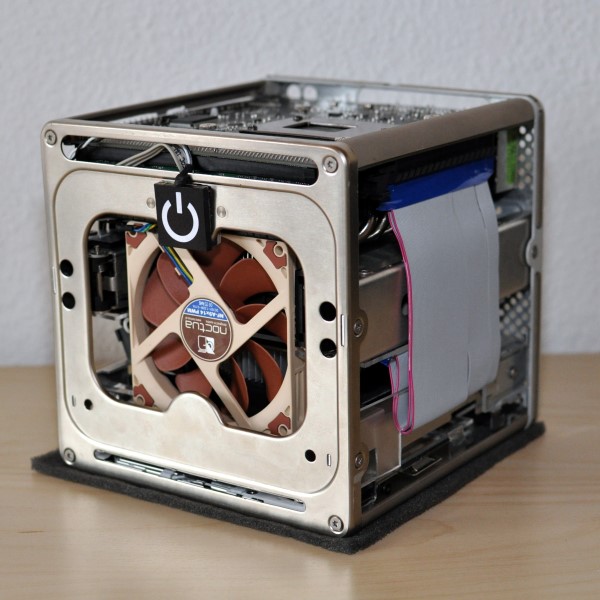
After mounting the top cover on the Cube and the installation of the plexiglas holder on the sides it looks like the hardware part is finished.
And there it is:
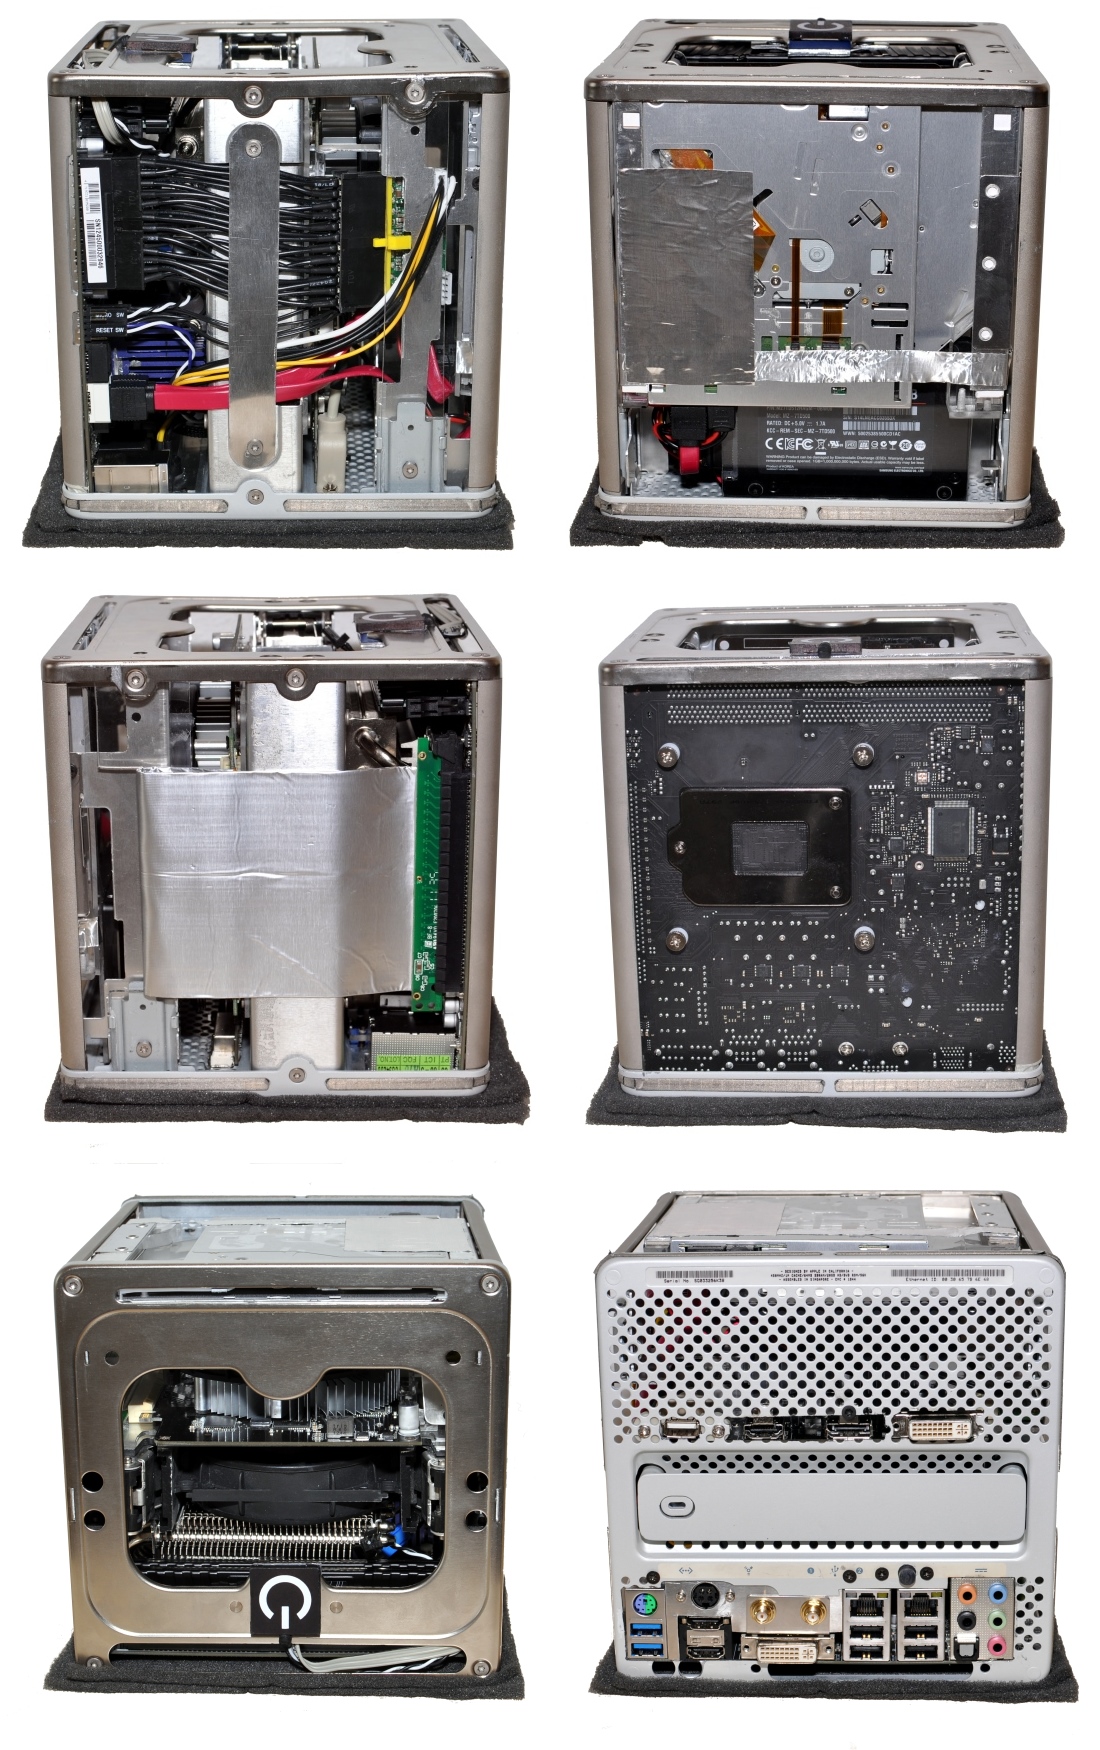
And finally a picture of all sides:
Benchmarks
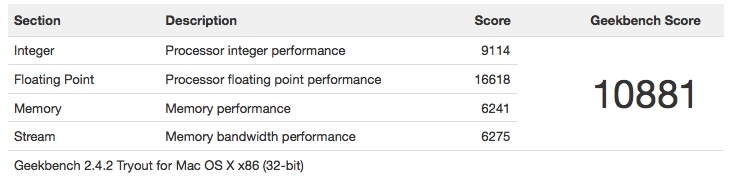
Geekbench 2 (32bit) results:
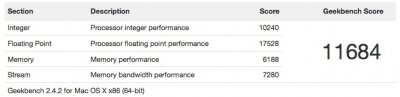
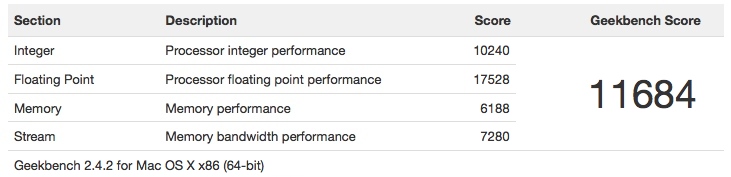
Geekbench 2 (64bit) results:
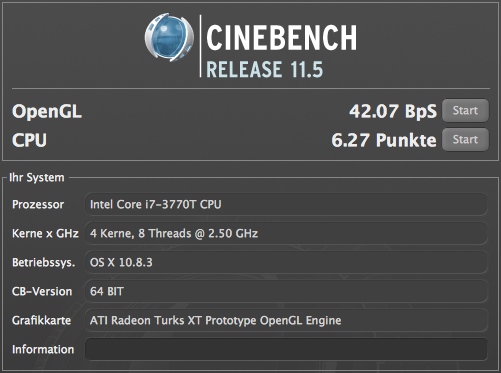
Cinebench results:
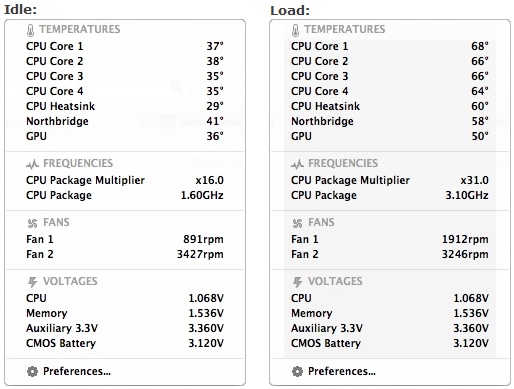
Temperatures
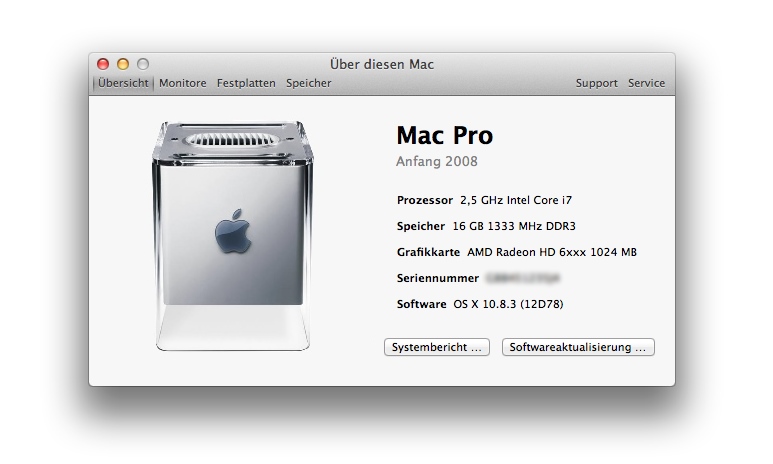
About this Mac
Feature Checklist
 = Works!
 = Doesn’t work
Audio
LAN
Bluetooth (onboard)
DisplayPort (up to 2560x1440)
USB 2.0
Sleep
Hardware monitoring
Touch Sensor
CD/DVD/BR input as original Cube
LAN after Sleep
EDITS
2013/06/15: Geekbench 2 - 64bit results added
I just finished my “Cube 2.1” Project in which I used a Core i7 and a dedicated GPU (ATI 6670) inside a Cube G4 case. This topic should be about the case mod and not the system components. You find all details about the MacOS X Installation, Bios Settings, Problems etc are in the “User Builds” Section: http://www.tonymacx86.com/user-buil...16gb-ram-500gb-ssd-ati-6670-a.html#post588511
Components
- Intel Core i7-3770T, 4x 2.50GHz, LGA1155, 45W TDP
- Gigabyte GA-Z77N-WIFI, Z77
- Corsair Vengeance Low Profile black DIMM Kit 16GB PC3-12800U CL10-10-10-27
- ASUS EAH6670/DIS/1GD5, Radeon HD 6670, 1GB GDDR5, DVI, HDMI, DisplayPort
- Samsung SSD 840 Series 500GB, 2.5", SATA 6Gb/s
- Ituner picoPSU-160-XT + 192W external AC/DC Adapter
- Sony Optiarc BD-5850H, Slim, Slot-In, SATA
- Prolimatech Samuel 17
- be quiet! Silent Wings 2 PWM, 92x92x25mm, 470-1800rpm, 55.4m³/h, 16.9dB(A)
- be quiet! Shadow Wings SW1 Mid-Speed 92x92x25mm, 1800rpm, 54.4m³/h, 16.9dB(A)
- M-ware® PCIe 16X Raiser Riser 1x Flex Cable 15cm
- DeLock Slot intern USB 5pin to 2x USB2.0
- Papst 512F/2, 50x50x15mm, 5000rpm, 20m³/h, 30dB(A)
- Edison Sensor Systeme MT0.2-ST-NR-N
- Optek Technology OVLAW4CB7 White High-Intensity LED Lamp, 3 mm, 45° Viewing Angle, 3500mcd
The Story
Maybe you have seen my previous Cube project in the “Case Mod” section. A few months ago I bought another Cube on eBay for the second case mod. I wanna tell you shortly the story why I am so fascinated by that little computer. I read the Steve Jobs biography from Walter Isaacson around Christmas 2011. In the chapters about the early Apple computers I had my iPad ready to hand for checking pictures about the named devices. “Apple Lisa”… what’s that… “ah, okay.. I see”. Apple Cube, yeah, I know that… I searched on google and got a picture from the Cube fish tank! Then I found this forum and the great work from Tony and the others and decided to build my own “Apple Cube 2.0” (http://www.tonymacx86.com/powermac-...-0-i5-2500t-ga-h67n-usb3-b3-16gb-ram-ssd.html).
Not many computers were shown in the “Museum of Modern Art” in New York. The Apple Cube from Jonathan Ive is shown there. I visited the MoMA last year but it was not part of the exhibition to that time. That’s okay for me because I have my own Cube on my desk at home but not with parts from 2001.
Hardware Build
The “Gigabyte GA-Z77N-WIFI“ board has the identical layout to the previously used “Gigabyte GA-H67N-USB3-B3” so I can place the components in a similar way to reach all connectors on the board. This new build uses faster components and many things are improved compared to my first Cube 2.0. See the details in the following section:
The beginning…
The disassembly went really fast because I know this small computer inside out in the meantime. After that step I cut the holes for the board and graphics card into the baseplate. The Dremel 300 is an excellent tool for that work.
Graphics card
I decided to use the original holding mechanism but without the cooling fins. A plexiglas plate should provide the stability to the frame and a PCIe 16x riser card is used to be able to install a graphics card.
I chose the “AMD Radeon HD 6670” from ASUS because it provides a DisplayPort for my Apple Cinema display and runs without problems (See the “Problems” section for details). With a height of 16.8cm this card is absolutely on the limit what you can install in such small case. I have to use another riser card with smaller dimensions because the width of the ASUS is a few centimetres larger compared to my MSI 6670 card. I installed the card on the plexiglas plate and mounted everything on the Cube baseplate.
I used the “be quiet! Shadow Wings SW1 Mid-Speed” as GPU fan which is glued on the cooler and held by the frame on which the HDD was installed in the original Cube. I shortened the cable for a better air flow in the case.
Power Supply
The picoPSU-160-XT is a great power supply when you have not much space in your case. I made my own 24pin ATX-Power cable but selected another position in the Cube. The blue fan connector is used for the touch sensor. It is crimped to +5VSB on pin 9 and provides the connection for the power switch on the motherboard.
I also made my own 5V/12V molex connector cable set for a perfect fitting connection to the SSD and optical drive. It also provides the 12V for the GPU fan.
The next picture shows the installed picoPSU on the “HDD frame” in which I had to cut holes for the additional 12V power connector and the cable to the external AC/DC adapter. You can also see the additional USB2.0 port besides the graphics card.
SSD & Optical drive
I deceived to use an optimized version of my well-proved plexiglas frame for the optical drive. The SSD is now at the bottom of the case to provide a better air flow to the graphics card and the fan.
The shown section is then installed with 4 screws in the Cube. It gives back the stability of the “HDD frame” which is no longer one part because of the required hole for the GPU fan. The SATA connector for the SSD and the small 5V one to the drive are also connected.
The Mainboard
Let’s turn around the cube to install the “be quiet! Silent Wings 2 PWM” fan for CPU cooling. The resulting space between the two holing mechanism parts is exactly 92mm so this fan fits perfect. You can also see that I have installed a blue reset button.
I installed the CPU and RAM on the “Gigabyte GA-Z77N-WIFI“ board and also used the “Samuel 17” cooler which needs to be shortened a little bit. During the tests I saw that the Z77 chip temperatures are very high so I decided to install a bigger cooler instead. This is the blue one on the picture. I used the WiFi antenna holes for my metal plate with the connector for the external adapter.
It’s nearly done. The mainboard is inside the Cube and the fan and power connections are already made. As you can see the Samuel 17 cooler suits on the metal holding part which gives stability to that section. The board is additionally held with the hexagonal bolts.
Touch Sensor
I replaced the original touch sensor with the “MT0.2-ST-NR-N” from Edison Sensor Systeme as I already did it for my first Cube. This time I used a 3mm plexiglas plate with the same dimensions of the sensor that is illuminated with a white LED. This plate is placed on top of the touch sensor.
My second Cube 2.1
After mounting the top cover on the Cube and the installation of the plexiglas holder on the sides it looks like the hardware part is finished.
And there it is:
And finally a picture of all sides:
Benchmarks
Geekbench 2 (32bit) results:
Geekbench 2 (64bit) results:
Cinebench results:
Temperatures
About this Mac
Feature Checklist
EDITS
2013/06/15: Geekbench 2 - 64bit results added