
- Joined
- Nov 2, 2012
- Messages
- 146
- Motherboard
- << need model # >> See Forum Rules !!
- CPU
- i7-3770K
- Graphics
- GTX 660
- Mac
- Classic Mac
- Mobile Phone
Mr Eddy's Photo Station - GA-Z77X-UD5H | i7-3770k | MSI GTX 660 Twin Frozr [Mavericks installed / WiFi Card added]
Components
Motherboard : Gigabyte GA-Z77X-UD5H
http://www.amazon.com/gp/product/B007R21JK4/
CPU : Intel Core i7-3770K Quad-Core Processor 3.5 GHz 6 MB Cache LGA 1155
http://www.amazon.com/gp/product/B007SZ0EOW/
Graphic Card : MSI GTX 660 Twin Frozr 2GB GDDR5 - N660 TF 2GD5
http://www.amazon.com/gp/product/B0095FMXAG/
CPU Cooling : Corsair Cooling Hydro Series CWCH60
http://www.amazon.com/gp/product/B004MYFOE2/
Power Supply : Corsair TX650M 650W Modular
http://www.amazon.com/gp/product/B005E98I0G/
Memory : Corsair Vengeance 32 GB (4x8GB) DDR3 1600MHz PC3 240 Pin DIMM Memory CMZ32GX3M1A1600C10
http://www.amazon.com/gp/product/B006EWUO22
SSD Disk: Crucial M4 SSD 256 GB SATA 6.0 Gb/s 2.5-Inch Solid State Drive CT256M4SSD2
http://www.amazon.com/gp/product/B006EKJ8UI/
Hard Disk : Seagate Barracuda 2TB ST2000DM001 7200RPM 6.0Gb/s
http://www.amazon.com/gp/product/B005T3GRN2/
WiFiCard : TP-Link TL-WDN4800
http://www.amazon.com/dp/B007GMPZ0A/ref=as_li_ss_tl?ie=UTF8&tag=tonymacx86com-20
Internal Memory Card Reader : Icy Box IB865 3.5" with internal USB 3.0 connection to the motherboard (supports most card types : SD, CF, MicroSD, MS, etc) - Initially, I was looking for http://www.amazon.com/gp/product/B006DKEQL0/, but it is not available in Europe were I live, so I took the Icy Box model which looks exactly the same except for the brand.
Sony Optiarc AD-7280S DVD±RW (±R DL) / DVD-RAM 24x 12x Serial ATA internal 5.25" black
http://www.amazon.com/gp/product/B0057FRTPW/
Case : Corsair Graphite Series 600T
http://www.amazon.com/gp/product/B004X63JWS/
Creative Bluetooth Audio BT-D1 USB Transmitter
http://www.amazon.com/gp/product/B003FVAQM8/
Seen as an audio output device, great to get a good audio quality and the benefit of wireless ! Note this is APT-X compatible, so great audio quality if you have a receiver also compatible (like the Real Cable iPlug-BTR for example)
Already Owned
Apple OS X Mountian Lion from Mac App Store
http://itunes.apple.com/fr/app/os-x-mountain-lion/id537386512
Display : DELL UltraSharp U2412M 24" LED LCD Monitor
http://www.amazon.com/gp/product/B005JN9310/
Keyboard : Logitech K750 Wireless Keyboard
http://www.amazon.com/gp/product/B005L38VRU
Apple Magic Trackpad
http://www.amazon.com/gp/product/B003XIJ3MW/
Hard Disks : 2x1 TB Western Digital Caviar Green 32MB SATA II
http://www.amazon.com/gp/product/B001IEZX3G/
Comments
This is my first Hackintosh system, but not my first build since I used to do them all by myself in my old Windows days. Because of the rising prices of the latest iMac, I have decided to try myself with a Hackintosh. And I can already tell you this is my best idea in a long time to balance power and budget.
You may have noticed I didn't mention a graphic card. One will be added in the futur, but it wasn't a needed feature at the moment, so I kept my money for later  Same goes for a DVD reader/burner by the way. I have an external DVD writer anyway.
This leads me to the why ! Since I am a photographer, I needed a good computer to handle the numerous files I am pushing through Lightroom and Photoshop. As I wrote, an iMac is too expensive (and I already have a great mate display), a Mac Mini is not powerful enough and a Mac Pro.. well it's expensive AND outdated. After some math, I realized I could get a powerful hackintosh for the price of a .. Mac Mini.
An Ivy Bridge was the obvious choice, so I went to the best quad core I could find at the moment, which is the i7-3770K. The "K" will allow me to overclock it if needed in the future, when I will exchange my Nikon D700 for a newer full frame DSLR which will have at least two times the number of pixels to deal with.
About the motherboard, I was hesitating between the GA-Z77X-UD5H and the GA-Z77X-UP5 TH. Both didn't need any DSDT, first reason to look at them. The UP5 TH has thunderbolt, which was the reason of my dilemna. I had some hard disks in external box chained through FW800, but finally I have decided to put them inside my case. This way, I didn't need anymore thunderbolt nor FW800, so I could choose the less expensive one, the UD5H.
Last question I had, finding an internal memory card reader which could connect with the internal USB3 motherboard. Most of them are connecting through USB2 internal motherboard pin, but mine were taken due to the front panel USB 2.0 connectors. This was quite hard, since the one I could hear about here wasn't available in Europe. Anyway, I managed to find one that looks exactly the same.
The Install
For this part, I mainly followed Slugnet's build description's installation procedure.
BIOS
I first updated BIOS to latest version F14: http://www.gigabyte.com/products/product-page.aspx?pid=4139#bios. You need to extract the zip file you'll get and just use the file named "Z77XUD5H.F14". I tried by mistake with the "exe" file first and the BIOS was preventing me the file wasn't good.
Then set up BIOS using this guide: http://www.tonymacx86.com/99-quick-guide-configuring-uefi-gigabyte-s-7-series-lga-1155-boards.html
Note that you can't boot from UEFI designations when setting boot devices, only drives labeled SATA or P0.
UniBeast
Nothing to mention, everything went well installing 10.8.2 Mountain Lion.
MultiBeast
Here I just skipped the "3rd Party SATA" Driver in the "Disk" section, since I'm not using Marvell SATA connectors, nor GSATA. So, don't forget to select it if you are planning on using them.
MultiBeast Configuration


Reboot. You're done 
Installing GeForce GTX 660 graphic card
I finally decided to buy a discrete graphic card. My choice went on the MSI GTX 660 Twin Frozr OC 2GD5 to be precise. Here is how I made it work :
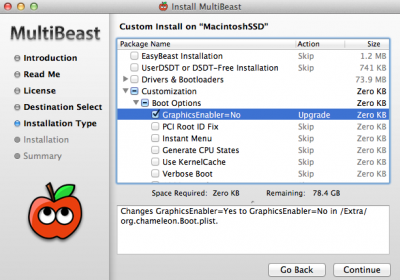
1. Set "GraphicsEnabler" to No using MultiBeast :
 

2. Install nVidia drivers for 10.8.2 ( http://www.nvidia.com/object/macosx-304.00.05f02-driver.html )
It will ask you to restart your computer, do so.
3. Shut down your computer (if your desktop resolution looks weird, it's because of step 2, but don't care about it)
4. Install your graphic card and connect your display to it.
5. Start your computer and get to the Bios. In Peripherals, you need to set "Init Display First" to PEG so it won't try to run using Intel's integrated graphics.
You're done 
Remaining Issues
1 - Auto Sleep Mode FIXED
It is not putting my computer to sleep, just the display goes black. Tried the darkwake=no and darkwake=10 solution, didn't helped. But for me it's not a big issue since I put my computer to sleep every time I leave it.
Disabling "CPU PLL Overvoltage" in UEFI solved this problem. Since you're not OCing your CPU too much, this is a okay to disable. I tested my CPU by boosting turbo from 39 to 42, without any issue for example (CPU tested with Prime95)
2 - USB Drives Disconnect with Sleep FIXED
When waking up the computer after sleep, any USB drives that was connected is signaled as ejected improperly.
Disabling "CPU PLL Overvoltage" in UEFI solved this problem. Since you're not OCing your CPU too much, this is a okay to disable. I tested my CPU by boosting turbo from 39 to 42, without any issue for example (CPU tested with Prime95)
List of features working (or not..)
Fully Working :
• OSX Mountain Lion 10.8.2
• Auto-sleep mode
• Ethernet
• Front Panel USB 2.0 and Firewire
• HDMI and DVI connectors of the motherboard using HD4000
• Dual monitors
• USB 3.0
• eSata
Bluetooth & Audio
After trying an IOGear bluetooth to send the sound of my hack to my Hi-Fi (I can't do photo editing without some music), I realised my Apple trackpad was freezing sometimes and the sound wasn't that good.
Since I bought a bluetooth receiver able to use apt-x codec (Real Cable iPlug BTR) plugged to my HiFi, I thought it would be a good option to buy the BT-D1 from Creative to send a better sound and really enjoy my music library.
And guess what ? It is working like a charm ! And I can control iTunes from my iPhone using the Remote app if I'm not working on my hack.
Activate Mercury Playback Engine GPU Acceleration (CUDA) in Adobe Premiere Pro and After Effects CS6
If you're planning on building a hackintosh to use it with one of those applications, but are not buying a GeForce GTX 285, GeForce GT 650M, Quadro CX, Quadro FX 4800, Quadro 4000, then GPU acceleration won't be available without the following fix.
And for this fix to work, you need to have a nVidia graphic card with at least 896MB of onboard memory, and your memory will need to be DDR or DDR5. Fortunately, my build was fitting exactly.
First, install Cuda for Mac OSX from here : http://www.nvidia.com/object/mac-driver-archive.html
Then, you just need to run GPUSniffer. Open Terminal Window and copy and paste this command :
This will give you your graphic card's name.
For Premiere Pro CS6 :
Paste this command in Terminal window :
And add your graphic card's name you just found before (you could have copy it and just paste it now, or write it, doesn't matter as long as you don't misspell it)
Type Ctrl-X, say Yes (Y) and it's done.
Open a project in Premiere Pro, go to Projects -> Settings, and here you are with GPU acceleration.
For After Effects CS6 :
Paste this command in Terminal window :
Again, add your graphic card's name you just found before (you could have copy it and just paste it now, or write it, doesn't matter as long as you don't misspell it)
Type Ctrl-X, say Yes (Y) and it's done.
Open a After effects, go to Preferences -> Previews, and here you are with GPU acceleration too.
iMessage fix
Chimera 2.0 was released with iMessage login fix")
Conclusion and Benchmarks
This build is lightning fast compared to all the computers I have ever owned. The mix of SSD and i7-3770K is very impressive ! Everything seems to work like immediately. I am finally comfortable to work on the post-production of my photos.
And the benefits of having a big case, I missed it so much since I was on the "iMac" road. Now, in one case, I have 3 hard disks, a memory card reader and will have in a near future a DVD writer/reader and a graphic card to help my CPU focusing on Lightroom.
About this mac:

Here is my Geekbench result:
I was impressed, this is 50% better than my Mac Mini, for cheaper...
 

Unigine Heaven 3.0 Benchmark Default Settings
Cinebench OpenGL and CPU :
 

Luxmark v2.0 : Sala scene = 821
And SSD speed:
Much better than what my Mac Mini SSD was doing by the way. It was around 200MB/s both for reading and writing...
 

11/13/2012 : Added GTX 660 installation process. Plus Benchmarks (Cinebench, Unigine Heaven)
11/15/2012 : USB 3.0 perfectly working, even on my Icy Box internal reader which have a USB 3.0 port.
12/07/12 :
Auto-sleep issue fixed
USB ejected after wake from sleep fixed
Mouse/Keyboard/Trackpad lag after wake from sleep fixed
12/09/2012 :
Sony CD/DVD reader and writer added, working Out Of the Box 
01/13/2013 :
Added a word about my bluetooth dongle in combination with the Logitech Wireless Speaker.
Added a guide to get GPU acceleration (CUDA) in Premiere Pro and After Effects.
01/19/2013 :
Added an update about my bluetooth dongle.
Added a link to a fix for iMessage.
02/05/2013 :
Added my final audio solution for wireless sound and some basic explanation on how I applied the iMessage fix.
10/24/2013 :
OS X 10.9 Mavericks successfully installed.
07/13/2014 :
WiFi Card PCIe (TP-Link TL-WDN4800) installed successfully. Just plugged & online !
Mr Eddy's Photo Station :
GA-Z77X-UD5H | i7-3770k | MSI GTX 660 Twin Frozr
OS X. 10.9 Mavericks
 

GA-Z77X-UD5H | i7-3770k | MSI GTX 660 Twin Frozr
OS X. 10.9 Mavericks
Components
Motherboard : Gigabyte GA-Z77X-UD5H
http://www.amazon.com/gp/product/B007R21JK4/
CPU : Intel Core i7-3770K Quad-Core Processor 3.5 GHz 6 MB Cache LGA 1155
http://www.amazon.com/gp/product/B007SZ0EOW/
Graphic Card : MSI GTX 660 Twin Frozr 2GB GDDR5 - N660 TF 2GD5
http://www.amazon.com/gp/product/B0095FMXAG/
CPU Cooling : Corsair Cooling Hydro Series CWCH60
http://www.amazon.com/gp/product/B004MYFOE2/
Power Supply : Corsair TX650M 650W Modular
http://www.amazon.com/gp/product/B005E98I0G/
Memory : Corsair Vengeance 32 GB (4x8GB) DDR3 1600MHz PC3 240 Pin DIMM Memory CMZ32GX3M1A1600C10
http://www.amazon.com/gp/product/B006EWUO22
SSD Disk: Crucial M4 SSD 256 GB SATA 6.0 Gb/s 2.5-Inch Solid State Drive CT256M4SSD2
http://www.amazon.com/gp/product/B006EKJ8UI/
Hard Disk : Seagate Barracuda 2TB ST2000DM001 7200RPM 6.0Gb/s
http://www.amazon.com/gp/product/B005T3GRN2/
WiFiCard : TP-Link TL-WDN4800
http://www.amazon.com/dp/B007GMPZ0A/ref=as_li_ss_tl?ie=UTF8&tag=tonymacx86com-20
Internal Memory Card Reader : Icy Box IB865 3.5" with internal USB 3.0 connection to the motherboard (supports most card types : SD, CF, MicroSD, MS, etc) - Initially, I was looking for http://www.amazon.com/gp/product/B006DKEQL0/, but it is not available in Europe were I live, so I took the Icy Box model which looks exactly the same except for the brand.
Sony Optiarc AD-7280S DVD±RW (±R DL) / DVD-RAM 24x 12x Serial ATA internal 5.25" black
http://www.amazon.com/gp/product/B0057FRTPW/
Case : Corsair Graphite Series 600T
http://www.amazon.com/gp/product/B004X63JWS/
Creative Bluetooth Audio BT-D1 USB Transmitter
http://www.amazon.com/gp/product/B003FVAQM8/
Seen as an audio output device, great to get a good audio quality and the benefit of wireless ! Note this is APT-X compatible, so great audio quality if you have a receiver also compatible (like the Real Cable iPlug-BTR for example)
Already Owned
Apple OS X Mountian Lion from Mac App Store
http://itunes.apple.com/fr/app/os-x-mountain-lion/id537386512
Display : DELL UltraSharp U2412M 24" LED LCD Monitor
http://www.amazon.com/gp/product/B005JN9310/
Keyboard : Logitech K750 Wireless Keyboard
http://www.amazon.com/gp/product/B005L38VRU
Apple Magic Trackpad
http://www.amazon.com/gp/product/B003XIJ3MW/
Hard Disks : 2x1 TB Western Digital Caviar Green 32MB SATA II
http://www.amazon.com/gp/product/B001IEZX3G/
Comments
This is my first Hackintosh system, but not my first build since I used to do them all by myself in my old Windows days. Because of the rising prices of the latest iMac, I have decided to try myself with a Hackintosh. And I can already tell you this is my best idea in a long time to balance power and budget.
You may have noticed I didn't mention a graphic card. One will be added in the futur, but it wasn't a needed feature at the moment, so I kept my money for later  Same goes for a DVD reader/burner by the way. I have an external DVD writer anyway.
This leads me to the why ! Since I am a photographer, I needed a good computer to handle the numerous files I am pushing through Lightroom and Photoshop. As I wrote, an iMac is too expensive (and I already have a great mate display), a Mac Mini is not powerful enough and a Mac Pro.. well it's expensive AND outdated. After some math, I realized I could get a powerful hackintosh for the price of a .. Mac Mini.
An Ivy Bridge was the obvious choice, so I went to the best quad core I could find at the moment, which is the i7-3770K. The "K" will allow me to overclock it if needed in the future, when I will exchange my Nikon D700 for a newer full frame DSLR which will have at least two times the number of pixels to deal with.
About the motherboard, I was hesitating between the GA-Z77X-UD5H and the GA-Z77X-UP5 TH. Both didn't need any DSDT, first reason to look at them. The UP5 TH has thunderbolt, which was the reason of my dilemna. I had some hard disks in external box chained through FW800, but finally I have decided to put them inside my case. This way, I didn't need anymore thunderbolt nor FW800, so I could choose the less expensive one, the UD5H.
Last question I had, finding an internal memory card reader which could connect with the internal USB3 motherboard. Most of them are connecting through USB2 internal motherboard pin, but mine were taken due to the front panel USB 2.0 connectors. This was quite hard, since the one I could hear about here wasn't available in Europe. Anyway, I managed to find one that looks exactly the same.
The Install
For this part, I mainly followed Slugnet's build description's installation procedure.
BIOS
I first updated BIOS to latest version F14: http://www.gigabyte.com/products/product-page.aspx?pid=4139#bios. You need to extract the zip file you'll get and just use the file named "Z77XUD5H.F14". I tried by mistake with the "exe" file first and the BIOS was preventing me the file wasn't good.
Then set up BIOS using this guide: http://www.tonymacx86.com/99-quick-guide-configuring-uefi-gigabyte-s-7-series-lga-1155-boards.html
Note that you can't boot from UEFI designations when setting boot devices, only drives labeled SATA or P0.
UniBeast
Nothing to mention, everything went well installing 10.8.2 Mountain Lion.
MultiBeast
Here I just skipped the "3rd Party SATA" Driver in the "Disk" section, since I'm not using Marvell SATA connectors, nor GSATA. So, don't forget to select it if you are planning on using them.
MultiBeast Configuration

Installing GeForce GTX 660 graphic card
I finally decided to buy a discrete graphic card. My choice went on the MSI GTX 660 Twin Frozr OC 2GD5 to be precise. Here is how I made it work :
1. Set "GraphicsEnabler" to No using MultiBeast :
2. Install nVidia drivers for 10.8.2 ( http://www.nvidia.com/object/macosx-304.00.05f02-driver.html )
It will ask you to restart your computer, do so.
3. Shut down your computer (if your desktop resolution looks weird, it's because of step 2, but don't care about it)
4. Install your graphic card and connect your display to it.
5. Start your computer and get to the Bios. In Peripherals, you need to set "Init Display First" to PEG so it won't try to run using Intel's integrated graphics.
You're done 
Remaining Issues
1 - Auto Sleep Mode FIXED
It is not putting my computer to sleep, just the display goes black. Tried the darkwake=no and darkwake=10 solution, didn't helped. But for me it's not a big issue since I put my computer to sleep every time I leave it.
Disabling "CPU PLL Overvoltage" in UEFI solved this problem. Since you're not OCing your CPU too much, this is a okay to disable. I tested my CPU by boosting turbo from 39 to 42, without any issue for example (CPU tested with Prime95)
2 - USB Drives Disconnect with Sleep FIXED
When waking up the computer after sleep, any USB drives that was connected is signaled as ejected improperly.
Disabling "CPU PLL Overvoltage" in UEFI solved this problem. Since you're not OCing your CPU too much, this is a okay to disable. I tested my CPU by boosting turbo from 39 to 42, without any issue for example (CPU tested with Prime95)
List of features working (or not..)
Fully Working :
• OSX Mountain Lion 10.8.2
• Auto-sleep mode
• Ethernet
• Front Panel USB 2.0 and Firewire
• HDMI and DVI connectors of the motherboard using HD4000
• Dual monitors
• USB 3.0
• eSata
Bluetooth & Audio
After trying an IOGear bluetooth to send the sound of my hack to my Hi-Fi (I can't do photo editing without some music), I realised my Apple trackpad was freezing sometimes and the sound wasn't that good.
Since I bought a bluetooth receiver able to use apt-x codec (Real Cable iPlug BTR) plugged to my HiFi, I thought it would be a good option to buy the BT-D1 from Creative to send a better sound and really enjoy my music library.
And guess what ? It is working like a charm ! And I can control iTunes from my iPhone using the Remote app if I'm not working on my hack.
Activate Mercury Playback Engine GPU Acceleration (CUDA) in Adobe Premiere Pro and After Effects CS6
If you're planning on building a hackintosh to use it with one of those applications, but are not buying a GeForce GTX 285, GeForce GT 650M, Quadro CX, Quadro FX 4800, Quadro 4000, then GPU acceleration won't be available without the following fix.
And for this fix to work, you need to have a nVidia graphic card with at least 896MB of onboard memory, and your memory will need to be DDR or DDR5. Fortunately, my build was fitting exactly.
First, install Cuda for Mac OSX from here : http://www.nvidia.com/object/mac-driver-archive.html
Then, you just need to run GPUSniffer. Open Terminal Window and copy and paste this command :
Code:
/Applications/Adobe\ Premiere\ Pro\ CS6/Adobe\ Premiere\ Pro\ CS6.app/Contents/GPUSniffer.app/Contents/MacOS/GPUSnifferThis will give you your graphic card's name.
For Premiere Pro CS6 :
Paste this command in Terminal window :
Code:
sudo nano /Applications/Adobe\ Premiere\ Pro\ CS6/Adobe\ Premiere\ Pro\ CS6.app/Contents/cuda_supported_cards.txtAnd add your graphic card's name you just found before (you could have copy it and just paste it now, or write it, doesn't matter as long as you don't misspell it)
Type Ctrl-X, say Yes (Y) and it's done.
Open a project in Premiere Pro, go to Projects -> Settings, and here you are with GPU acceleration.
For After Effects CS6 :
Paste this command in Terminal window :
Code:
sudo nano /Applications/Adobe\ After\ Effects\ CS6/Adobe\ After\ Effects\ CS6.app/Contents/raytracer_supported_cards.txtAgain, add your graphic card's name you just found before (you could have copy it and just paste it now, or write it, doesn't matter as long as you don't misspell it)
Type Ctrl-X, say Yes (Y) and it's done.
Open a After effects, go to Preferences -> Previews, and here you are with GPU acceleration too.
iMessage fix
Chimera 2.0 was released with iMessage login fix
Conclusion and Benchmarks
This build is lightning fast compared to all the computers I have ever owned. The mix of SSD and i7-3770K is very impressive ! Everything seems to work like immediately. I am finally comfortable to work on the post-production of my photos.
And the benefits of having a big case, I missed it so much since I was on the "iMac" road. Now, in one case, I have 3 hard disks, a memory card reader and will have in a near future a DVD writer/reader and a graphic card to help my CPU focusing on Lightroom.
About this mac:


Here is my Geekbench result:
I was impressed, this is 50% better than my Mac Mini, for cheaper...
Unigine Heaven 3.0 Benchmark Default Settings


Cinebench OpenGL and CPU :
Luxmark v2.0 : Sala scene = 821
And SSD speed:
Much better than what my Mac Mini SSD was doing by the way. It was around 200MB/s both for reading and writing...
11/13/2012 : Added GTX 660 installation process. Plus Benchmarks (Cinebench, Unigine Heaven)
11/15/2012 : USB 3.0 perfectly working, even on my Icy Box internal reader which have a USB 3.0 port.
12/07/12 :
Auto-sleep issue fixed
USB ejected after wake from sleep fixed
Mouse/Keyboard/Trackpad lag after wake from sleep fixed
12/09/2012 :
Sony CD/DVD reader and writer added, working Out Of the Box 
01/13/2013 :
Added a word about my bluetooth dongle in combination with the Logitech Wireless Speaker.
Added a guide to get GPU acceleration (CUDA) in Premiere Pro and After Effects.
01/19/2013 :
Added an update about my bluetooth dongle.
Added a link to a fix for iMessage.
02/05/2013 :
Added my final audio solution for wireless sound and some basic explanation on how I applied the iMessage fix.
10/24/2013 :
OS X 10.9 Mavericks successfully installed.
07/13/2014 :
WiFi Card PCIe (TP-Link TL-WDN4800) installed successfully. Just plugged & online !
Attachments
Last edited by a moderator: