- Joined
- May 30, 2016
- Messages
- 568
- Mac
- Classic Mac
- Mobile Phone
Hi all!
I have previously modded a G4 Cube (which turned out to be too small for my needs) as well as a G4 QuickSilver tower and had fun doing it but always wanted a MacPro tower. something about them, I love the way they look and how the are made. I found some on craigslist, it was actually 1xMacPro1,1 and 2xG5 Towers all for $60! they arent in perfect condition, but I couldn't complain about the price. there were some missing parts - only one side panel, which is from the G5 tower but it actually fits the MacPro tower even though the latches don't lock in as they are located in a different position on the side panel. the DVD tray was not there, someone ripped off the power supply cover in some attempt to take the power supply out, idk. there was only one hard drive tray, I had to order some on eBay. Im using one of the G5 towers as a foot rest lol. the last one is in rather rough shape so its in the basement.
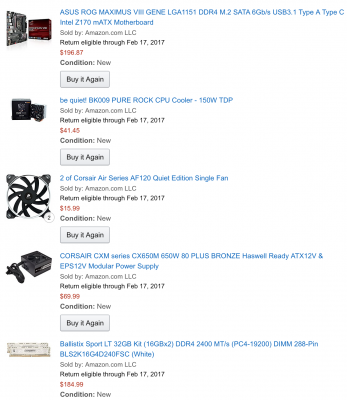
Parts list:
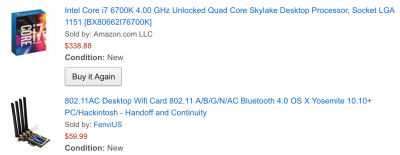
the wifi card on here natively works with macOS, supports continuity, handoff, Apple Watch unlock, etc. its awesome, no messing with ktext files it just works!!
I had on hand the drives already which are 2x500GB EVO 850 drives and 2x WD Green 2TB mirrored in macOS.
I also had a 980Ti from another build already
Before I started, I messed with the stock Mac Pro.. it actually turned on! the drive it came with was bad and making a clunking noise, so I couldn't boot off it. I tried to use my SSD which has Sierra on it, I made it into clover but it wouldn't boot into macOS, big surprise. after that I gutted the case down to just the aluminum and power washed it to get the grime off.
*Item of note* - if you do any cutting in the case the shavings WILL find their way into the dvd drive door sliding mechanism. I had to take this all apart and clean it a few times as it would just jam. before you install any parts hose it down to get the metal shavings out - I had to take everything out of the case after I realized it was full of small shavings and needed to be cleaned. oh, and don't spray silicone on the dvd drive sliding mechanism, it will just make a huge mess and need to be rinsed out lol.
The first order of business was to Dremel out the old motherboard plate to make room for the new one.
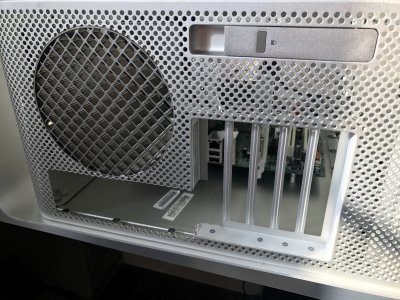
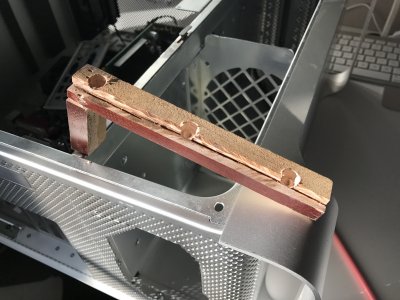
After this I pondered how to get the plate to be flush - I decided to build a bracket out of some wood. cut and notched the wood to fit the screws and ridges inside, and then used a nail gun to attach the pieces together:
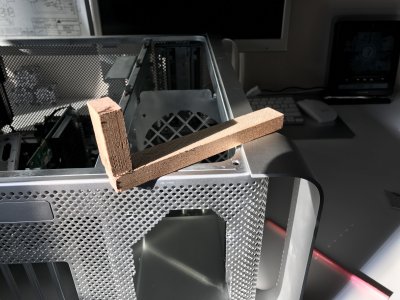
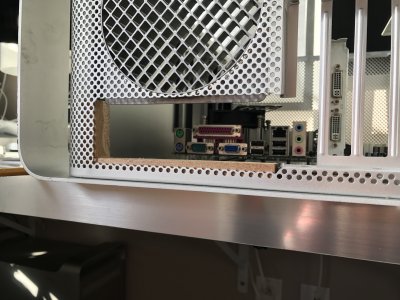
Then checked the fit to make sure it was flush:

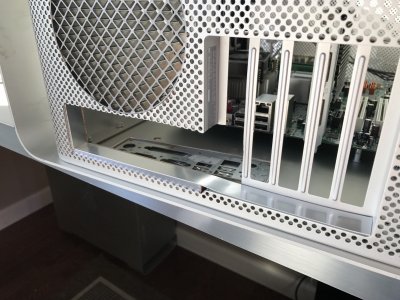
Then I used this silver colored molding, the same stuff on the front of my desk in the pictures. I made this desk from a counter top at Ikea, they gave me some extra strips of the stuff in case I needed to cover a cut side, I had some extra:
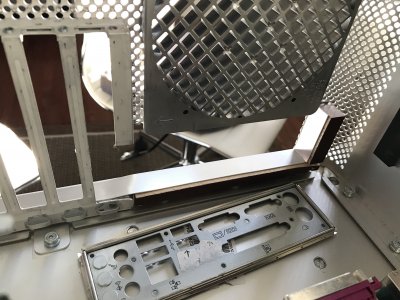
Then test fit with a junk board I had, stuck in the old GT7300 card that the MacPro came with:
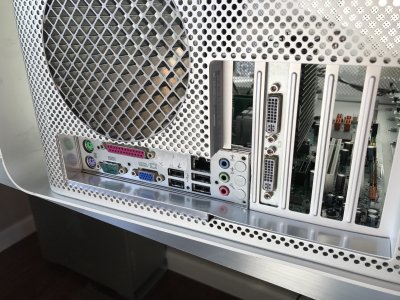
the silver strip really makes it look stock!
then glued down the stock motherboard standoffs using the liquid metal epoxy:
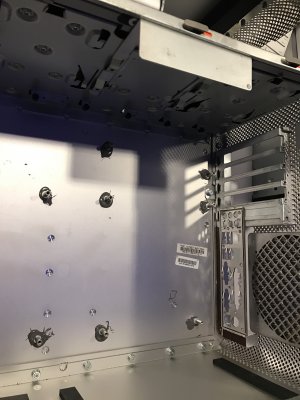
I had to cut a hole under the drive caddy bays to route the power cables as they were not long enough to reach going through the stock hole in the front of the case. I lined the hold with electrical tape to hide the sharp edges:

Installed the power supply and motherboard:
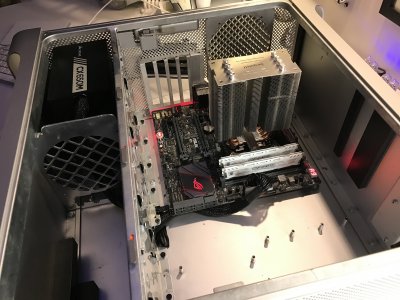
Tested booting without the GPU, notice the fans installed. one in the back behind the CPU on the case (well thats the only one you can see lol) one on the top of the stock gray plastic housing on the left and one in the front of the power supply, behind the dvd drive caddy.
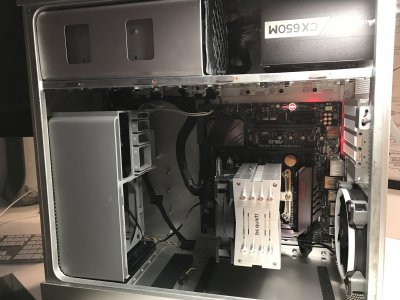
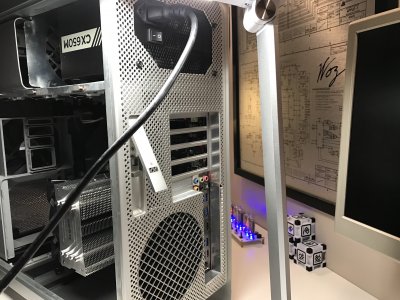
Here you can see how the back panel looks. You can also notice how I cut a hole for the power supply. I thought about using the case from the old power supply but decided to just do this, it was a lot easier.
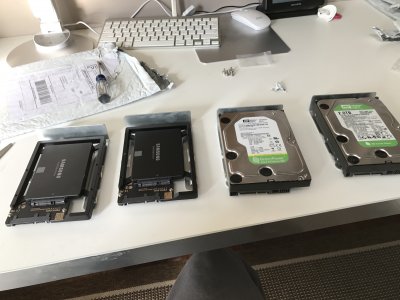
I installed the SSDs into drive caddys so they would match up with a regular hard drive port to utilize the stock drive bays:
I don't have a picture of it, but I removed the stock SATA/SAS cables for the back plane and bought some crucial NAS backplane replacement parts and it fit almost perfectly. that way I didnt need a SAS adapter or anything, it just screwed into the back where the old ones were and gave me a separate SATA / power cable.
Finished product:
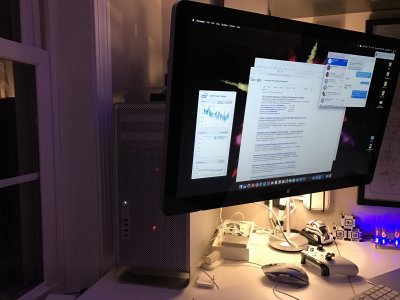
sorry its dark. I am using it with a Cinema Display DP version, that way the sound / mic / webcam all work as its a separate USB cable.
Front panel: I modded the front panel to work using some guides I found here but the LED wouldn't work. I ended up just soldering on some wires directly to the LED behind the button to make it work. the front USB ports arent hooked up or the fire wire ones. I was thinking about making a wire to hook up the USB ports until I ran into the USB port limitation of macOS and ended up having to disable some ports to make the bluetooth work. plus they are USB2 so meh.
LMK of any questions you might have
Thanks to Stork on the OS side of things, used his guide to get this motherboard working. I re-used my Sierra install from my old build, it booted right up! had to make some changes to work but it wasn't too bad.
I have previously modded a G4 Cube (which turned out to be too small for my needs) as well as a G4 QuickSilver tower and had fun doing it but always wanted a MacPro tower. something about them, I love the way they look and how the are made. I found some on craigslist, it was actually 1xMacPro1,1 and 2xG5 Towers all for $60! they arent in perfect condition, but I couldn't complain about the price. there were some missing parts - only one side panel, which is from the G5 tower but it actually fits the MacPro tower even though the latches don't lock in as they are located in a different position on the side panel. the DVD tray was not there, someone ripped off the power supply cover in some attempt to take the power supply out, idk. there was only one hard drive tray, I had to order some on eBay. Im using one of the G5 towers as a foot rest lol. the last one is in rather rough shape so its in the basement.
Parts list:


the wifi card on here natively works with macOS, supports continuity, handoff, Apple Watch unlock, etc. its awesome, no messing with ktext files it just works!!
I had on hand the drives already which are 2x500GB EVO 850 drives and 2x WD Green 2TB mirrored in macOS.
I also had a 980Ti from another build already
Before I started, I messed with the stock Mac Pro.. it actually turned on! the drive it came with was bad and making a clunking noise, so I couldn't boot off it. I tried to use my SSD which has Sierra on it, I made it into clover but it wouldn't boot into macOS, big surprise. after that I gutted the case down to just the aluminum and power washed it to get the grime off.
*Item of note* - if you do any cutting in the case the shavings WILL find their way into the dvd drive door sliding mechanism. I had to take this all apart and clean it a few times as it would just jam. before you install any parts hose it down to get the metal shavings out - I had to take everything out of the case after I realized it was full of small shavings and needed to be cleaned. oh, and don't spray silicone on the dvd drive sliding mechanism, it will just make a huge mess and need to be rinsed out lol.
The first order of business was to Dremel out the old motherboard plate to make room for the new one.

After this I pondered how to get the plate to be flush - I decided to build a bracket out of some wood. cut and notched the wood to fit the screws and ridges inside, and then used a nail gun to attach the pieces together:


Then checked the fit to make sure it was flush:


Then I used this silver colored molding, the same stuff on the front of my desk in the pictures. I made this desk from a counter top at Ikea, they gave me some extra strips of the stuff in case I needed to cover a cut side, I had some extra:


Then test fit with a junk board I had, stuck in the old GT7300 card that the MacPro came with:

the silver strip really makes it look stock!
then glued down the stock motherboard standoffs using the liquid metal epoxy:

I had to cut a hole under the drive caddy bays to route the power cables as they were not long enough to reach going through the stock hole in the front of the case. I lined the hold with electrical tape to hide the sharp edges:

Installed the power supply and motherboard:

Tested booting without the GPU, notice the fans installed. one in the back behind the CPU on the case (well thats the only one you can see lol) one on the top of the stock gray plastic housing on the left and one in the front of the power supply, behind the dvd drive caddy.

Here you can see how the back panel looks. You can also notice how I cut a hole for the power supply. I thought about using the case from the old power supply but decided to just do this, it was a lot easier.

I installed the SSDs into drive caddys so they would match up with a regular hard drive port to utilize the stock drive bays:

I don't have a picture of it, but I removed the stock SATA/SAS cables for the back plane and bought some crucial NAS backplane replacement parts and it fit almost perfectly. that way I didnt need a SAS adapter or anything, it just screwed into the back where the old ones were and gave me a separate SATA / power cable.
Finished product:

sorry its dark. I am using it with a Cinema Display DP version, that way the sound / mic / webcam all work as its a separate USB cable.
Front panel: I modded the front panel to work using some guides I found here but the LED wouldn't work. I ended up just soldering on some wires directly to the LED behind the button to make it work. the front USB ports arent hooked up or the fire wire ones. I was thinking about making a wire to hook up the USB ports until I ran into the USB port limitation of macOS and ended up having to disable some ports to make the bluetooth work. plus they are USB2 so meh.
LMK of any questions you might have
Thanks to Stork on the OS side of things, used his guide to get this motherboard working. I re-used my Sierra install from my old build, it booted right up! had to make some changes to work but it wasn't too bad.

