- Joined
- Aug 21, 2018
- Messages
- 2
- Motherboard
- MSI Z370M Mortar
- CPU
- i7-8700K OC 4.8Ghz
- Graphics
- Vega 56
My old workhorse was showing the signs of age. Slow, lazy and content. The iMac Pro is too expensive but I couldn't wait for multi hour renders any more. Maybe a used trashcan? Was it time to ditch the ten year old cheese grater I've spent so much time with?
Never.
So I started googling for another solution, which led me to the tonymac case mod forum. I lurked through the posts and gathered valuable information, silently tipping my hat in gratitude to every contributor. It all seemed pretty straightforward. I had never built a computer in my life. I knew nothing and just presumed it'll be easy and fun. I had to learn a lot. Let me share what I learned and what I built.
Hardware:
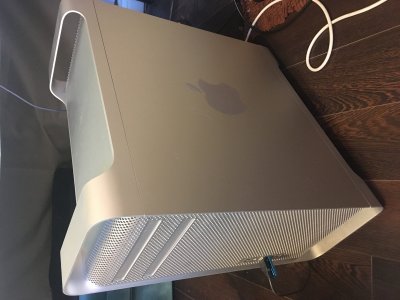
- Mac Pro (early 2008), fully functional but very slow
- i7 8700K on MSI Z370M MircoATX board
- be quiet dark rock 4 cooler and three 120mm be quiet silent wings 3 PWM fans
- Sapphire Radeon Vega 56 Nitro+ GPU
- 650W Enermax Revolution SFX Modular 80+ Gold (bricked in build process)
- Seasonic 750W FOCUS Plus Modular 80+ Platinum
- 32GB G.Skill Aegis DDR4-3000 (2x16GB)
- 500GB Samsung 970 Evo M.2
- 500GB Crucial MX500 M.2
- Extension cables from eBay (power, sata, USB, audio & graphics)
- Benq 32" 4K PD3200U monitor
- 6TB Seagate Backup Plus Hub
Total Cost:
Euros: Less than half the price of a base iMac Pro (2 640 € vs 5 599 €)
Work: ~40 hours (starting at skill level noob, finishing at skill level intermediate)
Step 1.
Cleaned out the case. Wiggled off risers. Fitted parts in case and decided on how to mod.
Step 2.
Glued risers in place with power epoxy. Modded the PSU to motherboard power cable according to aquamac scheme to get the front panel working. Assembled all parts in case and powered on. The computer didn't fire up, no post. The PSU fan just took a couple of spins and the died. No leds, no nothing. F**k!
Step 3.
Googled. Found Tonyshardware.com troubleshooting. Got all new parts on credit. Cardboarded build and exchanged one part a time. Computer posted after PSU swap! Victory! But the Enermax was bricked. Luckily nothing more expensive got toasted. Decided to not try to splinter solder cables and trust sketchy online tutorials any more. The replacement full sized PSU fit well enough so I read up on PSU:s and decided to go with Seasonic 750W FOCUS Plus Modular 80+ Platinum as it is pretty compact, quiet and of very good quality. Returned excess parts.
Step 4.
Installed High Sierra on cardboarded computer. The install log is pretty long, something like 50 lines and 34 reboots. It took a while to get everything figured out. I learned a lot. It was painful at times.
Step 5.
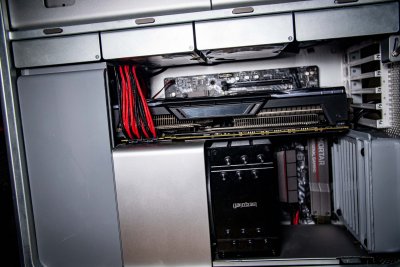
Installed all components in case. Removed top shelf divider (riveted) by wiggling and bending. The rivets are almost as weak as the motherboard risers. First pic, below. Decided to keep the original wind tunnel design.

Close up on fans. They fit perfectly in the Mac Pro fan housing. You can see my old Kingston 240GB SSD velcroed to the case. It now serves as a Windows 10 bootable drive (for gaming and other stuff the Mac is not up to, ie flashing Vega 64 bios onto Vega 56 card). You can also see the Crucial M.2 SSD is not plugged in. At the moment I run High Sierra on that one and Mojave on the Samsung. For some reason it's not possible to boot from the Samsung if the Crucial is connected. Bummer. But not a big deal as this is just a phase until I get everything to work perfectly on Mojave. Then the Crucial will serve its original purpose: Video editing.

The top drive bay is left empty. Always good to have some spare space for future extensions/upgrades.

Pic below. The exhaust fan is inside the original fan case but flipped 90° and snapped on to the exhaust vent. It fits snugly but is easy to pop off if/when I need to access the sockets and extension cables on the motherboard.

The Sapphire Radeon Vega 56 Nitro+ is a beefy card and needs support. I plan to screw in a metal plate between the card and the case. You can't really tell from the picture, but as it is it mainly rests on the original fan casings on both ends. Works pretty well during the mod build as there are no screws that need to be unscrewed in order to remove the card. Those hard drives in bay two and three I haven't done anything to. They are 2TB drives in a 4TB RAID 0. Didn't bother with a SAS/SATA adapter, I simply plugged the cables to the motherboard and slid them in place. Bay four will have a fixed SATA & power plug to be able to service a 500GB mirror / backup HDD of the main boot drive.

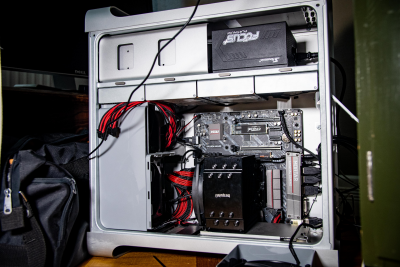
There it is. My good old friend, the ten year old beast, on fire. I left the extension slot ports open to let it better vent out hot exhaust air. As I look at the picture I wish I could fit in another exhaust fan to pull out the GPU exhaust air from below those hard drives.

I'm happy with the build. I did however underestimate the scale and learning curve of such a project. I normally do. Oh, almost forgot. I did over clock to 4.8 GHz on 1.28v. OC-virginity lost. I have not yet flashed the GPU for OC performance. I might though. But right now I'm pleased with the performance boost I already got out of my old friend.
Thank y'all for sharing! Keep those cheese grinders grinding. All the best!
Some benchmarks below. As You can see the base 2017 iMac Pro gets smoked on both single and multi core. The full range of iMac Pros are blasted on single core, but as one would expect, machines with ten, or more, cores leave my build in the dust on multi core performance. But as you know, a 10-core processor adds 960 € to the base price and an 18-core processor will have the Apple Store machine cost a mere 8 479 €. Worth it? Hmmm...
The actual build:


iMac Pro benchmarks:


(Source: Geekbench Browser)
Never.
So I started googling for another solution, which led me to the tonymac case mod forum. I lurked through the posts and gathered valuable information, silently tipping my hat in gratitude to every contributor. It all seemed pretty straightforward. I had never built a computer in my life. I knew nothing and just presumed it'll be easy and fun. I had to learn a lot. Let me share what I learned and what I built.
Hardware:
- Mac Pro (early 2008), fully functional but very slow
- i7 8700K on MSI Z370M MircoATX board
- be quiet dark rock 4 cooler and three 120mm be quiet silent wings 3 PWM fans
- Sapphire Radeon Vega 56 Nitro+ GPU
- 650W Enermax Revolution SFX Modular 80+ Gold (bricked in build process)
- Seasonic 750W FOCUS Plus Modular 80+ Platinum
- 32GB G.Skill Aegis DDR4-3000 (2x16GB)
- 500GB Samsung 970 Evo M.2
- 500GB Crucial MX500 M.2
- Extension cables from eBay (power, sata, USB, audio & graphics)
- Benq 32" 4K PD3200U monitor
- 6TB Seagate Backup Plus Hub
Total Cost:
Euros: Less than half the price of a base iMac Pro (2 640 € vs 5 599 €)
Work: ~40 hours (starting at skill level noob, finishing at skill level intermediate)
Step 1.
Cleaned out the case. Wiggled off risers. Fitted parts in case and decided on how to mod.
Step 2.
Glued risers in place with power epoxy. Modded the PSU to motherboard power cable according to aquamac scheme to get the front panel working. Assembled all parts in case and powered on. The computer didn't fire up, no post. The PSU fan just took a couple of spins and the died. No leds, no nothing. F**k!
Step 3.
Googled. Found Tonyshardware.com troubleshooting. Got all new parts on credit. Cardboarded build and exchanged one part a time. Computer posted after PSU swap! Victory! But the Enermax was bricked. Luckily nothing more expensive got toasted. Decided to not try to splinter solder cables and trust sketchy online tutorials any more. The replacement full sized PSU fit well enough so I read up on PSU:s and decided to go with Seasonic 750W FOCUS Plus Modular 80+ Platinum as it is pretty compact, quiet and of very good quality. Returned excess parts.
Step 4.
Installed High Sierra on cardboarded computer. The install log is pretty long, something like 50 lines and 34 reboots. It took a while to get everything figured out. I learned a lot. It was painful at times.
Step 5.
Installed all components in case. Removed top shelf divider (riveted) by wiggling and bending. The rivets are almost as weak as the motherboard risers. First pic, below. Decided to keep the original wind tunnel design.
Close up on fans. They fit perfectly in the Mac Pro fan housing. You can see my old Kingston 240GB SSD velcroed to the case. It now serves as a Windows 10 bootable drive (for gaming and other stuff the Mac is not up to, ie flashing Vega 64 bios onto Vega 56 card). You can also see the Crucial M.2 SSD is not plugged in. At the moment I run High Sierra on that one and Mojave on the Samsung. For some reason it's not possible to boot from the Samsung if the Crucial is connected. Bummer. But not a big deal as this is just a phase until I get everything to work perfectly on Mojave. Then the Crucial will serve its original purpose: Video editing.
The top drive bay is left empty. Always good to have some spare space for future extensions/upgrades.
Pic below. The exhaust fan is inside the original fan case but flipped 90° and snapped on to the exhaust vent. It fits snugly but is easy to pop off if/when I need to access the sockets and extension cables on the motherboard.
The Sapphire Radeon Vega 56 Nitro+ is a beefy card and needs support. I plan to screw in a metal plate between the card and the case. You can't really tell from the picture, but as it is it mainly rests on the original fan casings on both ends. Works pretty well during the mod build as there are no screws that need to be unscrewed in order to remove the card. Those hard drives in bay two and three I haven't done anything to. They are 2TB drives in a 4TB RAID 0. Didn't bother with a SAS/SATA adapter, I simply plugged the cables to the motherboard and slid them in place. Bay four will have a fixed SATA & power plug to be able to service a 500GB mirror / backup HDD of the main boot drive.
There it is. My good old friend, the ten year old beast, on fire. I left the extension slot ports open to let it better vent out hot exhaust air. As I look at the picture I wish I could fit in another exhaust fan to pull out the GPU exhaust air from below those hard drives.
I'm happy with the build. I did however underestimate the scale and learning curve of such a project. I normally do. Oh, almost forgot. I did over clock to 4.8 GHz on 1.28v. OC-virginity lost. I have not yet flashed the GPU for OC performance. I might though. But right now I'm pleased with the performance boost I already got out of my old friend.
Thank y'all for sharing! Keep those cheese grinders grinding. All the best!
Some benchmarks below. As You can see the base 2017 iMac Pro gets smoked on both single and multi core. The full range of iMac Pros are blasted on single core, but as one would expect, machines with ten, or more, cores leave my build in the dust on multi core performance. But as you know, a 10-core processor adds 960 € to the base price and an 18-core processor will have the Apple Store machine cost a mere 8 479 €. Worth it? Hmmm...
The actual build:
iMac Pro benchmarks:
(Source: Geekbench Browser)
Attachments
Last edited:
") ? Any advise you could pass along or some guides that might point me in the right direction would be so awesome...
? Any advise you could pass along or some guides that might point me in the right direction would be so awesome...