Contribute
Register

Mac Pro 1.1 Hackintosh Z390 Designare Build 2021

Status
Not open for further replies.
today I went to a hardware store and good lucky to find m3 bolts that where 7cm I needed to attach the Seasonic Power supply unite in the old Mac Pro power supply unit.

the only thing I had to do was cut a small piece off the bolts and use washers and I was done.

what do you all thing?
8E8D537D-0EFA-439A-A3C8-B53F7BADB63E.jpeg
46FFF5DE-10F2-4F99-808A-CFB7394FEB50.jpeg
 
(Update)
Today I had some time to glue the motherboard stand-offs in place with the first layer off epoxy now letting it dry before going over it with the second layer of epoxy for strength and good bonding resons
F3312A81-6AB2-4F8C-8EDC-640885B0188A.jpeg


Lucky I use Quick dry epoxy so less than an hour late I could apply the second layer off epoxy so now I am going to leave it to dry for 24 hours.
E79101F3-AC3B-4D65-A0FA-1F988B6E47F5.jpeg

The circle you see on the case is a mounting point I still need to glue back for the front fan unit that will be done by the next update.

So fare my update hope to update somewhere during the upcoming week hope you all like the progress of the build
 
Last edited:
Hi everyone this is my progress update for today.

I started with cutting away from the old ram case and grinding a stand-off for pre-proration to epoxying the front fan unite mount back in the case
FE135650-F1E6-4617-9D46-401EB85154A2.jpeg
after that I cleaned the parts I cut/grinded before test fitting it in the case
FB747362-99AD-4A9F-9D52-5541A43FD343.jpeg
5C0C51AD-4FD8-4AFE-A12E-FCC0252390CC.jpeg


sadly had to find out, I need to cut more off the old ram case so the gpu cooler will fit.
I marked what I think will be enuf so the gpu cooler and old ram unit shield wil fit correctly in the case.
D949653A-60F0-4E12-AC4B-F82588D7A5C7.jpeg

How the motherboard mounts and backplate looks like from the inside plus you can see the few case mounting points I can’t use to fasten case als one anymore.
EDFB3946-3492-4F6F-8D0A-FE1DD4667942.jpeg


But now I am going to epoxy glue the front fan mount back in place plus fill up all the remaining old apple motherboard mounting hols for a smooth inside case.

so far my update on my build progress.

Next progress update will come asap with The adjusted old ram case.
 
Next day progress case mod update:

today after work I started with the cutting a bit more off the old ram case
2AE1975B-325A-4FAC-91B5-D30B6EEC0A5E.jpeg
69353A2B-FFD2-4780-9BC2-F7A0B504593C.jpeg
after sanding and cleaning i filled the old stand-off hols with epoxy for the first layer and waited for an hour before placing the old ram unit shield on its mounting point in the Mac Pro case and build op the front fan unit and second shield
603CE15A-1DAA-46B8-8048-AB7F02C241E8.jpeg
E8F1C3AD-E0C0-475B-BC95-D052008008DA.jpeg

Before i glued the front fan unit stand-off back in place with epoxy and the left over epoxy I used to place a second layer over the hols I am filling to get a smooth surface inside
BD28987F-CC7C-43D1-B4B2-8C97A13B2B6C.jpeg


and make a photo how the front looks with the fan unit back in place
C5546790-A665-4B39-AE08-D79BCE1A0DB2.jpeg

Now I let it harden so when it’s dry I can sand the inside smooth if I don’t need to put a third layer of epoxy over them.

so far my build progress update.

Next update will come very soon, hope you all like how the build is going so far
 
Last edited:
Glad to see the progress you made further.

It's a pity to see you had to remove the upper part of the RAM cage. It looks like this will affect the wind tunnels for separating the CPU and GPU.

I haven't done anything on a 1,1 or 3,1 Mac Pro before, but for 4,1 or 5,1 cases, there is no need to modify the RAM/CPU cage for GPU clearance.
 
It’s been awhile that I had the chance to work on my build but since I have a few weeks off from work I made a big progress in just 3 days.

I wasn’t happy about the stand-off placement so I redid them and now everything is level and in the right place plus going to make a shield for the gab between the old ram shield and the Mac Pro case so you can’t see the back fan.
85D2A8AF-ACBF-407B-A436-C3BBCE3639F4.jpeg

Next step was making holes in the fan back plate from the rear of the Mac Pro case
F9C7F93F-F7DE-4EC2-A165-AA20707DAA30.jpeg

So I could use these to secure the back fan to the fan back plate
D1F77ACD-37F8-47F1-901F-AA1E38F10959.jpeg

After placing them I fitted the back fan and placed it in the Mac Pro Case place
2D864BA4-A611-4849-AD06-30682FAF20FA.jpeg

For the Mac Pro power supply unit case I modded it but did not though it trough enuf so had to chance and think again about it still need to chance more to it so it doesn’t make contact with the motherboard
BA196AC4-F9D0-4344-8E7D-72D801484EB7.jpeg


The plan for now with the power supply unit case is to make it so it fits with out making contract with the motherboard for the Seasonic unit I’m going to make a bracket so it will be higher above the motherboard and still have the originele look with the Mac Pro power supply unit case to hide the Seasonic power supply unit behind it.

After all these points are done then I’m done with the modding of the Mac Pro case and I can start with the kabel soldering part of the build.

Hope you all enjoy my build progress so far.

Next update will be coming soon because hoping to get this build done before the end of this year
 
Today’s progress update:

I chopped the back fan cap that connects to the old Mac Pro ram tray with the back with hopefully enuf clearance for the cpu cooler unit
9C19ACC9-A878-4D1F-86F1-001590AE6C7A.jpeg
0CB7E00A-1FD8-48A7-97ED-387D751725CF.jpeg

Also thinking of making this piece fit so there is no gab but will have to look if I can make it look nice and snuck fit as possible or just leave it as it is
177BB22F-D798-4075-93D1-7B304D992792.jpeg

Also cut the Mac Pro power supply unit case plus re-glued the mounting piece so it’s not a losse pieces of metal
E64AC2E1-20A1-4AE4-94E0-74662285249D.jpeg
C89AEDEC-4070-4526-BAFA-E4C7772B3531.jpeg

Just need to wait until it dry’s so I can drill a hole to screw it together again.

So far my update for today. Now I am going to enjoy my birthday so probably not able to do allot tomorrow but I will update as soon as possible with my build progress.

Hope you all enjoy this build so far just a few more steps to take before it’s completed.
 
Hi all,

Last few day I was busy making the following chances/mods for my build:

Made this so it slides in te place and won’t be wobbly plus going to use dubbel side tape for the back fan cover so it looks originele as possible
2044F041-6867-4567-B86B-B94CACFE4766.jpeg

Had to fix these stand-offs because I sadly tapped them out.. lucky it was a quick fix
3ED697E3-6FFE-4DE6-9EEF-4588F5154857.jpeg

Snapped these and also grinded them down to make more space for the power supply unit
6C4DA203-90B9-4E6D-8237-A227464BD3B6.jpeg
F2F82189-9570-4288-A6F2-851E801D9550.jpeg

Made a bracket for the power supply unit this is a look from the inside
01A4FD87-9FA0-4D24-A48F-78427BD4C533.jpeg

Plus this one
781D9E4C-9180-44B4-A812-1964C8B4841C.jpeg

Side look when I am done because I want it to look as stock as possible I made it so it inside of the original power supply case unit
35166220-EE63-429F-8A14-806F93C86303.jpeg

And this is from the back
F7B9DC67-C7A8-4FD5-9358-D4B81AEE4DC0.jpeg

Only thing to do now is glue a new mounting punt for the bracket in the case plus glue up the original Mac Pro power supply case unit see Photos
4AD2A748-7805-4EF0-AB68-8574ECB9C13D.jpeg
49CAFC5D-7624-4343-9E29-B7DFECB5FD1C.jpeg


After this I am going to test fit the kabels from the power supply unit to know if I can place a small fan for air circulation or that I need to cut a circle out the bracket I made for that.

Will keep you all updated what it’s going to be.

Hope you all like the progress so far

Next update will be soon
 

Attachments

  • 7667C404-98D4-4F92-B837-AD292B3E4BF5.jpeg
    7667C404-98D4-4F92-B837-AD292B3E4BF5.jpeg
    1.7 MB · Views: 66
  • C98B5FF2-86EF-4CF5-832D-A3517072604D.jpeg
    C98B5FF2-86EF-4CF5-832D-A3517072604D.jpeg
    1.5 MB · Views: 71
Today’s progress update on my build so far:

After the first layer was dry enuf I also did the other side so it could dry as one piece
CA5823A4-FFFC-45F1-A5FF-124A48A39BB3.jpeg

1C90E939-67D3-4954-B1BD-DD125177A5FC.jpeg

I had to glue a new mounting point in the case after it had it’s second layer off glue and it was dry enuf I cut it to the right size
C22163BB-E145-4133-BC25-A65AECE81303.jpeg

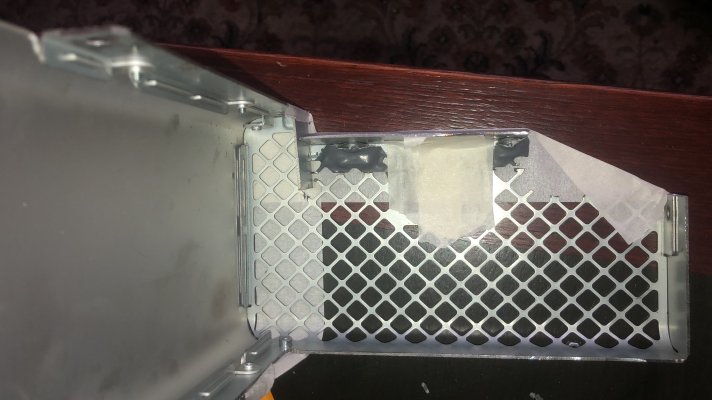
Then it came time to put it back together for a test fit of the power supply unit and behold I ran in to an issue that I wasn’t able to connect the plug lucky it was a quick fix. Just had to cut a hole in the bracket I made plus I also made a chance to it
13DA61D8-B745-4F3C-8A07-F8737D534D7A.jpeg
33F4A93C-1792-4D12-A49E-9CFB5FCA2D4C.jpeg

Now I was able to connect and place it all together
E5BCCD4F-B348-46BD-9955-6F49F8665993.jpeg

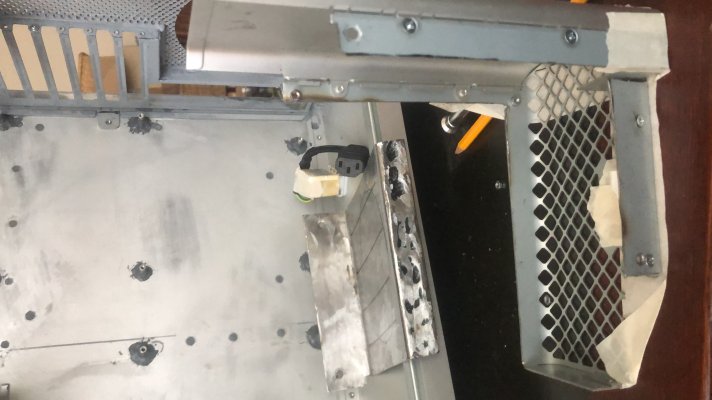
And how it looks with all the original Mac Pro parts inside
794F10A8-A956-4102-963E-EFE3720BB112.jpeg

Just need to fix this in the morning, has to be a little bit lower to fit properly
A7B0FE9A-4B8B-4FDE-A25A-88A7F119F655.jpeg


But al and al i am happy so far with the end result just one more fix before I can prep the case for the first coat of primer before getting it’s two tone paint job.

Also getting this week the vinyl logo’s (2 big Apple logo’s and 2 small logo’s for the headphone and usb logo’s) made hope to get them soon to start with the paint job

But in the main while I can focus on the cables.

Hope to find a guide for the cable mods I need to do of a Mac Pro 1.1 because I saw a few of the G5’s but not yet of the Mac Pro 1.1 I need maybe one of you know it?

But for now this was my progress update for today hope you all enjoy this build progress so far till the next update
 
Today’s progress update:

I prepped all the items that where getting there first 2 coats of primer
5CFCBA15-D234-4609-85EE-6B40147EC57C.jpeg

522A03F3-AB8C-4C31-A532-8A8396DBA15F.jpeg

21AF74F9-163B-4843-9B86-5EEDC5C34C2D.jpeg

99617A62-2722-4EB5-8FA0-0083BA58A388.jpeg

Sadly the 2 cans of white primer I bought Where not enuf for all the items luckily I had to gray primer cans left from a old project so used those to finish it.

Letting it dry for the night and tomorrow it’s going to be light sanding to remove imperfections after that straight to first few coats of mat black and I know was planning on paint it space gray but could not find the right colors so decide to paint it mat black with high glossy black for the logo’s

Look out for tomorrow’s update
 
Status
Not open for further replies.
Back
Top