Contribute
Register

Mac G5 ATX Conversion - Noob Attempt 2

Status
Not open for further replies.
Sorry for the delay guys, driving lessons, work and college have basically taken over! But I've managed to escape for weekend so I can update everyone with how the G5 is going. Once again I think I have a new hardware list, but I'll post that shortly. The main update is the fact I've just bought a G5 front panel conversion kit from The Laser Hive! It cost me £46 including shipping and should be here next week sometime.

I'll update everyone once its arrived! :)

Jack

EDIT:

Heres the new hardware list:

Intel Pentium G3258 CPU
EVGA Nvidia GTX 960 OC GPU
HypeX Fury 8GB RAM
MSI Z97 Gaming 3 Mb
600w Corsair PSU
 
Last edited:
Sorry for the delay guys, driving lessons, work and college have basically taken over! But I've managed to escape for weekend so I can update everyone with how the G5 is going. Once again I think I have a new hardware list, but I'll post that shortly. The main update is the fact I've just bought a G5 front panel conversion kit from The Laser Hive! It cost me £46 including shipping and should be here next week sometime.

I'll update everyone once its arrived! :)

Jack

EDIT:

Heres the new hardware list:

Intel Pentium G3258 CPU
EVGA Nvidia GTX 960 OC GPU
HypeX Fury 8GB RAM
MSI Z97 Gaming 3 Mb
600w Corsair PSU

You might be able vets pending a little on the motherboard there for the G3258. Although I can see your rationale for doing so.
 
I've only chosen that CPU as a long term temporary measure, it will be swapped out for an i5 a few months later. But as its only around £50, and I'm on a strict budget it does the job for what I want. Plus its unlocked.

Not sure if I mentioned, but the machine will be dual booted between OSX and Windows. The Windows side being used for gaming etc and the Mac side for everything else - Just like my current iMac. :)
 
So the front panel arrived today!

I got home from work and immediately set to work...

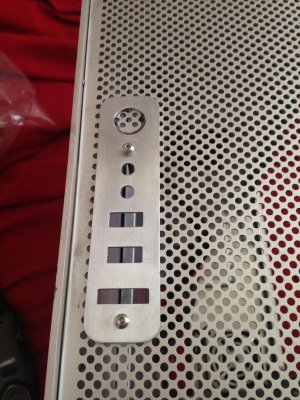
IMG_3454.jpg
Heres the front panel placed over the case and marked out to be cut.

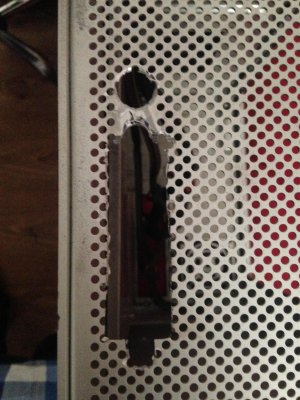
IMG_3455.jpg
Heres the beginning of the cutting process, much more sanding and filing needed.

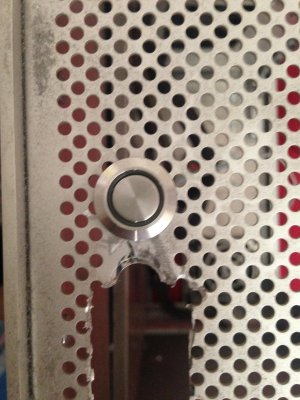
IMG_3456.jpg
Heres checking that the switch fits nicely into the hole, without being too tight.

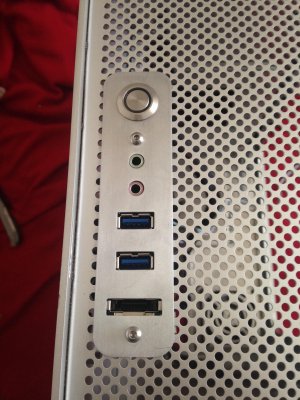
IMG_3457.jpg
And heres the final thing! In this picture the back supports hadn't been tightened completely, hence the ports being askew - they're fully tightened now though.

IMG_3458.jpg
I'm a little unhappy with how tight the cables, they're almost at 90 degree angles putting a lot of stress on the cables. To overcome this, I probably should've mounted the front panel a little further to the right of the case (when looking at the front), relieving the stress.


Now, all thats left to do to the case is sort the hard drive mounts, but thats yet to come!

Jack :)
 
Hey Jack!

Thanks for the great explanation and clear pictures. Keep it up.

I will start creating my own mod by today. Though I think I have a pre-2005 model with the right I/O panel (not entirely sure), I do have a question about it: can I (temporary) get my PC to work if all parts are put in the right place, without the I/O panel attached? (with a temporary power button or screwdriver?) Note that I already have a full running hackintosh in a boring case. That's why I'd like to build it into the G5 one. I'd love to get the panel working but I need some advice from people around here.

Forgive me, I am a software geek but handling hardware is quite new to me. :p

Edit: I just made some pictures of the I/O panel. If you want me to make a different thread, that's okay for sure. Though I thought that posting it here would be okay since it's about the same subject.
 

Attachments

  • IMG_1052.JPG
    IMG_1052.JPG
    340.1 KB · Views: 176
  • IMG_1046.JPG
    IMG_1046.JPG
    361.3 KB · Views: 177
  • IMG_1045.JPG
    IMG_1045.JPG
    334 KB · Views: 192
Last edited:
Hey Jack!

Thanks for the great explanation and clear pictures. Keep it up.

Thanks man! I appreciate it!:)

can I (temporary) get my PC to work if all parts are put in the right place, without the I/O panel attached? (with a temporary power button or screwdriver?)

If by this you mean building the components into the case, and then just attaching a power button to the correct pins on the mobo then sure! I did this for a long time before I bought the front panel. And sure, a screwdriver will work too, just be careful not to short anything else in the process ;)

Also, the G5 modding community is huge! There are some pretty standard ways of doing things with the G5's, but some members of the community come up with some really creative and great ideas to use the gorgeous G5 effectively! For my G5 mod I've tried to follow convention with how I'm doing stuff - but my previous one, I went for broke and just did everything the 'ghetto' way :lol:. Feel free to reply back to this or start a new thread and I'm more than happy to give advice :)

Good luck man!
 
Hi again all,

Could I get some ideas from other members of how to mount the hard drives? Please bare in mind that I live in the UK, so shipping from the US or Europe may be a bit costly for me!

Thanks all!

Jack
 
Thank you :)

Got both cases empty and made the aluminium background from another PC case to fit the motherboard.

As for the HDD's, you should check Youtube and pictures of others. I assume you have seen it already, but this: http://build-its.blogspot.nl/2011/04/how-to-fit-your-pc-in-power-mac-g5-case.html was useful for me. Not that my case is finished but this really helped me getting an idea of how I want to work out certain stuff.

By the way, there is a power button on my motherboard. Is this used to start my PC when no power button is attached?

Sorry if my English isn't the best. ;)
 
Thank you :)

Got both cases empty and made the aluminium background from another PC case to fit the motherboard.

Thats awesome! Good job :)

As for the HDD's, you should check Youtube and pictures of others. I assume you have seen it already, but this: http://build-its.blogspot.nl/2011/04/how-to-fit-your-pc-in-power-mac-g5-case.html was useful for me. Not that my case is finished but this really helped me getting an idea of how I want to work out certain stuff.

I haven't seen that page for a while, but its a really good guide to get a G5 build together! Unfortunately I no longer have the original G5 HDD rack, but I could pick one up from eBay I guess?

By the way, there is a power button on my motherboard. Is this used to start my PC when no power button is attached?

Yeah! Thats a much better way of switching on your PC than using a screwdriver!

Sorry if my English isn't the best. ;)

I didn't even notice! Your English seems great, dont worry ;)!

Good luck!

Jack
 
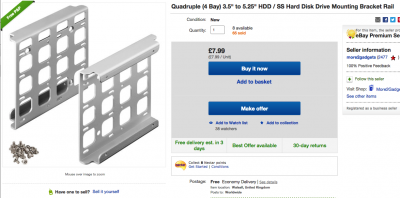
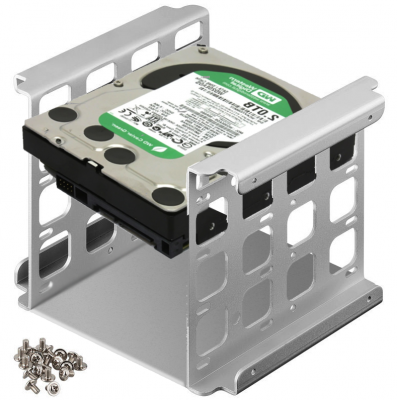
So I had a scour around eBay and came across this:

Screen Shot 2015-05-02 at 19.15.20.png
Its a 2 metal brackets that are designed to fit into 3 x 5.25 bays (dvd drive sized) and adapt it to fit 4 x 3.5 bays (3.5" HDD size).

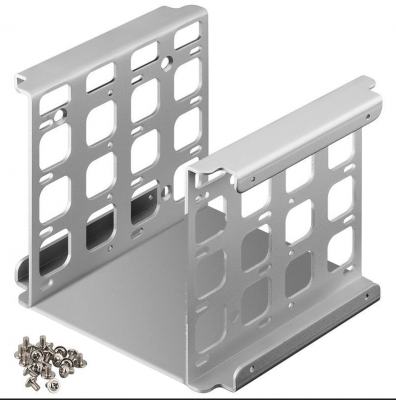
To adapt this into a more sturdy HDD rack for my G5, I'd fit a sheet of aluminium across the bottom, and bolt to the underside of the upper shelf. Here a mocked up Photoshop image:


Screen Shot 2015-05-02 at 19.14.22.png

Excuse how crude the image is, it took me about 2 minutes :lol:. Anywho, thats kinda what it'd look like... and to clear up any confusion, the drives would mount into that like so:

Screen Shot 2015-05-02 at 19.23.55.png

Again, thats another very crudely mocked up image...

I'll probably use this idea unless anybody has any better suggestions :)

Jack
 
Status
Not open for further replies.
Back
Top