
- Joined
- Sep 2, 2011
- Messages
- 211
- Motherboard
- GA-Z170N-Gaming 5
- CPU
- I7-6700K
- Graphics
- EVGA GTX 980 Ti FTW
Loginfailed's Build - P8Z77-M / 3770K / 650 Ti
Components
Silverstone Temjin TJ08B-E Micro ATX Case
http://www.amazon.com/dp/B005DDCDH2
http://www.newegg.com/Product/Product.aspx?Item=N82E16811163182
Corsair AX750 ATX Power Supply
http://www.amazon.com/dp/B003PJ6QWE
http://www.newegg.com/Product/Product.aspx?Item=N82E16817139016
ASUS P8Z77-M Micro ATX Motherboard
http://www.amazon.com/dp/B007RIFKS0
http://www.newegg.com/Product/Product.aspx?Item=N82E16813131832
Intel Core i7-3770k Quad-Core Processor
http://www.amazon.com/dp/B007SZ0EOW
http://www.newegg.com/Product/Product.aspx?Item=N82E16819116501
Cooler Master Hyper 212 EVO CPU Cooler
http://www.amazon.com/dp/B005O65JXI
http://www.newegg.com/Product/Product.aspx?Item=N82E16835103099
Corsair Vengeance CML16GX3M2A1600C10 16GB 8x2 Low-Profile Memory
http://www.amazon.com/dp/B007TG8QRW
http://www.newegg.com/Product/Product.aspx?Item=N82E16820233280
ZOTAC GeForce GTX 650 Ti 2GB Graphics Card
http://www.amazon.com/dp/B009L901NW
http://www.newegg.com/Product/Product.aspx?Item=N82E16814500277
Sandisk Extreme SDSSDX-240G-G25 240 GB SSD (system drive)
http://www.amazon.com/dp/B006EKJ8UI
http://www.newegg.com/Product/Product.aspx?Item=9SIA2W00YW3731
Seagate ST4000DM000 4TB Hard Drive (storage)
http://www.amazon.com/dp/B00B99JU4S
http://www.newegg.com/Product/Product.aspx?Item=N82E16822178338
Sony Optiarc AD-7280S-0B DVD-RW Optical Drive
http://www.amazon.com/dp/B0057FRTPW
http://www.newegg.com/Product/Product.aspx?Item=N82E16827118067
Vantec MRK-401ST-BK EZ Swap 4 SATA Hard Drive Rack
http://www.amazon.com/dp/B003DVTWQ6
http://www.newegg.com/Product/Product.aspx?Item=N82E16817986001
Zalman ZM-F3 120mm Quiet Case Fan (exhaust)
http://www.amazon.com/dp/B000FZ33AE
http://www.newegg.com/Product/Product.aspx?Item=N82E16835118008
Asus VE278Q 27" HD LED Monitor
http://www.amazon.com/dp/B0043T34RK
http://www.newegg.com/Product/Product.aspx?Item=9SIA25V0RD7416
Logitech 920-003472 Wireless Solar Keyboard K750 for Mac
http://www.amazon.com/dp/B005L38VRU
http://www.newegg.com/Product/Product.aspx?Item=N82E16823126274
Logitech Wireless Performance Mouse MX
http://www.amazon.com/dp/B002HWRJBM
http://www.newegg.com/Product/Product.aspx?Item=N82E16826104321
Software
Apple OS X Mavericks 10.9.1
https://ithttp://www.apple.com/osx/
Unibeast 3.0.1
http://www.tonymacx86.com/374-unibeast-install-os-x-mavericks-any-supported-intel-based-pc.html
Multibeast Mountain Lion 6.0.1
http://www.tonymacx86.com/395-multibeast-6-0-update.html
MaciASL
http://www.tonymacx86.com/dsdt/83565-native-dsdt-aml-ide-compiler-maciasl-open-beta.html
ShowAllFiles
http://tonymacx86.blogspot.com/2009/12/great-osx86-community-software.html
Xcode
https://developer.apple.com/xcode/
ssdtPRGen
http://www.tonymacx86.com/ssdt/86906-ssdt-generation-script-ivybridge-pm.html
Kext Wizard
http://www.insanelymac.com/forum/topic/253395-kext-wizard-easy-to-use-kext-installer-and-more/
Chameleon Wizard
http://www.insanelymac.com/forum/topic/257464-chameleon-wizard-utility-for-chameleon/
AppleIntelCPUPowerManagementInfo.kext
http://www.tonymacx86.com/ssdt/91551-appleintelcpupowermanagementinfo-kext-msrdumper-successor.html
IORegistryExplorer
http://www.tonymacx86.com/audio/58368-guide-how-make-copy-ioreg.html
Comments
I started monkeying around with this stuff back when the Intel Atom ITX boards were released (10.5.2?) and since then I have built about a half a dozen different versions of OSX86 monstrosities. This particular build has so far been the most completely functional that I've managed to put together.
With that said, I believe I'm just now barely starting to figure this stuff out. If not for the help this forum and everyone participating, I would never have had the slightest chance of making these things run correctly. So thanks to everyone here for documenting and sharing your work!
The purpose of the machine is some video editing with iMovie, ripping my DVDs, converting the files to Apple TV format, hosting my iTunes library to 4 Apple TVs, some gaming and other random shenanigans. It serves all of these functions with ease.
Mavericks Installation Guide
Ok, so here is a guide. Basically it is an assembly of different other guides that others on this forum have created. I will try to make it as basic as possible while including the steps needed in the order I did them. I realize there is no perfect guide that will produce perfect repeatable results for every situation and hardware combination. But this has been my process.
Step #1
Create your Unibeast thumb drive.
Step #2
Flash Asus P8Z77-M UEFI bios with a patched bios.
- Must use BIOS Flashback feature. Not the utility from within bios.
- I am using patched version of bios 1806.
- Only need power supply and motherboard
- No CPU, RAM, HDD needed at this time.
- If machine already assembled, thats okay too.
- BIOS Flashback instructions page 1-18: http://dlcdnet.asus.com/pub/ASUS/mb/LGA1155/P8Z77-M/E7075_P8Z77-M.pdf
- Patched bios repo courtesy of samisnake: http://biosrepo.wordpress.com/asus/z77/
Step #3
UEFI Settings
- With machine assembled, boot while tapping delete key to enter bios setup
- When bios reached, click advanced button
- Select "Load optimized defaults"
- You can change other settings if you know what you're doing, but "optimized defaults" works fine.
- I made a few other changes for my setup
- Under "Boot" tab - Set POST delay time to "0" (for faster boot time)
- Under "Boot" tab - Change Setup Mode to "Advanced" (to eliminate needing to click "advanced" each time entering the UEFI)
- If you have a card reader like I do, you will likely see the following when you boot the machine:
Code:
EBIOS read error: Error 0x31
  Block 0x0 Sectors 0
EBIOS read error: Error 0x31
  Block 0x0 Sectors 0
EBIOS read error: Error 0x31
  Block 0x0 Sectors 0
EBIOS read error: Error 0x31
Block 0x0 Sectors 0- Under "Boot" - change "Option ROM Messages" to "Keep Current"
- Under "Advanced / USB Configuration / Mass Storage Devices" - change each one to "CDROM"
- Insert your Unibeast thumb drive and press F10 to save and reboot.
>http://www.tonymacx86.com/customization/54733-apple-internal-sd-card-slot-working.html#post734780<
Step #4
Install Mavericks
- Follow this guide starting at step 4: http://www.tonymacx86.com/374-unibeast-install-os-x-mavericks-any-supported-intel-based-pc.html
Step #5
DSDT Extraction and patching
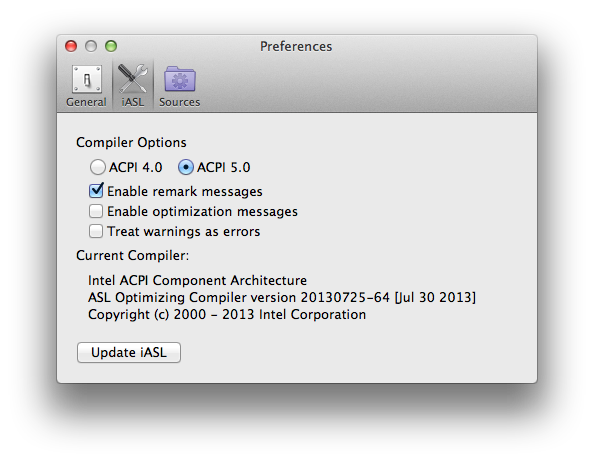
- Download MaciASL (see software section above)
- Open MaciASL. It will automatically extract your system DSDT
- Open MaciASL preferences
- Select iASL tab and click the ACPI 5.0 circle
- Click the Sources icon
- Click the plus sign
- For name, type PJALM Asus
- For URL, type "http://pjalm.info/repos/asus"
- Click plus sign again
- For name, type Toleda HDMI
- For URL, type "https://raw.github.com/toleda/audio_hdmi_uefi/master"
- When done it should look something like this:

- Close MaciASL completely and re-open
- Now click the purple "Patch" button
- On the left, select PJALM Asus and then click "P8Z77-M"
- Wait a couple seconds then click "Apply"
- Wait a couple seconds then click "Close"
- Click "Compile" button
- Wait a couple seconds then click "Patch" button again
- From the left select Toleda and then click "UEFI-Clean Compile"
- Wait a couple seconds then click "Apply"
- Wait a couple seconds then click "Close"
- Click "Compile" button
- Wait a couple seconds then click "Patch" button again
- From the left select Toleda and then click "Desktop-AMD/Nvidia-A1"
- Wait a couple seconds then click "Apply"
- Wait a couple seconds then click "Close"
- Click "Compile" button
- At the top menu bar, click File > Save As
- For file format, select "ACPI Machine Language Binary"
- Name it DSDT.aml (add .aml manually) "Where" drop down should be "Desktop"
- It should look something like this:
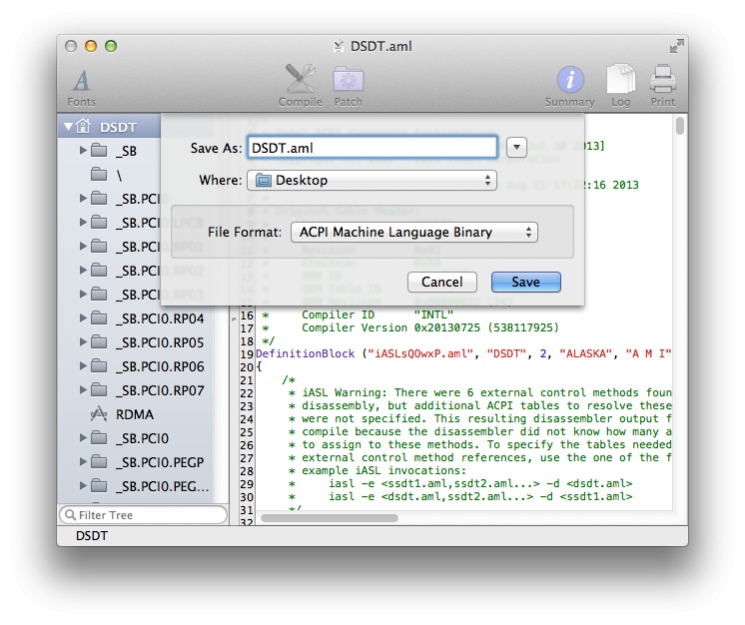
- Click "Save"
- Close MaciASL
Step #6
Run Multibeast
- Be sure that the DSDT.aml created earlier is on the desktop
- Use this guide, starting at Step 5: http://www.tonymacx86.com/374-unibeast-install-os-x-mavericks-any-supported-intel-based-pc.html
- Chose options in the following screen shot:
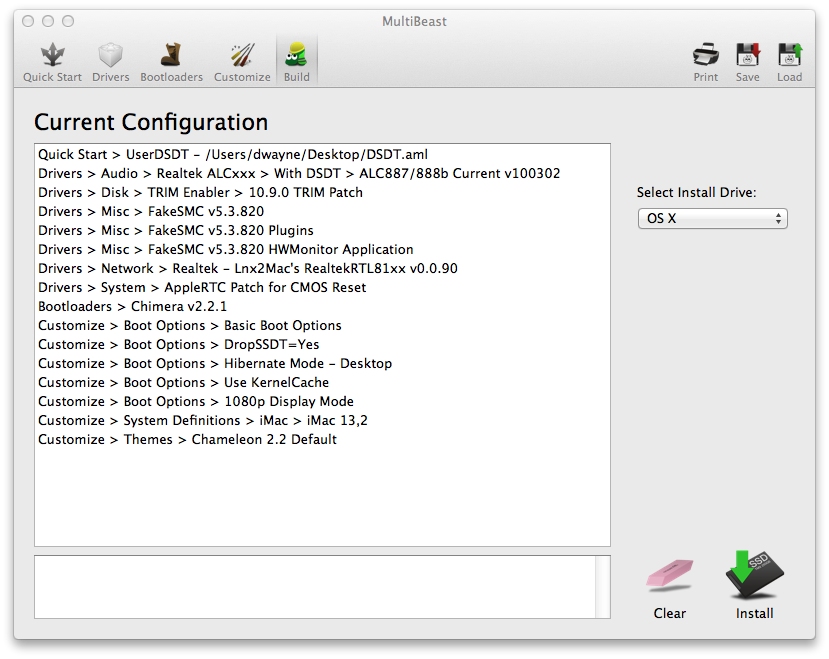
- Close Multibeast when it is finished.
Step #7
Create SSDT for CPU power management
- Guide is here: >http://www.tonymacx86.com/ssdt/86906-ssdt-generation-script-ivybridge-pm.html<
- I did not overclock so these are the steps I followed
- Run installer twice
- The second time, it will ask to copy ssdt_pr.aml to /Extra/ssdt.aml
- Type "y" and press return
- Close terminal window
- Navigate to /Extra folder and rename ssdt_pr.aml to ssdt.aml
Step #8
Edit IOPlatformPluginFamily.kext
- Ivybridge CPU power management only gives 2 steps with the iMac 13,2 system definition
- Mac Mini 6,2 has the best CPU power management but is causes various graphics problems with the 650Ti
- What I did is copy the ring table info from Mac Mini 6,2 to the iMac 13,2 system definition
- Navigate to System/Library/Extensions
- Locate IOPlatformPluginFamily.kext and copy it to the desktop
- Open ShowAllFiles application
- Click the "SHOW" button
- Right click on the IOPlatformPluginFamily.kext on the desktop
- Select "Show Package Contents"
- In the resulting Finder window, navigate to /Plugins
- Right click on X86PlatformPlugin.kext and select "Show Package Contents"
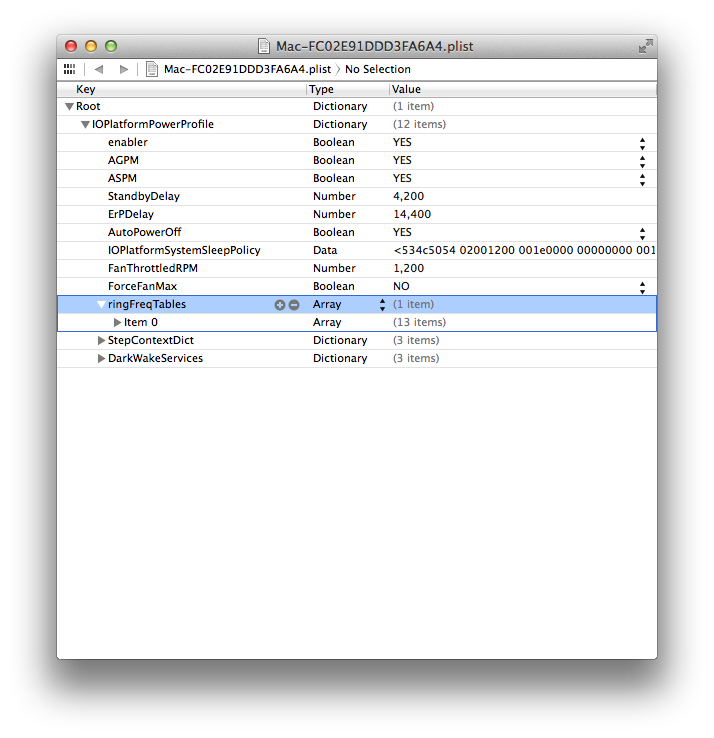
- In the resulting Finder window, navigate to /Resources/Mac-FC02E91DDD3FA6A4.plist (iMac 13,2)
- Right click on Mac-FC02E91DDD3FA6A4.plist and select Open With > Xcode
- Move the window to the side and then right click Mac-F65AE981FFA204ED.plist (Mac Mini 6,2) Open with > Xcode
- In the Mac-F65AE981FFA204ED.plist Xcode window, right click the ringFreqTables entry and select copy
- In the Mac-FC02E91DDD3FA6A4.plist Xcode window, paste the ringFreqTables line
- The Mac-FC02E91DDD3FA6A4.plist Xcode window should look like this:
- Select File > Save
- Close Xcode
Step #9
Edit AppleGraphicsPowerManagement.kext
- Navigate to System/Library/Extensions
- Locate AppleGraphicsPowerManagement.kext and copy it to the desktop
- Right click on the AppleGraphicsPowerManagement.kext on the desktop
- Selct "Show Package Contents"
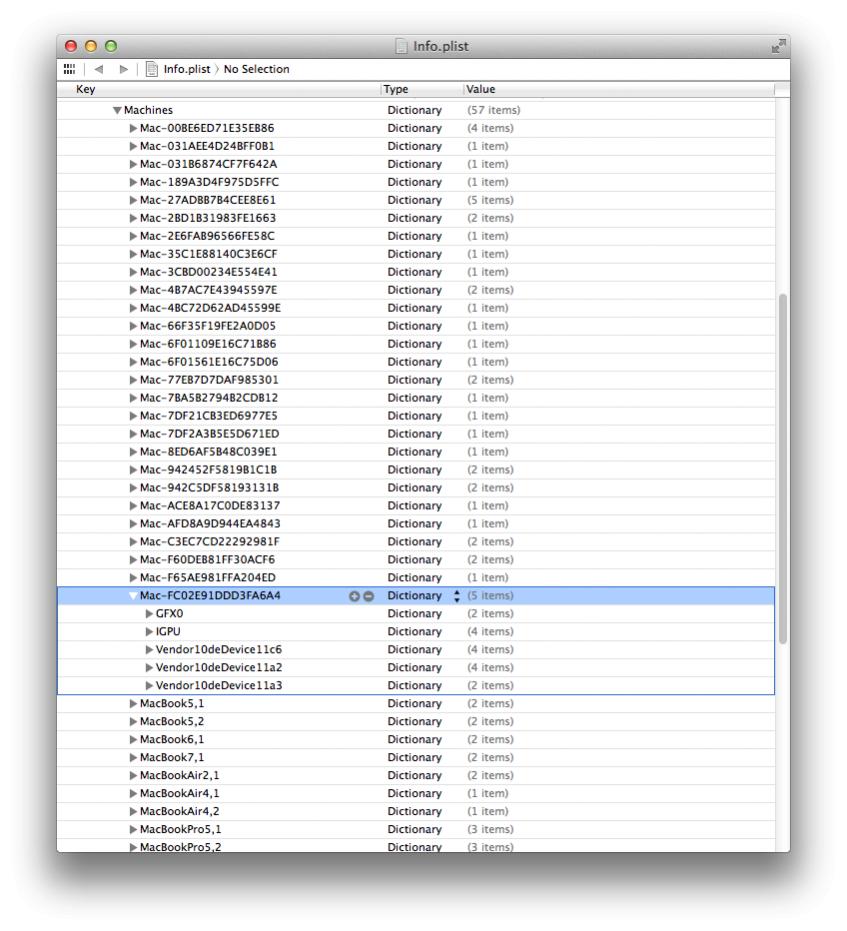
- In the resulting Finder window, navigate to Contents/info.plist
- Right click info.plist and select "Open With"
- Select Xcode
- Navigate to IOKitPersonalities/AGPM/Machines
- Under Mac-FC02E91DDD3FA6A4 (iMac 13,2), Vendor10deDevice0fe0 one of the closest matches to the 650ti
- Rename Vendor10deDevice0fe0 to match information in System Information
- My graphics card in System Information: Vendor 10de | Device 11c6:
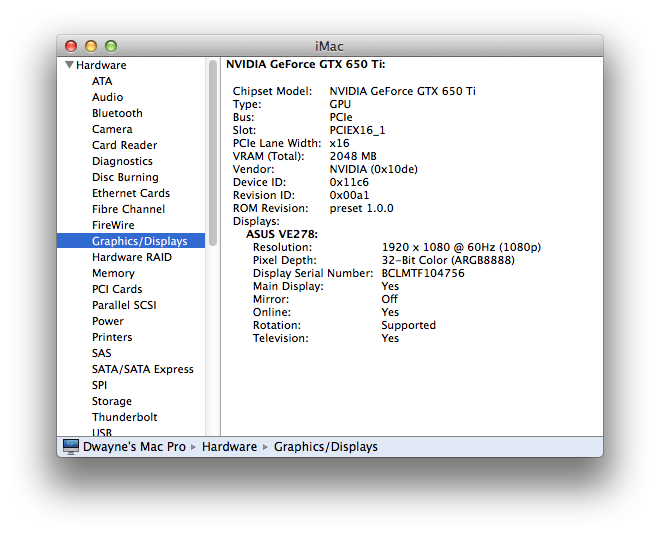
- So I rename it to Vendor10deDevice11c6
- My AppleGraphicsPowerManagement.kext now looks like this:
- Click File > Save and close Xcode
Step #10
Install AppleIntelCPUPowerManagementInfo.kext, edited AppleGraphicsPowerManagement.kext and IOPlatformPluginFamily.kext
- Open Kext Wizard
- Click Installation tab
- Drag AppleIntelCPUPowerManagementInfo.kext, edited AppleGraphicsPowerManagement and IOPlatformPluginFamily.kext into the box
- Click Install
- Click Maintenance Tab
- Check the System/Library/Extensions box
- Click Execute
- Close Kext Wizard when finished
- You can also now open ShowAllFiles and select HIDE
- Restart machine
Step #11
Verify Ivy Bridge Native Power Management
- Open IORegistryExplorer
- Look for X86PlatformPlugin
- If it is there, Ivy Bridge power management should be working

- Close IORegistryExplorer
Step #12
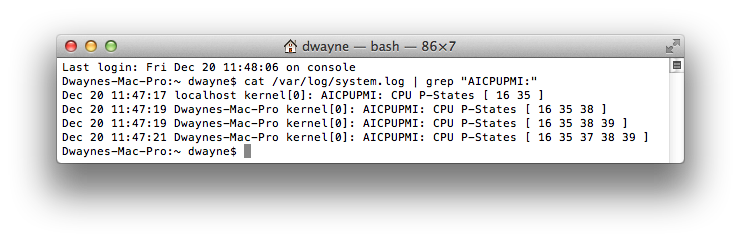
Verify Intel Speed Step is working
- Guide is here: >http://www.tonymacx86.com/ssdt/91551-appleintelcpupowermanagementinfo-kext-msrdumper-successor.html<
- Terminal output should look something like this:
Step #13
Sleep and wake
- Navigate to /Extra
- Open org.chameleon.Boot.plist with Xcode
- Add a new line with this entry: Kernel Flags / darwake=10
- Should look like this:

- File>Save and close Xcode
- Open System Preferences > Energy Saver
- Uncheck all boxes except for "Wake for Etheret network access
- Should look something like this:

Step #14
Fixing iMessage
- Using this guide, most likely iMessage will not be working at this point.
- This is the process to fix iMessage.
- Open Chameleon Wizard
- Click on the Modules tab
- Check the box that says FileNVRAM.dylib

- Click Update
- Click the Install tab
- Click the Download button (just below the DSDT button)
- In the Chameleon revision drop down box, select 2283

- Click the Install button at the bottom right.
- Close Chameleon Wizard when finished
- Restart machine.
- iMessage should now be working.
Final thoughts
Sleep / Wake
Working
Airplay
Working
AirDrop
Not tested
Bluetooth
Not tested
USB3
Not tested
Audio
Working
I use HDMI out for my audio (650Ti>ASUS VE278>Insignia NS-PCS41 speakers). OS X does not provide any volume controls via HDMI. Base volume is set at the monitor and I use the knob located on the right speaker to adjust volume.
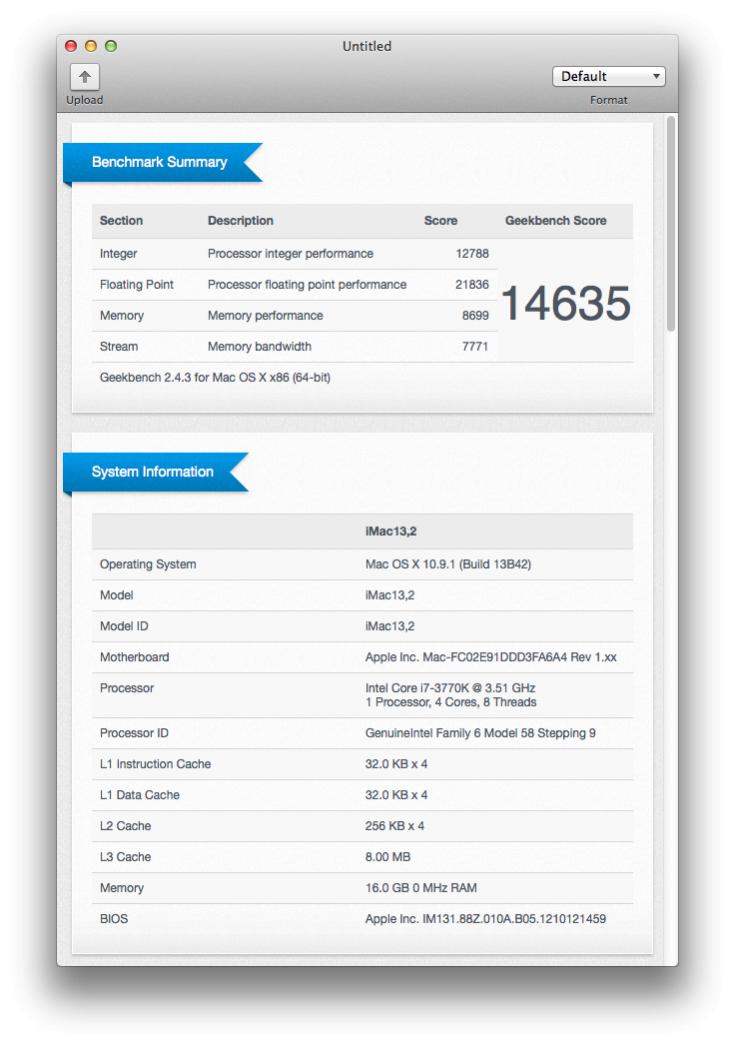
Geekbench
Hopefully the guide is mostly complete. I may have missed a step or made some spelling or formatting errors. Feel free to point anything out that looks fishy. Or ask questions if you have any.
Loginfailed
12/20/2013 Edit: Updated guide to include Mavericks and the latest versions of Unibeast and Multibeast. Added iMessage fix. Updated hardware information. Fixed some spelling errors. Updated some of the pictures.
01/09/2014 Edit: Regarding the EBIOS READ ERROR referenced in step #3. I recently replaced my generic card reader with an original Apple iMac internal card reader. See the post below:
>http://www.tonymacx86.com/customization/54733-apple-internal-sd-card-slot-working.html#post734780<
Last edited by a moderator:
")
