- Joined
- Jan 4, 2017
- Messages
- 43
- Motherboard
- Asus Strix Z370-F
- CPU
- i7-8700k
- Graphics
- RX 570
- Mac
- Classic Mac
- Mobile Phone
Components
Asus Strix Z370-F ATX Motherboard
https://www.amazon.com/dp/B075RHWLF2/?tag=tonymacx86com-20
Intel i7-8700K Processor
https://www.amazon.com/dp/B07598VZR8/?tag=tonymacx86com-20
Corsair Carbide Clear 400C White Mid-Tower ATX Case
https://www.amazon.com/dp/B01F97W9ZM/?tag=tonymacx86com-20
Noctua NH-U14S Processor Cooler
https://www.amazon.com/dp/B00C9FLSLY/?tag=tonymacx86com-20
Corsair Vengeance LED 32GB (2 x 16GB) DDR4 DRAM 3000MHz Memory
https://www.amazon.com/dp/B01HKF3ZPY/?tag=tonymacx86com-20
Corsair Vengeance LED 16GB (2 x 8GB) DDR4 DRAM 3000MHz Memory
https://www.amazon.com/dp/B01HKF4ZUI/?tag=tonymacx86com-20
Noctua 120mm NF-S12A PWM Fan
https://www.amazon.com/dp/B00BEZZBFO/?tag=tonymacx86com-20
Noctua 140mm NF-A14 PWM Fan
https://www.amazon.com/dp/B00CP6QLY6/?tag=tonymacx86com-20
EVGA Supernova GS 550 550-Watt Modular Power Supply
https://www.amazon.com/dp/B00UVN20UO/?tag=tonymacx86com-20
MSI GAMING Radeon RX 570 8GB
https://www.amazon.com/dp/B076Y93L8F/?tag=tonymacx86com-20
2x LG 27UD58P-B 4k 27" Monitors
https://www.amazon.com/gp/product/B0719FQ3DD/?tag=tonymacx86com-20
Samsung 500MB 850 EVO 2.5" SSD (For macOS)
https://www.amazon.com/dp/B00OBRE5UE/?tag=tonymacx86com-20
Samsung 250GB 960 m.2 NVME SSD (For Windows)
https://www.amazon.com/dp/B01LYFKX41/?tag=tonymacx86com-20
Fenvi FV-T919 802.11AC A/B/G/N/AC BT 4.0 Desktop Wifi Card
https://www.amazon.com/dp/B01687RNFS/?tag=tonymacx86com-20
Comments
I used this build to replace a (real) 2017 27" 7600k iMac when a kid's computer died at home and we needed to shuffle things around. Overall I'm very satisfied and its the best hackintosh build experience I've ever had. All USB ports (internal and external) fit within the 15 port limit, which is awesome.
This guide started out with a Nvidia GTX 1070 Ti as the graphics card, but I later switched to a RX 570. The 1070 Ti is a better card, but I went with the RX 570 because it works out-of-box, without having to track the Nvidia web drivers after macOS patches. So long as you use imac14,2, the RX 570 works out of box, without RadeonDeinit or WhateverGreen.
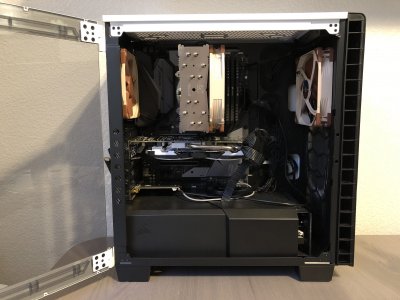
The Corsair fans that ship with this case aren't the worst, but they're louder than most. I swapped them out with Noctuas. Probably not worth the $40, but they are much quieter.
Hardware Installation
The only weird bit I ran into was the RAM installation. The manual for the board advises installing the first pair of modules in slots 1 & 3 and installing any second pair in 0 & 2. I found though that macOS can't see the sticks in 1 & 3 unless the memory is detailed in config.plist. You can get around the issue by only using 0 & 2 if you have two sticks, but the memory config is needed if you have four.
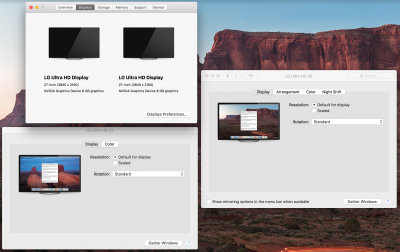
Also, to get 4k @ 60hz, I used displayport for both of the monitors.
BIOS / UEFI Settings
OS Install
What Works
What Doesn't / Might Not Work
Benchmarks
Edit 12/19/17: Added info about NvidiaGraphicsFixup.
Edit 12/19/17: Updated for Multibeast 10.2.0 and added FileVault2 setup instructions.
Edit 12/23/17: Added fixing audio after sleep with CodecCommander.kext.
Edit 12/29/17: Added a workaround for memory detection issues with slots 1 & 3.
Edit 01/29/18: Replaced the 1070 Ti with a RX 570, upgraded RAM, and replaced case fans.
Edit 04/29/18: Updated for 10.13.4: Switch to iMac 14,2 and use onboard audio.
Edit 05/01/18: Updated onboard audio instructions and removed Filevault2. Filevault2 likely still works, but I don't use it anymore.
Asus Strix Z370-F ATX Motherboard
https://www.amazon.com/dp/B075RHWLF2/?tag=tonymacx86com-20
Intel i7-8700K Processor
https://www.amazon.com/dp/B07598VZR8/?tag=tonymacx86com-20
Corsair Carbide Clear 400C White Mid-Tower ATX Case
https://www.amazon.com/dp/B01F97W9ZM/?tag=tonymacx86com-20
Noctua NH-U14S Processor Cooler
https://www.amazon.com/dp/B00C9FLSLY/?tag=tonymacx86com-20
Corsair Vengeance LED 32GB (2 x 16GB) DDR4 DRAM 3000MHz Memory
https://www.amazon.com/dp/B01HKF3ZPY/?tag=tonymacx86com-20
Corsair Vengeance LED 16GB (2 x 8GB) DDR4 DRAM 3000MHz Memory
https://www.amazon.com/dp/B01HKF4ZUI/?tag=tonymacx86com-20
Noctua 120mm NF-S12A PWM Fan
https://www.amazon.com/dp/B00BEZZBFO/?tag=tonymacx86com-20
Noctua 140mm NF-A14 PWM Fan
https://www.amazon.com/dp/B00CP6QLY6/?tag=tonymacx86com-20
EVGA Supernova GS 550 550-Watt Modular Power Supply
https://www.amazon.com/dp/B00UVN20UO/?tag=tonymacx86com-20
MSI GAMING Radeon RX 570 8GB
https://www.amazon.com/dp/B076Y93L8F/?tag=tonymacx86com-20
2x LG 27UD58P-B 4k 27" Monitors
https://www.amazon.com/gp/product/B0719FQ3DD/?tag=tonymacx86com-20
Samsung 500MB 850 EVO 2.5" SSD (For macOS)
https://www.amazon.com/dp/B00OBRE5UE/?tag=tonymacx86com-20
Samsung 250GB 960 m.2 NVME SSD (For Windows)
https://www.amazon.com/dp/B01LYFKX41/?tag=tonymacx86com-20
Fenvi FV-T919 802.11AC A/B/G/N/AC BT 4.0 Desktop Wifi Card
https://www.amazon.com/dp/B01687RNFS/?tag=tonymacx86com-20
Comments
I used this build to replace a (real) 2017 27" 7600k iMac when a kid's computer died at home and we needed to shuffle things around. Overall I'm very satisfied and its the best hackintosh build experience I've ever had. All USB ports (internal and external) fit within the 15 port limit, which is awesome.
This guide started out with a Nvidia GTX 1070 Ti as the graphics card, but I later switched to a RX 570. The 1070 Ti is a better card, but I went with the RX 570 because it works out-of-box, without having to track the Nvidia web drivers after macOS patches. So long as you use imac14,2, the RX 570 works out of box, without RadeonDeinit or WhateverGreen.
The Corsair fans that ship with this case aren't the worst, but they're louder than most. I swapped them out with Noctuas. Probably not worth the $40, but they are much quieter.
Hardware Installation
The only weird bit I ran into was the RAM installation. The manual for the board advises installing the first pair of modules in slots 1 & 3 and installing any second pair in 0 & 2. I found though that macOS can't see the sticks in 1 & 3 unless the memory is detailed in config.plist. You can get around the issue by only using 0 & 2 if you have two sticks, but the memory config is needed if you have four.
Also, to get 4k @ 60hz, I used displayport for both of the monitors.
BIOS / UEFI Settings
- Advanced/Intel Virtualization Technology - Enabled
- Advanced/System Agent (SA) Configuration/VT-d - Disabled
- Advanced/System Agent (SA) Configuration/Graphics Configuration/Primary Display - PCIE
- Advanced/System Agent (SA) Configuration/Graphics Configuration/iGPU Multi-Monitor - Disabled
- Advanced/USB Configuration/Legacy USB Support - Enabled
- Boot/CSM (Compatibility Support Module)/ Launch CSM - Disabled
- Boot/Secure Boot/ OS Type - Other OS
- AI Tweaker - Overclocking, an exercise for the reader
OS Install
- Follow the Tonymacx86 Installation guide to get the OS installed via the usual UniBeast-created USB installer thumb drive. No special steps required.
- Run MultiBeast post install, with -
- Quick Start > UEFI Boot Mode
- Drivers > Audio > 100 / 200 / 300 Series Audio Support
- Drivers > Audio > 200 / Z370 Series / X299 Audio Device ID Patch
- Drivers > Misc > FakeSMC Plugins
- Drivers > Misc > FakeSMC HWMonitor Application
- Drivers > Network > Intel > IntelMausiEthernet (latest)
- Drivers > USB > Increase Max Port Limit 200 Series (you'll remove this later)
- Bootloaders > Clover UEFI Boot Mode + Emulated NVRAM
- Customization > System Definitions > iMac > iMac 14,2
- Build - confirm the above and Install
- Reboot
- Run MultiBeast again, with -
- Drivers > Audio > 200 / Z370 Series / X299 Audio Device ID Patch
- Reboot
- Disable hibernation by running this at the command line (Terminal): sudo pmset -a hibernatemode 0
- If you have four sticks of RAM and macOS is only seeing two of them, you will need to list them manually in your config.plist. I used Clover Configurator to do that, but YMMV - Clover Configurator can sometimes mess up config.plists.
- Roll the dice and use Clover Configurator to create a config like the attached "clover-memory.png".
- OR add a config via another editor, like the attached "config-memory.plist".
- Fix iMessage using the iMessage guide under Guides. I had to:
- Generate a new Board Serial
- Copy Serial Number to Board Serial Number and add five digits (I used 12345)
- Generate a UUID for SMUUID
- Replace the USB port limit patch with a DSDT. I had no issues while running the patch, but created the DSDT just in case.
- Download the latest release of Rehabman's USB-Inject-All.
- Copy USBInjectAll.kext to your desktop and install via Kextbeast.
- Mount your EFI partition.
- Install the attached SSDT-USB.aml in EFI/CLOVER/ACPI/patched within the EFI partition.
- Create a backup copy of your config.plist
- Edit config.plist with an editor and remove the 27 port limit patch. This can be done with a text editor, clover configurator, etc. Just delete the appropriate dict.
- Reboot.
What Works
- Airdrop
- Audio
- Bluetooth
- Ethernet
- HWSensors
- iMessage
- Sleep
- USB (all ports, including USB type C)
- Wifi
What Doesn't / Might Not Work
- On-board video. Since I had the RX 570, I didn't try to get on-board video working. Other guides for this processor say it does work.
- RAM slots 1 & 3. See notes above - using slots 1 & 3 requires a config.plist hack.
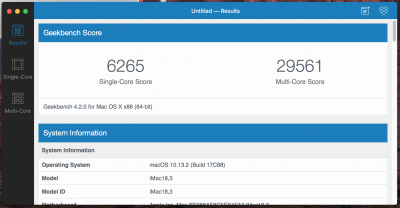
Benchmarks
Edit 12/19/17: Added info about NvidiaGraphicsFixup.
Edit 12/19/17: Updated for Multibeast 10.2.0 and added FileVault2 setup instructions.
Edit 12/23/17: Added fixing audio after sleep with CodecCommander.kext.
Edit 12/29/17: Added a workaround for memory detection issues with slots 1 & 3.
Edit 01/29/18: Replaced the 1070 Ti with a RX 570, upgraded RAM, and replaced case fans.
Edit 04/29/18: Updated for 10.13.4: Switch to iMac 14,2 and use onboard audio.
Edit 05/01/18: Updated onboard audio instructions and removed Filevault2. Filevault2 likely still works, but I don't use it anymore.
Attachments
Last edited:


