Contribute
Register

Installation Guide For Using Clover on the Intel Haswell NUC

Status
Not open for further replies.
Just as a heads up, I have now successfully done a from scratch install with a Clover/Unibeast combination method as outlined in this post: http://www.tonymacx86.com/alternate-bootloaders/113679-using-unibeast-create-clover-installer.html but using the Clover settings outlined by Mariolillo in this thread and my config.plist in EFI/CLOVER

Also make sure you also copy FakeSMC.kext into EFI/CLOVER/Kexts/10.9 while the EFI volume is mounted on your desktop, and that you also put the DSDT and SSDT into the EFI/CLOVER/acpi/patched folder.

When making a combination installer like this, as long as the NUC is set for UEFI boot as mentioned earlier then the Clover installation takes precedence over Unibeast and installing is essentially hassle free without any patching etc. needing to be done - much simpler.

After you have set up your new install then install Clover to your Hard Drive/SSD in exactly the same manner and finally use Kext Wizard or Kext Utility to put the AppleHDAIDT.kext into system/library/extensions and you are done.

[Edit: In case you are wondering why I used Unibeast at all here, it is because the terminal command based ways of making a USB install stick did not result in a bootable installer for me - whereas the Unibeast/Clover combination simply worked like a dream.]
 
A quick synopsis of the dual or multiboot setup would be useful too, for those considering this setup.

i.e Windows or OSX first, any files that get overwritten and need to be replaced or restored, any gotchas or tricks to have them both running side-by-side.

I've pondered using Win7 and/or Linux Mint alongside OSX but my SSD is 90% full already and is my production install so I dont want to mess it up.

Another point to ask is : did you still need the patched kernel as per my guide, or does Clover take care of that ?

Never needed to do your kernel patch procedure, Clover did it for me :)
I will add the multiboot instructions to the guide. As a heads up, it is a lot easier in Clover, because we will be able to actually use a pure GPT filesystem, unlike using Chameleon/Chimera where you need to create a hybrid MBR for Windows (it's still possible to create this setup under Clover if needed).


Everything patched on the fly.....just need to have the injector kext for the AppleHDA that I uploaded and the config.plist changes (uploading here to save you needing to using Clover Configurator).
The kext makes sure that the correct Platform.xml.zlib, Layout1.xml.zlib and the configdata for the Hardwareconfig plugin of AppleHDA.kext are loaded, the binary patches I added make the binary of AppleHDA.kext recognise the ALC283.

This means a vanilla AppleHDA.kext will on first boot have the binary patched and that the injector kext will automatically make sure the right data for our codec is used - so this does not actually "patch" these parts but gets them to load. It does mean though that for as long as Apple continue to use the same way of handling layouts/platforms etc then the system should be robust enough not to need tweaking when a new AppleHDA.kext issues.

Similarly the bin patch for the frame buffer should mean no issues when Apple update the graphics drivers.

Note: I have the inject kext (AppleHDAIDT.kext) installed in S/L/E - it needs to be there and will not work from EFI/Clover/Kexts/10.9.

Excellent work minihack!! I saw earlier that HP Probook post but didn't had time to follow the instructions and test, I'm glad you managed to get it done! This should allow our NUC to have a new OS X installation or update without having to change anything!
Oww yeah!

I will add your work to the guide as well.


[Edit: In case you are wondering why I used Unibeast at all here, it is because the terminal command based ways of making a USB install stick did not result in a bootable installer for me - whereas the Unibeast/Clover combination simply worked like a dream.]

Clover is very flexible in terms of boot options. You can install it as UEFI only to a USB and install Chimera/Chameleon. Clover also provides for BIOS booting without interfering with Chimera, so you could have a USB installer with Clover UEFI, Clover Legacy BIOS boot and Chimera.

There is as well a OEM folder inside EFI/CLOVER. Inside this folder you can create other folders with different names of system boards.
For example, you can create the folder EFI/CLOVER/D54250WYK and inside that folder put the config.plist for the NUC, an ACPI folder for the DSDT and SSDT, a kexts/10.9 folder to put FakeSMC, and all this would be loaded when you boot Clover in a D54250WYK board. This allows you to have plenty of configurations for different boards in the same USB!

Pretty good features Clover packs! :)
 

A couple of notes on Clover for the NUC


Clover is intimidating at first because the documentation is not as complete.

Whether you feel more comfortable with the initial set up using Chimera or Chameleon that is fine as Clover can always be installed later.

As an additional help when it comes to boot loader installation time (or indeed if something perhaps went wrong on your own Clover install and you want to try my settings) I have made a folder called D54250WYB which I have zipped and attached to this post and can act as a quick starter for you.

Simply, after the Clover package has installed according to post #1 in this thread, and when Clover has automatically mounted your EFI partition (which it does when the Clover installation finishes) just open the EFI volume, and then open the internal folder EFI/CLOVER/OEM and drag the attached folder in there.


Because the folder name is recognised by Clover as being the name of the board you are booting it will automatically use the config.plist inside that folder, and also use the DSDT and SSDT inside the D54250WYB/ACPI/patched and the Kexts inside D54250WYB/KEXTS/10.9 - so that will give you a shortcut to a working system.

The plist in the folder already contains code for all the needed kext and kernel patching, (except for the AppleHDAIDT next which needs to be installed properly to system/library/extensions) so that on the next re-boot you should be pretty much 100% functional.

I recommend you add a MBA6,2 serial number into the section SMBIOS/SerialNumber of the plist.

I hope this helps, and does not add to any confusion for readers. Please do note that the DSDT and the SSDT in the attached folder were created and patched based on UEFI version 22, so may not work for you if you are on a later version. In any case, I certainly recommend that you "roll your own" DSDT following the indications set out in the WonkeyDonkey NUC thread.
 

Attachments

  • D54250WYB.zip
    265.2 KB · Views: 209

A couple of notes on Clover for the NUC


Clover is intimidating at first because the documentation is not as complete.

Whether you feel more comfortable with the initial set up using Chimera or Chameleon that is fine as Clover can always be installed later.

As an additional help when it comes to boot loader installation time (or indeed if something perhaps went wrong on your own Clover install and you want to try my settings) I have made a folder called D54250WYB which I have zipped and attached to this post and can act as a quick starter for you.

Simply, after the Clover package has installed according to post #1 in this thread, and when Clover has automatically mounted your EFI partition (which it does when the Clover installation finishes) just open the EFI volume, and then open the internal folder EFI/CLOVER/OEM and drag the attached folder in there.


Because the folder name is recognised by Clover as being the name of the board you are booting it will automatically use the config.plist inside that folder, and also use the DSDT and SSDT inside the D54250WYB/ACPI/patched and the Kexts inside D54250WYB/KEXTS/10.9 - so that will give you a shortcut to a working system.

The plist in the folder already contains code for all the needed kext and kernel patching, (except for the AppleHDAIDT next which needs to be installed properly to system/library/extensions) so that on the next re-boot you should be pretty much 100% functional.

I recommend you add a MBA6,2 serial number into the section SMBIOS/SerialNumber of the plist.

I hope this helps, and does not add to any confusion for readers. Please do note that the DSDT and the SSDT in the attached folder were created and patched based on UEFI version 22, so may not work for you if you are on a later version. In any case, I certainly recommend that you "roll your own" DSDT following the indications set out in the WonkeyDonkey NUC thread.

Thanks guys for your work in this thread. I haven't tried the Clover setup but from what I read here, we pretty much have it all going, which provides another option for the NUC users.

Great work here !

:thumbup:
 
Thanks for the positive comments WD, indeed I think that this does add another element of choice for NUC users.

I just wanted to mention that if anyone has any problems sorting out their build with Clover I am very happy to try to help out even though I am far from what I would call an expert in it. I hope also that others more experienced will feel free to jump in and help.

My own system will be down for the next couple of weeks as I am now beyond the point of no return in a case mod involving the NUC - if you want to check out my progress then take a look at http://www.tonymacx86.com/others/128962-nuc-mac-mini-case.html .

You can see that at the moment I have just destroyed my cooler unit, so I cannot do any actual live checks for problems until I have finished my tinkering with this aspect…..however I have a copy of my system on a USB drive so I can always check out files etc if anyone wants kext details etc.

Happy modding everyone.

:thumbup:
 
I am about to jump head first into this install.

I have decided on clover because it seems to be (relatively) less intensive to get up and running.

I have some experience with hackintosh - eeepc, Dell mini9, customac pro
but Clover is a first.
I will also be the first to say that I am a perpetual noob and always learning more.

Thanks for putting in the effort in this tutorial to help out others! I know I will be coming back real soon for pointers.


So far I am creating the boot disk and preparing it with clover. I feel like I am combining multiple posts while using this install guide as the master guide.

I am starting off with two identical D34010wyk models. As far as I know the only difference so far is the CPU. is it possible to use the DSDT, SSDT provided for my NUC's?
 
I would not advise using the SSDT for this board with a mobo (albeit an identical one) with a different CPU. This is because the SSDT is specific to the CPU.
The DSDT may be useable, but if it was me I would start with a DSDT free install method and then do the DSDT extraction and patching later. There could be significant difference in the DSDT between the boards and I know that sometimes even seemingly very small differences can be enough to prevent boot.
So procedure to follow would be to use a non DSDT/SSDT install procedure and then to do the DSDT patching. If when you extract it you find that your DSDT does not patch cleanly using the MaciasL methods set out in WOnkeyDonkeys thread then post your DSDT on here and I will take a look at the differences and help you to patch it.
Good luck.


I think I am going to need some pointers when jumping into DSDT patching.

So I was able to use Unibeast to build a clover installer by this guide.
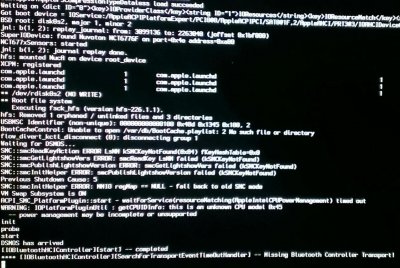
I didn't have a DSDT but was somehow able to get all the way through the installer. Booting on the USB again, verbose into the newly installed Mavericks locks up.

I think my fakeSMC.kext that I found, from your post in a ZIP for the D54250WYB you uploaded but it locks up because of a lot of SMC errors or the BluetoothController.

help?

bootFail-SMC.jpg
 
I think I am going to need some pointers when jumping into DSDT patching.

So I was able to use Unibeast to build a clover installer by this guide.
I didn't have a DSDT but was somehow able to get all the way through the installer. Booting on the USB again, verbose into the newly installed Mavericks locks up.

I think my fakeSMC.kext that I found, from your post in a ZIP for the D54250WYB you uploaded but it locks up because of a lot of SMC errors or the BluetoothController.

help?

View attachment 89178

FakeSMC is not in the uploaded NUC Install Pack. It is installed as part of Multibeast normally. SMC errors do occur but can usually be ignored; and the message about not finding/configuring a bluetooth controller can also be ignored. They can be considered warnings, and should still allow the system to boot.

Minihack is correct about the SSDT too; the one I included in the install pack has different specifications to your CPU; you should use the SSDT generation script to produce a new SSDT based on your own CPU specification.
 
Status
Not open for further replies.
Back
Top