
- Joined
- Nov 7, 2012
- Messages
- 36
- Motherboard
- OS X 10.8.3
- CPU
- Core i7 3770K
- Graphics
- Intel HD4000
- Mac
- Classic Mac
- Mobile Phone
Insidiator's Grow-Into-It Build: Core i7-3770k - GA-Z77X-UD5H - 32GB RAM - Intel HD4000

Components Intel Core i7-3770K IvyBridge 3.5GHz LGA 1155 77W Quad-Core Processor
http://www.amazon.com/dp/B007SZ0EOW/
http://www.newegg.com/Product/Product.aspx?Item=N82E16819116501
Gigabyte GA-Z77X-UD5H
http://www.amazon.com/dp/B007R21JK4
http://www.newegg.com/Product/Product.aspx?Item=N82E16813128545
Corsair Builder Series CX430 V2 430W PSU, 80 Plus Bronze Certified
http://www.amazon.com/dp/B004YD45N2
http://www.newegg.com/Product/Product.aspx?Item=N82E16817139026
32GB G.SKILL Ripjaws X Series DDR3 1600 (PC3 12800) Desktop Memory
http://www.amazon.com/dp/B007GWMQNE/
http://www.newegg.com/Product/Product.aspx?Item=N82E16820231569
Mushkin Enhanced Atlas Series mSATA 120GB SATA III
http://www.amazon.com/dp/B0089W4R50
http://www.newegg.com/Product/ProductList.aspx?Submit=ENE&DEPA=0&Order=BESTMATCH&N=100006650&isNodeId=1&Description=MKNSSDAT120GB-DX&x=0&y=0
LG Electronics 14X BD-R 2X BD-RE 12X BD-R DL 2x BD-RE DL 16X DVD+R 8X DVD+RW 8X DVD+R DL 16X DVD-R 6X DVD-RW 5X DVD-RAM 16X DVD-ROM 48X CD-R 24X CD-RW 48X CD-ROM 4MB Cache SATA Blu-Ray/DVD/CD Rewritable Drive (Black)
http://www.amazon.com/dp/B007YWMCA8
http://www.newegg.com/Product/Product.aspx?Item=N82E16827136250
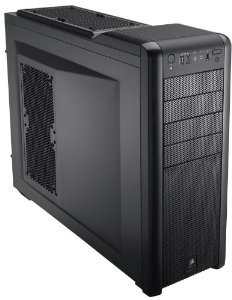
Corsair Carbide 400R (Black)
http://www.amazon.com/s/ref=nb_sb_noss_1?url=search-alias%3Delectronics&field-keywords=CORSAIR+CARBIDE+400R
http://www.newegg.com/Product/Product.aspx?Item=N82E16811139008
Arctic Silver 5 Thermal Compound
http://www.amazon.com/dp/B0002VFXFE
http://www.newegg.com/Product/Product.aspx?Item=N82E16835100007
AZIO BTD-V400 Micro Bluetooth 4.0 Class 1 Adapter (USB)
http://www.amazon.com/dp/B00AQGGKV6
http://www.newegg.com/Product/Product.aspx?Item=N82E16833340022
TP-LINK TL-WDN4800 Dual Band Wireless N900 PCI Express Adapter
http://www.amazon.com/dp/B007GMPZ0A
http://www.newegg.com/Product/Product.aspx?Item=N82E16833704133
Apple Mac OS X Version 10.8.3 Mountain Lion @ App Store)
https://itunes.apple.com/us/app/os-x-mountain-lion/id537386512?mt=12
Already Owned
Samsung P2570HD 24.6" Full 1080p HDTV LCD Monitor
http://www.amazon.com/Samsung-P2570HD-24-6-Inch-1080p-Monitor/dp/B002DHKJTK
http://www.newegg.com/Product/Product.aspx?Item=N82E16824001335
Apple Wired Keyboard
http://[SIZE=2]ww[/SIZE]w.amazon.com/dp/B000V07N9U
http://www.newegg.com/Product/Product.aspx?Item=N82E16823101012
Logitech M-BJ58 Wired Optical Mouse
Comments
B]MultiBeast Settings[/B]
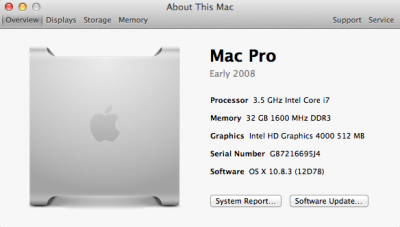
'About This Mac' Screenshot
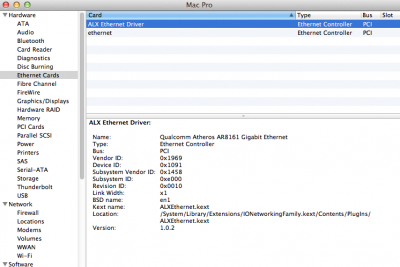
System report showing my Ethernet ports
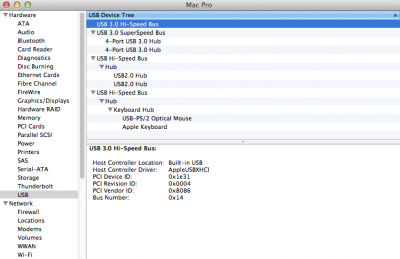
System report showing my USB device tree
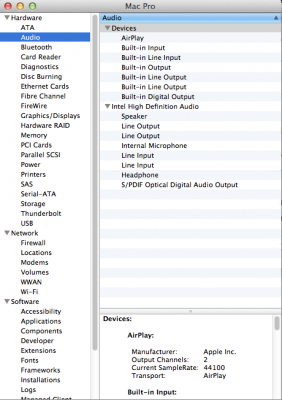
System report showing my audio devices.
Buying Your Parts
If you can, buy all of your parts for your Customac by clicking on the referral links found in posts on this forum because doing so will support the maintenance of this website and the further development of the tools that have made all of our hackintosh dreams come true. If time is not of the essence you will probably be able to stretch your budget the furthest by waiting until Black Friday sales in November. The best example from my own build is my memory, which I bought for $117 (including shipping) at Newegg during a Black Friday sale in 2012 and is now (May 5, 2013) selling for $245 ($128 savings). Occasionally there might also be the odd local computer store deal that might tear you away from this site’s referral links. For example, I bought my i7-3770k from the Micro Center in Boston, which sells it for $229 (in-store only); ~$100 savings compared to Newegg or Amazon. Just remember, if you do end up buying from Newegg or Amazon, to add the items to your basket using the referral links.
The Significance of DVI
My build is different from most of those using the i7-3770k and the GA-Z77X-UD5H because I did not purchase a discrete graphics card (I plan to use the HD4000 for as long as possible).
Before going any further I feel I should state: if all you have is a VGA monitor, go out and buy a DVI monitor!!! Based on personal experience and hours of searching these forums, you will not be able to fully use the features of this motherboard and CPU if all you have is a VGA monitor. Period. Don’t even try because you’ll just waste your time (as I did). It is also worth mentioning that a DVI-to-VGA adapter will not work because the DVI port on this motherboard is a DVI-D, which does not send out an analog signal (by contrast, a DVI-I port has four additional pins that carry an analog signal).
The whole ‘boot flags’ business[/SIZE]
I like to think of myself as a technically competent person, but to be honest I found some of the setup directions confusing (a lot of it is technical jargon that I had never heard before). So, in case you are like me and find the highly-detailed setup instructions provided by others on this forum confusing (in retrospect they are all 100% correct, it’s just hard to appreciate that when you are a newbie and don’t understand the language of hackintoshing), here is my quick-and-dirty understanding of them: boot flags are last-minute modifications to the functionality of the motherboard that can be made independently of the BIOS and before all the major extensions load.
To enter a boot flag, simply press any key at the Chimera screen (when you get to choose which operating system to boot from; this instruction is given on the screen, but you might not notice if you are in a panic of why the thing isn't working) and start typing them in. You can have as many as you want, just put a space between them. It is important to note that some have a ‘-‘ in front while others do not. Below is a list of boot flags that I used at some point or other:
‘-v’: Verbose mode. Entering this boot flag will let you see all the gorey details of the booting procedure; it’s like opening the hood on your car so you can watch and listen to the engine run in an effort to figure out which part of it is not working as it should.
‘-x’: Safe mode. This disables all but the most basic extensions (all extensions?) and should allow you to reach the desktop, albeit with most bells and whistles disabled (remember holding down the ‘shift’ key way back in Mac OS 7.x-9.x for the same purpose?). When all else fails, use this to get to the desktop so you can undo whatever changes (installed kexts, etc) you made during the previous session.
‘GraphicsEnabler=No’: This turns off the hardware acceleration provided by the integrated graphics processor. People with discrete graphics cards use this setting because they don’t need the integrated graphics. This setting will also let you get to the desktop if you have a VGA monitor plugged in, but you will only have 64mb of graphics memory and you will not be able to change screen resolution (plus the boot time is really long, even with a SSD).
‘GraphicsEnabler=Yes’: This turns on the hardware acceleration provided by the integrated graphics processor. People without a discrete graphics card use this, but if this setting is used while a VGA monitor is plugged in the computer will not boot. Seriously, don’t bother trying (unless you’re brilliant and can find a workaround, in which case please tell us all how you did it). This setting is not without its faults, the primary of which I will get to later.
Setup Problems and Solutions
Problem 1: After using MultiBeast 5.3 to install just the basic extensions (2 Ethernet drivers), the computer did not boot; it kept getting stuck at something having to do with an Airport handshake.
Solution 1: This ended up being related to me using a VGA monitor. When I set ‘GraphicsEnabler=No’ I was able to boot. Using a VGA monitor seemed to make an awful lot of problems for me initially…
Problem 2: After using MultiBeast to install the Without-DSDT Realtek 898 extension (after I had gotten the computer to the point that it would boot to the desktop) my computer stopped booting. It got stuck somewhere around Airport Handshake again. I also received an error that the AppleHDA kext ‘was improperly installed’ when (just for the heck of it) I ran KextBeast (I didn’t actually DO anything with the program; just ran it to see what it did). I noticed that if I booted in safe mode and replaced the newly installed audio kexts with the backups I’d made of my original ones, it booted just fine, indicating that there was something wrong with the drivers themselves.
Solution 2: I think this ended up being a corrupted MultiBeast 5.3 download. After multiple unsuccessful cycles of deleting the AppleHDA.kext and HDAEnabler1.kext files (in System/Library/Extensions), repairing permissions and then reinstalling the Without-DSDT Realtek 898 drivers from MultiBeast, I re-downloaded MultiBeast 5.3, deleted the offending kexts one more time, repaired permissions, installed again from the new Multibeast download, repaired permissions AGAIN and was relieved upon restart to see not only a system that completely booted, but one that had functional (3 ports on the back and the headphone jack on the front; I have not tested the microphone jacks) audio! There is still room for improvement (my HDMI audio does not work yet, but that isn’t important right now), but at least the major bells and whistles worked.
Problem 3: My Intel HD4000 was not recognized in Mac OS X Mountain Lion. My ‘System Report’ showed graphics as being 64mb of shared VRAM, not the 512MB Intel HD4000 that it was supposed to. In a way this was not surprising because I configured my chameleon.boot.plist file to always have ‘GraphicsEnabler=No,’ but up until that point I had to have that setting just to get the darned thing to boot completely.
Solution 3: Changing my display from the VGA one that I started with to a DVI-capable HDTV I had in my living room (which I moved to my desk and connected via DVI-D cable) and then setting ‘GraphicsEnabler=Yes’ made most of the difference. Not only did my system boot successfully, but rather than taking a good 25 seconds to get to the desktop after the Chimera screen, it took just about 10 seconds! Of course then I found another problem…
Problem 4: I could not change the resolution of my monitor from the default highest-resolution setting to any of the smaller ones without the signal getting scrambled (it looked like there were 5 or 6 iterations of my Finder offset by a few inches and interlaced between themselves; very confusing).
Solution 4: After spending a good couple of hours on Google and the forums here I finally found the solution! I don’t really understand what the problem actually is, but the solution has something to do with specifying to the GraphicsEnabler function exactly what layout of video ports you have. A more complete explanation can be found in dta's excellent post here. The short version of what is actually a longish story is that I systematically tried each of the possibly configurations mentioned in dta's post (although supposedly the new version of Chimera is supposed to render this solution moot) and finally found that only configuration 5 allowed me to change my resolutions.
Screenshot of the portion of my org.chameleon.Boot.plist file with the lines of code immediately following GraphicsEnabler that let me change my screen's resolution in a stable manner.
BTW, to see and switch between different resolution options you must first click on ‘scaled’ in the Display system preference pane (the radio button under 'Best for built-in display'; coming from Snow Leopard I found this confusing at first).
Problem 5: At first, I was unable to connect to the App Store to download anything (it gave me an error that I don't remember)
Solution 5: After deleting the NetworkInterfaces.plist file located in Library/Preferences/SystemConfiguration as suggested here: http://www.tonymacx86.com/mountain-...3-icloud-mountain-lion-issue-unable-sign.html and elsewhere, I was able to login and download updates and other software.
Problem 6: At first, the front panel power buttons and LEDs on my case did not work (for almost a week I had to use the internal power button on the motherboard).
Solution 6: This ended up being a loose connection of the ribbon cable going from the motherboard to the front panel unit in the top of the case. The loose connection appeared to be caused by poor application of hot glue at the factory (I think as it cooled it expanded and popped the connector off the pins).
Final Thoughts
There you have it. At some point in the future I'll try to get some screenshots of my BIOS settings up to provide some under-the-hood context to the rest of this. I hope this slightly expanded post helps other people who buy similar/identical hardware and plan to primarily use the integrated graphics processor; there seem to be precious few builds like mine (most use dedicated graphics cards) and there are therefore subtle differences in the setup process.
I want to send out a HUGE thank you to the tonymacx86 founders and community for the wealth of information available through this site! Six months ago I had never heard of a hackintosh/customac, and through this process I have learned a lot. I look forward to continuing to learn from this fantastic community as well as to contributing to it through my own experiences!
Edit log
May 6, 2013
-Simplified the narrative
-Added screenshots of MultiBeast and System Report windows
-Added 'Problems and Solutions' section
-Added 'Buying your parts' section
-Added a section on boot flags
-Added a screenshot of the 'device-properties' code that enabled resolution changing on my display
-Changed the display I used in the 'Previously Owned' list.


")