Contribute
Register

HP 4540s: "Product Information Not Valid" error message at system start up

Status
Not open for further replies.
Joined
Jul 3, 2012
Messages
62
Motherboard
HP ProBook 4540s
CPU
Intel Core i7 3632QM 2.2 GHz Ivy Bridge
Graphics
Intel HD4000 + ATI 7650 2GB (Disabled)
Mac
  1. 0
Classic Mac
  1. 0
Mobile Phone
  1. Android
  2. iOS
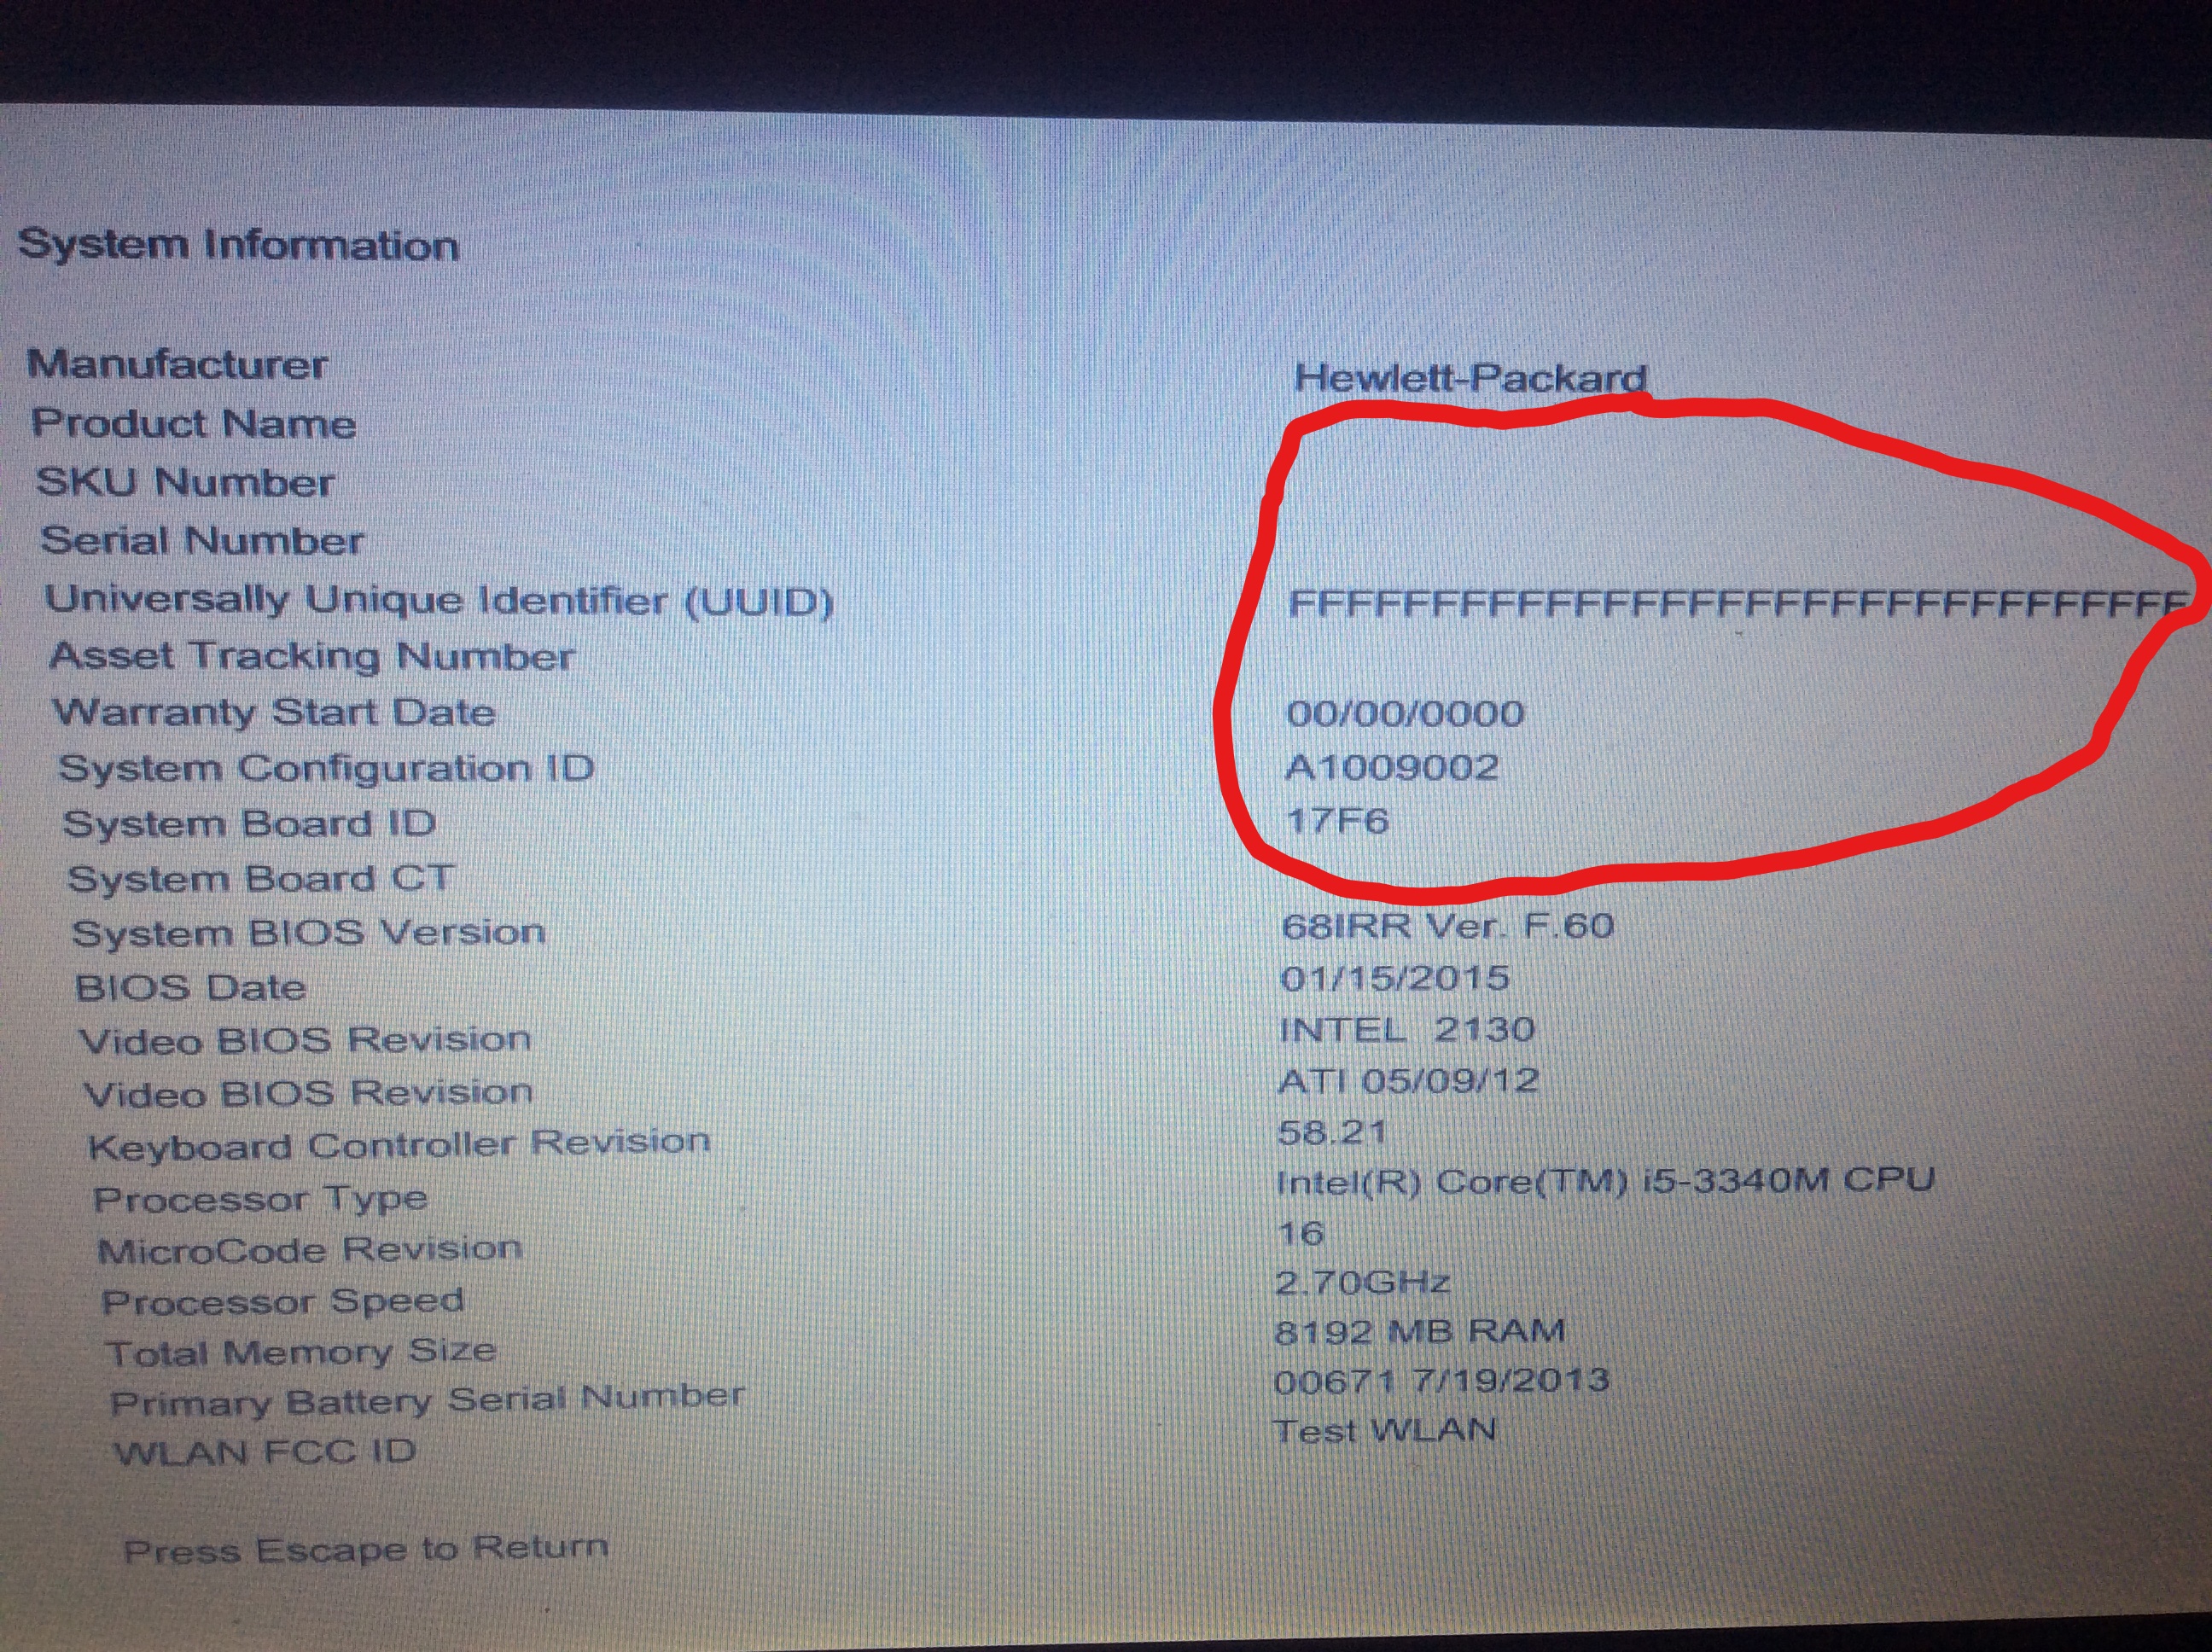
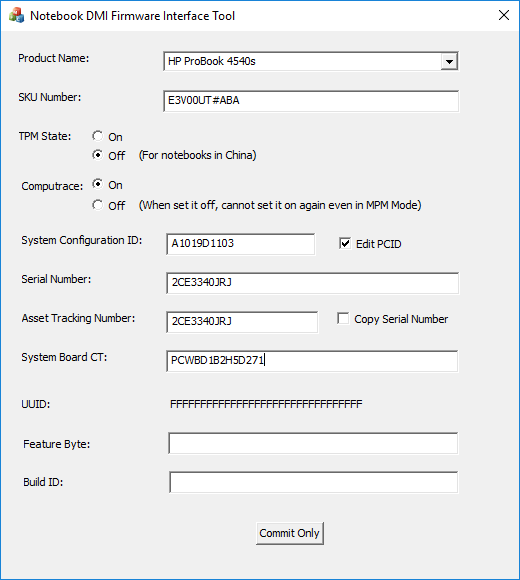
Today when I turned on my Probook I faced an error message at system start up. After searching the internet, I noticed It is a common problem among HP notebooks. This a BIOS related problem which results in losing product information stored in motherboard like Serial Number, PCID, UUID, Notebook Model & ... . I spent several hours on the net to find a solution for the problem. The solution is very simple. I need to use a batch file (HP DMI ToolKit) provided on HP CSN (Channel Services Network), put it on a MS-DOS boot-able flash, run the batch file and manually insert the product information. Unfortunately the versions I downloaded do not support HP Probook 4540s. I couldn't find any version which supports this model.

I know this is not a OS X related problem but as all of us have a Probook in here I thought someone could help me to solve it. I really appreciate your help.

The link to HP Support Forum:
http://h30499.www3.hp.com/t5/Notebo...formation-Not-Valid/td-p/1122449#.U0f4lvmSzV8
 
This may help - Link

Good Luck
 
This may help - Link

Good Luck

Thanks P1LGRIM,

I already tried that method. I always get the same error: "This utility can NOT be executed on this platform. Please check other version utility again".

Still searching for a version which works on ProBook 4540s Ivy Bridge...
 
If the laptop were under warranty fine, I would have gone to HP directly, but that was not the case. So, as a last resort and without breaking any copyright laws, I used wndmifit64.exe from HP. Gather your laptop info: Serial (below battery), SKU (product number), PCID (remove back panel) and System Board CT (look through the holes in the metal plate, its 14 digits from the left to right on a white label). Gather necessary files by googling nbdmifit-2.03.zip (which are the HP dmi fit tools), from the Chinese site. Put contents of the folder wndmifit in a the root of a bootable USB MS-DOS pen drive (Use Rufus) Copy first and then rename FSMC.bin as SMC bin. The wndmifit64.exe application is run from within Windows, but before it can write to the BIOS you must enable the MPM mode (manufacturer programming mode - the red letters when the computer gives the error that count up to 10 eventually). I tried recreating whatever circumstances I was doing when the laptop system information got stupidly and annoyingly reset. By the way, mine got messed up after trying to recover my machine from the 10.10.3 update screwed up my install, finally now working 100% as before without any losses. I could not get the counter reset. So, to access the MPM, you must reset the count. I got it reset with rmpmcnt within Windows and the renamed copied file SMC. It performed the reset in the next reboot. Then I was able to change the values with wndmifit64.exe. Input the info stated above, forget about the rest. Finally hit commit and lock. Good Luck!
 
Hi. Im haveing the same issue with a 4430. When ever i try the reset it always fails. Ive done it with a flash drive and i even created a hptool partition. No matter what i do it fails. Once the screen went black and was unresponsive. I readon a different website the smc file has to be built for yiur specific computer. I have all the dmi tools. Is there a step becore copying everything to the flash drive?
 
I just ran into this "Product Information Not Valid" problem this week with my daughter's ProBook 4540s. I'll relay the steps that I successfully used to remedy the problem, and hopefully save someone else the days of unsuccessful attempts. I believe these steps will be nearly identical for all HP laptops manufactured since 2012. For the older laptops, you can do the same thing, but in a DOS bootdisk environment. From the screen shots, you will noticed that I updated the BIOS to F.62. That didn't help, but it also didn't further break anything.

Symptom: your BIOS screens look like this

  1. First step is to acquire HP's NbDmiFit tool. This is not available to the general public, but I found it through some Google-fu on a Russian website. Version 2.10 is the most current (as of sometime in 2016). I have attached that NbDmiFit-2.10.zip file to this post in case the original disappears.
  2. Next, become familiar with the documents in the README folder of the NbDmiFit, in particular the flow chart on page 5 of HP Commercial Notebook Step-by-Step Guide - 2.10.pdf
  3. Next find and photograph all of the labels that you can find inside the bottom of your laptop. You are looking for the SKU Number, System Configuration ID, Serial Number, and System Board CT.
  4. According to the Step-by-Step Guide, the next step is to create a Windows PE USB disk. I struggled with this for many hours, and while I could create the bootable Windows PE (v10, v8, & v2.1) USBs, I could never successfully run the Wndmifit64.exe application in that environment. HP has a WinPE64-2.10 tool that automates this process, but I failed to replicate it with the Windows ADK. My recommendation is to use an MBR install of Windows 10 rather than the fancy Windows PE method. Note that a GPT/UEFI install of Windows will not work. My solution was to install a blank harddrive into the laptop, and install Windows 10 Pro onto it using a USB drive created with the Windows 10 Download Tool. Note that the BIOS Boot Mode of the laptop must be set to Legacy in order to create a Windows MBR install..
  5. Boot into your Windows MBR harddrive, which will likely require you to change the BIOS setting from UEFI Native to Legacy.
  6. Once in Windows, run Wndmifit64.exe which is located in the WNDMIFIT folder of the NbDmiFit-2.10.zip package. You will likely receive an error telling you that the MPM (Manufacturing Programming Mode) is locked.
    You will need to unlock the MPM, run Wndmifit64.exe, and then relock the MPM. To unlock the MPM, copy the FSMC.bin file from the WNDMIFIT folder to a Fat32-formatted USB drive. Rename the file to SMC.bin. Plug the USB drive into the laptop with the power off. Hold Windows Key + Arrow UP Key + Arrow Down Key at the same time and power the system on. Release all keys when you see the blue HP logo. You should see a brief message on a white screen saying that the SMC command was handled successfully. This means that the MPM is unlocked, and will remain so for the next 10 power-cycles.
  7. Now you need to reset the missing information in the BIOS. To do this, boot back into your Windows MBR harddrive and run Wndmifit64.exe which is located in the WNDMIFIT folder of the NbDmiFit-2.10.zip package. You should see the Notebook DMI Firmware Interface Tool appear on the screen. Fill the blanks in with the information that you gathered in Step 3. I would recommend verifying that you have correctly read the Serial Number by performing a search for it on the HP Support site. Note that your laptop may not have numbers for all of these fields, I believe the last two fields are only for laptops manufactured since 2015. Click "Commit Only," "OK," and "OK."
  8. The last step is to lock the MPM back up. If you reboot now, you will lose everything that you accomplished in Step 7. Run lockmpm.bat, which is also located in the WNDMIFIT folder.
  9. Finally, reboot the system and enter into the BIOS to verify that the System Information has been up restored and restore all of your BIOS settings, including UEFI Native. Remove your Windows MBR harddrive and make all is it previously was. My generated UUID did not match the pre-error UUID, but that doesn't seem to matter. System Information prior to error:
    System information after error was fixed with Wndmifit64:
 

Attachments

  • NbDmiFit-2.10.zip
    12.2 MB · Views: 5,402
Last edited:
Thank you Eric! I did so: I cloned Win 10 hard drive in a working PC to external HD, then I unzipped NbDmiFit-2.10.zip archive there. I moved this HD to my HP ProBook 4530s and ran first Wndmifit.exe and entered Product SKU, serial number and CT number. After that i ran lockmpm.bat to lock these values. After restart I didn't get anymore "Product infomation not valid" complains. Now can return to Mac OS X and delete this temporary Win 10 hard drive.
 
hello Eric
i have hp elitebook folio 9470m but i cant unlick MPM with smc file can u help me?
 
hello Eric
i have hp elitebook folio 9470m but i cant unlick MPM with smc file can u help me?

At what point is the unlock failing, and what is the message?

To unlock the MPM, copy the FSMC.bin file from the WNDMIFIT folder to a Fat32-formatted USB drive. Rename the file to SMC.bin. Plug the USB drive into the laptop with the power off. Hold Windows Key + Arrow UP Key + Arrow Down Key at the same time and power the system on. Release all keys when you see the blue HP logo. You should see a brief message on a white screen saying that the SMC command was handled successfully.
 
At what point is the unlock failing, and what is the message?
I did same process but no change occur in blue screen or after windows boot. I formated usb with fat32 also try to format flash with rfu software
 
Status
Not open for further replies.
Back
Top