Contribute
Register

How to use SSD as a boot drive and HDD as data drive

Status
Not open for further replies.
Joined
Mar 21, 2014
Messages
34
Motherboard
GA-Z87X-UD3H
CPU
Intel i7 4770K
Graphics
GeForce GTX 760 2GB
Mac
  1. iMac
Classic Mac
  1. iBook
Mobile Phone
  1. Android
Hello! I have successfully installed OS X 10.8.5 on my new Hackintosh (10.9.2 wasn't working.) I made the install drive my SSD (SanDisk Extreme) and then I have an HD (WD Blue.) Everything like my music wants to download to the SSD but this will fill up quick and I need to use it just as the OS X drive and for my most used applications like Final Cut and Steam. I need to know how to default most things to my HD which is currently only recognized as a "Device" any help is appreciated.

P.S I already have browser downloads going to the HD I just need it for more system oriented things. I also have not setup the Mac App store with Ethernet and a few other things.
 
Hi

System Prefereneces, Users and Gropus
Go to your user, right click and go to Advanceed
There you can specify your HOME directory. For me it is /Volumes/OSX_USER/Users/pistooli, where obviously OSX_USER is a HDD, so not my primary SSD

Good luck!
 
While that method does work well, your apps will no longer reside on your SSD drive which is really where you want them, at least I do! :)

A great way to change up your iTunes library location is within iTunes itself where you can change the location. See here:

http://support.apple.com/kb/HT1449?viewlocale=en_US&locale=en_US

After you get that done you'll (maybe/probably) also want to move the location of your iTunes backups for any iDevices you have as the backups location will not change using the above method. You can change the location using symbolic links:

http://ismashphone.com/2012/05/how-to-change-the-location-of-your-iphone-backup.html
 
That will also work! Thanks for your input!

Although with the apps I only have 120 GB and a might be putting Parallels on my computer (for streaming to Twitch) and I want as much free room on the SSD for Parallels to run as well. I will have apps like FPCX and Steam that are heavy duty on the SSD because it still allows me to do so. Thanks again! :)
 
I just moved all of my stuff over. Pretty simple. I just used CCC to copy everything including my Users folder and my Username onto the SSD. I DID NOT choose to move ANY items inside of my username folder. Seems to work great except for one glaring issue. It will not force boot from the SSD.

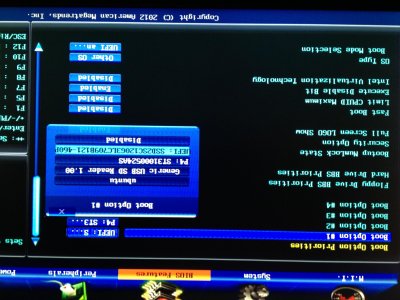
I tried to change my BIOS settings to boot from the SSD, but it doesn't recognize it properly. My old HDD is shown as P4... and the SSD only shows as UEFI... I can choose to boot from the SSD from the startup menu when it starts loading OSX, but it's kind of a pain. I switched the startup disk in the system preferences, but it doesn't seem to help. I'm thinking it's in the BIOS, but not sure why it does't recognize the drive properly. Any thoughts?
IMG_0968.jpg
Edit: why the hell is my pic upside down?
 
I haven't resolved the boot issue. It boots just fine if I interrupt the standard boot order, but it would be nice to boot directly to the drive I want. Is there something I need to change in my Multibeast settings or something?
 
I had the same problem with the boot drive only showing up with the UEFI option. I believe I just swapped it to the P0 port or the GSATA P0 port, either one...I can't remember! :) after that though I was able to make it the boot drive without the UEFI showing up in the menu.
 
That was my issue. It wanted the SSD to be in SATA port 0. For some reason it doesn't like to see any other drives in the BIOS though. In any case, that was the issue and it seems to be resolved for now.
 
I use the Lnx2mac UNIX method

With this method, you have your OS & Apps on your SSD and everything else on your Hard Drive

It's never caused me any problems with OSX version updates nor Apps and is great for disk cloning.

Before you can use this method, you will have to Enable root user in Mac OS X. (see also YouTube tutorial)

"The root user, or superuser, is a special user account in OS X that can modify and delete critical system files. By default, the root user is not enabled."


You will perform the Lnx2mac method inside this root user account

You will be using the Terminal but please don't be scared...

I just copied/pasted the command lines into the Terminal and checked then double checked each step before hitting Enter each time (you don't want to miss a step).

as long as you have backed up your initial install firstly and are patient and careful entering the command lines (do not rush this) then it works great.

Please Note: this link is an old post so when you get to the comments shown below, you CAN actually pop open the Champagne since those final tweaks Lnx2mac suggested are not needed. (I have never used them !)

"We can now reboot and verify the /Users is correctly mounted !

At this time, all our users home directories are in the new partition, and as we instructed OS X to mount it automatically (via the /etc/fstab file), it should be accessible just as before.


... But don't uncork the champagne yet !"


After you have completed this method and are happy everything works then i would disable that Root user account and continue in your regular account as normal.


UPDATE 24/09/2014 : i performed a fresh install of OS X 10.9.4 and Clover last week then i used the Lnx2mac UNIX method above with my exisiting SSD & HDD and everything works in Mavericks so i stand by this recommendation :thumbup:

Thanks again to Lnx2mac and kentsu for your posts.
 
Last edited:
Status
Not open for further replies.
Back
Top