Contribute
Register

How to build your own iMac Pro [Successful Build/Extended Guide]

Status
Not open for further replies.
Did you plug your graphics card output into the thunderbolt input?

Yes.

I wouldn't have anything displayed otherwise.

I've swapped the Asus Prime for a Gigabyte X299 Designare. TB is working just fine on Windows. On the Asus I could only plug the TB connector to the Apple TB display after POST had completed, otherwise I would get an error about too much USB power draw.

The Designare works just fine which is a relief.
Very well build board. But now the hackintosh I had made with the Prime no longer boot :(
 
pete1959 said:
The FakeSMC can do that, or the type of sensors. Try these - they work on my 7900x.
Also make sure you don't have duplicate FakeSMC in system or Lib.

THANK YOU!!!
This worked! :D
 
I don't want to influence your component choice at all. Anyway, just a few recommendations from my side.


Think about some adequate CPU water blocking.. minimum recommendation for all i9-79xx without OC: Corsair H150i

Thank you for your awesome guide, it got me running in no time with the Asus Prime.

Nous that I've switched to the gigabyte board, it no longer boots. I'm suspecting that it's the MSR 0Xe2 refister thst is read only, however from your description of that was the case I would get a kp, it just hangs...

In regards to cooler, I replaced the H150i with the H115i as I got a smaller case, I notice no difference between the two, quite the opposite even, the H115i gives me about 5C lower than the 150 at peak speed
 
I don't want to influence your component choice at all. Anyway, just a few recommendations from my side.

To have 100% compatibility with my guide (incl. BIOS settings) and my EFI-Folder distribution, I would still stay with the ASUS Prime X299 Deluxe, even if you do not need the TBEX 3 (you can sell it if you don't need it). If you opt for any other motherboard, please be ware that you also have to take responsibility to account for deviations from with my guide (incl. BIOS settings) and my EFI-Folder distribution.

To drive your GTX 1050 with 3 screens, you will probably have to enable CSM in the BIOS and add CsmVideoDXE-64.efi to /EFI/Clover/kexts/Other/.. Something I don't like at all and I only recommend if there is no other alternative. Do you really need CUDA? Else I would rather opt for a natively implemented ATI Sapphire RX Vega 64 (8GB) or at least for the Sapphire RX 580 Pulse (8GB).

Also think about one of the recommended BT/WIFI solutions. Onboard WIFI of most of the X299 motherboards will be useless.

The i9-7960X, certainly would be a good decision, as any i9-79xx is.... (stay away from i7 CPUs - only 28 PCIe lanes!)

Regarding DDR4, proof that the envisaged memory is compatible with your motherboard. I would opt for DDR4 =/> 3200 MHz, if possible.

Think about some adequate CPU water blocking.. minimum recommendation for all i9-79xx without OC: Corsair H150i

PSU: 860W-1500W

Good luck and have fun,

KGP

Thanks so much for your insight, I wasn't expecting this much help.
Of course the whole point is using the same MB you worked so hard on otherwise it doesn't make much sense.
With the TDP of these processors it makes sense to go with a high end MB and not skimp.
Indeed I could sell the TB3 card , hadn't thought about that.
I'll go with the Sapphire RX580 if that's what you recommend , I have no need for Cuda and my graphic needs are low.
Wifi I can do without and Bluetooth as well.
So 7960x/ Prime x299 Deluxe / RX580 / Seasonic Prime 1300 Gold / 32G Trident Z DDR4 Ram /Corsair 750D Case/ Samsung SSD 960 PCIe M2/ EKWB EK KIT X360 all just over 4K, the price I can sell my dual Xeon hack for.
It's a tough decision because the Xeons have served me well despite nagging USB problems but the low clock (2.2Ghz) is really a problem in certain situations.
I was initially intrigued by pastrychef's 8700k build as it was straightforward and worked first time. It overclocks easy on air but then I realised that geekbench only tells half the story and that DAWbench shows very different numbers for my specific use. I made the same mistake with the 2x44 core Xeons , not choosing the right CPU for the application.
I'll post back when it's done and tested, hopefully without any more nagging.

Thanks again, this build is thorough and inspiring.
Just one last recommendation.. If you get a reasonable deal for the Sapphire RX Vega 64 (at about 600$), take the latter GPU instead of the Sapphire RX 580 Pulse..

Enjoy and have fun,

KGP
 
Successful Update to macOS High Sierra 10.13.4 Public Beta 3 (17E160e)

10.13.4-17E160e.png


Guide update will follow tomorrow...

Enjoy and have fun,

kgp.png
 
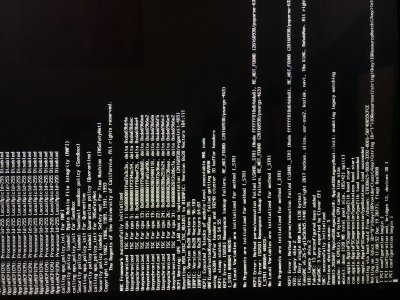
Advice wanted, I'm stuck booting on this new gigabyte board, always in the same spot, last line displayed being "[ PCI configuration begin ]".

I've followed exactly the gigabyte bios steps mentioned on page 1.

Here is a screen capture, any advices on what to do?
Thanks
 

Attachments

  • 43E51873-DB67-4DBB-B1CF-976F1CA5CD56.jpeg
    43E51873-DB67-4DBB-B1CF-976F1CA5CD56.jpeg
    3.8 MB · Views: 134
Advice wanted, I'm stuck booting on this new gigabyte board, always in the same spot, last line displayed being "[ PCI configuration begin ]".

I've followed exactly the gigabyte bios steps mentioned on page 1.

Here is a screen capture, any advices on what to do?
Thanks

First at all and once more, please provide your Skylake-X/X299 system specs (mobo, CPU, GPU) in either your profile or signature. Otherwise you want receive any support or help by anybody...
 
Big Progress in Skylake-X/X299 HWMonitoring

After a extensive tweet session between @BJango, @gxsolace and myself, it seems that we approached a major step forward towards a correct Skalyke-X/X299 HWMonitoring based on the HWSensor and FakeSMC kext distribution provided by @interferenc and iStatMenus provided by @BJango. Many thanks to both @interferenc and @Bjango for their awesome and extensive contributions and just brilliant work!

iStatMenus.png


The recent iStatMenus beta distribution can be achieved here: https://s3.amazonaws.com/bjango/files/istatmenus6/957.zip …
The HWSensor and FakeSMC kext distribution of @interferenc can be achieved here: https://github.com/interferenc/HWSensors
To compile the the HWSensor kexts, perform the individual steps detailed below:

1.)
Code:
git clone https://github.com/interferenc/HWSensors
2.)
Code:
cp HWSensors ~/Desktop/
3.)
Code:
cd ~/Desktop/HWSensors
4.)
Code:
xcodebuild -project Versioning\ And\ Distribution.xcodeproj/
5.)
Code:
xcodebuild -project HWMonitor.xcodeproj/
6.)
Code:
xcodebuild -project HWSensors.xcodeproj -alltargets

Subsequently, one finds the all compiled binaries in ~/Desktop/HWSensors/Binaries/.

Note that all compiled kext binaries are once more attached below. Just download and unzip HW-Sensors.zip and copy all kexts to /EFI/Clover/kexts/Other/.

Remaining problems:

a.) CPU Package Cores and CPU package DRAM power consumption apparently not supported by sensor kexts...
b.) GPU Fan speed at 100 rpm for water blocked Nvidia GPU :)

Enjoy and have fun,

kgp.png
 

Attachments

  • HW-Sensors.zip
    161.9 KB · Views: 142
Last edited:
Status
Not open for further replies.
Back
Top