Contribute
Register

How to build your own iMac Pro [Successful Build/Extended Guide]

Status
Not open for further replies.
What a pain this motherboard.
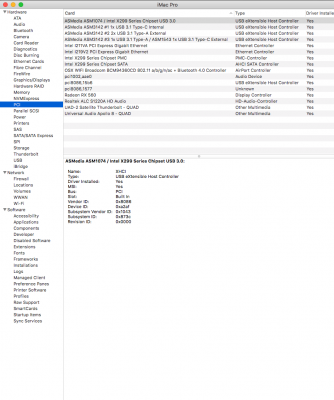
Trying to use the TB3 card.

It took me like 20 reboots and almost as many bios reset for finally recognising the card (and the clear bios button at the back doesn't work, gotta short 2 pins on the motherboard). And the manual is super crap.

About every reboot out of three it just hangs with the card in.

The documentation states it can be installed in Port 1,2,4,5, yet it cant fit in Port 4 as it's a PCI x1 slot.
A search indicate that the card can only work in Port 2.
That limits the width of the graphic card to be exactly 2 slots.

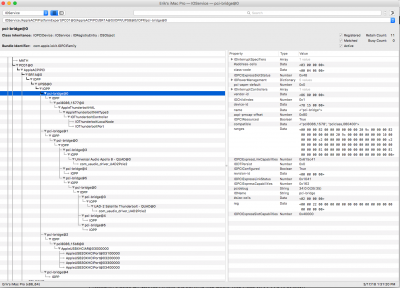
The NVM version of the card is much older than the one on the Designare (25 VS 20).

Im about ready to throw that motherboard through the window.

There's one thing better with the TB3 card however, it doesn't matter which DP in slots you use to connect to the graphic card, it works regardless.
 
DSM2, What kexts do you have installed?

Maybe there are some I have there that are causing issues... Could you post your EFI folder?

I will upload my efi later for you.
 
Here is my EFI for the X299 Designare EX.
Don't wonder about the audio chip on the motherboard.
I don't need it at all so I did not implement anything for it.
 

Attachments

  • EFI.zip
    3.3 MB · Views: 130
Hi @kgp,

I've successfully followed and implemented your guide in full, and after doing the step by step PCI implementation, the only thing I cannot seem to get working is the TB3 hot-swap. It's the one that breaks all the other PCI implementations.

Other than my graphics card and RAM, my build is mostly identical to yours - specifically which PCI slots I am using.

I noticed in my ioreg for the TB3 that there is no 'PEGP' as listed in the SSDT, the address seems to go PCI01-BR1A-UPSB-pci-bridge. I've tried to mess with it but nothing seems to work. Is it something additional I need to add in clover?

I've read and re-read everything numerous times so I am not sure what I might be missing.

The attached SSDT labeled 'working' has everything perfect, but as soon as I use the one labeled 'add TB', all of my entries are missing. Please let me know if I should upload anything else.

Any help would be greatly appreciated as this is the last step to completing this incredible build!

Thank you in advance for this, and for everything your amazing guide and thread has bestowed upon the community!


EDIT: I found a post where you mentioned we have to disable SL01 -> UPSB in clover and viola, everything shows up! Now to test hot-swap!
 

Attachments

  • Screen Shot 2018-03-17 at 1.31.13 PM.png
    Screen Shot 2018-03-17 at 1.31.13 PM.png
    272.6 KB · Views: 184
  • SSDT-X299-iMacPro - working.aml
    3.9 KB · Views: 133
  • SSDT-X299-iMacPro - add TB.aml
    6.1 KB · Views: 109
  • config - EG.plist
    10.4 KB · Views: 206
  • Screen Shot 2018-03-17 at 2.13.51 PM.png
    Screen Shot 2018-03-17 at 2.13.51 PM.png
    191.1 KB · Views: 170
Last edited:
Here is my EFI for the X299 Designare EX.
Don't wonder about the audio chip on the motherboard.
I don't need it at all so I did not implement anything for it.

That is really a super slim EFI !
There's nothing at all in there.
X299USB.kext is that the equivalent to the USB port limit patch?

And you can put the machine to sleep with just that ?
amazing
 
I noticed in my ioreg for the TB3 that there is no 'PEGP' as listed in the SSDT, the address seems to go PCI01-BR1A-UPSB-pci-bridge. I've tried to mess with it but nothing seems to work. Is it something additional I need to add in clover?

The PEGP device doesn't appear in the DSDT, it's a standard device attached to BR1A where the TB is attached. IT's attached to SL01 device.
What the DSDT do is disabled both SL01 and PEGP ...
 
That is really a super slim EFI !
There's nothing at all in there.
X299USB.kext is that the equivalent to the USB port limit patch?

And you can put the machine to sleep with just that ?
amazing

X299 Usb Kext is my Kext for all USB Ports which I use. It also includes the X299 Deluxe and all ports for iMac/iMac Pro and MacPro 6,1 SMBios. It’s not necessary most of the time but normally you have to implement USBX what I don’t need since I just created the Kext with all ports defined and with the file in your EFI
AppleBusPowerController will load correctly, what it does not all the time without the Kext! I know the usb controller was natively implemented in AppleUSBXHCISPT3 but this doesn’t mean that MacOS knows which connector type the port is on its own for example is and this can bring problems.

I don’t need any USB port limit patch at all and yes this way sleep works on my rig.

But I still have to mess around with hot plug via thunderbolt. After Sleep I have to reboot my System since my UAD Apollo will not be recognised anymore since it can’t just connect without hotplug feature.
 
Last edited:
X299 Usb Kext is my Kext for all USB Ports which I use. It also includes the X299 Deluxe and all ports for iMac/iMac Pro and MacPro 6,1 SMBios. It’s not necessary most of the time but normally you have to implement USBX what I don’t need since I just created the Kext with all ports defined and with the file in your EFI
AppleBusPowerController will load correctly, what it does not all the time without the Kext! I know the usb controller was natively implemented in AppleUSBXHCISPT3 but this doesn’t mean that MacOS knows which connector type the port is on its own for example is and this can bring problems.

I don’t need any USB port limit patch at all and yes this way sleep works on my rig.

But I still have to mess around with hot plug via thunderbolt. After Sleep I have to reboot my System since my UAD Apollo will not be recognised anymore since it can’t just connect without hotplug feature.


I'm having the exact problem with UA Arrow -- it requires hot plug in order for it to be recognized by the UAD Meter & Control Panel.

@kgp Also, when I boot, I have to boot from my USB drive and then select the HD from the Clover Bootloader, which is how I've used my machine for the last three to four months. How do I get the bootloader onto the HD so that I can still get into the OS without the thumb drive? How and where do I set that EFI partition onto the HD? The BIOS doesn't recognize the HD, but it does recognize the USB thumb drive. Thank You so much!
 
I received the ASRock Professional Gaming i9 XE this morning and now I have time to set it up...
So I'm not going to work on the Designare any more...
As such, I'm posting what I have achieved so far, in the hope that it will help others.
The included SSDT doesn't contain anything optional, only stuff found on the motherboard. So the entry for the graphic card, the airport card or the TB3 external card isn't there.
If you do have a nvidia card, fitted in the PCI 1 slot, you can take @kgp GFX0 entry SSDT as is.
I have never bothered to get audio working, I have no need for it.

What works:
- Thunderbolt devices show up in the PCI list.
- All motherboard devices are showing
- USB 3.1 USBC devices connected on the TB3 ports are working, provided you boot the mac with it
- Sleep/Wake works, provided you disable TB3 in the BIOS
- Various sensors with the latest iStat Menu

What doesn't work:
- Audio (but I have no doubt it would be trivial to fix, just follow @kgp instructions)
- Waking the mac if it's sleeping if you have TB3 enabled in the BIOS
- TB3 Hotplug
- USB C 3.1 hotplug. The USB devices must be plugged before booting.

For sleep/wake to work (with TB3 disabled), you need to go into the BIOS and enable Platform Power Management (in addition to the other BIOS settings @kgp as listed on the first page)

For people using more than two DP screens, install in the EFI/CLOVER/kexts/Other directory the Lilu.kext and VegaGraphicsFixup.kext. With the 10.13.4 beta, I get no display working at all without them. So if you have screen issue, I recommend that you install it.

I'm hoping that the sleep/wake issue is only a matter of BIOS configuration, I've tried a few things, none worked.
I don't think TB3 hotplug will ever work.

Remember to edit the Clover's config.plist and change the serial number smUUID

Enjoy.
I'll report soon how it went with the ASRock MB and ASRock TB3 cards.

I can't have TB3 hot plug not work -- that defeats the whole purpose of building this system with the TB3-friendly motherboard!
 
@kgp Also, when I boot, I have to boot from my USB drive and then select the HD from the Clover Bootloader, which is how I've used my machine for the last three to four months. How do I get the bootloader onto the HD so that I can still get into the OS without the thumb drive? How and where do I set that EFI partition onto the HD? The BIOS doesn't recognize the HD, but it does recognize the USB thumb drive. Thank You so much!

Just download Clover Configurator, mount your EFI Partition from your USB Thumb Drive with CC.
Copy the EFI Folder, mount your EFI Partition on your MacOS Drive and Paste the EFI Folder in it and that’s it!
 
Last edited:
Status
Not open for further replies.
Back
Top