Contribute
Register

High Sierra on Intel DH77DF motherboard: MultiBeast support and something to fix

Status
Not open for further replies.
Joined
Jan 3, 2019
Messages
12
Motherboard
Intel DH77DF
CPU
i5-3570T
Graphics
HD 2500
Mobile Phone
  1. Android
Hi, I installed Mojave on my new PC for the first time. I followed the guide for the installation of the 3 operating systems on a single HD but I stopped at the end when I have to use MultiBeast. I do not know which drivers to choose for my hardware configuration. I need help.

Thanks a lot!
 
Last edited:
nobody can help me?
 
The following settings might be worth starting with. Hopefully someone with a similar CPU and Chipset can comment as well...

Quick Start --> Choose UEFI boot mode
Drivers --> Audio --> Choose AppleALC
Drivers --> Disk --> Choose Intel Generic AHCI SATA
Drivers --> Misc --> Choose FakeSMC Plugins (not sure if you need NullCpuPowerManagement)
Drivers --> Network --> Expand the "Intel" section and choose IntelMausiEthernet 2.4.0
Drivers --> USB --> Choose Remove XHCI USB Port Limit and USBInjectAll
Bootloaders --> Choose Clover UEFI Boot Mode + Emulated NVRAM (3rd option)
Customize --> Graphics Configuration --> Choose Core Graphics Fixup AKA WhateverGreen
Customize --> SSDT Options --> (don't select any of them)
Customize --> System Definitions --> (keep current setting; do not change)

I started the project with a multiboot UEFI (guide link here)
I followed your guide to do the post installation process but now, booting whithout the UniBeast usb key, in the Bios and in Clover i can't see the UEFI boot of OSX and i see only Windows and Linux UEFI. Before this, booting CLover with UniBeast usb key i can see all the UEFI partitions. What's happened?
About NullCpuPowerManagement, how can i know if i need it?

Thank you very much for your help!
 
Last edited:
I started the project with a multiboot UEFI (guide link here)
I followed your guide to do the post installation process but now, booting whithout the UniBeast usb key, in the Bios and in Clover i can't see the UEFI boot of OSX Mojave and i see only Windows and Linux UEFI. Before this, booting CLover with UniBeast usb key i can see all the UEFI partitions. What's happened?
About NullCpuPowerManagement, how can i know if i need it?

Thank you very much for your help!
You can still boot from the USB flash disk and see if the macOS disks appear in Clover.

Sometimes doing a full shutdown helps. This means unplugging the power cable for about 10 seconds to clear CMOS, then restarting.

Please note that the Mojave SSD must contain an EFI partition, and that partition must contain a folder called EFI, and inside that folder must be a folder called BOOT containing BOOTX64.efi. Only then will the drive be considered bootable.
Hi, tried with the usb bootloader and without but i can see only the Windows 10 and Linux partitions in Clover...
How can i fix this?
I really appreciate your help!
thank you
 
Hi, tried with the usb bootloader and without but i can see only the Windows 10 and Linux partitions in Clover...
How can i fix this?
I really appreciate your help!
thank you
  • If the EFI partition on the Mojave SSD is damaged or missing, then it will not appear as a bootable disk.
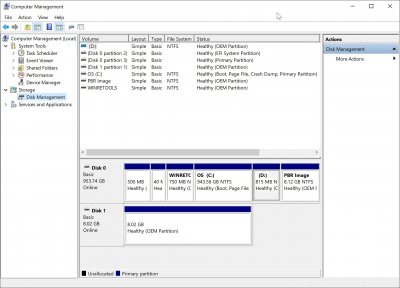
  • So how can you check if the EFI partition is damaged or missing? The easiest would be to boot into Windows and use Disk Management to see if the EFI partition exists.
  • In Windows, right-click on "This PC" and choose "Manage". When the Manage application opens, choose Disk Management.
  • Look in both the top and bottom parts of the window to see if you can find the Mojave EFI partition.
  • If you find it, see if you can right-click on it and "Mount" it to Windows. It is a FAT32 filesystem, so Windows can easily read and write to it.
  • If you can mount it, check that it has an EFI folder with a BOOT subfolder with a file called BOOTX64.efi inside.

    389926
 
  • If the EFI partition on the Mojave SSD is damaged or missing, then it will not appear as a bootable disk.
  • So how can you check if the EFI partition is damaged or missing? The easiest would be to boot into Windows and use Disk Management to see if the EFI partition exists.
  • In Windows, right-click on "This PC" and choose "Manage". When the Manage application opens, choose Disk Management.
  • Look in both the top and bottom parts of the window to see if you can find the Mojave EFI partition.
  • If you find it, see if you can right-click on it and "Mount" it to Windows. It is a FAT32 filesystem, so Windows can easily read and write to it.
  • If you can mount it, check that it has an EFI folder with a BOOT subfolder with a file called BOOTX64.efi inside.

    View attachment 389926
Hi, i used MiniTool Partition Wizard Free Edition to Mount the UEFI image and Explorer++ to view the folders.
Yes there is the EFI folder with a BOOT subfolder with a file called BOOTX64.efi inside. I think the problem is the Apple folder (there it is) maybe... no? Clover boots normally but there isn't the OSx Mojave icon..
What can i do?

Thank you very much!
 
Last edited:
Hi, I installed Mojave on my new PC for the first time. I followed the guide for the installation of the 3 operating systems on a single HD but I stopped at the end when I have to use MultiBeast. I do not know which drivers to choose for my hardware configuration. I need help.

Thanks a lot!

I decided to start over by installing only the mac High Sierra operating system in order to set it up completely and then proceed with the triple or dual boot with the other operating systems. I hope some moderator will move the topic to the high sierra section!

I used he following settings with good results:

Quick Start --> UEFI Boot Mode
Drivers --> Audio --> Realtek ALC898
Drivers --> Disk --> Intel Generic AHCI SATA
Drivers --> Misc --> FakeSMC Plugins
Drivers --> Network --> IntelMausiEthernet 2.4.0
Drivers --> USB --> 7/8/9 Series Usb support + Remove XHCI USB Port Limit +USBInjectAll
Bootloaders --> Choose Clover UEFI Boot Mode
Customize --> Graphics Configuration --> not selected
Customize --> SSDT Options --> not selected
Customize --> System Definitions --> not selected (will be installed iMac 14,2 as default)

Everything works well except few small things.. I will write about it in the next post!
 
Last edited:
First Point: Intel turbo boost technology

I noticed that the Intel turbo boost technology does not activate under any circumstances.
The processor, intel quad core 3570T, in normal mode runs at 2.30 ghz while in turbo mode it should reach 3.30 ghz as per specifications.

IMG_20200110_160756.jpg


In the bios I set the intel turbo boost technology active but the processor never exceeds 2.30 ghz even using the "yes" command in the terminal to increase the CPU load:

IMG_20200109_151918.jpg


By doing a search I found a method to activate macOS native power management by modifying only the config.plist file with clover configurator

This method is one of the easiest method to enable macOS native power management without any need of a SSDT.

CPU
Make sure that you've set the correct UEFI/BIOS settings for your system and a correct SMBIOS.

  1. Mount your EFI partition
  2. Navigate to : EFI/Clover/config.plist
  3. Open your config.plist file
  4. Go to ACPI/SSDT/Generate and set PluginType=YES
GPU

  1. Make sure that the above settings has been implemented
  2. Mount your EFI partition
  3. Open your config.plist file.
  4. Navigate to Acpi tab and add the following patch in DSDT section of your config.plist.


Code:

Comment: change GFX0 to IGPU
Find* [HEX]: 47465830
Replace* [HEX]: 49475055

This technique is introduced by RehabMan, all credit goes to him.

Note :

  • Some config.plist have set GenerateCstates, Pstates to true/YES, if your config.plist has such values, set it to false/NO.

IMG_20200110_161337.jpg


These are the results:

IMG_20200109_154020.jpg


..with the "yes" command launched 4 times, the intel turbo boost technology is deactivated, I think it is normal because the cpu reaches higher temperatures ..

IMG_20200109_154322.jpg


... with Ableton Live, simulating a CPU load of 80%, I did not understand why it is reported that the core CPU is used only at 23% ...


IMG_20200109_172506.jpg


EDIT: i set config.plist/KernelAndKextPatches/KernelXCPM=true and this is the result while i run a benchmark with Geekbench 5 (380% ?????)

IMG_20200110_192751.jpg


I would like to understand if macOS native power management works correctly or I have to use an SSDT as reported in this guide: Mavericks: Native CPU/IGPU Power Management


Soon I will insert the second point concerning the correct functioning of the monitor .. thank you very much everyone!
 
Last edited:
Status
Not open for further replies.
Back
Top