Contribute
Register

Haswell-E + X99 Motherboard Temporary Guide - OS X 10.10

Haswell-E + X99 Motherboard Temporary Guide - OS X 10.10.0

Hello everybody,

my system is: i7 5820k, Asus X99-a, Asus R9 280x, 2x8GB Crucial Ballistix, 250 GB Samsung SSD

I installed Yosemite following the guide at the beginning. It worked out o.k., but now I'm facing difficulties getting it to work without -x flag. I have Bios 1004 and used Multibeast for postinstallation (dsdt-free+6coreVodoo+USB3.0+chimera+MacPro 6.1). If I don't use any stick I get here:
IMG_0827.jpg

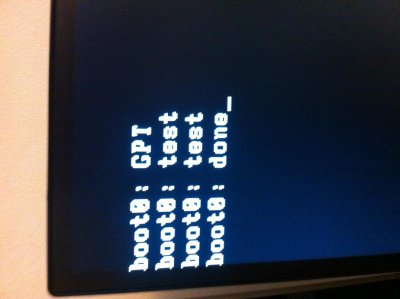
and if I use the usb-stick without -x I get her:

IMG_0843.jpg

I tried to copy the settings from macphotophile post #312, so it looks like this now:

org.chameleon.Boot.plist


EthernetBuiltin=Yes
GraphicsEnabler=No
Kernel Flags:
-v -f kext-dev-mode=1 npci=0x2000
Legacy Logo=Yes
Timeout=2
UseKernelCache=No


...loaded optimized defaults in Bios, disabled secureboot. Also tried to find the older fakesmc macphotophile mentioned (but I couldn't find older fakesmc's in the tonymac-download section, so I took one from here:http://sourceforge.net/projects/hwsensors/). Also macphotophile mentioned a voodoohda and a appleIGB that need to be disabled, but I couldn't find them in my S/L/E folder on the harddisk. In general the way macphotophile describes his procedure makes me feel I should do the same on my system, but I have a few questions:

- where can I disable bluetooth in the bios?
- where can I get the old fakesmc that was mentioned
- do I have to repair permissions after using multibeast or after deleting a kext or after changing a .plist? (to install a kext I use kextbeast)
- do I have to use boomrrs method with clover anyway because of the R9 GPU? (it is being recognized as a 7xxxx card now if I remember correctly)

I tried to install clover once, but when I chose the UEFI-only installation it couldn't finish the installation and ended abruptly. When I chose the other method I could install it and use the configurator with it, but it didn't boot at all. But with clover I'm not sure if i'm using it correctly...

Thanks a lot for any help! I'm really glad I got to see Yosemite on my build at least with -x mode. Hopefully the rest will workout, too. It's really great that you people make this happen in general!

All the best

Janzwo
 

Attachments

  • IMG_0827.jpg
    IMG_0827.jpg
    471.4 KB · Views: 104
Haswell-E + X99 Motherboard Temporary Guide - OS X 10.10.0

OK I read through the entire 38 pages of this thread. I was hoping that a thorough examination of the info therein would solve any problems that I might have or answer any questions. Unfortunately I’m still having some issues.

I’ll start with the system configuration:

Intel Core i7 5820K
Asus X99-A BIOS version 1004 (VT-d disabled / disabled CPU power management / set USB with both partial and full initialization which seems to make no difference)
Crucial 4GB DDR4 2133 DIMM
Intel 330 240GB SSD
HD 6870

I added the VoodooTSCSync.kext then patched the Unibeast USB installer stick and added “npci=0x2000’” to the org.chameleon.Boot.plist of the installer.

Installed Yosemite, rebooted with Unibeast and patched the install. I am then able to enter the Yosemite install on the SSD in safe mode by using the USB stick with the following flags:

-x -v -f npci=0x2000 kext-dev-mode=1

That part was all relatively easy thanks to all the hard work put in by the intrepid individuals that contributed and paved the way. A big thanks goes out to you all.


Unfortunately things go down hill for me after that.

ideally I would then use MultiBeast but every option I have tried (under EasyBeast or DSDT free) has made the install unbootable even with the UniBeast USB installer and every boot flag I could think off. Usually stopping with a system uptime notification.

So I’ve reinstalled several times now,….

Right now the things that come to mind are:

1) issues using an HD 6870 in Yosemite
2) Possible bad BIOS setting
3) bad kext option in the MultiBeast installer

I have a GTX 760 I could use if that would help and I am going over my BIOS settings agin carefully.

Can anyone share exactly what options they used with MultiBeast (especially so if you’re an Asus user)? I’m not sure how to disable a kext as was mentioned before so if there is a kext that is part of a mandatory install from a MultiBeast install option (EasyBeast or DSDT free) then would deleting the kext and repairing permissions before rebooting work? If not how would one disable a wayward kext before it becomes a problem?

One other thing,…..

When I created and patched the UniBeast USB stick I am using now it was via the two command method. Before it was edited down to the single command it is now in the original post.

Should I just start over and use the single patch command to create a fresh UniBeast USB install stick,……?


Any help would be greatly appreciated.

Thanks in advance.

Oct.
 
Haswell-E + X99 Motherboard Temporary Guide - OS X 10.10.0

Installed Yosemite, rebooted with Unibeast and patched the install.

I am then able to enter the Yosemite install on the SSD in safe mode by using the USB stick with the following flags:

-x -v -f npci=0x2000 kext-dev-mode=1

You don't patch the install at this step. You open Terminal and copy the already patched kernel that's on your UniBeast key over to the proper location on your newly installed Yosemite using the terminal command at the beg. of this post - thereby replacing the kernel installed by Yosemite installer with the one on your USB.

Once you copy over patched kernel to your SSD, exit Terminal/Yosemite installer & reboot. Again, pressing F8 at POST and selecting your USB key for boot. But now, select your Yosemite install. Only flags you should need are -v (and maybe -x for safe mode) .... npci and kext-dev-mode should already be on your USB key's org.chameleon.boot. plist - entering them now has no effect.

Unfortunately things go down hill for me after that.

ideally I would then use MultiBeast but every option I have tried (under EasyBeast or DSDT free) has made the install unbootable even with the UniBeast USB installer and every boot flag I could think off. Usually stopping with a system uptime notification.

So I’ve reinstalled several times now,….

Oct.

Please see this post from me for UEFI/BIOS settings:
http://www.tonymacx86.com/yosemite-...orary-guide-os-x-10-10-0-a-34.html#post918063

Don't confuse deleting a kext with not selecting a kext in MultiBeast to install in the first place. Your MB settings should be pretty simple. For now, basically the VooDoo 6 core patch, USB3, network adapter, and system definition is all you should need. I'm attaching a MultiBeast file that works for my X99-Deluxe. Since you have SSD boot drive + 6-core CPU, this should work for you as well. **MAYBE** I'd open this file up & add NullCPUPowerManagement to help (for now) with power mgmt issues.

Also, once you finish installing MultiBeast, don't forget to go into your org.chameleon.boot.plist and make sure to add npci=0x2000 .... it goes on the same line as kext-dev-mode...just put a space after it & then type npci=0x2000.
 

Attachments

  • ASUS X99Deluxe v1.4.mb
    4.5 KB · Views: 138
Haswell-E + X99 Motherboard Temporary Guide - OS X 10.10.0

ssdt is not injecting anything; installed improperly, incompatible or simply not working.
Remove installed ssdt and download ssdt-1 from Post #229.
Rename and install to EFI/CLOVER/ACPI/patched/SSDT.aml.
Reply with new Clover boot log, config.plist and IOReg.
 
Haswell-E + X99 Motherboard Temporary Guide - OS X 10.10.0

OK I read through the entire 38 pages of this thread. I was hoping that a thorough examination of the info therein would solve any problems that I might have or answer any questions. Unfortunately I’m still having some issues.

I’ll start with the system configuration:

Intel Core i7 5820K
Asus X99-A BIOS version 1004 (VT-d disabled / disabled CPU power management / set USB with both partial and full initialization which seems to make no difference)
Crucial 4GB DDR4 2133 DIMM
Intel 330 240GB SSD
HD 6870

I added the VoodooTSCSync.kext then patched the Unibeast USB installer stick and added “npci=0x2000’” to the org.chameleon.Boot.plist of the installer.

Installed Yosemite, rebooted with Unibeast and patched the install. I am then able to enter the Yosemite install on the SSD in safe mode by using the USB stick with the following flags:

-x -v -f npci=0x2000 kext-dev-mode=1

That part was all relatively easy thanks to all the hard work put in by the intrepid individuals that contributed and paved the way. A big thanks goes out to you all.


Unfortunately things go down hill for me after that.

ideally I would then use MultiBeast but every option I have tried (under EasyBeast or DSDT free) has made the install unbootable even with the UniBeast USB installer and every boot flag I could think off. Usually stopping with a system uptime notification.

So I’ve reinstalled several times now,….

Right now the things that come to mind are:

1) issues using an HD 6870 in Yosemite
2) Possible bad BIOS setting
3) bad kext option in the MultiBeast installer

I have a GTX 760 I could use if that would help and I am going over my BIOS settings agin carefully.

Can anyone share exactly what options they used with MultiBeast (especially so if you’re an Asus user)? I’m not sure how to disable a kext as was mentioned before so if there is a kext that is part of a mandatory install from a MultiBeast install option (EasyBeast or DSDT free) then would deleting the kext and repairing permissions before rebooting work? If not how would one disable a wayward kext before it becomes a problem?

One other thing,…..

When I created and patched the UniBeast USB stick I am using now it was via the two command method. Before it was edited down to the single command it is now in the original post.

Should I just start over and use the single patch command to create a fresh UniBeast USB install stick,……?


Any help would be greatly appreciated.

Thanks in advance.

Oct.
You aren't supposed to use multibeast. After you get the initial install with Unibeast done you then switch over to clover as your bootloader.
 
Haswell-E + X99 Motherboard Temporary Guide - OS X 10.10.0

samtimbaud, I seem to recall in the early days of this thread you had some trouble getting Yosemite installed. Do you think that might have been because of the large memory?

Do you have any special advice to someone building a system with memory beyond 32 GB?

thanks

use Gskill beyond 2400 mhz if you want activate XMP
 
Haswell-E + X99 Motherboard Temporary Guide - OS X 10.10.0

You aren't supposed to use multibeast. After you get the initial install with Unibeast done you then switch over to clover as your bootloader.

Actually, per the instructions of the original post by Tonymac, yes you are. What you're suggesting is an alternate method to getting your system up & running that is a variation of the OP.

Since you are having success with the hybrid Unibeast/Clover method, maybe you could start a new thread for an "alternate" temporary guide for Haswell-E + X99 for OS X 10.10.0.

We really should do what we can to keep the integrity of this thread (UniBeast/MultiBeast). FWIW, my system is working pretty well simply following this guide (with the exception of iMessage, and personally that is not a dealbreaker issue for me).
 
Haswell-E + X99 Motherboard Temporary Guide - OS X 10.10.0

ssdt is not injecting anything; installed improperly, incompatible or simply not working.
Remove installed ssdt and download ssdt-1 from Post #229.
Rename and install to EFI/CLOVER/ACPI/patched/SSDT.aml.
Reply with new Clover boot log, config.plist and IOReg.
Okay I used your SSDT instead and it's working perfect now without the HDAfix.

Actually, per the instructions of the original post by Tonymac, yes you are. What you're suggesting is an alternate method to getting your system up & running that is a variation of the OP.

Since you are having success with the hybrid Unibeast/Clover method, maybe you could start a new thread for an "alternate" temporary guide for Haswell-E + X99 for OS X 10.10.0.

We really should do what we can to keep the integrity of this thread (UniBeast/MultiBeast). FWIW, my system is working pretty well simply following this guide (with the exception of iMessage, and personally that is not a dealbreaker issue for me).

That would just make things more confusing by having two alternate threads running.

btw my iMessage is working.
 
Haswell-E + X99 Motherboard Temporary Guide - OS X 10.10.0

That would just make things more confusing by having two alternate threads running.

And you think contradicting Tonymac's original post instructions and suggesting the use of Clover is not?
 
Haswell-E + X99 Motherboard Temporary Guide - OS X 10.10.0

And you think contradicting Tonymac's original post instructions and suggesting the use of Clover is not?
nope cuz clover is better
 
Back
Top