
You are using an out of date browser. It may not display this or other websites correctly.
You should upgrade or use an alternative browser.
You should upgrade or use an alternative browser.
Guide: Update OS X Mavericks to OS X Yosemite Using UniBeast and MultiBeast
- Thread starter tonymacx86
- Start date
- Joined
- Dec 5, 2013
- Messages
- 3
- Mac
- Classic Mac
- Mobile Phone
I was having issues upgrading and thought I'd pass along the info in case anyone is running into the same problem. During install my computer was kernel panic and shut off after about 10 minutes in the installation. After a couple hours I gave up and went to bed. The next morning everything installed fine.
The take away is if you are having a kernel panic and immediately shutting off then your computer is probably over heating. Let it cool down completely and try again.
The take away is if you are having a kernel panic and immediately shutting off then your computer is probably over heating. Let it cool down completely and try again.
- Joined
- Sep 13, 2012
- Messages
- 10
- Motherboard
- GA-B75M-D3P
- CPU
- Intel Core i7 3.39 GHz
- Graphics
- HD 4000
- Mac
- Classic Mac
- Mobile Phone
GA-B75M-D3P, i7-3770 system updated directly from Mountain Lion with no issues. Took awhile, but smooth sailing all the way through. Many thanks for the clear instructions, as always!
- Joined
- Jun 30, 2011
- Messages
- 74
- Motherboard
- Gigabyte Z68x-UD5-B3
- CPU
- Core i7 2600k 3.4GHZ
- Graphics
- ATI Radeon 6870
- Mac
- Classic Mac
- Mobile Phone
Save all of your settings, files, apps, etc... by following this simple guide to upgrade OS X Mavericks to OS X Yosemite.
1. Boot OS X Mavericks
2. Remove /Extra/modules/FileNVRAM.dylib if present
3. Remove /System/Library/Extensions/GenericUSBXHCI.kext if present
4. Edit /Extra/org.chameleon.Boot.plist to remove the following 2 lines if present:
View attachment 107204
Just started my upgrade following this method and when I go to boot into the USB drive wit Yosemite, I get a grey screen with the following message.
Can't find /mach_kernel
Press any key to continue ...
When I hit the key, it takes me back to the "Choose your OS" screen.
Ideas?
- Joined
- Jun 30, 2011
- Messages
- 74
- Motherboard
- Gigabyte Z68x-UD5-B3
- CPU
- Core i7 2600k 3.4GHZ
- Graphics
- ATI Radeon 6870
- Mac
- Classic Mac
- Mobile Phone
Disregard prior post. I never got it to boot properly by switching in the standard bootloader. Instead, I switched the BIOS to boot directly from the USB and that sorted it out. Everything else went off without a hitch.
- Joined
- Dec 14, 2014
- Messages
- 2
- Motherboard
- Z87X-UD3H
- CPU
- i7-4770 3,4GHz
- Mac
- Classic Mac
- Mobile Phone
when the installation of Yosemite start the monitor turns off and there is no video signal 
what is the problem guys?
EDIT: resolved
what is the problem guys?
EDIT: resolved
Last edited:
- Joined
- Jun 26, 2012
- Messages
- 32
- Motherboard
- PC/Mac
- CPU
- Intel i7 3770K
- Graphics
- nividia 570gtx
- Mac
- Classic Mac
- Mobile Phone
I almost gave up. I have no idea, but the installer always holds after the Apple load screen shows up. I also tried it on another machine and there it loads 50% and then screen turns black.
Board: Gigabyte x79-ud5, BIOS 12, with gtx 560ti
Also tried different USB ports. Like USB 2.0 USB 3.0 etc..
also tried different loader settings like: -v -x -f and all I got was a hold after PCI configuration
Board: Gigabyte x79-ud5, BIOS 12, with gtx 560ti
Also tried different USB ports. Like USB 2.0 USB 3.0 etc..
also tried different loader settings like: -v -x -f and all I got was a hold after PCI configuration
- Joined
- May 3, 2012
- Messages
- 151
- Motherboard
- Gigabyte X79-UD3
- CPU
- i7 X9730k
- Graphics
- Nvidia GeForce GTX670 OC
- Mac
- Classic Mac
- Mobile Phone
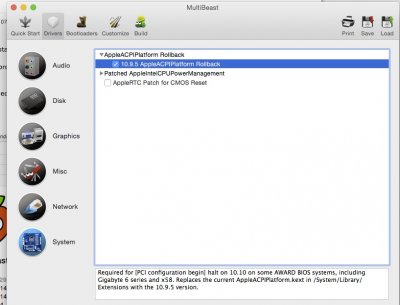
Have you tried the 10.9.5 rollback kext within MB. See attached. This was a solution for my other mobo. I actually didn't have any issues upgrading on my X79 UD3 mobo. Make sure you removed the kexts and files as per the instructions (if upgrading). The following is my plist. Everything is working fine although I seem to be having an issue where the computer is not releasing my "file cache" This is a problem that I have had in the past but was resolved by booting in safe mode and then restarting. Let me know if there is anything else you find out. This cache issue is very annoying.
<key>EthernetBuiltIn</key>
<string>Yes</string>
<key>GraphicsEnabler</key>
<string>No</string>
<key>IGPEnabler</key>
<string>Yes</string>
<key>Kernel Flags</key>
<string>npci=0x2000 kext-dev-mode=1</string>
<key>Legacy Logo</key>
<string>Yes</string>
<key>Timeout</key>
<string>2</string>
<key>UseKernelCache</key>
<string>Yes</string>
<key>HDEFLayoutID</key>
<string>01000000</string>
<key>HDAEnabler</key>
<string>Yes</string>
Attachments
- Joined
- Jun 26, 2012
- Messages
- 32
- Motherboard
- PC/Mac
- CPU
- Intel i7 3770K
- Graphics
- nividia 570gtx
- Mac
- Classic Mac
- Mobile Phone
Thanks.. followed your instruction. Did not work.
Also got me a brand new USB stick and still the same result.
Once the monitor get grey and the logo appears it stops.
I don't really think it has to do with the installed Os, I also tried an empty harddrive. Still it stops...
Checked the BIOS, all ok, all in the way it should and latest update.
Also got me a brand new USB stick and still the same result.
Once the monitor get grey and the logo appears it stops.
I don't really think it has to do with the installed Os, I also tried an empty harddrive. Still it stops...
Checked the BIOS, all ok, all in the way it should and latest update.
- Joined
- May 3, 2012
- Messages
- 151
- Motherboard
- Gigabyte X79-UD3
- CPU
- i7 X9730k
- Graphics
- Nvidia GeForce GTX670 OC
- Mac
- Classic Mac
- Mobile Phone
have you tried to boot with the graphics card? Also, I have had luck doing clean installs. Then taking the HDD out of the computer and ran MB using another computer (HDD enclosure) then reinserting in the computer and seeing if it starts. If you had the computer up and running with 10.8.5 you can always carbon copy that back on your HDD and then try the update method as per the tonymac instructions. You have to be careful not to install TRIM until you disable the necessary settings using Trim Enabler.
Copyright © 2010 - 2024 tonymacx86 LLC