
- Joined
- Feb 11, 2017
- Messages
- 10
- CPU
- Intel Core i5
- Graphics
- Intel HD4000
- Mac
[GUIDE] [LONG-TERM SUPPORT] SONY VAIO FIT 15E SVF-SERIES
macOS HIGH SIERRA 10.13

INTRODUCTION AND EXPLANATION
WHY AM I OPENING A SPECIAL VAIO THREAD, AND PUT EFFORT IN COMPATIBILITY AND LONG-TERM SUPPORT?
I'm using the VAIO SVF notebook every day - when at university, not at home, etc. Means, my macOS
installation is approved day by day, under different and real conditions. I'm working with DSDT and
SSDT's, perfectly pitched for native hardware support on VAIO.
MAIN REASONS:
DURABILITY (besides, SVF case is a dream for changing components)
RELIABLE COMPATIBILITY TO HARDWARE AND MAC OS X. Allows using the VAIO as a serious notebook.
CONTINUOUS SUPPORT BY MANUFACTURER. It’s nice to see that Sony still puts afford in keeping the VAIO
online database up to date. At the end of 2016 they started a new BIOS firmware distribution - in
turn this made some things easier with Clover.
WHO IS IT FOR?
I started this thread with a structured step by step guide, for installing a fresh macOS High Sierra
10.13 on your VAIO. Therefore the thread is currently most suitable to newer users, just starting
getting in touch with installing macOS on a VAIO. It's recommended to have small knowledge in
handling macOS, and to take a short skim over RehabMan's [FAQ] READ FIRST! Laptop Frequent
Questions. No need to be afraid, no need to have high knowledge about Clover bootloader, DSDT/SSDT
and Kext background at this point.
* This guide is primary meant for VAIO SVF1521 models. When following this guide you agree to take
the risks and responsibilities of losing data. Always backup!
TUTORIAL UPDATES
ACTUALLY I'M STILL UPDATING THE GUIDE THREAD. IF YOU'RE NOT FAMILIAR WITH MACOS HIGH SIERRA INSTALLATION ETC, PLEASE WAIT UNTIL I REMOVED THIS HINT!
CREDITS
Know-how and much important input from king of VAIO configuration johnrey
Lots of Kext's and solutions from tonymacx86 an RehabMan
Native audio wouldn't have been possible without Micky1979 and Mirone.

---
SPECIFICATIONS VAIO SVF1521O4E
WORKING
SOMETIMES WORKING
NOT WORKING
REQUIRED COMPONENTS
--
PRE-PROCESS
SPECIALISE USB EFI PARTION FOR VAIO
CLOVER FOLDER BACKUP TO USB
---
VAIO PROCESS
[/SIZE]
---
POST PROCESS
macOS HIGH SIERRA 10.13
INTRODUCTION AND EXPLANATION
WHY AM I OPENING A SPECIAL VAIO THREAD, AND PUT EFFORT IN COMPATIBILITY AND LONG-TERM SUPPORT?
I'm using the VAIO SVF notebook every day - when at university, not at home, etc. Means, my macOS
installation is approved day by day, under different and real conditions. I'm working with DSDT and
SSDT's, perfectly pitched for native hardware support on VAIO.
MAIN REASONS:
DURABILITY (besides, SVF case is a dream for changing components)
RELIABLE COMPATIBILITY TO HARDWARE AND MAC OS X. Allows using the VAIO as a serious notebook.
CONTINUOUS SUPPORT BY MANUFACTURER. It’s nice to see that Sony still puts afford in keeping the VAIO
online database up to date. At the end of 2016 they started a new BIOS firmware distribution - in
turn this made some things easier with Clover.
WHO IS IT FOR?
I started this thread with a structured step by step guide, for installing a fresh macOS High Sierra
10.13 on your VAIO. Therefore the thread is currently most suitable to newer users, just starting
getting in touch with installing macOS on a VAIO. It's recommended to have small knowledge in
handling macOS, and to take a short skim over RehabMan's [FAQ] READ FIRST! Laptop Frequent
Questions. No need to be afraid, no need to have high knowledge about Clover bootloader, DSDT/SSDT
and Kext background at this point.
* This guide is primary meant for VAIO SVF1521 models. When following this guide you agree to take
the risks and responsibilities of losing data. Always backup!
TUTORIAL UPDATES
ACTUALLY I'M STILL UPDATING THE GUIDE THREAD. IF YOU'RE NOT FAMILIAR WITH MACOS HIGH SIERRA INSTALLATION ETC, PLEASE WAIT UNTIL I REMOVED THIS HINT!
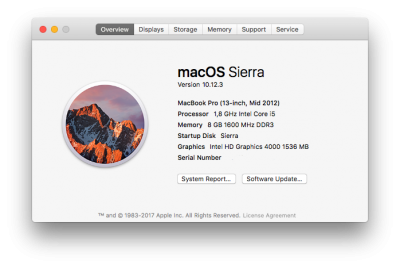
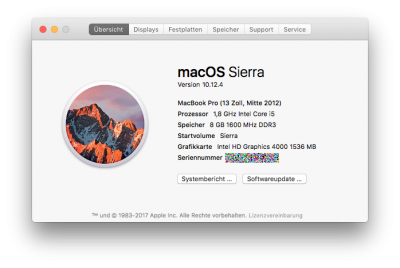
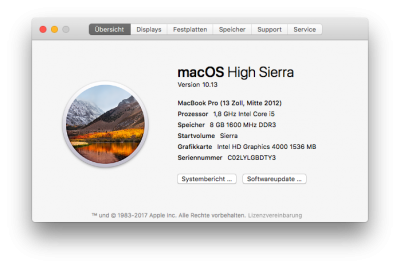
- 5. OCTOBER 2017: STARTED UPDATING GUIDE FOR WORKING macOS HIGH SIERRA 10.13.
- 14. May 2017: BIG GUIDE UPDATE with new, WORKING BACKLIGHT CONTROL using AppleBacklightInjector.kext and macOS Sierra 10.12.4. Amazing improvment for the whole screen appearance/experience. Lot's, lot's of thanks and credits to RehabMan's gorgeous [Guide] Laptop backlight control using AppleBacklightInjector.kext. As RehabMan already mentions in his guide: "(...) IF YOU ALREADY HAVE PATCHED YOUR DSDT (OR SSDT) WITH A "BRIGHTNESS" PATCH (PNLF), YOU MUST REMOVE IT!"
- 12. May 2017: Updated thread to actual macOS Sierra 10.12.4. Restructuring the BBCode style there was no time since I had exams the last weeks.
- 5. March 2017: Apple's Safari browser fully messed up the correct BBCode style format for my step-by-step guide. Today i started with restructuring it from the beginning. Will take some time since it is hell of work.
- 25. February 2017: BBCode/styling/picture structure of first post is wrong formatted since last update. Will be corrected next week.
- 19. February 2017: Some minor picture and BBCode improvements.
- 13. February 2017: First version posted.
")
CREDITS
Know-how and much important input from king of VAIO configuration johnrey
Lots of Kext's and solutions from tonymacx86 an RehabMan
Native audio wouldn't have been possible without Micky1979 and Mirone.
---
SPECIFICATIONS VAIO SVF1521O4E
- Processor: Intel Core i5 (3rd Gen)
- RAM: 8 GB 1600 MHz DDR3L SDRAM
- Grapics: Intel HD4000
- Display: 15.5" Widescreen LED-Backlit 16:9
- Chipset: 7-Series
- Drive: Samsung SDD 750 EVO
- Sound: Realtek ALC233
- BIOS version*: R0250DA (recommend to flash newest update
from Sony from NOV.2016. Click on version number for download.
This Link is non commercial and just for exact model SVF1521O4E!
Flashing just supported under Windows) - Backlit keyboard
WORKING
- Intel HD4000 Graphics with QE/CI Acceleration
- HDMI (with Audio)
- Sound (Speakers, Microphone, Headphone Jack, HDMI)
- TRIM support for SSD
- Keyboard, Touchpad (with support for new-style (animated) Trackpad preference pane)
- USB 2.0/3.0
- Webcam
- Ethernet
- Brightness
- Backlit keyboard
- Power button
- VAIO "fn" buttons (just brightness is on different position)
- Sleep/Wake
- UEFI/NVRAM
- Webcam
SOMETIMES WORKING
- Bluetooth: The Broadcom bluetooth chip worked with OOB,
but does not feature Handoff. (It's possible to replace chip)
NOT WORKING
- WiFi: Apple doesn't support this Broadcom Chip. (you can replace your chip with an Atheros or Broadcom one)
- SD-Card/Memory Stick Reader (no drivers for OS X)
- Assist button (when booted into macOS)
REQUIRED COMPONENTS
- USB DRIVE (16 GB recommend)
- MAC COMPUTER (10.7.5 or later)
--
PRE-PROCESS
CREATE BOOTABLE USB DRIVE
- Head over to tonymacx86's wonderful explained walkthrough. Click on the following link, start from beginning, and come back when fulfilled 'STEP 2: Create a bootable USB drive with UniBeast' with all sub-steps including point 15.
- When finished go to next step.
SPECIALISE USB EFI PARTION FOR VAIO
- Open folder /EFI/CLOVER/drivers64UEFI
- Delete VBoxHFS.efi

- Download HFSPlus.efi
- Copy HFSPlus.efi into /EFI/CLOVER/drivers64UEFI
- Move to folder /EFI/CLOVER/kexts
- Delete all existing folders, except Other

- Download RehabMan's up-to-date kexts for:
FakeSMC.kext
VoodooPS2Controller.kext
- Copy into folder /EFI/CLOVER/kexts/Other

- Next we replace config.plist
- Download configured SVF1521 - config.plist.zip (just for SVF/FIT 15E models with same hardware!)
- Copy and replace config.plist into /EFI/CLOVER
CLOVER FOLDER BACKUP TO USB
- Copy all files from /EFI/CLOVER
- Paste to /EFI-Backups folder (created automatically in UniBeast step) .
Found on USB partition Install macOS Sierra

- Eject the EFI and USB partition.
VAIO PROCESS
[/SIZE]
BIOS SETTINGS
BOOT MAC OS INSTALLER
INSTALL CLOVER TO SIERRA DRIVE
ADD IMPORTANT KEXTS
We now have to install some important Kext files to system library before rebooting.
- Shut down VAIO.
- Press Assist button.
- Select option going into BIOS.
- Restore factory defaults under Exit tab.
- Change following settings:
- Disable Intel virtualization technology (just for the main macOS installation step)
- Secure Boot Mode must be disabled
- Ensure UEFI is selected.
- Move external devices to first boot position.
- Go to last register card.
- Select Save and Shutdown
BOOT MAC OS INSTALLER
- Switch over to tonymacx86's 'STEP 4: Install macOS Sierra' walkthrough. When finished with this
step come back and go to next part.
INSTALL CLOVER TO SIERRA DRIVE
- For booting without USB we install Clover to Sierra drive.
- Download Clover EFI bootloader
- Open Clover installer package.
- Click Continue, Continue. Click Change Install Location
- Select Sierra drive. (Don’t select your USB this time)

- Continue
- Click Customize
- In the packages list check:
- Install Clover in the ESP ('Install Clover in the ESP‘ is checked automatically)
- Under Drivers64UEFI check OsxAptioFixDrv2-64
- Install RC scripts on target volume
- Click on Install. Type your password.
- Click Install Software.
- When finished close.
- Open the folder /EFI/CLOVER/kexts
- Delete VBoxHFS.efi
- Open USB partition ‘Install macOS Sierra’
- Copy content of EFI-backup folder into /EFI/CLOVER/ of 'Sierra' drive .
- Replace files.
- Open folder /EFI/CLOVER/kexts.
- Add folder named ’10.12’
- Do not yet reboot.
ADD IMPORTANT KEXTS
We now have to install some important Kext files to system library before rebooting.
- Open folder /EFI/CLOVER/kexts/other from 'Sierra' EFI partition
- Copy following Kext’s to /Desktop:
FakeSMC.kext
RealtekRTL8111.kext
VoodooPS2Controller.kext
- Download cVad's MAC Kext Utility
- Drag Kext Utility.app into /Applications
- Open and type password.
- Process will be busy a moment.
- When finished a message appears: ‘All done’

- Don’t close the window yet.
- Mark FakeSMC.kext, RealtekRTL8111.kext, VoodooPS2Controller.kext on /Desktop
- Drag them onto Kext Utility window.
- Kext Utility will ask for password, and put kext-files into right place.
- When finished click Quit
- Restart your VAIO without the USB and reboot into macOS Sierra.
---
POST PROCESS
MOUNT EFI PARTITION
When installing or changing something to EFI partition, we always have to mount it.
But nothing simpler than that.
PATCHING DSDT/SSDT’S

PART I
PART II
PART III
When installing or changing something to EFI partition, we always have to mount it.
But nothing simpler than that.
- Download and start MACKIE100's Clover Configurator
- Open Clover Configurator. It appears a pop-up hint, asking to mount EFI-Partition.

- Click on “Mount EFI Partition”.
The main window from Clover Configurator appears.

- Under EFI Partitions find correct 'diskXsY' belong to macOS Sierra drive.
- Click on ‘Mount Partition’
PATCHING DSDT/SSDT’S
EXTRACT NATIVE ACPI FILES
DISASSEMBELING THE NATIVE FILES
PATCHING AND COMPILING ACPI FILES
IMPLEMENT PATCHED ACPI FILES IN CLOVER
SSDT POWER MANAGEMENT
IMPLEMENT CREATED SSDT IN CLOVER
INSTALL “POST” KEXT’S
- Reboot VAIO into Clover bootloader menu.
- Press F4
- Clover dumps the native DSDT/SSDT files to /EFI/CLOVER/ACPI/origin
- No feedback is given when done. It just takes milliseconds.
- Continue booting into macOS.
- Mount EFI partition.
DISASSEMBELING THE NATIVE FILES
- Disassemble extracted files in /EFI/CLOVER/ACPI/origin, a iasl compiler is required, used in Terminal.
- Download RehabMan's iasl compiler build
- Open Terminal and put in the following commands:
Code:cd ~/"path where you downloaded the iasl.zip" unzip iasl.zip sudo cp iasl /usr/bin
- Close Terminal.
- Download RehabMan’s MaciASL
- Launch MaciASL
- Go to MaciASL > Preferences > iASL

- Make sure that under Compiler Options > ACPI Specifications, ACPI 6.1 is selected.
- Add RehabMan’s Laptop Repo to Preferences > Sources

- Create folder named ACPI on /Desktop
- Copy DSDT file from /EFI/CLOVER/ACPI/origin and paste to /Desktop/ACPI
- Copy all files beginning with ‘SSDT’ from /EFI/CLOVER/ACPI/origin to /Desktop/ACPI
(DO NOT copy ACPI files that don't begin with DSDT or SSDT)

- Open folder /Desktop/ACPI
- If no *.aml file extension exists, change their names that they have an *.aml extension.
- Disassemble in Terminal:
Code:cd "path to ACPI folder at Desktop with copied DSDT/SSDT’s" iasl -da -dl *.aml
- DSDT/SSDT’s *.aml files from the ACPI folder will result as *.dsl files.
- Now we can work in MaciASL for correct patches.
- Follow the next step for patching the *.dsl files.
PATCHING AND COMPILING ACPI FILES
- We previously added RehabMan’s Laptop Repo to preferences of MaciASL in previous step. Therefore all patches for *.dsl files are available. (Make sure your online, since the patches are loaded from online source)
- Open ACPI folder on /Desktop again.
- Open DSDT.dsl with MaciASL
- Click on ‘Patch’ in the upper toolbar.
- Choose and Apply following patches to your DSDT.dls:
[sys] Fix _WAK Arg0 v2
[sys] HPET Fix
[sys] SMBUS Fix
[sys] IRQ Fix
[sys] RTC Fix
[sys] OS Check Fix
[sys] Fix Mutex with non-zero SyncLevel
[sys] Add IMEI
[igpu]Brightness Fix (HD3000/HD4000):: Not required anymore with new AppleBacklightInjector.kext method
[igpu] Rename GFX0 to IGPU
[usb] USB 7-series/8-series
[bat] Sony VAIO SVE
- Save as ACPI Machine Language Binary 'DSDT.aml'. Add *.aml extension manually if missing.

- Open SSDT-0.dsl in MaciASL
- Click on ‘Patch’ in upper toolbar.
- Choose and ‘Apply’ the following patch:
[syn] Remove _PSS placeholders
- Save as ACPI Machine Language Binary 'SSDT-0.aml'. Add the *.aml extension manually if missing.
IMPLEMENT PATCHED ACPI FILES IN CLOVER
- Copy following files to /EFI/CLOVER/ACPI/patched:
DSDT.aml
SSDT-0.aml
SSDT-1.aml
- Don’t copy dynamic (with ‚x‘, like ‘SSDT-2x’) or not patched SSDT’s.

- Copy unpatched or unchanged SSDT's (with SVF1521 models SSDT-1.aml) direct from /EFI/CLOVER/ACPI/origin to /EFI/CLOVER/ACPI/patched
- Copy following files to /EFI/CLOVER/ACPI/patched:
SSDT POWER MANAGEMENT
- Use ssdtPRGen to create SSDT for your system.
- Open Terminal and type:
Code:curl -o ~/ssdtPRGen.sh https://raw.githubusercontent.com/Piker-Alpha/ssdtPRGen.sh/master/ssdtPRGen.sh chmod +x ~/ssdtPRGen.sh
- Type this command to generate an SSDT for your system:
Code:~/ssdtPRGen.sh
IMPLEMENT CREATED SSDT IN CLOVER
- Open a Terminal and type:
Code:sudo -s
- Type this command to include the SSDT in Clover:
Code:cp ~/Library/ssdtPRGen/SSDT.aml /Volumes/EFI/EFI/CLOVER/ACPI/patched
- Now restart.
- Open a Terminal and type:
In this part we will install important Kext’s/patches for:- Audio (ALC233 sound, mic and headphone-output)
- SVF-Series Synaptics Touchpad (having perfect working multi-touch functions, see more here:
https://github.com/RehabMan/OS-X-Voodoo-PS2-Controller/pull/90
- RehabMan's new backlight method (AppleBacklightInjector.kext) and Battery improvements
- Download Micky1979 and Mirone's AppleHDA Patcher
- Move to /System/Library/Extensions folder.
- Copy original AppleHDA.kext on /Desktop (always keep a backup of your original AppleHDA.kext)
- Move to AppleHDA Patcher.app, right-click on it, and select 'Show package contents'
- Copy original AppleHDA.kext from /Desktop into /AppleHDA Patcher.app/Contents
- Close Finder.
- Mount EFI partition and copy config.plist from /EFI/CLOVER to /Desktop
- Open AppleHDA Patcher
- Mark AppleHDA.kext and config.plist on /Desktop
- Drag files on AppleHDA Patcher window

- Select Laptop’s Audio in right corner. With VAIO SVF1521 models ‘Realteck ALC 233’.
- Now click the ‘patch AppleHDA’ button
- When patching finished close AppleHDA Patcher.
- Delete AppleHDA.kext and config.plist from /Desktop. (again, always keep a backup of your original AppleHDA.kext!)
- On /Desktop AppleHDA Patcher created a folder MironeAudio
- Open folder.
- Find config.plist and replace it with the one in /EFI/CLOVER
- Find & Copy following Kext's from /MironeAudio folder to /Desktop:
AppleHDA.kext
CodecCommander.kext
HDAEnabler.kext

- For now leave everything as it is, and continue with Part II.
PART II
- Download and extract:
VAIO SVF-Series Touchpad
RehabMan’s ACPIBacklight:: We will use RehabMan's new, macOS Sierra 10.12.4 compatible AppleBacklightInjector.kext method later.
RehabMan’s ACPIBatteryManager - Copy extracted Kext’s
ACPIBacklight.kext
ACPIBatteryManager.kext
VoodooPS2Controller.kext
VoodooPS2Controller.kext.dSYM
to /Desktop/
- You should have following Kext files on Desktop:
AppleHDA.kext
CodecCommander.kext
HDAEnabler.kext
ACPIBacklight.kext
ACPIBatteryManager.kext
VoodooPS2Controller.kext (and VoodooPS2Controller.kext.dSYM)
- Copy VoodooPS2Controller.kext.dSYM from /Desktop into /System/Library/Extensions
- Put in the Password.
- Open Kext Utility and type password.
- When process is finished you’ll get a message: ‘All done’, don’t close the window yet!
- Mark all previous mentioned Kext’s from Desktop
- Drag them on Kext Utility window.
- Kext Utility will again ask for password, and then process dragged Kext's
- When finished click Quit
- Now switch to RehabMan's perfect [Guide] Laptop backlight control using AppleBacklightInjector.kext, do exactly every step until reaching 'installation' head. Resume here with next point.
- Most of the next steps are also from RehabMan's guide, but modified/customized for VAIO FIT SERIES
- NOTE: WHEN PREVIOUSLY PATCHED VAIO DSDT (OR SSDT) WITH A "BRIGHTNESS" PATCH (PNLF), YOU MUST REMOVE IT NOW!
- Copy SSDT-PNLF.aml from ~/Projects/guide.git/build/ to EFI/Clover/ACPI/patched
- We use SortedOrder in our VAIO config.plist. So we need to add SSDT-PNLF.aml in Clover Configurator. Pay attention to add it as last point in list.
PART III
- Install AppleBacklightInjector.kext to /L/E:
Code:sudo cp -R ~/Projects/probook.git/kexts/AppleBacklightInjector.kext /Library/Extensions
- Add the patch marked with comment "change F%uT%04x to F%uTxxxx in AppleBacklightInjector.kext (credit RehabMan)" from ~/Projects/guide.git/config_patches.plist to config.plist at EFI/Clover/config.plist.

- DO NOT USE CLOVER CONFIGURATOR! USE A PLIST EDITOR SUCH AS XCODE OR PLISTEDIT PRO TO COPY/PASTE.
- Inject and change the Product-Id in config.plist for EDID data to 0x9c7c
- Remove (only if you already installed it) ACPIBacklight.kext from S/L/E
- Restart your VAIO.
- Right after booting with all components in place, rebuild cache:
Code:sudo kextcache -i /
- Again do a reboot
- Congratulations, your VAIO should be ready for work.
- Install AppleBacklightInjector.kext to /L/E:
Attachments
-
SVF1521 - config.plist.zip2.5 KB · Views: 1,107
-
 Screen Shot 2017-02-13 at 11.09.35.png108 KB · Views: 2,391
 -
 Screen Shot 2017-02-11 at 13.55.55.png419.8 KB · Views: 2,082
 -
VAIO SVF1521-Series Touchpad.zip385.2 KB · Views: 1,360
-
 Bildschirmfoto 2017-05-12 um 02.57.43.png120 KB · Views: 2,097
 -
 Bildschirmfoto 2017-05-15 um 00.51.44.png33.1 KB · Views: 2,040
 -
 Bildschirmfoto 2017-05-15 um 01.17.58.png12.1 KB · Views: 1,901
 -
 Bildschirmfoto 2017-10-05 um 18.15.59.png113.5 KB · Views: 1,415
Last edited: