- Joined
- Mar 7, 2016
- Messages
- 3
- Motherboard
- MSI Z170A G43 PLUS
- CPU
- Intel i5 6600K
- Graphics
- Sapphire AMD R9 380
please report any inconsistencies you have found
This system wasn't meant for a hackintosh build but it managed to become one.
My Configuration
What works
What sorta works
What doesn't work
Installation prerequisites
Get Sierra
Things to download
IMPORTANT: Unplug all monitor except your primary (Both for new installs and updates)
Pre Install
BIOS Settings
Install Sierra
Post-Installation Configuration
Turn on the computer


View attachment 237217
Unfortunately you will need to boot with black screen because you will be booting with the onboard graphics and R9 380 has problems with MacOS.
This system wasn't meant for a hackintosh build but it managed to become one.
My Configuration
- MSI Z170A-G43 PLUS
- Core i5-6600k @ 4.6GHz
- 2x HyperX 4 GB DDR4 2133 MHz RAM (8GB)
- Sapphire NITRO R9 380 4GB
- LG 4K Monitor
- OCZ 120GB
- Western Digital Blue 1TB
- Asus Bluetooth usb
- macOS 10.12.3 Sierra
What works
- USB 2.0 and USB 3.0
- HDMI/DP
- CPU power management
- GPU power management
- Build-in Ethernet (Including WOL)
- Bluetooth (even better than windows )
What sorta works
- USB 3.1 Type A port works with a mouse. (Unable to mount any drives on that port.)
- Front panel usb 3.0 (sometimes when something is connected on them macOS won't boot)
- OnBoard Audio (sometimes it works sometimes its not even available but I use BT Headphones so I don't really need it)
What doesn't work
- Sleep
- Booting with PEG setting
Installation prerequisites
- A working Mac or Hackintosh
- A USB stick or drive, 16 GB or larger
- HDMI cable to your onboard graphics since you are gonna boot from it and you need to setup your BIOS
Get Sierra
- Open Mac App Store
- Log in with your Apple ID
- Download OS X Sierra (10.12.3)
- When the download finishes and the setup screen appears, Quit the app from the menu bar. You should now see the application /Applications/Install macOS Sierra.app
Things to download
- Unibeast for Sierra
- Multibeast for Sierra
- Clover Configurator (You will need it later in case you can't connect to the internet)
- EFI Mounter v3
IMPORTANT: Unplug all monitor except your primary (Both for new installs and updates)
Pre Install
Use tonymacx86's Unibeast guide https://www.tonymacx86.com/threads/...ierra-on-any-supported-intel-based-pc.200564/ to create your bootable USB and install macOS Sierra on your SSD.
BIOS Settings
- In BIOS Features
- Load Optimised Defaults
- Fast Boot: Disabled
- Secure Boot Mode: Disabled
- Windows 8/10 Features: (if you connect via DP you need to disable it otherwise if you use HDMI you don't have to. For some reason it overrides your onboard graphics and boots from DP so installation will not be able to start)
- Windows 7: Disabled
- Boot Mode: UEFI only
- Initial Display Output: Internal Graphics : Enabled !!! (IMPORTANT otherwise you won't be able to boot the installation or your MacOS)
- 64MB Memory
- Legacy USB Support: Enabled
- XHCI Hand-off: Enabled
- Paralel Port: everything disabled
- In Super IO Configuration:
- Serial Port: Disabled
- VT-d: Disabled
- CFG-Lock: Disabled
- In some cases you might need to disable Virtualisation in CPU Features (Under OC) (In El Capitan I had to disable it on Sierra even with Overclock it seems to work with it enabled)
Install Sierra
- Insert USB drive Please use one of the USB 2.0 ports if you are using a USB 3.0 flash drive
- Follow tonymacx86's installation guide
- If you are asked to log in with your Apple ID rejoice you are one of the lucky ones that their network worked just like that. If not don't worry you can fix it with multibeast later
Post-Installation Configuration
Turn on the computer
2. Press F11 to choose boot device
3. Choose USB
4. At the Boot Screen, choose your new Sierra installation.
5. Complete macOS Sierra setup
6. Open and run MultiBeast
3. Choose USB
4. At the Boot Screen, choose your new Sierra installation.
5. Complete macOS Sierra setup
6. Open and run MultiBeast

7. click Quick Start. UEFI Boot Mode i

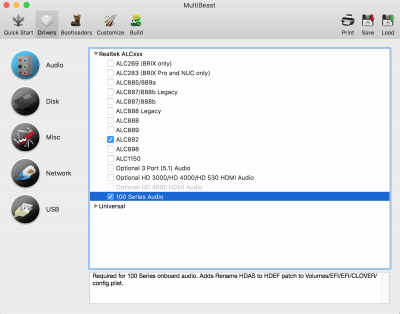
8. click Drivers. Under Audio ALC892 and 100 series Audio
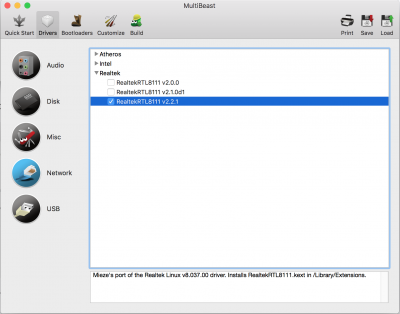
9. Under Network choose RealtekRT8111
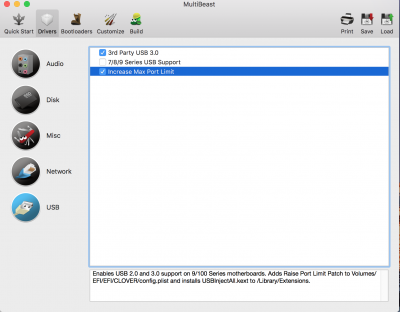
10. Under USB choose 3rd Party USB 3.0 and Increase max port limit
11. click Bootloaders and choose Clover v2.3k r3766 UEFI Boot Mode
12. click Customise and choose Intel HD 530 (you don't need it to run since you are using it for boot only but I noticed that during boot it stalls because of it so your boot time is longer)
13. Click Build then Install
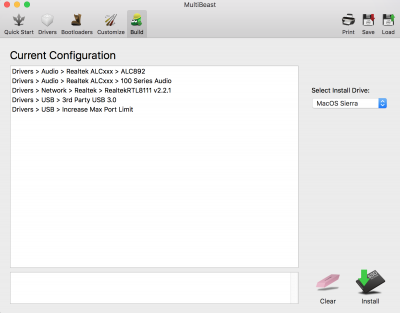
13. Reboot
14. Enter into Bios and change Boot priority to your EFI partition of your SSD (it will appear as UEFI clover OS or something similar)
15. Congratulations you just installed Sierra.
16. Open Clover Configurator mount your EFI partition navigate to EFI>CLOVER>config.plist and open it
17. Go to Install Drivers Unistall (make it go white) VBoxHfs under DRIVERS 64 UEFI and install HFSPlus UEFI under EXTRA DRIVERS (you need this because it makes your boot time faster) also if you plan to enable iMessage (I did it following this guide An iDiot's Guide To iMessage ) you need to install under DRIVERS 64 UEFI EmuVariableUefi
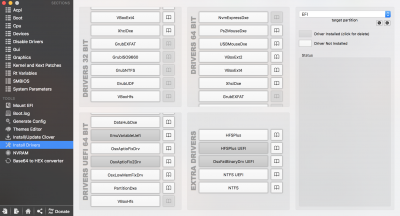
Optional: You can change your pc to iMac 17,1 (Its better to have a skylake definition ) under SMBIOS and you will need to if u want to enable iMessage in order to configure the serial numbers
and Reboot.
Now you need to change your monitor to DP so you can setup your resolution and scaling and enjoy your Mac!
10. Under USB choose 3rd Party USB 3.0 and Increase max port limit

11. click Bootloaders and choose Clover v2.3k r3766 UEFI Boot Mode
12. click Customise and choose Intel HD 530 (you don't need it to run since you are using it for boot only but I noticed that during boot it stalls because of it so your boot time is longer)
13. Click Build then Install

13. Reboot
14. Enter into Bios and change Boot priority to your EFI partition of your SSD (it will appear as UEFI clover OS or something similar)
15. Congratulations you just installed Sierra.
16. Open Clover Configurator mount your EFI partition navigate to EFI>CLOVER>config.plist and open it
17. Go to Install Drivers Unistall (make it go white) VBoxHfs under DRIVERS 64 UEFI and install HFSPlus UEFI under EXTRA DRIVERS (you need this because it makes your boot time faster) also if you plan to enable iMessage (I did it following this guide An iDiot's Guide To iMessage ) you need to install under DRIVERS 64 UEFI EmuVariableUefi

Optional: You can change your pc to iMac 17,1 (Its better to have a skylake definition ) under SMBIOS and you will need to if u want to enable iMessage in order to configure the serial numbers
and Reboot.
View attachment 237217
Unfortunately you will need to boot with black screen because you will be booting with the onboard graphics and R9 380 has problems with MacOS.
Last edited:

