- Joined
- Sep 8, 2011
- Messages
- 39
- Motherboard
- B450 Aorus M
- CPU
- Ryzen 2600
- Graphics
- RTX 2060
- Mobile Phone
Hi there !
I recently bought a new desktop "OSX compliant". I didn't find any guide yet for El Capitan on that hardware so I though it might be a good idea to share my experience, even though the setup is really easy.
Note: I'm installing it on its own hard drive (it's simpler that way and avoid messing up other OSes).
This guide is also available on my Google Drive : https://docs.google.com/document/d/10FHemlUd5dOBqAJlJ0lwyH1XMmP1RA5E9J_Xk8VXSEE/edit?usp=sharing
Configuration
Mobo: Gigabyte GA-H97M-HD3
CPU: Intel i5 4590 Haswell 3.3Ghz
Memory: Corsair Vengeance CML8GX3M2A1600C9 Low-Profile 8GB 2X4GB DDR3-1600 CL9-9-9-24 Dual Channel Memory Kit
PSU: Corsair CX500M
Hard Drive: Sandisk SSD Ultra Plus 256GB (from old config)
Screen: LG 25UM65-P ULTRAWIDE 25" 2560x1080 (using HDMI)
Installer Creation
Just follow the main guide from tonymacx86 : http://www.tonymacx86.com/el-capita...-el-capitan-any-supported-intel-based-pc.html
Quality and size of the USB key matters. As said in the guide, a 8GB USB key can be too small, 8GB doesn't all have the exact same size. So if you're short even a few MB, the installer won't work properly.
Mine is 7 692MB exactly, it's big enough.
Motherboard Settings
From here : http://www.tonymacx86.com/user-buil...-ga-h87m-hd3-core-i5-4440-hd4600-r9-280x.html
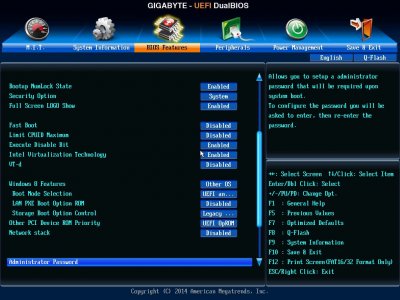
Reboot and press del to enter into the Bios settings.
Under “Bios Features”
Set “VT-d” to disabled
Set “Windows 8 Features” to “Other OS”
Save and reboot.
Installation
Nothing special, follow tonymacx86 guide. If you’re not booting automatically from USB, press f12 during the boot to choose your booting device and select your USB key.
So easy !
First Boot And Enhancement
Mandatory tools
Download the post-installation tools from the guide (step 5)
Run Clover Installer UEFI pkg file. Without Clover, no boot !
Run CustoMac Essentials to install FakeSMC and Ethernet support (well, ethernet is working without it but... ).
).
Clover Setup
Run Clover Configurator
It should show you a popup saying that you need to mount the EFI partition. Click on "Mount EDI partition".
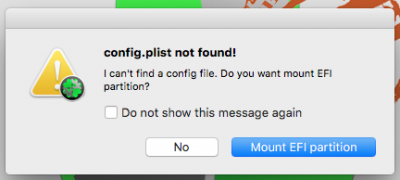
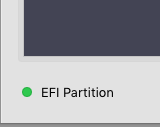
Then, in the bottom right corner, click on "Mount EFI partition"

The little sign should turn green. (see screenshot)
Go back to the home screen of the app. At the bottom, you should see several config file. Click that one EFI/EFI/Clover/confit.plist

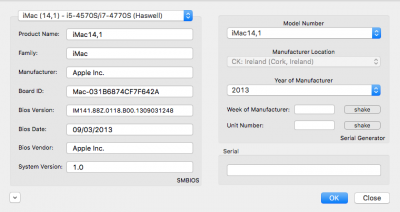
In SMBIOS Click the magic wand.

Click on the iMac (first icon) and then choose iMac 14,1. You can choose iMac 14,2 if you have a i7 CPU.
In Boot enable rootless=0

In Devices, enable "Reset HDA" and inject audio id 1

In graphics check that you’re injecting the correct fix for your GPU. In my case, I use the HD 4600 so I checked Inject Intel (I’ll probably buy a mid-range graphic card later though).

Save (you might have a message regarding the file versioning, you can ignore it).
Reboot.
Sound
Now, sound.
We’ll use https://github.com/toleda/audio_CloverALC
Download that command file: https://github.com/toleda/audio_CloverALC/blob/master/audio_cloverALC-110.command.zip (click on View Raw)
Run it with your terminal.
- Enter your password
- Confirm Realtek ALC892 : y
- Enable HD4600 Audio : y (this one depends on your GPU though)
- Clover ID audio injection : y
- Use audio id 1: y
Reboot.
Go to System Preferences and choose the correct audio output.
Fix screen resolution
I got a LG ultrawide screen 2560x1080. El Capitan doesn't want to set its resolution correctly. I wonder if it's an Apple issue.
We’ll use https://github.com/Floris497/mac-pixel-clock-patch
Download and extract that zip file https://github.com/Floris497/mac-pixel-clock-patch/archive/master.zip
Run the macPixelClockPatcher.command using your terminal.
Enter password.
Reboot.
Go to System Preferences -> Display and choose the right resolution.
Get HWMonitor to work properly
This software is quite useful and provides a large range of information regarding your hardware.

To get it working :
- Go on the official project page : http://www.hwsensors.com/releases
- Get both pkg file and binaries (.dmg)
- Install package file (.pkg)
- Open Clover Configurator and mount EFI
- Open hwsensors .dmg
- Copy FakeSMC, CPUSensors, ACPISensors, LPCSensors kexts into /Volumes/EFI/EFI/CLOVER/kexts/10.11
- Reboot
- Launch HWMonitor (it should be in your Applications folder)
- Enjoy
You’re done ! That wasn’t that bad, right ?
Performance
Geekbench 32bits

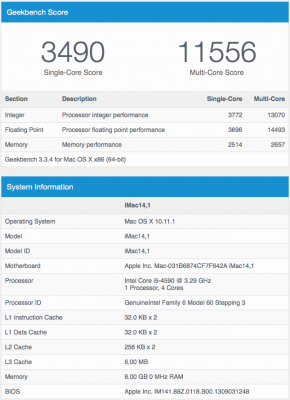
Geekbench 64bits
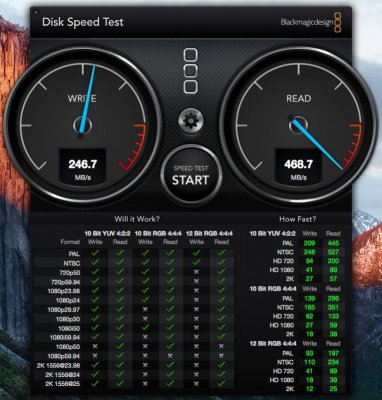
Blackmagic Disk Speed Test
I recently bought a new desktop "OSX compliant". I didn't find any guide yet for El Capitan on that hardware so I though it might be a good idea to share my experience, even though the setup is really easy.
Note: I'm installing it on its own hard drive (it's simpler that way and avoid messing up other OSes).
This guide is also available on my Google Drive : https://docs.google.com/document/d/10FHemlUd5dOBqAJlJ0lwyH1XMmP1RA5E9J_Xk8VXSEE/edit?usp=sharing
Configuration
Mobo: Gigabyte GA-H97M-HD3
CPU: Intel i5 4590 Haswell 3.3Ghz
Memory: Corsair Vengeance CML8GX3M2A1600C9 Low-Profile 8GB 2X4GB DDR3-1600 CL9-9-9-24 Dual Channel Memory Kit
PSU: Corsair CX500M
Hard Drive: Sandisk SSD Ultra Plus 256GB (from old config)
Screen: LG 25UM65-P ULTRAWIDE 25" 2560x1080 (using HDMI)
Installer Creation
Just follow the main guide from tonymacx86 : http://www.tonymacx86.com/el-capita...-el-capitan-any-supported-intel-based-pc.html
Quality and size of the USB key matters. As said in the guide, a 8GB USB key can be too small, 8GB doesn't all have the exact same size. So if you're short even a few MB, the installer won't work properly.
Mine is 7 692MB exactly, it's big enough.
Motherboard Settings
From here : http://www.tonymacx86.com/user-buil...-ga-h87m-hd3-core-i5-4440-hd4600-r9-280x.html
Reboot and press del to enter into the Bios settings.
Under “Bios Features”
Set “VT-d” to disabled
Set “Windows 8 Features” to “Other OS”
Save and reboot.

Installation
Nothing special, follow tonymacx86 guide. If you’re not booting automatically from USB, press f12 during the boot to choose your booting device and select your USB key.
So easy !
First Boot And Enhancement
Mandatory tools
Download the post-installation tools from the guide (step 5)
Run Clover Installer UEFI pkg file. Without Clover, no boot !
Run CustoMac Essentials to install FakeSMC and Ethernet support (well, ethernet is working without it but...
Clover Setup
Run Clover Configurator
It should show you a popup saying that you need to mount the EFI partition. Click on "Mount EDI partition".

Then, in the bottom right corner, click on "Mount EFI partition"

The little sign should turn green. (see screenshot)

Go back to the home screen of the app. At the bottom, you should see several config file. Click that one EFI/EFI/Clover/confit.plist
In SMBIOS Click the magic wand.

Click on the iMac (first icon) and then choose iMac 14,1. You can choose iMac 14,2 if you have a i7 CPU.

In Boot enable rootless=0

In Devices, enable "Reset HDA" and inject audio id 1

In graphics check that you’re injecting the correct fix for your GPU. In my case, I use the HD 4600 so I checked Inject Intel (I’ll probably buy a mid-range graphic card later though).

Save (you might have a message regarding the file versioning, you can ignore it).
Reboot.
Sound
Now, sound.
We’ll use https://github.com/toleda/audio_CloverALC
Download that command file: https://github.com/toleda/audio_CloverALC/blob/master/audio_cloverALC-110.command.zip (click on View Raw)
Run it with your terminal.
- Enter your password
- Confirm Realtek ALC892 : y
- Enable HD4600 Audio : y (this one depends on your GPU though)
- Clover ID audio injection : y
- Use audio id 1: y
Reboot.
Go to System Preferences and choose the correct audio output.
Fix screen resolution
I got a LG ultrawide screen 2560x1080. El Capitan doesn't want to set its resolution correctly. I wonder if it's an Apple issue.
We’ll use https://github.com/Floris497/mac-pixel-clock-patch
Download and extract that zip file https://github.com/Floris497/mac-pixel-clock-patch/archive/master.zip
Run the macPixelClockPatcher.command using your terminal.
Enter password.
Reboot.
Go to System Preferences -> Display and choose the right resolution.
Get HWMonitor to work properly
This software is quite useful and provides a large range of information regarding your hardware.

To get it working :
- Go on the official project page : http://www.hwsensors.com/releases
- Get both pkg file and binaries (.dmg)
- Install package file (.pkg)
- Open Clover Configurator and mount EFI
- Open hwsensors .dmg
- Copy FakeSMC, CPUSensors, ACPISensors, LPCSensors kexts into /Volumes/EFI/EFI/CLOVER/kexts/10.11
- Reboot
- Launch HWMonitor (it should be in your Applications folder)
- Enjoy
You’re done ! That wasn’t that bad, right ?
Performance
Geekbench 32bits

Geekbench 64bits

Blackmagic Disk Speed Test

Last edited:
