- Joined
- Dec 10, 2010
- Messages
- 1,375
- Motherboard
- Gigabyte Z390 Aorus Elite
- CPU
- i9-9900K
- Graphics
- RX 6600 XT
- Mobile Phone
macOS Catalina on: Gigabyte Z390 Aorus Elite motherboard + i3 9100 Coffee Lake processor + AMD Radeon RX 580 graphics card + fenvi FV-T919 WIFI and Bluetooth card + Clover r5121 + AppleALC, Lilu, VirtualSMC, XHCI-unsupported, IntelMausiEthernet, USBPorts and WhateverGreen. Inspired by this thread started by @kasix and completed by @joanserramiret on tonymacx86.
Hardware
Pretty much everything I've tried:
Integrated Intel UHD Graphics 630 card: see below.
BIOS settings (version F9)
I only write down the significant options, there are many other options that do not influence macOS and that you can configure to your liking (for example the LEDs on the board, etc.).
SSDT
Some SSDT.aml files in EFI/CLOVER/ACPI/patched.
SSDT-EC.aml (USB power charge)
SSDT-UIAC.aml (USB port mapping)
SSDT-USBX.aml (USB port mapping)
SSDT-PMC.aml to have native NVRAM on Z390 mother boards
SSDT-Z390-RP21-SLOT4-TB3HP.aml (Thunderbolt devices hot plug) it can be skipped.
Drivers in EFI/CLOVER/drivers/UEFI
ApfsDriverLoader.efi
AudioDxe.efi
DataHubDxe.efi
FSInject.efi
VBoxHfs.efi
SMCHelper.efi
OcQuirks.efi *
OpenRuntime.efi *
OcQuirks.plist *.
* see OC Quirks below.
Extensions in EFI / CLOVER / kexts / Other
AppleALC.kext
IntelMausi.kext
Lilu.kext
USBPorts.kext
VirtualSMC.kext
WhateverGreen.kext
XHCI-unsupported.kext.
NOTE 1: The USBPorts.kext extension along with 3 aml files included in patched folder (SSDT-EC.aml, SSDT-UIAC.aml y SSDT-USBX.aml) were generated by @joanserramiret with the configuration of USB ports for this motherboard so that the limit defined by macOS of 15 ports is not exceeded. Leaves the system configured in this way:
NOTE 2: XHCI-unsupported.kext is required for XHC chipsets whose Device ID is not included in macOS. Depending on the USB driver of your board, it may be necessary to install some additional extension:
Config.plist file
The differential options are:
Acpi> DSDT: change HECI to IMEI / change SAT0 to SATA
Acpi> Fixes: FixShutdown
Acpi> Drop OEM_DSM
Acpi> Drop Tables> DMAR / MATS
Acpi> SSDT> PluginType selected (Plugin Type number blank)
Acpi> Halt Enabler / FixHeaders
Boot> Boot Arguments> slide = 0 / darkwake = 8
Devices> USB> Inject / FixOwnership / HighCurrent
Devices> Audio> Inject 11
Kernel and Kext Patches> Apple RTC and KernelXCPM selected
Kernel and Kext Patches> KextsToPatch> Name: com.apple.driver.AppleAHCIPort / Find: 40600200 / Replace: 00000000 / Comment: SATA hot plug
Kernel and Kext Patches> KextsToPatch> Name: com.apple.driver.AppleAHCIPort / Find: 45787465 726E616C / Replace: 496E7465 726E616C / SATA orange icons
SMBIOS> iMac19.1
System Parameters> Inject Kexts: Yes / Inject System ID: selected.
Quirks > select AvoidRuntimeDefrag – DevirtualiseMmio – EnableSafeModeSlide – ForceExitBootServices – ProtectUefiServices – ProvideConsoleGopEnable – ProvideCustomSlide – SetupVirtualMap – SyncRuntimePermissions and set ProvideMaxSlide = 0. *
Set true DevirtualiseMmio and ProtectUefiServices in OcQuirks.plist file (recommended on Z390 mother boards).
* see OC Quirks below.
macOS Catalina install
There are many publications with instructions so I will only comment on a few specific details.
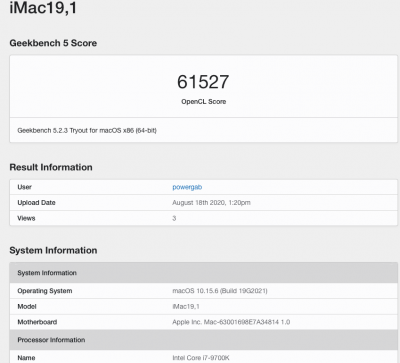
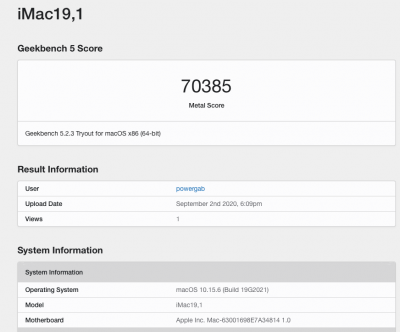
Although my RX 580 card is a model from the XFX brand, known for using custom VBios and giving problems in macOS, in my case it seems to work well with Lilu and WhatEverGreen. Booting the operating system it does not show artifacts, the 3 DP ports and the only HDMI port work, you can send the image simultaneously to 2 screens (I have not tried more) with the usual duplication options, yo can send sound in addition to image to one TV by HDMI, during the installation of the operating system it works correctly provided that Lilu and WhatEverGreen are in the USB device, etc. GeekBench 5 Scores: Metal 50100 / OpenCL 44100. As a comparison, the integrated card does not reach 4800 in Metal.

Regarding the hardware decoding of H264 and HEVC videos, the Hackintool tool and the VideoProc application report that it is not supported although the playback of files of both types with rates of up to 20 mbps is correct so I suspect that it actually encodes well. In order for hardware decoding to appear as supported in the commented applications, the integrated Intel Graphics 630 card must be enabled even if it is disconnected in headless mode (using the RX 580 card as primary sending image to the screen).
Sound
This board incorporates the Realtek ALC1220 chip that needs the AppleALC extension to work. AppleALC is a Lilu plugin so both must be properly installed.
Note: Clover > Devices > Audio > Inject 11 or 13 or 15. I’ve tried several layouts and this are the only valid at least in my case.
Some users have commented that the system does not load AppleALC and they have no sound despite having the extensions in EFI / CLOVER / kexts / Other. In these cases it can be successful to install AppleALC and Lilu in / Library / Extensions and rebuild the extensions cache with Hackintool (a very convenient way to do it) or with this Terminal command:
What this command does is disable Gatekeeper, mount the system disk in read / write mode, repair permissions on the extensions folders and rebuild the cache. But all of that is done by Hackintool with less work on our part.
Ethernet
This board carries the Intel I219V chip that works well with the IntelMausiEthernet extension.
Wifi and Bluetooth
I use a Fenvi FV T-919 mini PCI-E card that carries both wifi and bluetooth chips. This card works perfectly in macOS without needing anything other than placing it on the board because it is recognized as Airport Extreme and Bluetooth Apple. Has its own article on perez987.
Discs
Samsung EVO 860 SSD. It is a solid state disk with references to work well in Mac. In my case it works well, with a read speed of 430 and a write speed of 250. I have tried faster SSDs but they have given problems to install Catalina, instead with the EVO 860 everything has worked perfectly.
Integrated graphics
Integrated Intel Graphics 630 card: we can to make it work correctly by adding some properties in Clover's Devices tab. For it to work you have to:
- enable it on the board as primary graphics: Initial Display Output IGFX instead of PCIe 1 Slot (actually this is the final step after modifying config.plist)
- add in config.plist: Boot> Boot Arguments> igfxonln = 1
- apply a patch (video and audio) in config.plist: Devices> Properties. It is easier to do it from the config.plist file in text mode than from Clover Configurator. With the file open as text find the lines
Immediately above of them paste this text:
But the system crashes when comes out of sleep mode (the PC restarts after a few seconds of leaving sleep mode). This behavior occurs if the cable that comes out from the HDMI port on the motherboard (the only existing connector on this Mobo) plugs in a DisplayPort port on the monitor; if it plugs directly into another HDMI port (monitor or TV) the bug does not occurs and the PC goes in and out of sleep normally.
Currently the only way to have the graphics card connected to a port other than HDMI without this crash is by replacing the "hda-gfx" property with "no-hda-gfx" in the above code of config.plist. The 2 lines
must be replaced by
After adding this property, you will no longer have sound over HDMI / DP but sleep works very well.
In summary:
- Intel HDMI to DisplayPort monitor> has HDMI audio output but has kernel panic when coming from sleep
- Intel HDMI to HDMI TV> has HDMI audio output and sleep works fine
- Intel HDMI to DisplayPort monitor with "no-hda-gfx"> sleep works fine but HDMI audio output is lost.
(based on the post "[GUIDE] General Framebuffer Patching Guide (HDMI Black Screen Problem)" by @CaseySJ; thanks also to @deeveedee for his help).
This card can be left activated without connection to the monitor (headless mode) and apparently does not show any interference with the rest of the system.
With the integrated card as the main card, the system shows enabled both graphics cards and allows to have a screen connected to the Intel 630 via HDMI and a different screen connected to the RX 580 via DP or HDMI, in this case the primary screen is that from the Intel and the other only works when the graphics driver is loaded but, once the system is up and running, the screens allow duplication options as if they depend on a single card.


Evolution to Oc Quirks
OC Quirks is an EFI driver for Clover that replaces AptioMemoryFix and all OsxAptioFix variants. It supports the OpenCore quirks model. AptioMemoryFix has evolved little in the most recent stage and is in a way becoming obsolete. Next versions of Clover will probably stop installing AptioMemoryFix and switch to OC Quirks which is evolving and receiving frequent improvements. You can read about this on the working group website: ReddestDream.
Migrating our installation from AptioMemoryFix to OC Quirks is relatively simple:
Hardware
- Gigabyte Z390 Aorus Elite motherboard: support for Intel 8 and 9 generation processors, Realtek ALC1220 audio, Intel I219V Ethernet, 4 PCI-E slots, 2, 3 and 3.1 USB ports, Intel Graphics 630 integrated graphics card
- 9th generation Intel i3 9100 processor
- Nox Hummer H-212 120mm CPU Fan
- Corsair Vengeance LPX 3200 MHz 16 GB RAM (2 x 8)
- AMD Radeon RX 580 8GB graphics card
- Wifi and Bluetooth Card Fenvi FV-T919
- Mars Gaming MPII850 Power Supply (850W)
- Samsung EVO 860 SSD disk.
Pretty much everything I've tried:
- Radeon RX 580: 3 DP ports and 1 HDMI port, output to 2 displays simultaneously
- Shutdown, reboot and sleep
- Integrated sound and HDMI sound output
- USB ports (2, 3 and 3.1)
- Enable TRIM for SSD drive
- AirDrop, Sidecar, etc.
Integrated Intel UHD Graphics 630 card: see below.
BIOS settings (version F9)
I only write down the significant options, there are many other options that do not influence macOS and that you can configure to your liking (for example the LEDs on the board, etc.).
- XMP Profile: Auto / Profile 1 / Enabled (eXtreme Memory Profile, I use 3200 MHz memory and without this profile it works at 2600)
- Platform Power Management: Disabled
- VT-d: Disabled
- XHCI Hand-Off: Enabled
- Legacy USB Support: Enabled
- Network Stack: Disabled
- CSM: Disabled
- Secure Boot: Disabled
- Fast Boot: Disabled
- OS Type: Other OS
- Wake on LAN: Disabled
- Integrated Graphics: Auto
- Initial Display Output: PCIe 1 Slot
- DVMT Pre-Allocated: 256M or higher.
SSDT
Some SSDT.aml files in EFI/CLOVER/ACPI/patched.
SSDT-EC.aml (USB power charge)
SSDT-UIAC.aml (USB port mapping)
SSDT-USBX.aml (USB port mapping)
SSDT-PMC.aml to have native NVRAM on Z390 mother boards
Drivers in EFI/CLOVER/drivers/UEFI
ApfsDriverLoader.efi
AudioDxe.efi
DataHubDxe.efi
FSInject.efi
VBoxHfs.efi
SMCHelper.efi
OcQuirks.efi *
OpenRuntime.efi *
OcQuirks.plist *.
* see OC Quirks below.
Extensions in EFI / CLOVER / kexts / Other
AppleALC.kext
IntelMausi.kext
Lilu.kext
USBPorts.kext
VirtualSMC.kext
WhateverGreen.kext
XHCI-unsupported.kext.
NOTE 1: The USBPorts.kext extension along with 3 aml files included in patched folder (SSDT-EC.aml, SSDT-UIAC.aml y SSDT-USBX.aml) were generated by @joanserramiret with the configuration of USB ports for this motherboard so that the limit defined by macOS of 15 ports is not exceeded. Leaves the system configured in this way:
- Enabled all USB2 ports that are not part of a USB3 port (1 internal for BT + 4 rear that are together + 2 on the front)
- Enabled the USB2 ports that are part of the 2 rear red USB3.1 ports
- Disabled the USB2 ports that are part of the 4 rear blue USB3 ports
- Enabled all USB3 ports except the internal one for USB type C connection.
NOTE 2: XHCI-unsupported.kext is required for XHC chipsets whose Device ID is not included in macOS. Depending on the USB driver of your board, it may be necessary to install some additional extension:
- 8086: 8CB1 on macOS 10.11.1 or lower: XHCI-9-series.kext
- 8086: 8D31, 8086: A2AF, 8086: A36D, 8086: 9DED: XHCI-unsupported.kext
- 8086: 1E31, 8086: 8C31, 8086: 8CB1, 8086: 8D31, 8086: 9C31, 8086: 9CB1: FakePCIID.kext + FakePCIID_XHCIMux.kext.
Bash:
/System/Library/Extensions/IOUSBHostFamily.kext/Contents/Plugins/AppleUSBXHCIPCI.kext/Contents/Info.plistConfig.plist file
The differential options are:
Acpi> DSDT: change HECI to IMEI / change SAT0 to SATA
Acpi> Fixes: FixShutdown
Acpi> Drop OEM_DSM
Acpi> Drop Tables> DMAR / MATS
Acpi> SSDT> PluginType selected (Plugin Type number blank)
Acpi> Halt Enabler / FixHeaders
Boot> Boot Arguments> slide = 0 / darkwake = 8
Devices> USB> Inject / FixOwnership / HighCurrent
Devices> Audio> Inject 11
Kernel and Kext Patches> Apple RTC and KernelXCPM selected
Kernel and Kext Patches> KextsToPatch> Name: com.apple.driver.AppleAHCIPort / Find: 40600200 / Replace: 00000000 / Comment: SATA hot plug
Kernel and Kext Patches> KextsToPatch> Name: com.apple.driver.AppleAHCIPort / Find: 45787465 726E616C / Replace: 496E7465 726E616C / SATA orange icons
SMBIOS> iMac19.1
System Parameters> Inject Kexts: Yes / Inject System ID: selected.
Quirks > select AvoidRuntimeDefrag – DevirtualiseMmio – EnableSafeModeSlide – ForceExitBootServices – ProtectUefiServices – ProvideConsoleGopEnable – ProvideCustomSlide – SetupVirtualMap – SyncRuntimePermissions and set ProvideMaxSlide = 0. *
Set true DevirtualiseMmio and ProtectUefiServices in OcQuirks.plist file (recommended on Z390 mother boards).
* see OC Quirks below.
macOS Catalina install
There are many publications with instructions so I will only comment on a few specific details.
- The installation USB memory must have a GUID partition scheme so that the board's UEFI can boot from it.
- I have prepared the USB with the createinstallmedia method + the application "Install macOS Catalina" in the Applications folder
- The device is USB 3 and, connected to the front USB 3 port, it performs the task quite quickly
- I have used Clover r5121 which is currently the latest version.
- The EFI folder of the installation USB can be the same as that of the hard disk with 2 differences: Acpi> SSDT> PluginType deselected and Acpi> Boot leave Default Boot Volume blank and Timeout -1 (so that no volume will boot automatically from the Clover menu).
- To mount the EFI partition (of the disk or the USB device) I have used Clover Configurator which makes this task very simple or the command line (diskutil), first finding out what disk and partition number is the EFI (diskutil list) and showing it later (mountdisk):
Bash:sudo diskutil list sudo diskutil mountdisk / dev / disk2s3
Although my RX 580 card is a model from the XFX brand, known for using custom VBios and giving problems in macOS, in my case it seems to work well with Lilu and WhatEverGreen. Booting the operating system it does not show artifacts, the 3 DP ports and the only HDMI port work, you can send the image simultaneously to 2 screens (I have not tried more) with the usual duplication options, yo can send sound in addition to image to one TV by HDMI, during the installation of the operating system it works correctly provided that Lilu and WhatEverGreen are in the USB device, etc. GeekBench 5 Scores: Metal 50100 / OpenCL 44100. As a comparison, the integrated card does not reach 4800 in Metal.
Regarding the hardware decoding of H264 and HEVC videos, the Hackintool tool and the VideoProc application report that it is not supported although the playback of files of both types with rates of up to 20 mbps is correct so I suspect that it actually encodes well. In order for hardware decoding to appear as supported in the commented applications, the integrated Intel Graphics 630 card must be enabled even if it is disconnected in headless mode (using the RX 580 card as primary sending image to the screen).
Sound
This board incorporates the Realtek ALC1220 chip that needs the AppleALC extension to work. AppleALC is a Lilu plugin so both must be properly installed.
Note: Clover > Devices > Audio > Inject 11 or 13 or 15. I’ve tried several layouts and this are the only valid at least in my case.
Some users have commented that the system does not load AppleALC and they have no sound despite having the extensions in EFI / CLOVER / kexts / Other. In these cases it can be successful to install AppleALC and Lilu in / Library / Extensions and rebuild the extensions cache with Hackintool (a very convenient way to do it) or with this Terminal command:
Bash:
sudo spctl --master-disable; sudo mount -uw /; killall Finder; sudo chown -v -R root: wheel / System / Library / Extensions; sudo touch / System / Library / Extensions; sudo chmod -v -R 755 / Library / Extensions; sudo chown -v -R root: wheel / Library / Extensions; sudo touch / Library / Extensions; sudo kextcache -i /Ethernet
This board carries the Intel I219V chip that works well with the IntelMausiEthernet extension.
Wifi and Bluetooth
I use a Fenvi FV T-919 mini PCI-E card that carries both wifi and bluetooth chips. This card works perfectly in macOS without needing anything other than placing it on the board because it is recognized as Airport Extreme and Bluetooth Apple. Has its own article on perez987.
Discs
Samsung EVO 860 SSD. It is a solid state disk with references to work well in Mac. In my case it works well, with a read speed of 430 and a write speed of 250. I have tried faster SSDs but they have given problems to install Catalina, instead with the EVO 860 everything has worked perfectly.
Integrated graphics
Integrated Intel Graphics 630 card: we can to make it work correctly by adding some properties in Clover's Devices tab. For it to work you have to:
- enable it on the board as primary graphics: Initial Display Output IGFX instead of PCIe 1 Slot (actually this is the final step after modifying config.plist)
- add in config.plist: Boot> Boot Arguments> igfxonln = 1
- apply a patch (video and audio) in config.plist: Devices> Properties. It is easier to do it from the config.plist file in text mode than from Clover Configurator. With the file open as text find the lines
XML:
        <key>Audio</key>
        <dict>
            <key>ResetHDA</key>
            <false/>
            <key>Inject</key>
            <integer>11</integer>
        </dict>
XML:
        <key>Properties</key>
        <dict>
            <key>PciRoot(0x0)/Pci(0x1F,0x3)</key>
            <dict>
                <key>layout-id</key>
                <data>CwAAAA==</data>
                <key>model</key>
                <string>Cannon Lake HDMI</string>
                <key>hda-gfx</key>
                <string>onboard-2</string>
                <key>AAPL,slot-name</key>
                <string>Internal@0,31,3</string>
                <key>device_type</key>
                <string>Audio device</string>
            </dict>
            <key>PciRoot(0x0)/Pci(0x2,0x0)</key>
            <dict>
                <key>framebuffer-con0-busid</key>
                <data>AAAAAA==</data>
                <key>framebuffer-con0-type</key>
                <data>AAgAAA==</data>
                <key>framebuffer-con2-flags</key>
                <data>xwMAAA==</data>
                <key>model</key>
                <string>Intel UHD Graphics 630</string>
                <key>framebuffer-con1-busid</key>
                <data>AAAAAA==</data>
                <key>device-id</key>
                <data>kT4AAA==</data>
                <key>framebuffer-con2-type</key>
                <data>AAgAAA==</data>
                <key>framebuffer-con2-busid</key>
                <data>BAAAAA==</data>
                <key>device_type</key>
                <string>Display controller</string>
                <key>hda-gfx</key>
                <string>onboard-1</string>
                <key>framebuffer-patch-enable</key>
                <data>AQAAAA==</data>
                <key>framebuffer-con1-type</key>
                <data>AAgAAA==</data>
                <key>AAPL,slot-name</key>
                <string>Internal@0,2,0</string>
                <key>AAPL,ig-platform-id</key>
                <data>BwCbPg==</data>
                <key>framebuffer-con2-enable</key>
                <data>AQAAAA==</data>
                <key>framebuffer-con1-enable</key>
                <data>AQAAAA==</data>
                <key>framebuffer-con0-enable</key>
                <data>AQAAAA==</data>
            </dict>
        </dict>
But the system crashes when comes out of sleep mode (the PC restarts after a few seconds of leaving sleep mode). This behavior occurs if the cable that comes out from the HDMI port on the motherboard (the only existing connector on this Mobo) plugs in a DisplayPort port on the monitor; if it plugs directly into another HDMI port (monitor or TV) the bug does not occurs and the PC goes in and out of sleep normally.
Currently the only way to have the graphics card connected to a port other than HDMI without this crash is by replacing the "hda-gfx" property with "no-hda-gfx" in the above code of config.plist. The 2 lines
XML:
               <key>hda-gfx</key>
               <string>onboard-2</string>
XML:
                <key>No-hda-gfx</key>
<data>AAAAAAAAAAA=</data>In summary:
- Intel HDMI to DisplayPort monitor> has HDMI audio output but has kernel panic when coming from sleep
- Intel HDMI to HDMI TV> has HDMI audio output and sleep works fine
- Intel HDMI to DisplayPort monitor with "no-hda-gfx"> sleep works fine but HDMI audio output is lost.
(based on the post "[GUIDE] General Framebuffer Patching Guide (HDMI Black Screen Problem)" by @CaseySJ; thanks also to @deeveedee for his help).
This card can be left activated without connection to the monitor (headless mode) and apparently does not show any interference with the rest of the system.
With the integrated card as the main card, the system shows enabled both graphics cards and allows to have a screen connected to the Intel 630 via HDMI and a different screen connected to the RX 580 via DP or HDMI, in this case the primary screen is that from the Intel and the other only works when the graphics driver is loaded but, once the system is up and running, the screens allow duplication options as if they depend on a single card.
Evolution to Oc Quirks
OC Quirks is an EFI driver for Clover that replaces AptioMemoryFix and all OsxAptioFix variants. It supports the OpenCore quirks model. AptioMemoryFix has evolved little in the most recent stage and is in a way becoming obsolete. Next versions of Clover will probably stop installing AptioMemoryFix and switch to OC Quirks which is evolving and receiving frequent improvements. You can read about this on the working group website: ReddestDream.
Migrating our installation from AptioMemoryFix to OC Quirks is relatively simple:
- download the latest version of OC Quirks (search Releases, current version is 23)
- have a USB device that boots up properly to use in case of failure
- mount the disk's EFI partition
- delete AptioMemoryFix and any other OsxAptioFix variant
- add OcQuirks.efi, OpenRuntime.efi and OcQuirks.plist to Clover's drivers/UEFI folder
- change to true DevirtualiseMmio and ProtectUefiServices in the file OcQuirks.plist (recommended on boards with Z390 chipset)
- in Clover> Quirks config.plist file, check the boxes AvoidRuntimeDefrag - DevirtualiseMmio - EnableSafeModeSlide - ForceExitBootServices - ProtectUefiServices - ProvideConsoleGopEnable - ProvideCustomSlide - SetupVirtualMap - SyncRuntimePermissions and assign the value 0 to ProvideMaxSlide
- Restart the PC.
Attachments
Last edited:
")