Welcome to my Lenovo Thinkpad T440S macOS Mojave guide.
This guide uses the Clover UEFI hotpatching method as opposed to ACPI static patching method.
This method is the universal solution to all models as no changes are required whether you have the:
i3, i5 or i7 model or if you have touchscreen or non-touchscreen model.
Due to the different patching method, i recommend you clean install if you are coming from a different guide.
Upgrades
Below i listed some possible upgrades for Lenovo Thinkpad T440S that can make the experience more pleasant.
Wireless and Bluetooth Card
The Intel Wireless and Bluetooth card that comes with this laptop is not supported, therefore a replacement is necessary in order to have working Wireless and Bluetooth. Some compatible replacement cards are:
DW1830: This card has 802.11AC Dual Band Wireless Support and Bluetooth 4.1 LE and it should be cheaper than the DW1560 model, the other advantage is that it has native ID(s) which works out of the box in macOS.
The only downside is that it has 3 antenna connectors and T440S does have only two antennas.
That shouldn't be a hard workaround as you can order an antenna from AliExpress for super cheap price or just use the two connectors and leave one empty as people reported having it working correctly even like that.
DW1560: This card has 802.11AC Dual Band Wireless Support and Bluetooth 4.0 LE it recently became more expensive which i think is due to the fact that the number of existing cards is being reduced thus becoming rare.
BCM94360CS2: This card is the one available on real Macbook and Macbook Pro and has two antenna connectors.
It needs the NGFF adapter in order to be able to use it in our laptops that have NGFF slots if there is enough room or space to fit it without getting in the way for the cover or any other part of the laptop.
(Haven't tested because i don't have this laptop anymore, web pictures of laptop interior show that there should be enough room to fit it, you may only need to trim or cut the last part of the NGFF adapter to fit it perfectly)
Note: BCM94360CS2 is natively fully supported on macOS without using any kext at all wether for WiFi or Bluetooth.
All features like HandOff, Continuity, Instant Hotspot, Universal Clipboard should work without a single issue.
DW1820A: This card has also been flying under the radar recently on many forums and seems to work well.
Note: be careful and only pick the model from the link that i attached as the other models with different IDs seem to have issues with kernel panics and random disconnects, the one i attached on the link is the correct one.
The model that you should look for is the one with the part number: CN-0VW3T3
The two other variants with part number starting with: CN-096JNT and CN-08PKF4 seems to be problematic.
Display Panel
If you have the Lenovo ThinkPad T440S with the 1366x768 or 1600x900 Display panel, i know you hate the display and so do i, these two panels have terrible viewing angles with a blu blurried tint when you look from the sides.
It has not so bright display and also terrible color reproduction, thankfully there are great replacement models:
B140HAN01.1 B140HAN01.2 till B140HAN01.8: These models are mostly the same, just some minimal differences between those that are not even worth writing about it and can barely noticed in the in-depth spec sheet on which you can compare and decide which one to pick on
www.panelook.com
These panels are the perfect replacement and the best 14" compatible panel replacements for this laptop with:
- IPS Panel
- Excellent viewing angles (89/89/89/89)
- Excellent colors (16.2M colors and 72% CIE1931)
- Better Contrast ratio (700:1)
- Brighter Display (300 nits)
TouchPad
The touchpad can be replaced with a T450S or newer model as it fit's perfectly (same housing and screws).
T450S: The ClickPad (Left Middle Right) Clickable buttons make the Touchpad experience much more pleasant.
Note: Be aware that some sellers may send you an ALPS or ELAN model so whenever you order or plan to do so,
write a message to the seller before ordering to ask if they have the Synaptics model for purchase.
Or as some of them have random models, make sure to specify on the Order message:
" Please send Synaptics model! "
Replacing the touchpad requires you to disassemble the laptop and to have some disassembling tools for the process
In order to do so, i attached a video walking through step by step instructions on how to replace it:
You can use this video as a walkthrough for disassembling the laptop for other replacement parts like:
HDD or SSD, Wireless and Bluetooth Card, Internal Battery or for Upgrading the RAM memory of your laptop.
What works
- Intel HD 4400 Graphics QE/CI
- USB Ports
- Intel Ethernet
- Audio (All Inputs & Outputs)
- Sleep and Wake
- Touch Screen
- Mini DisplayPort and Mini DisplayPort Audio
- VGA / D-Sub Port
- Dual Band AC Wireless 2.4GHz & 5GHz
- Bluetooth 4.x LE
- CPU and IGPU Power Management
- Battery Status
- Brightness
- Function Keys (Fn)
- ClickPad and TrackPad
- Integrated Camera
- Rest of the things that i forgot to list & non listed on "what doesn't work"
What doesn't correctly work yet
- SD Card Reader (no completed kext yet, still under development, kext attached on the T440S repository folder)
- Dock Audio (i have a codec dump with dock, i will patch AppleALC to support it when i get time for it)
- Dock Video (i have no dock, haven't tested video ports, i assume they don't without additional patches)
What you need
- Lenovo Thinkpad T440S Laptop
- macOS Mojave downloaded from the Mac App Store
- 8GB+ USB flash drive
- Downloaded Lenovo Thinkpad T440S Project from my Github (click on Lenovo Thinkpad T440S),
- Download as zip like shown below:
There are some settings that you need to change to have a fully working macOS setup on this laptop.
All of these settings are required to be turned off on Bios for you to have fully functional setup.
If left enabled you won't be able to wake laptop from sleep as it will start the 3x Beep Beep Beep sound.
You will have to force restart or shutdown by holding the power button for 5+ seconds.
BIOS Settings to change:
- Disable Security Chip
- Disable Anti Theft Module
- Disable TPM
Precautions: This laptop does have WHITELIST which restricts using another Wireless and Bluetooth Card that is not from Lenovo or Lenovo branded, this makes it impossible to have Wireless and Bluetooth functionality with Intel card.
In order to install supported Wireless and Bluetooth Card you have two options:
- BIOS Mod (Hard): You are required to do a BIOS Mod in order to bypass that which involves dissasembling your laptop & requires some tools to complete the process.
- BIOS Downgrade (Easy): You can downgrade to Bios v2.36 but i recommend modding the bios so you have latest enhancements, security and bug fixes bios that lenovo has released for this laptop
Whitelist Removal
1. BIOS Mod
Modding the BIOS to remove Whitelist requires some skills and it's mean't for more advanced users.
It requires to disassemble the laptop to reach the BIOS EEPROM.
To complete the process, these tools are required (which they can be found very cheap on AliExpress or eBay):
- CH341a Flash Programmer
- SOIC8 Test Clip
- Another Windows laptop to complete the process
Assuming you received the Tools, disassembled the laptop, installed the program for the tools:
You first make a dump of your BIOS and make sure to Backup a copy of it somewhere safe in case something goes wrong, you can always write it back !
You post your Bios Dump into the whitelist removal thread on:
https://www.bios-mods.com
Make sure that you request whitelist removal when you post on the thread !
Within a few minutes or hours someone will eventually show up or PM you with the Modded Bios.
Now you download the modded bios.
First erase your EEPROM with the program and after the erase process has been completed,
You open the modded bios and press write to flash it.
Reboot and your laptop should accept every Wireless & Bluetooth card that you can fit.
For more details on the process, visit this thread: Specifically for more details go to:
https://www.bios-mods.com/forum/Thread-Guide-Whitelist-remove-for-2014-Lenovo-thinkpad
Reboot and your laptop should accept every Wireless & Bluetooth card that you can fit.
2. BIOS Downgrade Instructions:
- Download the v2.36 (.exe) version from Lenovo here.
- Run the installer, attempt to install the downgrade and let it fail. Exit the installer.
- Be sure computer has really good charge or is plugged in.
- Open command prompt, paste this command (C:\DRIVERS\FLASH\gjuj23us\WinFlash64.exe /sd /file C:\DRIVERS\FLASH\gjuj23us\GJET86WW\$01DF000.FL1), accept UAC message, and let it run.
- You should now have BIOS v2.36 with the removed whitelist.
Rollback procedure explained at:
https://www.bios-mods.com/forum/Thread-Lenovo-Rollback
Creating USB Installer
Before proceeding with this guide i would highly suggest that you begin with a clean install rather than upgrading as the method and kexts are different than what you might be currently using on your laptop.
Step 1:
Download Clover Bootloader:
https://sourceforge.net/projects/cloverefiboot/
Step 2:
Format USB Drive as HFS+J with GPT partition table and make sure to name it: install_osx
Step 3:
Download macOS Mojave from the Mac App Store, after the download process has finished, now create the USB Installer by opening terminal and writing the following command:
Code:
sudo "/Applications/Install macOS Mojave.app/Contents/Resources/createinstallmedia" --volume /Volumes/install_osx --nointeraction
Press "Enter" and write User and password, hit enter, wait for the process to end which takes around 10-30 minutes.
Step 4:
Download all the needed kexts for "Pre" and "Post" installation which are listed down below.
They are hyperlinks and should direct you straight to the download page when click on them:
Step 5 (Installing Clover Bootloader)
Prepare USB Drive with the correct configuration, kexts, Bootloader, config.plist and ACPI
Note: if you accidentally install Clover Bootloader into the real iMac, MacMini or MacBook that you are using,
you might brick it, so be careful and choose the USB drive for installation!
Install Clover Bootloader by carefully following the steps explained down below:
Open Clover bootloader installer, click on continue, agree to the terms and conditions, continue,
Click on "
Change Install Location..." like shown in the picture below:
Select the
USB Flash Drive which in our case is named as "
install_osx" like shown in the picture below:
Click "
Continue", and now click on the "
Customize" button like shown in the picture below:
At the "
Customize" section, here we select "
Clover for UEFI booting only" and "
Install Clover in the ESP"
Like shown in the picture below:
Now we expand "
UEFI Drivers" to see the full list of the UEFI Drivers by clicking in the arrow in front of the checkbox and then we select all the UEFI Drivers that we need like i selected them in the picture down below:
Don't select "
Themes" yet as we will customize that later after we are done with the installation.
Now click
Install, it will open a prompt for your Username and Password, write it and press Enter,
the installation will start, after bootloader installation ends, your EFI partition of the USB Drive will be mounted.
Preparing USB EFI Partition
Open the mounted EFI partition of your USB Drive and go to
EFI/Clover/
Replace the
config.plist with the one from the downloaded
Lenovo-Thinkpad-T440S repository of my Github
Into
EFI/Clover/ACPI/Patched add the
SSDT-T440S.aml from the downloaded
Lenovo-Thinkpad-T440S Repo
Into
EFI/Clover/Drivers64UEFI make sure to add
HFSPlus.efi (click on HFSPlus.efi to download it)
Into
EFI/Clover/kexts/Others make sure to add the following
kexts listed down below:
Step 6:
Backup all your important data because we will continue with the installation process on the next step.
Backup Clover Bootloader installer into the USB Drive for installation (not on the USB EFI folder !)
Backup my
Lenovo-Thinkpad-T440S folder download from the Github repository
Installation
Step 1:
Reboot your laptop, after the laptop screen turns on, press F12 repeatedly to enter into the Boot Menu.
On the Boot Menu, choose the USB Drive and press "Enter"
Now it should bring you into the Clover Bootloader menu, select Install macOS Mojave (USB Drive) and press enter.
The Installer now should boot and reach installation menu.
Step 2:
From the installation menu, open Disk Utility, select the partition that you plan to install macOS, format it as APFS and for the purpose of this guide we will name it "Mac". Exit Disk Utility after the format process has finished, this will bring you back to the Installer Main Menu.
Now select install macOS Mojave, agree to the "terms and conditions", select your HDD/SSD that you formatted and the installation process will begin. this will be the part 1 install. Part 1 should take around 5 minutes.
Step 3:
Laptop will automatically reboot when Part 1 installation ends. now as soon as Clover Bootloader menu shows up, this time you select the "Mac" partition to boot from, the installer will continue with Part 2 now and show the progress bar with time remaining under the Apple boot logo.
Note: Sometimes as soon as the time remaining shows up under the Apple boot logo, the laptop will reboot once more, if this happens, choose again to boot from the "Mac" partition and part 2 installation will continue and complete.
After the installation has been completed, laptop will reboot and bring you to the part 3 - first boot user setup.
Step 4:
Select Language, Continue, Connecting to Internet is optional or you can skip it for now.
When you reach the menu to sign with your Apple ID, make sure to skip this step, it will be important if you want to setup iMessage & FaceTime.
Post Installation
Step 1:
Run Apps from anywhere is now missing from SysPrefs > Security & Privacy > General.
Open terminal and enter the following command:
Code:
sudo spctl --master-disable
This allows you to install Applications downloaded from Internet and outside of the Mac App Store.
Step 2:
Open Clover Bootloader installer and continue with bootloader installation into the HDD/SSD that we installed macOS.
The procedures are exactly the same as on the Creating USB Installer - Step 5 of the guide except that this time, instead of the USB Drive, we select the "Mac" HDD/SSD that we installed macOS.
Step 3:
Now we need to install all the needed kexts into the HDD/SSD where we installed macOS: the "Mac" partition.
All kexts should be installed into /Library/Extensions
Download all the kexts if you still didn't:
Extract them and make sure to copy each & only the ones listed above by selecting the "
Release" folder of the kexts.
Create a folder on desktop called "
kexts", copy all the listed kexts into that "
kexts" folder into desktop
Open Terminal and write this command to install kexts into
/Library/Extensions/
Code:
cd desktop/kexts

sudo cp -R *.kext /Library/Extensions/
Hit enter, write your Username password and all the kexts will be copied and installed into
/Library/Extensions/
Now we need to rebuild caches with the following terminal command:
Wait for the process to end, after the process is completed, reboot.
Step 4: Disable Hibernation
Be aware that hibernation (suspend to disk or S4 sleep) is not supported on hackintosh.
You should disable it:
Code:
sudo pmset -a hibernatemode 0
sudo rm /var/vm/sleepimage
sudo mkdir /var/vm/sleepimage
Always check your hibernatemode after updates and disable it. System updates tend to re-enable it, although the trick above (making sleepimage a directory) tends to help.
And it may be a good idea to disable the other hibernation related options:
Code:
sudo pmset -a standby 0
sudo pmset -a autopoweroff 0
Step 5: Install Tools
Create a new folder on desktop and name it:
tools
copy
patchmatic and
iasl and paste them on the "
tools" folder that you created on desktop
Get "
patchmatic" by clicking on this:
Link
Get "
iasl" by click on this:
Link
Open terminal and write the following commands to install these tools:
Code:
cd desktop/tools
sudo cp iasl /usr/local/bin
sudo cp patchmatic /usr/local/bin
Audio
For audio we use AppleALC as it has support for "ALC3232" codec using "layout-id 28" which everything is already configured into the config.plist and the SSDT-T440S.aml of my files that you downloaded from the Github Repo.
The only thing we need is the "
alc fix" which does fix the problem with Headphones and External Microphones.
This audio codec doesn't do the correction and detection on laptops with Combo Jack so it is required.
Copy the alc_fix folder which is inside the downloaded
Lenovo-Thinkpad-T440S folder from my Github Repo.
Open terminal and type the following commands:
Next you type the following command to initiate the installation script:
Or you can simply drag the install.sh file and drop it on the terminal window after you typed the first command
Pres enter and the alc_fix installation is completed
Keyboard
Keyboard is fully mapped and every single button works starting from Brightness to the rest of FN Buttons.
Fn Buttons do work but you have to assign them as shortcuts on Sysprefs > Keyboard > Shortcuts like my example:
- F4 (Mic On/Off) mapped to Siri shortcut
- F7 (Projector) mapped to Video/Mirror Toggle
- F8 (Radio On/Off) mapped to Notification Center
- F9 (Settings) mapped to System Preferences...
- F10 (Cortana/Search) mapped to Spotlight Search
- F11 (Open Apps/AltTab) mapped to Mission Control
- F12 (Start Menu) mapped to Launchpad
- PrtSc (Print Screen) mapped to Screenshot area of selection or known as the default cmd+4 shortcut
You can customize these keys to something else as you desire on Sysprefs > Keyboard > Shortcuts
Trackpad, ClickPad, Trackpoint
For Trackpad, ClickPad and Trackpoint we use VoodooPS2Controller.kext from
@RehabMan
Support for trackpoint and ClickPad has been ported from tluck thanks to
@jcsnider into
@RehabMan VoodooPS2Controller.
It also includes support for TrackPoint and Physical Buttons (ClickPad) like Left, Middle and Right Click Buttons.
TrackPoint has been fixed and now works 100% of the time, no more random stops during reboots or cold boot.
3 Fingers scrolling is supported and i assigned these gestures into SysPrefs > Keyboard > Shortcuts > Mission Control
- 3 fingers swipe up for "Application Windows"
- 3 fingers swipe down for "Show Desktop"
- 3 fingers swipe right for "Move left a space" (to move to the desktop on the left side)
- 3 fingers swipe left for "Move right a space" (to move to the desktop on the right side).
You can customize these shortcuts to something else on Sysprefs > Keyboard > Shortcuts
Note: VoodooPS2.kext from Acidanthera has native multi gesture support that they ported from VoodooI2C compared to RehabMan VoodooPS2Controller.kext that has it's own implementation.
The gestures are good but the kext has issues like problems with sleep and kernel panics, ThinkPad Touchpads don't work correctly yet. ClickPad (Left,Middle,Right Click) Buttons and TrackPoint work but there is no 2 Fingers Scrolling and some other gestures are missing. I don't recommend and support it yet until the issues are fixed.
There are also conflicts with VoodooI2C.kext and the Satellite kexts as it's twice the engine and cause kernel panics.
As soon as they issues are fixed and i consider it ok for full replacement, i will update the guide and files accordingly.
Wireless and Bluetooth
In terms of functionality, if you replaced with one of the compatible cards there is nothing left to be done.
In case that your Wireless Card is not being detected, you need FakePCIID.kext and FakePCIID_Broadcom_WiFi.kext.
Bluetooth works with BrcmPatchRam2.kext and BrcmFirmwareRepo.kext
Both functionalities require the AirportBrcmFixup.kext and BT4LEContinuityFixup.kext to work.
(Unless you purchased the BCM94360CS2 or BCM943602CS with the NGFF Adapter as these cards work natively).
Some customizations that you can do is the change the country code by using the boot-arg: brcmfx-country=XX
Replace XX with your corresponding country code, some examples are: (US, CN, #a, etc).
US is the the default country code that is set on the kext without using the boot-arg brcmfx-country=XX
iMessage and FaceTime
This is one of the last steps and things that you should fix after you stabilized your setup in order to properly work.
For iMessage and FaceTime
@P1LGRIM has a step by step detailed guide which you can follow on the link below:
https://www.tonymacx86.com/threads/an-idiots-guide-to-imessage.196827/
Keep in mind that even if you have setup iMessage and FaceTime correctly, newer AppleID(s) are not having much success as they do get the message to call Apple Support.
Contrary to this, old Apple ID(s) seems to be working perfect without having a single issue.
If you do have a newer AppleID and you can't make iMessage and FaceTime work, the only possible "current known" fix is to get an older Macbook that is not being used anymore, dump the MLB and ROM.
Generate your unique Serial Number and UUID as the guide describes and after you have correct setup:
Just replace the generated MLB and ROM with the ones you got from the dump of the older Macbook.
iMessage and FaceTime should now work correctly with your Unique Serial Number and UUID.
Customization
Themes
There is a huge list of available "Themes" across the web for Clover Bootloader which you can google.
I included the ThinkPad theme which i also used previously on my ThinkPad guides because i think it better fits these laptops, it is included on the
Lenovo-Thinkpad-T440S folder Downloaded from my Github Repository.
To install it you simply copy the Thinkpad folder into EFI/Clover/Themes and set it as default theme on config.plist
System Logo
For System Logo i use the laptop picture at the beginning of the guide which i think is one of the best available and best quality one for use as System Logo for this laptop.
What i did is i created two versions: One with Light Mode Wallpaper and One with Dark Mode Wallpaper as macOS Mojave has added the dynamic System Logo option on "
About this Mac"
With this when you use Dark Mode, you will have the T440S Laptop Logo with Dark macOS Mojave Wallpaper
When you use Light Mode, you will have the T440S Laptop Logo with Light macOS Mojave Wallpaper
To use Dynamic System Logo you go to Applications > Utilites > System Information (right Click) > Show Contents.
Go to Contents > Resources > Assets.car.
Replace it with the Assets.car that included in the
Lenovo-Thinkpad-T440S folder downloaded from my Github repo.
Examples with Light Mode and Dark Mode on the screenshots below:
Computer Name
To change the computer name you go to Users > YourUserName > RightClick somewhere and click Show View Options
Select Show Library Folder and close the Show View Options Window, now you open have the visible Library Folder.
Go to Library/Preferences and open com.apple.SystemProfiler.plist with a Plist Editor file (example:
PlistEditPro)
Expand CPU Names and type:
Lenovo Thinkpad T440S click file on the menu bar and save.
Problem Reporting
It is impossible to diagnose a problem without data that shows how your system is configured.
Also, impossible to analyze any data that you might provide without a clear understanding of your hardware. So make sure your profile is filled as per the first question in this FAQ, "Q. Where do I start?".
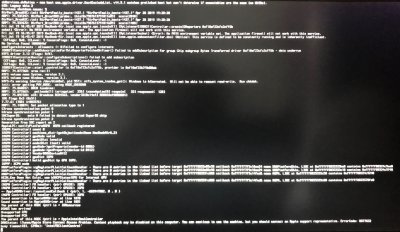
If you can't boot, a bare minimum is:
- Boot verbose, attach photo
- Attach EFI/Clover folder as ZIP (press F2 then F4 at main Clover screen just before collecting). Please eliminate 'themes' directory. Provide only EFI/Clover, not the entire EFI folder.
Note: Some Keyboards swap Fn+Fx for Fx. For those Keyboards, press Fn+F2 then Fn+F4. If you're not sure, press F2, then F4, then Fn+F2, then Fn+F4. You can also verify by pressing F1 (or Fn+F1) to see which one brings the menu.
If you can boot, but are having some other problem, describe the problem clearly and provide data...
Download patchmatic:
https://bitbucket.org/RehabMan/os-x-maciasl-patchmatic/downloads/RehabMan-patchmatic-2015-0107.zip
Extract the 'patchmatic' binary from the ZIP. Copy it to /usr/bin, such that you have the binary at /usr/bin/patchmatic.
In terminal,
Code:
if [ -d ~/Downloads/RehabMan ]; then rm -R ~/Downloads/RehabMan; fi
mkdir ~/Downloads/RehabMan
cd ~/Downloads/RehabMan
patchmatic -extract
Note: It is easier if you use copy/paste instead of typing the commands manually.
Attach contents of Downloads/RehabMan directory as ZIP.
Attach ioreg as ZIP:
http://www.tonymacx86.com/audio/58368-guide-how-make-copy-ioreg.html. Please, use the IORegistryExplorer v2.1 attached to the post! DO NOT reply with an ioreg from any other version of IORegistryExplorer.app.
Provide output (in Terminal):
Code:
kextstat|grep -y acpiplat
kextstat|grep -y appleintelcpu
kextstat|grep -y applelpc
kextstat|grep -y applehda
ls -l /System/Library/Extensions/AppleHDA.kext/Contents/Resources/*.zml*
pmset -g assertions
pmset -g
system_profiler SPSerialATADataType|grep TRIM
Attach EFI/Clover folder as ZIP (press F2 then F4 at main Clover screen just before collecting). Please eliminate 'themes' directory. Provide only EFI/Clover, not the entire EFI folder.
Note: Some Keyboards swap Fn+Fx for Fx. For those Keyboards, press Fn+F2 then Fn+F4. If you're not sure, press F2, then F4, then Fn+F2, then Fn+F4. You can also verify by pressing F1 (or Fn+F1) to see which one brings the menu.
For 10.11 and later, attach output of (in Terminal):
Older versions:
Code:
sudo touch /System/Library/Extensions && sudo kextcache -u /
Compress all files as ZIP. Do not use external links. Attach all files using site attachments only.
Q. Is there a script that will collect all Problem Reporting data automatically?
Yes! (almost)
User
@black.dragon74 has created a script (gen_debug.sh) that automates most of the "Problem Reporting" tasks (as described in the previous question).
The part it cannot do is pressing F2 and F4 for you at the main Clover screen.
And of course, it only works for the case you can boot into your system. If you have a problem booting, you must obtain and collect the verbose boot photo manually (and EFI/Clover).
Full details are here:
https://www.tonymacx86.com/threads/tool-generate-proper-problem-reporting-files.235953/

") I got everything installed in an evening without too much trouble.
I got everything installed in an evening without too much trouble.