- Joined
- Sep 19, 2012
- Messages
- 9
- Motherboard
- Gigabyte GA B75M D3H rev 1.1
- CPU
- Intel Xeon E3 1230v2
- Graphics
- Zotac GTX 650 TI 1GB
- Mac
- Classic Mac
- Mobile Phone
Specs:
Model: Lenovo G50-80
Bios version B0CN40WW
CPU: i5 5200u, HD 5500 Graphic
Ram: 4GB
Hard drive: Kingston Hyper X Savage 120 GB SSD + 500 GB Seagate HDD
Audio: Conexant CX20752
Ethernet: RTL8111
Please check your bios carefully, because you’ll need to modify your bios to increase dvmt, and there’s been a report here showing that higher bios might not be able work. If your laptop come with B0CN40WW bios please don’t ever upgrade. If it came with later bios, you probably might give it a try, and I take no responsibility of any damage you may encounter.
1 Increasing DVMT:
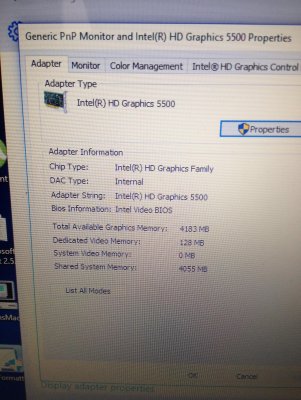
Follow these two guides here and here to increase dvmt to 96MB. You don’t need to install windows to do all the steps there. The default dvmt values is 32MB, so I all I did were downloading the bios files here B0CN75WW and here B0CN79WW in a windows machine, decompile the files with Inno Setup Unpacker then follow the instructions and use the tools provided in the posts to find out about dvmt values.
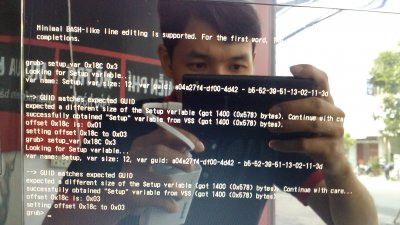
If you have the same bios version with me, and you don’t want to go through all those long steps, just download this EFI shell. After extracting it, you’ll find a boot folder, format your usb in Fat32, make a directory name EFI inside it, and copy the boot folder from downloaded EFI Shell. Then boot EFI from it and run this command:
If it says anything like error: can't set variable using EFI (error: 0x000000000000001a) then I think you may not able change dvmt and need to mask the assertion like this guide here (I have’t tried).
If output is like this, then congrats.

2 Bios: work OOB w/o any configurations.
3 Making USB intaller:
Follow this guide here to create a USB installer
http://www.tonymacx86.com/el-capita...ublic-beta-installation-usb-using-clover.html
For the kexts and configuration file, please download mine here.
4 Install El Capitan: follow all the steps of to compel the installation process, after finishing it, install clover to your hard drive and copy all the file in the EFI folder below and replace EFI folder created by Clover Installer.
5 This laptop need to patch DSDT for battery status, and brightness control, and audio to work.
I follow this guide for DSDT patching [Guide] Patching LAPTOP DSDT/SSDTs
all the patches I applied were:
[bat] Lenovo G50-70
[igpu] Brightness Fix (Haswell)
[sys] Fix _WAK Arg0 v2
[sys] HPET Fix
[sys] “SMBUS” Fix
[sys] IRQ Fix
[sys] RTC Fix
[sys] OS Check Fix (Windows 8)
[sys] Fix PNOT/PPNT
[sys] Add IMEI
[usb] 7-series/8-series USB
[usb] USB3_PRW(0x6D) and Rename XHC to XHC1
For brightness, apply this patch.
6 Install all the kexts provided below with kext Utility. It is important that you install all of them before upgrading to beta 2, 3, and 4. Because if you don’t put FakeSMC in S/L/E before upgrading, you won’t be able to boot after upgrading to beta 2.
7 For wifi: I purchased this tiny TP Link WN725v2.
8 Enjoy your Hackintoshbook
Kexts I used:
ACPIBacklight.kext
ACPIBatteryManager.kext
AppleHDA.kext
ApplePS2SmartTouchPad.kext
FakeSMC.kext
RealtekRTL8111.kext
Special thanks to Rehabman for his great guides, AustereJ for HD 5500 to work, Kinutsk for his guide on setting DVMT in InsydeH20 bios, jcsnider for his guide to install Yosemite http://www.tonymacx86.com/yosemite-laptop-guides/162391-guide-2015-x1-carbon-yosemite.html that I refer to a lot, EMlyDinEsh from osxlatitude for his great work that make elan possible in OS X.
Final words: Install OSX in Windows laptop is long process that give you enough headache of a massive work. If you succeed with my guide then congrats, if you can’t still do it. Read, read, read, then try, try, and try. It takes me a almost a week to read all the materials out there before deciding buying this laptop, another two weeks to try every possibly. However the reward is well worth. I upgraded to Beta 5 and everything works great so far.
Everything is included here, you can download and use them for faster installations
https://drive.google.com/folderview...hHU01SU244U1VMbUhlRjJfZEF2UEt3cnc&usp=sharing
Model: Lenovo G50-80
Bios version B0CN40WW
CPU: i5 5200u, HD 5500 Graphic
Ram: 4GB
Hard drive: Kingston Hyper X Savage 120 GB SSD + 500 GB Seagate HDD
Audio: Conexant CX20752
Ethernet: RTL8111
Please check your bios carefully, because you’ll need to modify your bios to increase dvmt, and there’s been a report here showing that higher bios might not be able work. If your laptop come with B0CN40WW bios please don’t ever upgrade. If it came with later bios, you probably might give it a try, and I take no responsibility of any damage you may encounter.
1 Increasing DVMT:
Follow these two guides here and here to increase dvmt to 96MB. You don’t need to install windows to do all the steps there. The default dvmt values is 32MB, so I all I did were downloading the bios files here B0CN75WW and here B0CN79WW in a windows machine, decompile the files with Inno Setup Unpacker then follow the instructions and use the tools provided in the posts to find out about dvmt values.
If you have the same bios version with me, and you don’t want to go through all those long steps, just download this EFI shell. After extracting it, you’ll find a boot folder, format your usb in Fat32, make a directory name EFI inside it, and copy the boot folder from downloaded EFI Shell. Then boot EFI from it and run this command:
Code:
setup_var 0x18c 0x03If it says anything like error: can't set variable using EFI (error: 0x000000000000001a) then I think you may not able change dvmt and need to mask the assertion like this guide here (I have’t tried).
If output is like this, then congrats.

2 Bios: work OOB w/o any configurations.
3 Making USB intaller:
Follow this guide here to create a USB installer
http://www.tonymacx86.com/el-capita...ublic-beta-installation-usb-using-clover.html
For the kexts and configuration file, please download mine here.
4 Install El Capitan: follow all the steps of to compel the installation process, after finishing it, install clover to your hard drive and copy all the file in the EFI folder below and replace EFI folder created by Clover Installer.
5 This laptop need to patch DSDT for battery status, and brightness control, and audio to work.
I follow this guide for DSDT patching [Guide] Patching LAPTOP DSDT/SSDTs
all the patches I applied were:
[bat] Lenovo G50-70
[igpu] Brightness Fix (Haswell)
[sys] Fix _WAK Arg0 v2
[sys] HPET Fix
[sys] “SMBUS” Fix
[sys] IRQ Fix
[sys] RTC Fix
[sys] OS Check Fix (Windows 8)
[sys] Fix PNOT/PPNT
[sys] Add IMEI
[usb] 7-series/8-series USB
[usb] USB3_PRW(0x6D) and Rename XHC to XHC1
For brightness, apply this patch.
Code:
into method label _Q12 replace_content
begin
// Brightness Down\n
    Notify (PS2K, 0x20)\n
end;
into method label _Q11 replace_content
begin
// Brightness Up\n
    Notify (PS2K, 0x10)\n
end;
6 Install all the kexts provided below with kext Utility. It is important that you install all of them before upgrading to beta 2, 3, and 4. Because if you don’t put FakeSMC in S/L/E before upgrading, you won’t be able to boot after upgrading to beta 2.
7 For wifi: I purchased this tiny TP Link WN725v2.
8 Enjoy your Hackintoshbook
Kexts I used:
ACPIBacklight.kext
ACPIBatteryManager.kext
AppleHDA.kext
ApplePS2SmartTouchPad.kext
FakeSMC.kext
RealtekRTL8111.kext
Special thanks to Rehabman for his great guides, AustereJ for HD 5500 to work, Kinutsk for his guide on setting DVMT in InsydeH20 bios, jcsnider for his guide to install Yosemite http://www.tonymacx86.com/yosemite-laptop-guides/162391-guide-2015-x1-carbon-yosemite.html that I refer to a lot, EMlyDinEsh from osxlatitude for his great work that make elan possible in OS X.
Final words: Install OSX in Windows laptop is long process that give you enough headache of a massive work. If you succeed with my guide then congrats, if you can’t still do it. Read, read, read, then try, try, and try. It takes me a almost a week to read all the materials out there before deciding buying this laptop, another two weeks to try every possibly. However the reward is well worth. I upgraded to Beta 5 and everything works great so far.
Everything is included here, you can download and use them for faster installations
https://drive.google.com/folderview...hHU01SU244U1VMbUhlRjJfZEF2UEt3cnc&usp=sharing

