trs96
Moderator
- Joined
- Jul 30, 2012
- Messages
- 25,507
- Motherboard
- Gigabyte B460M Aorus Pro
- CPU
- i5-10500
- Graphics
- RX 570
- Mac
- Mobile Phone
The Dell Optiplex CustoMac Mini Desktop

Comments
This guide for the Dell Optiplex 7010/9010 is a complete description of 7 steps necessary to get your system working with macOS High Sierra or Mojave. These business desktops are Ivy Bridge based and have the Intel Q77 Express chipset. Dell Optiplex PCs* are a very good choice for your first hackintosh or as an additional, secondary one if you already have a newer system. They have BIOS and UEFI which allows for either legacy or UEFI booting. UEFI is the preferred method and will be described here. This guide may appear to be excessively long, only because I've described each step in great detail. I've done this so beginners will know exactly what they must do to succeed without having to find the information elsewhere.
This Guide is only for use with the Four Optiplex Desktops Shown Above
*The Dell Optiplex 3010 models use the older Intel H61 chipset. You might get macOS installed with this guide but they won't work reliably. Avoid using this guide for the Optiplex 3010. Read about the reasons why here. Do not use this guide's custom SSDTs and config.plist with the Dell 9010 AIO or the Dell 3020, 7020 or 9020 models. They have been created specifically for the 7010/9010 desktops and nothing else. They don't work with the other Dell models mentioned previously.
If you have not purchased your Dell Optiplex yet, take a look at the 7020 and 9020 SFF and MT models. The prices are slightly higher than these Ivy Bridge based systems but they offer some unique advantages as well. If you will need an AMD RX 570/580 in your build they fit best in the 7020/9020 Mini-tower. Only graphics cards under 10" in length will fit.
Mojave Guide for the Dell Optiplex 7020/9020 Desktops

The 4K Dell OptiMac - 9020 MT - Core i7-4790 - Radeon RX 570 - LG 4K IPS Monitor
The Dell Optiplex 9020 and LG 4K IPS Monitor ____ Components Dell Optiplex 7020/9020 Mini-Tower (MT) Amazon - Newegg Dell Optiplex 7020/9020 Small Form Factor (SFF) Amazon - Newegg Dell Optiplex 9020 Ultra Small Form Factor (USFF) Amazon - Newegg Dell Optiplex 9020 Motherboard...
 www.tonymacx86.com
If you want to start with a clean install of Catalina, click the link below to see the full guide. 10.15.3 appears to be stable enough for everyone's use. It also provides more security features than Mojave does.
Catalina Guide for the Dell Optiplex 7010/9010 Desktops

[Guide] Install Catalina on the Dell Optiplex 7010 and 9010 Desktop PC
Catalina on the Dell Optiplex 7010/9010 Introduction These are currently some of the most affordable and easy to Hackintosh PCs that are widely available for purchase. The guide for High Sierra and Mojave that I posted previously has been immensely popular, currently at over 362,000 views...
 www.tonymacx86.com
What Works
- HDMI/DisplayPort audio
- Headphone and Mic Jacks
- USB 3.0 and 2.0 ports
- Sleep and Wake
- Intel 1 GigE wired Ethernet
- Updates via the Mac App Store
- Messages/Facetime
- HD4000 Integrated Graphics
- Dedicated Graphics SFF/DT/MT
- Airplay Mirroring
- Night Shift
- Dual monitors via onboard graphics
- Compatible with macOS Mojave
- Continuity and Handoff *
This is a Full Height card that requires installation in the MT version and connection to an internal USB 2.0 header.
(SFF form factor Dell Optiplex models do not have this internal USB 2.0 header therefore order the following)
USB 9 pin to external USB 2.0 adapter and use the BCM94360CS2 card in the spoiler section below.
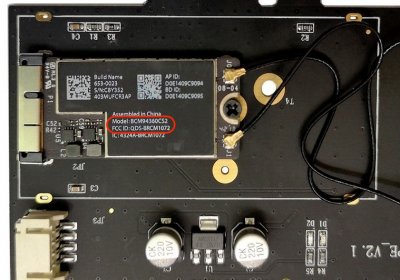
Fenvi Natively Supported Wifi and Bluetooth Card
Fenvi FV-HB1200 Broadcom 94360CS2 Wifi/BT Adapter
Low Profile or Full height
Amazon - Newegg
BCM94360CS2 Wifi + Bluetooth Combo Card
Is a Macbook Air Wifi/BT combo card that works via a PCI-E adapter and also requires a USB 2.0
header on your motherboard. Enables Continuity and Handoff as well. You can use the Desktop
Dell 7010/9010 with this or use the Mini-Tower version, either will work. (LP bracket included)
You can also buy the Wifi and BT card separately and build one yourself. Make sure of the exact
model number of the card. The BCM943602CS is a 3 antenna version that will also work.
For the Dell USFF model there are two Half mini PCIe cards to choose from.
https://www.amazon.com/dp/B00TZJYRF6/?tag=tonymacx86com-20
This will fit in the SFF, DT and MT versions of the 7010 or 9010 Optiplex. No USB header required.
For USB Wifi that works in all form factors see the following post for the choices and how to install drivers.
Realtek USB Wifi Adapters

 www.tonymacx86.com
Fenvi FV-HB1200 Broadcom 94360CS2 Wifi/BT Adapter
Low Profile or Full height
Amazon - Newegg
BCM94360CS2 Wifi + Bluetooth Combo Card
Is a Macbook Air Wifi/BT combo card that works via a PCI-E adapter and also requires a USB 2.0
header on your motherboard. Enables Continuity and Handoff as well. You can use the Desktop
Dell 7010/9010 with this or use the Mini-Tower version, either will work. (LP bracket included)
You can also buy the Wifi and BT card separately and build one yourself. Make sure of the exact
model number of the card. The BCM943602CS is a 3 antenna version that will also work.

For the Dell USFF model there are two Half mini PCIe cards to choose from.
- Half mini: BCM94360 HMB / AzureWave AW-CB160H - native WiFi/ac and BT4LE (3 antennas)
- Half mini: BCM94352 HMB / AzureWave AW-CE123H - supports WiFi/ac and BT4LE
https://www.amazon.com/dp/B00TZJYRF6/?tag=tonymacx86com-20
This will fit in the SFF, DT and MT versions of the 7010 or 9010 Optiplex. No USB header required.
For USB Wifi that works in all form factors see the following post for the choices and how to install drivers.
Realtek USB Wifi Adapters

The 4K Dell OptiMac - 9020 MT - Core i7-4790 - Radeon RX 570 - LG 4K IPS Monitor
The Dell Optiplex 9020 and LG 4K IPS Monitor ____ Components Dell Optiplex 7020/9020 Mini-Tower (MT) Amazon - Newegg Dell Optiplex 7020/9020 Small Form Factor (SFF) Amazon - Newegg Dell Optiplex 9020 Ultra Small Form Factor (USFF) Amazon - Newegg Dell Optiplex 9020 Motherboard...
 www.tonymacx86.com
- Attachments - Download Kexts and SSDTs
- Step #1 - Flash and Configure the BIOS
- Step #3 - Install macOS
- Step #5 - Install Essential Kexts
- Step #7 - Implement the iMessage Guide
- Hardware - Choices and Upgrades
Why use the Mac mini 6,1/6,2 System Definition ?
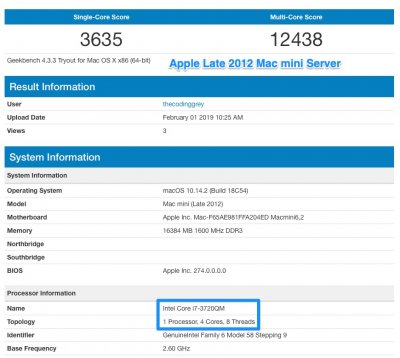
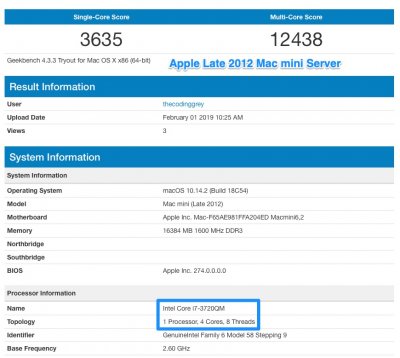
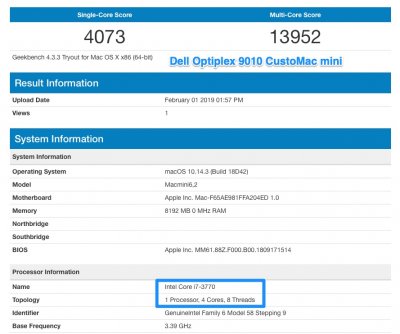
The Late 2012 Mac mini and Mac mini server were two of the best Macs that Apple ever produced. They were affordable, offered quad core CPUs and had easily upgradeable ram and storage. These used minis still demand high prices in the used/refurbished market today. The Dell Optiplex PCs featured in this guide are the best match for a hackintosh based on the 2012 Mac mini. Here is a comparison of Geekbench scores for the quad core i7 Mac mini and the Dell Optiplex i7-3770 CustoMac mini. Click on each image to see a larger view with more detail.
Once I've got macOS installed on this PC, what can I use one of these Dell Desktops for ?
The Late 2012 Mac mini and Mac mini server were two of the best Macs that Apple ever produced. They were affordable, offered quad core CPUs and had easily upgradeable ram and storage. These used minis still demand high prices in the used/refurbished market today. The Dell Optiplex PCs featured in this guide are the best match for a hackintosh based on the 2012 Mac mini. Here is a comparison of Geekbench scores for the quad core i7 Mac mini and the Dell Optiplex i7-3770 CustoMac mini. Click on each image to see a larger view with more detail.


Once I've got macOS installed on this PC, what can I use one of these Dell Desktops for ?
- Run the latest version of Xcode and develop software
- Edit video in iMovie or FCP X or Davinci Resolve
- Use any app that you can download from the Mac App Store
- Use as a media center to stream and play content
- Everyday tasks like email and social media
There are very few differences between the two. The 7010 and 9010 USFF models are exactly the same. The only important distinctions are between the various form factors. The Mini-Tower 7010 or 9010 Dells have 4 Sata ports and the Desktop versions have just 3. Dell says the PCIe x16 slot on the SFFs and Desktops can only provide up to 50W of power. The Mini-Tower up to 75W. That is important if you are using a LP RX560 or LP 1050 TI graphics card and you want to game in Windows. If so, choose the MT version to supply enough power for your card via the PCIe slot. Download the technical manual for each model, 7010/9010 Dell and read through it. There is much detailed info that you can use to help you decide on a 7010 or a 9010. Be sure to understand the main limitations of each form factor. Read the manual for detailed specs.
Can I install Mojave first and skip High Sierra ?
Yes, if you want to install Mojave now simply make a Mojave Unibeast 9.2.0 installer and follow this guide for Mojave. The primary difference from installing High Sierra on your Dell is that you can't use Nvidia graphics cards that require the Nvidia Web drivers with Mojave. There is no ETA for those. Use HD4000 graphics or buy a GT 710 card.
Why should I buy a Pre-Built Dell Computer that was new in 2013 ?
- The Dell Optiplex 7010 or 9010 is the perfect "starter" hackintosh
- It's also a nearly perfect fit for macOS High Sierra or Mojave
- It has all that you need for a system that performs as well as many newer CustoMacs do
- It's much better for the environment to buy used/refurbished
Graphics Options
If you buy an Optiplex with HD4000 graphics you can then use any form factor via the integrated Intel graphics. For the USFF model it's mandatory. An i3-3225/45 is ideal for general use, surfing the net and viewing video. An i5 with HD4000 is better for more demanding tasks. You'll need to connect your monitor via one of the two onboard DisplayPort outputs.
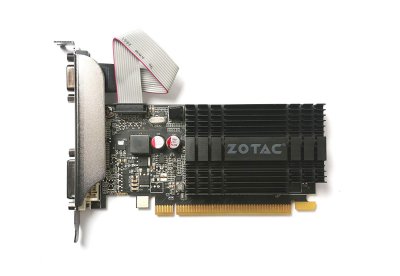
There are six Ivy Bridge CPUs you can use in your Dell Optiplex desktop that have the HD4000 graphics built in to the CPU. i3-3225 - i3-3245 - i5-3335S - i5-3475S - i7-3770S - i7-3770. The best performer is the i7-3770. The best value is the i5-3475S. If you want to game and/or edit video get the i7-3770. The 3570K and 3770K are potential upgrades but cannot be overclocked due to lack of any options for that in the Dell BIOS. If your CPU has HD2500 (i5-3470) then you must install a compatible dedicated graphics card. The GT 710 is a popular choice.
To Have Working macOS HS/Mojave Graphics, do not use the VGA Output to your Monitor
Always Connect To A DisplayPort Output when using your Onboard HD4000 Graphics
Note: The one exception to this rule is that you may need to use VGA to set up your BIOS when you get your Dell.
Some have reported that they were not able to access the BIOS when connected via DisplayPort to a 4K monitor.
Most 7010/9010s shipped with the i5-3470 or the i7-3770. The 3470 has only the unsupported HD2500 graphics. It is easy to swap that out for an HD4000 CPU if you'd like to. The USFF model has no PCIe x16 slot. Therefore your CPU must have HD4000 graphics if you want working video. You'll need to purchase a Displayport to HDMI cable or get an adapter if your monitor only has HDMI inputs. You can use a DP to VGA or DP to DVI adapter for older monitors.
Using a Full Height Graphics Card
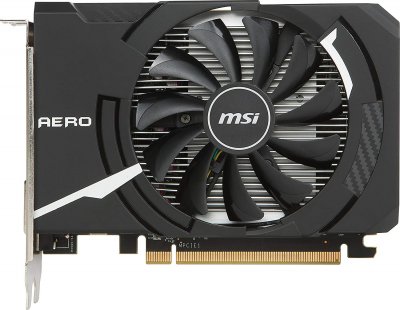
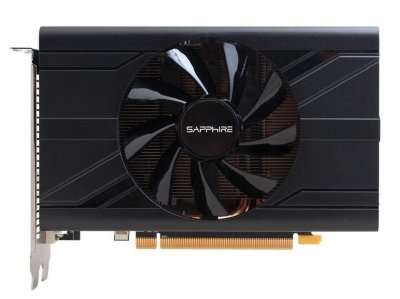
The Mini-Tower version allows you to use a replacement standard ATX power supply with a 24 pin power connector. This gives you the option to use more powerful PSUs that have supplemental 6 and 8 pin power connectors. You can easily use a mini-itx sized RX 570 with the right power supply upgrade to a 450W or higher model. Your graphics card length can be up to about 7.5 inches (19cm). If longer it will run into sata connector ports. It is probably best to go with 7 inch Mini-ITX versions of the RX 570 or GTX 1060 if you want more graphics power for gaming in Windows. This MT version is the only one of the four Optiplex form factors that gives you the option to use a full height dedicated graphics card. Click Here to view some of your best choices from a list of High Sierra and Mojave compatible graphics cards.
Three Important Preliminary Steps
1. Replace the Existing Thermal Paste on the CPU IHS (Integrated Heat Spreader)
Even if you bought your Dell from a professional refurbisher, it's highly unlikely that they took the time to replace the thermal compound between the CPU and heatsink. After five or six years, it needs to have the old compound removed and a fresh coat applied. Use 99% isopropyl alcohol and some guaze pads to remove it. Then apply some new paste like the Arctic MX4 which is available on Amazon or Newegg. If you don't have experience doing this look for some online video tutorials that show you how. Especially important if you buy the i7-3770 CPU version of the Optiplex. A new coat of thermal paste will help keep temps much lower when you are pushing your CPU during gaming or video/photo editing.
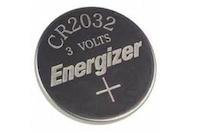
2. Replace the CMOS Battery
The CMOS battery in these is likely to have lost it's ability to hold a charge. These Dells are at least 5 years old so it's a good idea to replace it. My USFF and SFF model both had a battery like this. I kept getting a black screen at boot up on my 7010, was not able to even access the BIOS until I removed the battery for a minute and reseated it. Replace it altogether with a fresh new one before you make the BIOS changes in step 1. Once you remove it from your board, all BIOS setting changes will be lost and you'll have to reapply them. See the following post for more on this topic. CMOS battery failure If you buy the USFF form factor, replace the thermal compound at the same time. You'll have to completely remove the CPU heatsink anyway just to get access to the CMOS battery in the 7010 or 9010 USFF Dell Optiplex.
3. Password Protect MEBx
This is something you've likely never heard of before. It's included on all Dell business desktops. It stands for the Intel Management Engine BIOS Extension. You can access this by pressing the Control and P keys together at boot up. If those keys don't do anything, then it may have been disabled at the factory on your Optiplex. To confirm, open up the side panel and look at the white sticker on the underside. If you see the number 3 and ME Disabled or 6 & ME Lockout it has been factory disabled. These will not work well if you want to use HD4000 graphics. It will cause problems with graphics acceleration that are not fixable without some very complicated BIOS hacks. Return or exchange it immediately. If you see AMT_DASH_VPRO and the number 1, then use the key combo mentioned and set your password.
AMT_DASH_VPRO: DEFAULT
1
When you do get in, sign in with "admin" no quotes, as your password. Then you'll want to create a secure, 8 character minimum password. Why do this ? When this is left set to the default admin password it leaves your Dell wide open to remote access over the internet. Even if your Dell is completely powered down with an ethernet cable connected, it enables remote access. There is no easy way of disabling the IME. Leaving it enabled with a secure password is best.1
In Summary:
For those buying a complete Dell PC it may be best to ask the seller to look at the sticker on the inside of the side cover. If it has the DEFAULT set to 1 that's perfect. If it's got a 3 or 6, ask them to send a different one. Then you'll know for certain whether or not you'd have to jump through all these hoops just to get integrated Intel graphics to work. For those buying a Dell Optiplex board and not the whole Dell PC, you really have no way of knowing the status until you get it and test. What if your sticker on the side panel says 1 and ME is still disabled ? It is possible that the seller didn't put the same side panel back on that it came with, i.e. they refurbished many of these at the same time and mixed them up.
Installation Tips
If your Dell has any kind of wireless adapter installed (USB, PCIe or Mini PCIe) remove it before attempting the installation of macOS. Use Ethernet until after you've got everything else working properly. Then you can work on Wifi function after that. If you are unfamiliar with any of the terminology used here, please consult the tonymacx86 CustoMac Glossary for a clear and concise definition of the various acronyms and hardware components mentioned in this guide. You can also find the Dell 7010/9010 technical manuals attached below. Refer to those for specs and hardware upgrades.
This guide is complete in and of itself. Don't mix parts of or techniques from other guides. Even from ones for this same hardware. The only other guide you'll need to look at is the tonymacx86.com Unibeast creation guide if that is new to you.
Most Important Tip: If you have previously attempted a macOS install on your Dell, using other guides or techniques or even the previous version of this guide, perform a clean install (format your hard drive). That's the only way to be certain to have success with this guide. You will see the instructions to do that in step #3 below. Read and follow carefully.
You can do this from right within Windows by double clicking on the .exe file. This will initiate the flashing process. Make sure you have IE or Edge set as your default browser. If you don't have access to a Windows drive simply create a DOS bootable USB on a PC and boot from that and flash the BIOS. Rufus works well to make a DOS USB. If you do not have access to a Windows machine then try the Etcher App and FreeDOS LITE to create the USB on a macOS 10.9+ Mac or CustoMac.Step 1. Update your BIOS and Change the Settings
BIOS Downloads available here: 7010 BIOS ver. A29 -- 9010 BIOS ver. A30
Run the BIOS update utility from a DOS environment in Legacy Boot Mode
- Copy the downloaded BIOS file to a bootable DOS USB key.
- Power on the system, then Press F12 key and Select "USB Storage Device" and Boot to DOS prompt.
- Run the file by typing the copied file name where the executable is located.
- DOS System will auto restart and update the BIOS.
- After BIOS update finishes, the system will auto reboot for it to take effect.
Setting up the Dell BIOS (Tap on the F2 key at boot up to access)
Load Optimized Defaults after you've flashed the BIOS and before you make any other changes to it.
There is a "Load Defaults" tab in the lower central part of the window. Click on that and then click Apply.
Go to Boot Sequence and set the Boot List Option to UEFI. Under Advanced Boot Options leave the Legacy Option ROMs box unchecked unless you have an older graphics card without UEFI capability. For example a GTX 650 by Nvidia which is only Legacy capable. The GT 710 and all 10 series Pascal cards have UEFI capability. Also leave Legacy Option ROMs unchecked if you are using built in HD4000 graphics. Under System Configuration disable the Serial Port.
Secure Boot is disabled by default. SATA Operation should be set to AHCI by default. Check both of these and if they are set to anything else, change them. If you don't plan on ever booting your Dell remotely, change Integrated NIC to Enabled instead of Enabled w/PXE. If your CPU has HD4000 and you have no dedicated graphics, leave the Primary Display set to Auto. If you have installed an AMD or Nvidia card select that under Video -> Primary Display
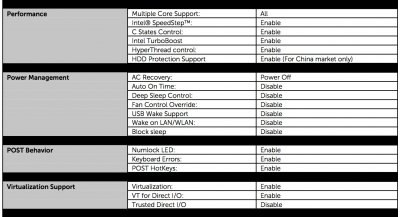
Summary of BIOS Setting Changes
General
Boot Sequence -> Boot List Option -> UEFI
Advanced Boot Options -> Uncheck - Enable Legacy Option ROMs
System ConfigurationSerial Port -> Disabled
Sata Operation -> AHCI
Integrated NIC -> Enabled
VideoPrimary Display -> Auto (For HD4000)
Primary Display -> Nvidia or AMD HD Graphics (if using a graphics card)
BIOS Settings Screenshots: Click here to view the the Suggested BIOS settings changes.Download links for Unibeast High Sierra https://www.tonymacx86.com/resources/unibeast-8-3-2-high-sierra.383/
or Mojave https://www.tonymacx86.com/resources/unibeast-9-2-0-mojave.426/
Step 2. Create your Unibeast Installer for UEFI Booting
Download Mojave from the Mac App Store on a 2012 or newer iMac or Mac mini running Mountain Lion or newer versions of macOS. A Mac Pro should be 2010 or newer and the eligible Macbooks that can be seen below, should be 2012 or newer models. A hackintosh must also be running Mountain Lion or newer and use one of the following minimum system definitions or newer. Then the CustoMac will appear as Mojave eligible at the Mac App Store and you'll be able to download it easily.
MacBook 8,1 / Early 2015
MacBook Pro 9,1 or 9,2 / Mid 2012
MacBook Air 5,1 or 5,2 / Late 2012
Mac mini 6,1 or 6,2 / Late 2012
iMac 13,1 or 13,2 / Late 2012
Mac Pro 5,1 / Mid 2010/2012
Mac Pro 6,1 / Late 2013
The 2010/2012 Mac Pro would need a Metal 2 capable graphics card.
See: Mojave compatible graphics card choices
If you don't see Mojave 10.14.6 in the Mac App Store you can still download it with gibMacOS. See the video guide.

gibMacOS Tutorial ~ How to Download macOS Directly from Apple
When your Mac is ineligible to download Catalina or Newer macOS versions If your Intel Mac is from approximately 2011/12 or older (see post #2) you won't be able to download Catalina from the Mac App Store. Follow the instructions in these videos to enable the download of Catalina or newer...
 www.tonymacx86.com
Leave the macOS installer in Applications. Create your Unibeast installer by following the standard tonymacx86 guide. Use an 8, 16 or 32GB USB flash drive. Anything larger than 32GB in size must be partitioned to less than 32GB.
There is one critical step to remember when formatting your USB or other drives in Disk Utility. Always click View (1) and then Show All Devices (2) instead of leaving it at "Show Only Volumes."
1.
 _______ 2.

3.
 _______ 4.

After you "show all devices" you'll see your USB's name (3) click on it then erase it in Disk Utility (4)3.
Once creation of the Unibeast installer has completed, you will need to replace the Unibeast created config.plist with a Custom one attached below. Do this before ejecting the Unibeast installer or you'll have to mount the EFI manually later.
A. There will be an external drive on your desktop that represents the Unibeast USB's EFI partition
B. Double click that EFI drive icon to open it up and reveal the EFI folder on that partition
C. Now open the Clover folder inside of that EFI folder
D. Download the Custom Clover config.plist (zip file) Attached below
E. Delete the existing config.plist and then add in the new Custom one you just downloaded
F. Open up the kexts/other folder and drag and drop the Release version USBInjectAll.kext into that folder
G. Download "SSDTs Dell Optiplex" zip file from the end of this post and copy and paste all
of those files in that folder to the /Clover/ACPI/patched folder in the EFI partition of your USB
H. Download the HFSPlus.efi file and place it in the drivers64UEFI folder
I. If you will install macOS to an NVMe drive, place the NvmExpressDxe-64 driver in drivers64UEFI
Step 3. Install High Sierra or Mojave
A. First, disconnect the Sata data cables from any Windows or Linux drives you may have in your Dell
B. Put your Unibeast installer into a front USB port. Either a USB 2 or 3 port should work
C. Boot UEFI from the Unibeast installer (tap on the F12 key at boot up)
Always boot in Verbose mode during the install. It helps you see the exact place where a kernel panic may occur. If all you see is a progress bar, you'll have no idea. Get to the Boot Manager screen by pressing the spacebar on your keyboard at the Clover Boot Menu screen. Then place a checkmark in the Verbose (-v) box. The initial boot from your Unibeast drive to the macOS installer is very slow. Be patient and let everything happen in it's own time. Follow the tonymacx86 guide for formatting the hard drive you will be installing on. Use GUID Partition table and Mac OS Extended Journaled as your choices in Disk Utility. Mojave will automatically convert your HDD or SSD to APFS (Apple File System) during the install. High Sierra will convert your SSD to APFS but not your HDD platter drive.
There will be 3 to 4 automatic reboots after you agree to terms and start the install to your hard drive. The progress bar may only go about 1/4 of the way across, then a reboot happens. That is normal for this part of the install. Let this process happen without interference. Select the hard drive you are installing to in the Clover Boot menu each time it reboots. If it stops at the "Install macOS Mojave" USB icon in the boot menu i.e. your Unibeast installer drive, use your keyboard's arrow key to select the other drive.
If you've followed this guide verbatim up to this point, you should reach the "select country" screen part of the initial setup. Choose your region, your keyboard, etc. but do not sign in to iCloud at this time. Choose Setup Later instead. Signing into iCloud registers the serial number of the computer, this serial number will change in Post-Installation, which will then result in two new systems being registered in iCloud. So skip iCloud sign-in until post-installation is done and you've rebooted after Step 7 is completed.
After you've created your Admin account you will reach the macOS desktop.
D. Now open up Terminal and copy/paste this text into it and hit enter:
Code:
sudo spctl --master-disableOptional: While you have Terminal open you can also disable Hibernation and recover some disk space.
Enter the following one line at a time. (Hit the return/enter key after each line)
Code:
sudo pmset -a hibernatemode 0
sudo rm /var/vm/sleepimage
sudo mkdir /var/vm/sleepimage
Code:
Warning: Idle sleep timings for "AC Power" may not behave as expected.
- Disk sleep should be non-zero whenever system sleep is non-zero.
trs96s-iMac:~ trs96$ sudo rm /var/vm/sleepimage
trs96s-iMac:~ trs96$ sudo mkdir /var/vm/sleepimageStep 4. Install and Configure Clover
Link to get the r4961 Clover version https://www.tonymacx86.com/resources/clover-uefi-boot-mode-v2-4k-r4961.432/ You won't need to make individual selections with MacMan's build. Just make sure to use HFS Plus instead of VboxHFS. (avoid the 5000+ versions of Clover)
These instructions are for the r4920 version of Clover which you'll find attached below in the "complete" zip file.
A. Double click the Clover package to open it and then click through the continue prompts to agree to terms.
B. Once you reach "Desination Select" choose the hard drive you formatted for the install.
C. Now click "Continue" and after this step, click on "Customize" at Installation Type:
D. Next select the appropriate configuration. Clover for UEFI booting only + Install Clover in the ESP
E. Under Themes, drill down and select only "BGM" (Black Green Moody) for installation purposes. It's the theme that is set on the config.plist which will be needed for installation. After you are done with installation, you can change the theme to anything else that you like. The Clover Theme Manager is an optional choice. Next select UEFI Drivers.
F. Some of the appropriate UEFI drivers have already been selected for you. You will also need to select
ApfsDriverLoader-64 and AptioMemoryFix-64. If you will also install an NVMe drive alongside this that
you would like to boot macOS or Windows from, include the NvmExpress driver when making your choices.
Now click on install and complete the process.
5. Install 3 Essential Kexts + AppleALC / Lilu and WhateverGreen
Link to get the Kextbeast app from Downloads: https://www.tonymacx86.com/resources/kextbeast-2-0-2.399/
Links to download the essential kextshttps://bitbucket.org/RehabMan/os-x-fakesmc-kozlek/downloads/
https://bitbucket.org/RehabMan/os-x-intel-network/downloads/ (release version)
Use the USBInjectAll kext (release version) as well that you have previously downloaded.
AppleALC and Lilu Kexts + WhateverGreen
If you'd like to use the builtin ALC269 audio, install the AppleALC 1.4.3 and Lilu 1.3.9 kexts to /L/E.
Include Whatevergreen (WEG) 1.3.4 as well to support your Intel graphics and/or AMD or Nvidia card.
Find all of these at the end of this post. Attached below
Use only these versions of AppleALC, Lilu and WEG together and don't mix other release versions with these, it won't work.
After download, place them on the desktop as well.
A. Now you are ready to run Kextbeast and install all of these kexts to /L/E
Make sure to put the checkmark in the tiny box to the left of /Library/Extentsions.
NOTES: Kextbeast will install every kext that is on your desktop. Make sure only the ones
you want installed are on the desktop before running the Kextbeast application.
B. Download Kext Utility (attached below) Run it to repair permissions and rebuild caches
You'll know it is finished when you see the quit button appear in the lower right of the window.
Do not drag and drop the kexts into the open window of Kext Utility as it suggests. Just let it run.
If you were to do this you'll have kexts installed to /S/L/E. Where you should not place them.
Go to Finder Preferences and put a checkmark next to Hard Disks.While your system drive's EFI partition is still mounted, go to the EFI folder and open it, then open the Clover folder.
C. Download the Dell Optiplex SSDTs from the zip file at the bottom of this post.
D. Go to /EFI/Clover/ACPI/patched - copy and paste all of the files from that SSDT folder into the patched folder
E. Drag and drop the HFSPlus.efi file into the /Clover/Drivers64UEFI folder (it is also attached below)
F. Once again, add the Custom Clover config.plist (attached below) to your Clover folder after deleting the existing one. (This config.plist has Audio layout-id set to 21. Make sure to use kexts: AppleALC 1.3.6 and Lilu 1.3.5 or newer)
G. Drag the FakeSMC kext (that you downloaded and placed on the desktop) into your /Clover/kexts/other folder.
H. Also add a copy of your Intel Mausi Ethernet kext to the "other" folder. Gives you internet access during recovery.
I. Finally, drag and drop the Release version USBInjectAll.kext into the "other" folder. (It's also on your desktop)
J. Now put all of the kexts on your desktop into a folder, label it and move them into Documents for safe keeping.
Nvidia Drivers for a High Sierra InstallationIf your Nvidia graphics card is not supported by the drivers in macOS High Sierra (Maxwell/Pascal based cards) GeForce GT 1030, GTX 1050, 1050 Ti, 1060, 1070, 1070 Ti or GeForce GTX 750, 750 Ti, 950, 960, 970, 980 graphics cards, alternate NVIDIA drivers are required. Download the correct Nvidia Web driver for your build of macOS. Download it here Open the installer package and click through the prompts to install the drivers. Remember that there are no new Nvidia Drivers for Mojave so install High Sierra for now and wait for the drivers. Get a Metal 2 capable graphics card by AMD or a Kepler based card like the GT 710 by Nvidia (see post #2) if you don't have HD4000 and want to run Mojave on your Dell.
When you install these two kexts to /Library/Extensions as directed in step number 5, this AppleALC method gives you a working front headphone jack and rear line out jack via ALC269. The mic jacks are also functional. This gives you the best audio output possible from your Dell. VoodooHDA used to be a part of this guide. Since AppleALC and Lilu work so well now, don't even consider using the VoodooHDA anymore. If you are using dedicated graphics, AMD or Nvidia, it's highly suggested that you also install the WhateverGreen kext. (This was also mentioned in step number 5 earlier)Step 6. Onboard Realtek ALC269 Audio via the AppleALC + Lilu Method
A. Eject Unibeast (if you didn't do this yet) and reboot your system.
You should now be able to boot from your High Sierra or Mojave system drive instead of from the Unibeast USB. Once at the desktop check that everything is working normally.
You will do this through the Clover Configurator application. Clover Configurator Global Edition P1LGRIM's guide gives you all the step by step directions. Read the guide carefully and implement each step. If you are using an i3 or i5 CPU select Mac mini 6,1 If you have an i7-3770 then select Mac mini 6,2 as your SMBIOS. Link: iMessage Guide for Messages and Facetime If you'd like to stay right here and follow my shortened and condensed version of that guide keep reading.Step 7. Implement the iMessage Guide and Generate a Unique Serial Number
Select your SMBIOS and generate new Serial Numbers in Clover Configurator (Specific to the Dell Optiplex)
If you want the short version of the iMessage guide, specific to a Dell Optiplex, I've included it here for your convenience.
Perform these steps to make your CustoMac completely unique from other Macs. You won't want to be using the serial number from any Mac computer that is in Apple's database. Your CustoMac will then work normally with Apple services:
You must have a working Ethernet connection which is defined as BuiltIn and en0.
An easy way to determine this is with the DPCIManager app. Link to DPCIMgr.
If you have signed into iCloud or the Mac App Store previously on your Dell then see P1LGRIM's guide linked above. You will need to follow the steps to sign out of iCloud and go to your /Library/Caches folder to delete specific files and folders there.
From your /Applications folder run Clover Configurator
Mount the EFI partition
Then File - Open - /EFI/CLOVER/config.plist
In the Rt Variables section - From the ROM dropdown list select UseMacAddr0
Make sure that the MLB box is empty.
In the SMBIOS section of Clover Configurator, apply the three steps shown below. Choose either Mac mini 6,1 or 6,2 SMBIOS. Those are the best matches. Make sure the "Trust" box is check marked, not Mobile. Generate a new Serial #.
Once you've finished those three steps in CC, click on the Check Coverage Tab (on the lower right of the panel)
Next, enter the Captcha code info. Press Continue. You should see the following response from Apple: That your Mac mini serial number is not valid. (means no real Mac uses the exact same serial) This is exactly what you want to see.
If you see the message "Your Service and Support Coverage" and a picture of a Mac mini then you have generated the Serial Number of a Mac computer that is already recorded in Apple's database. Do not use this Serial Number - Go back to Clover Configurator and generate a new one. Once you find one that works, get your unique SmUUID.
Save your edited config.plist. After a quick reboot you will run some final tests to make sure it all works on your system.
Reboot your System
Eject your Unibeast Installer if you haven't already.
You should now be able to boot from your High Sierra or Mojave system drive instead of from the Unibeast USB. Once at the desktop check to make sure that everything is working. Audio should now be enabled. Check the sound preferences. Plug in some headphones or speakers and see if you get any sound from them. Now you can sign into iCloud and set that up according to your needs. Test out Facetime and iMessage/Messages. Everything should work normally.
Conclusion: Three Optional Steps
Create an SSDT for CPU Power Management
Simply follow the tonymacx86 guide and place the ssdt.aml in the Clover/ACPI/patched folder on your system drive. Click here to see the guide If you already have an SSDT created for your i3, i5 or i7 CPU in High Sierra or Sierra use that. Drag and drop the file into the /Clover/ACPI/patched folder along with all the other SSDTs. Some CPUs seem to have problems with SSDTs created while running Mojave. Non-bootable systems have been reported. If that happens, simply boot with your Unibeast USB and remove the SSDT. Try one of the 3 SSDTs attached below if you have that specific CPU.
Dual Boot with Windows 7, 8.1 or 10
See the UEFI Dual Booting Guide: https://www.tonymacx86.com/threads/guide-multibooting-uefi-on-separate-drives.198869/ Note: when installing High Sierra or Mojave APFS you should not install Windows on that drive.
Use your IGPU in Headless Mode in Conjuction with a Graphics Card
Moderator jaymonkey has written a guide that will help you do this. Should work whether you have HD2500 or HD4000.
It can be helpful to enable this if you plan on working with video and photo editing on your Dell Optiplex CustoMac.
Pay close attention to the suggested changes you'll need to make to your config.plist for this to work on your system.
Link to the guide by jay: Guide to Lilu and it's Plugins
Your CustoMac Insurance Policy
If anything goes wrong with your install of macOS and you need to be back up and running again quickly, prepare a bootable clone of your system drive once everything works. Either purchase a new 120GB SSD or use an older but still functional mechanical drive to do this. New PNY 120 GB SSDs cost only twenty dollars right now on Amazon. A new Crucial 240 GB SSD costs only twenty six dollars. No good excuse to not make a clone of your system drive.
You can use Carbon Copy Cloner (CCC) or Super Duper or even Acronis True Image as mentioned below.
Important Final Step: Backup your working EFI folder and make a clone of your System drive Put a copy of your finalized EFI folder onto your Unibeast installer USB. That way you can easily replace it if your hard drive's config.plist gets corrupted. Don't mount the EFI partition of your Unibeast drive. Simply drag and drop the folder onto the flash drive. Leave the existing Unibeast EFI folder where it is.
You can make a complete Clone of your system drive by using Acronis True Image 2019 after you have installed all of your other programs and apps. You'll need to buy it from Amazon or Newegg. The free version of Acronis does not let you create a clone, it only lets you make backups. You get a lifetime license and will be able to make bootable clones in a few clicks. Completely painless and easy, in contrast to many of the other tasks required of a hackintosh owner.
Four Important Points to Remember
1. When you are installing kexts and not using Multibeast, you'll need to use Kextbeast 2.0.2 to install them to /L/E. After that you should run Kext Utility to repair permissions and rebuild caches.
2. The SSDTs and Clover Config.plist attached below are designed to work together. If you use just one or the other individually it will create problems and you won't have a fully functional and stable system. Follow this guide exactly as presented here for the best results. Don't mix in other kexts or make modifications to the config.plist that are not needed.
3. Update Clover to a newer version We started out using the newest RehabMan version of Clover r4701.RM. That has not been updated for 10.14.4 and later updates to Mojave. You can try Clover r4920 or newer from the Sourceforge download link. It appears to be a requirement for Mojave 10.14.4 or newer. In this official release of Clover the drivers in the "drivers64UEFI" folder are slightly different. In addition to what's already selected in UEFI Drivers, checkmark ApfsDriverLoader-64 and AptioMemoryFix-64 click install and you're done.
4. This is Revision II of the guide. The posts in this thread from #6 through #412 (July 2018 through January 2019) are related to the first version of this guide. Most of those problems have been resolved with changes to the guide. The issues you'll see reported there should no longer apply to your install of High Sierra or Mojave.
Download Kexts and SSDTs Here
If you want to download everything, including screenshots of the Steps in the Guide, download the Zip file that says: "Complete Dell Optiplex Guide and Files" and you'll have most everything you need for success. Get your macOS installer app only from the Mac App Store. Thanks for reading and following this guide !
Attachments
-
Kext_Utility.app.v2.6.6.zip281.2 KB · Views: 3,261
-
SSDTs Dell Optiplex.zip7.4 KB · Views: 4,451
-
HFSPlus.efi24.3 KB · Views: 3,780
-
Dell Tech Manuals.zip2.1 MB · Views: 1,757
-
Custom Clover config plist.zip2.2 KB · Views: 4,664
-
i5-3470 ssdt.aml.zip1.7 KB · Views: 1,827
-
i7-3770 ssdt.aml.zip1.5 KB · Views: 1,989
-
i5-3475S SSDT.aml.zip1,013 bytes · Views: 1,265
-
Readme.zip1.3 KB · Views: 1,330
-
NvmExpressDxe-64.efi.zip17.1 KB · Views: 1,409
-
Complete Dell Optiplex Guide and Files.zip26.5 MB · Views: 6,109
-
ALC.Lilu.WEG.zip1.2 MB · Views: 1,926
Last edited:

