jaymonkey
Moderator
- Joined
- Aug 27, 2011
- Messages
- 4,077
- Motherboard
- GB Z490 Vision D
- CPU
- i9-10850K OC @ 5.2 GHz
- Graphics
- RX6800-XT+UHD630
- Mac
- Mobile Phone
Injection of Device Properties for Power and Fan control
Last updated 14th May 2019
Update: MacOS Mojave 10.14.5+ includes a major overhaul of the Vega GPU drivers which should resolve all the power and fan control issues with most Vega cards and thus should make the methods outlined in this guide no longer necessary. Although you can still use the method to apply a core and/or memory overclock
For those users running earlier versions of MacOS the methods outlined in this guide should still work as long as you have a Vega GPU that can be controlled by MacOS.
Although the AMD Vega 56 and 64 GPU's are natively supported by MacOS 10.13.6 and 10.14.X they can sometimes need a little tweaking in order to get them running at their full potential on a hackingtosh system.
In most instances installing Lilu + WhatEverGreen (WEG) into /L/E will ensure that the Vega has the correct GFX0 ACPI identity and resolve most of the known issues such as the black screen on boot:-
https://www.tonymacx86.com/threads/an-idiots-guide-to-lilu-and-its-plug-ins.260063/
However many users have reported strange fan and GPU temperature behaviours when the Vega is put under load even with Lilu + WhatEverGrenn installed. One of most common issues reported is when the Vega is put under load the temps will start to rise but the Fan and/or Pump speed will decrease. Another common issue reported is that the fan is running at full speed at all times until a video in youtube is played.
The solution to these issues is to inject a custom SoftPowerPlayTable which defines fan speed set points, memory & die clock frequency's and voltages. To make life easy for us all, software developer @lihaoyun6 has written a utility called VGTab (link to his Chinese site) that allows us to define either a stock or custom SoftPowerPlayTable by means of a simple and easy to use GUI:-
_______________________________________________
The VGTab Utility exports the defined SoftPowerPlayTable as a raw hex file (Filename = VGTab_XXXX_data.kext) and as a simple injector kext (Filename = VGTab_XXXX.kext), the VGTab injector Kext essentially has two phases ....
First it configures the Vega Frame Buffer (FB) by using a Vega model specific FB name and some VID/PID matching.
However if you are already using WhatEverGreen (WEG) to configure your IGPU (possibly as headless) then WEG will also take care of configuring the Vega Frame Buffer by injecting a universal/generic Frame Buffer that should work for all Vega's as well as injecting some (but not all) Vega Device Properties.
By having both WEG and the VGTab kext configuring the Vega Frame Buffer using different methods results in a configuration conflict which can result in WEG and/or the VGTab kexts exiting abnormally.
Some users have worked around this conflict by directly modifying the info.plist embedded in Apple's AMD10000Controller kext, but the use of static patched systems kexts means that SIP must be fully disabled and the patch must be re-applied after each MacOS update so its not a great solution.
Other users have found that "injecting" the VGTab kext via Clover (/EFI/Clover/Kexts/Other) can help WEG and the VGTab kext to co-exist, but injected kexts live outside of the MacOS protected memory space and are not cached and can make for an unstable system, by forcing both kexts to be injected results in an improperly configured system as the conflict is still occurring.
Note: If you are not using WhatEverGreen then its unlikely you will suffer from this conflict and can just use the VGTab Kext as is, however if you have a desktop class CPU with IGPU and an internal PCIe dGPU then you should consider using WhatEverGreen to configure the IGPU with a headless PlatformID which is how genuine iMac's and Mini Mac's with dual GPU's are configured (does not apply to eGPU's). If you are un-familiar with headless PlatformID's then see the Lilu and Plug-in's guide for more information which has a dedicated section on the subject.
During its second phase the VGTab kext configures some additional Device Properties for the Vega's power and fan control and lastly injects the SoftPowerPlayTable defined in the VGTab GUI, if a conflict occurs between WEG and VGTab then in many cases the SoftPowerPlayTable will not get injected.
Since WEG already takes care of setting up the Vega's frame buffer (and configuring the IGPU) we can leave that task to it and inject the Vega's power and fan control parameters and the SoftPowerPlayTable as Device Properties using Clover rather than using the VGTab kext thus avoiding any conflicts or the need to directly modify the AMD10000Controller kext.
Installing the VGTab Utility
The VGTab Utility is attached to the bottom of this guide, simply download and extract the zip file.
By default the VGTab utility has the extended file attribute com.apple.quarantine assigned to it which means that if you try to run it from the location you downloaded it from, MacOS will 'TransLocate' the file and execute it from a read-only random file location, which will stop the utility from being able to generate any data and saving it to the desktop.
Normally all you have to do to remove the com.apple.quarantine attribute is to simply move the app from your Downloads folder to a new location (EG: Applications), however some users have found that this does not always happen which can result in the VGTab not generating/saving any info to the desktop due to it still being .TransLocated'.
If you find that the VGTab app does not save any data to your desktop then you can check if the app still has the com.apple.quarantine attribute by opening Terminal and changing the active path to the location of the VGTab app using the 'CD' command. Then execute the following command :-
Code:
xattr VGTab_en.appIf you see that the file still has the com.apple.quarantine attribute you can remove with the following command :-
Code:
sudo xattr -r -d com.apple.quarantine VGTab_en.appUsing VGTab to Generate the Vega Control Data
Run the VGtab utility and select the model type of your Vega card :-

In most instances you can just accept the stock/default values or use the GUI to modify the values as you wish, once your done click on the Build PowerPlayTable button (or Generate Control Information on the previous version) and accept the notification to allow VGTab to save the generated files/data onto your MacOS desktop.
Note-1: If VGTab fails to save the exported data and kext to the desktop, see the Installing VGTab section above.
Note-2: If you want to know what each setting does click on the Label of each setting :-
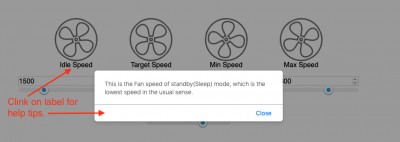
Note-3: For liquid cooled cards cards the stock settings seem to work well, and changing the Fan speeds will have no effect (as far as i can tell), however you should still generate a SoftPowerPlayTable as it will make the Fan/Pump work as expected, if you have an Air Cooled card than you may want to reduce the Idle & Target Fan speeds which will help to keep fan noise down ... some users have reported for Air Cooled cards that both Idle and Target should be set to the same (low) value.
Adding Vega Control Data to Clover config.plist
Manual Method
1. Mount your EFI partition and make a copy of your current config.plist and save in /EFI/Clover just in case something goes wrong.
2. Open your active config.plist with a code or text editor and move down the file until you find the "Devices" section, and then move down to the "Properties" sub section.
3. Highlight all of the following code and Copy/Paste it into your config.plst after the <dict> (below the Properties key) to create a new Key for the PCI path of the Vega GPU:
Code:
            <key>PciRoot(0x0)/Pci(0x1,0x0)/Pci(0x0,0x0)/Pci(0x0,0x0)/Pci(0x0,0x0)</key>
            <dict>

            </dict>
Note-1: I have attached a stripped out config.plist as an example with the above code from Step 3 already in place:
The result should look something like this ....
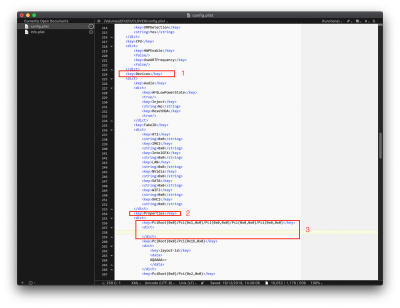
Although i'm sure that the PCI device path for your Vega GPU will be the same for most users you should check that it is correct for your system by using GFXUTIL (attached to this post), this will also ensure that the device has the correct GFX0 ACPI identity. Unzip the archive and open Terminal, change the current path (CD) to the folder you extracted GFXUTIL in and execute the following command:
Code:
./gfxutil -f GFX0GFXUTIL should return with the device path of your Vega GPU :-
Code:
MonkeyMac-Pro-2018:~ Jay$ cd /Users/Jay/Downloads/gfxutil-1.76b
MonkeyMac-Pro-2018:gfxutil-1.76b Jay$ ./gfxutil -f GFX0
DevicePath = PciRoot(0x0)/Pci(0x1,0x0)/Pci(0x0,0x0)/Pci(0x0,0x0)/Pci(0x0,0x0)
MonkeyMac-Pro-2018:gfxutil-1.76b Jay$
If the PCI Device Path for your Vega is different to the key value in the code you inserted in Step 3 then simply copy the PCI Device Path from the terminal output of GFXUTIL and paste it into your config.plist, over-writing the value from the example code above.
Note-2: If you get an error such as "GFX0 device not found" or "unsupported registry entry" then your Vega GPU most likely does not have the GFX0 ACPI identity which is critical for correct operation, installing Lilu + WhatEverGreen will correct this issue for you (see this guide for more info).
If you decide not to install WhatEverGreen and you still get the error "GFX0 device not found" or "unsupported registry entry" then try using 'display' in place of GFX0 with GFXUTIL:-
Code:
./gfxutil -f displayNote-3: Both myself and others have found that having the Clover ACPI Fix/Rename "Change PEG0 to GFX0" enabled in your config.plist will cause problems ... if you have this fix in your config.plist then you should remove it, reboot and try GFXUTIL again. As Detailed in Note-2 above, WhatEverGreen will take care of the GFX0 ACPI identity for the Vega GPU but in a more specific way rather than the generic/global rename method employed by Clover.
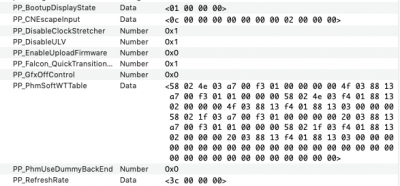
4. Now right click on the VGTab_XXXX.kext on the desktop and select Show Package Contents, expand the Contents folder and open the info.plist with your code or text editor, move all the way to the bottom of the file where you see the key "aty_properties" that includes a large 'data' value for the property PP_PhmSoftPowerPlayTable.
5. Highlight all the code between <dict> and </dict> (below the "aty_properties" key) as shown below :-
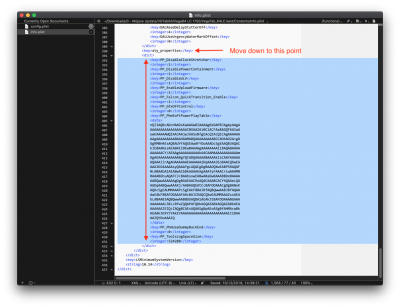
6. Copy/Paste the high-lighted code into your config.plist between the <dict> and </dict> below the new key value you created in Step 3, the result should look something like this :-
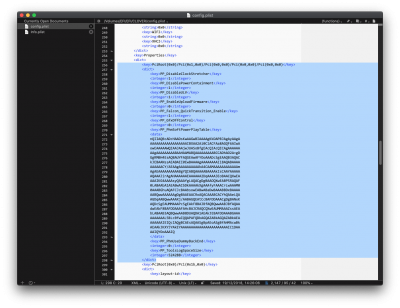
7. Check your work carefully, ensure that you keep the code structure correct, if all looks good then save your config.plist.
8. A quick and easy way to check that there are no syntax errors in your config.plist is to open it with Clover Configurator, Click on the Devices section, then on Properties on the lower tab bar, select the new PCI key you created in Step 3, you should see all of the property values that you inserted in Step 6, you can also use Xcode or PlistEdit Pro to check that the edits are correct:-
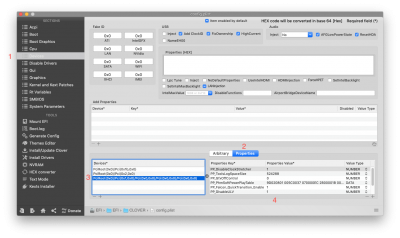
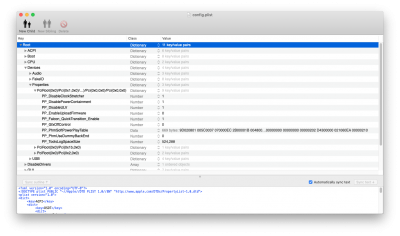
If you get a formatting or syntax error then you've made a mistake, recheck you code, if in doubt start you should start again using a copy of the backup you made in Step 1.
9. If everything looks ok then your good to go, if you have previously installed the VGTab kext in /L/E or /EFI/Clover/Kexts/Other then remove it and rebuild the kext caches if necessary ( I use Kext Utility).
10. Finally reboot.
__________________________________________________________
Automated Method
User @corporatenewt has written a python script called VGTabMerge that automates the above manual process. Full details of how to download, install and use the script can be found at his Git-Hub Repository :-
https://github.com/corpnewt/VGTabMerge
Before running the script I recommend that you create a backup of your current config.plist as detailed in Step 1 of the manual method.
Important: The Automated method will always assume that the PCI Device Path for the Vega card is :-
Code:
PciRoot(0x0)/Pci(0x1,0x0)/Pci(0x0,0x0)/Pci(0x0,0x0)/Pci(0x0,0x0)Before running the automated script you may want to first check that this is correct for your system using the method detailed in Step 3 of the manual method. If it does not match then you will have to manually alter it after the script has completed or use the manual method instead.
Troubleshooting and Additional Adjustments
If you have applied a setting such as an over optimistic overclock that causes the Vega card not to boot in to MacOS, then you can select the backup copy of your config.plist you made Step 1 using Clover -> Options -> Configs. This will allow you to boot MacOS using your last working config.plist, you can then re-run VGTab and correct the problems.
If after testing you find you need to make more adjustments to the Vega SoftPowerPlayTable then you can simply re-run the VGTab utility, make the adjustments and/or changes and re-export the data/kext. This time you'll only need to copy/paste the large 'data' value for the property PP_PhmSoftPowerPlayTable as all other property values will be unchanged (or re-run the automated method). Remember to update the backup copy of your config plist in /EFI/Clover before making any changes.
Once you have your fan speeds under control you can then think about using the VGTab Utility to create a SoftPowerPlay table that alters other settings of your card, Many users including myself have been able to increase the HBM (Memory) clock speed (I have mine at 1100Mhz) resulting in a good hike in performance as long as you can keep the card cool.
Please post any success in this thread so we can better understand what settings help, please include the type of Vega you have and the settings you found optimal.
Results
You should now find that your Vega's thermal cooling is working as expected in that the Fan/Pump speed will increases as the Vega's GPU die temp ramps up when under load, once it reaches the target temp set with the VGTab it should maintain that temperature until the GPU load is removed at which point the Fan/Pump speed will decreases as the die temp ramps down until it returns to the idle state.
By injecting the Device Properties for the Vega using Clover we can avoid having to use the VGTab kext and there is no need for any manual edits to the Native Apple Vega kext (AMD10000Controller.kext) meaning you can update MacOS and not have to worry about any static kext edits.
All credit for VGTab is user @lihaoyun6 I hope that like me you find it useful and thank him for his continued hard work at further developing the VGTab utility (see update at bottom of page).
Monitoring of Vega GPU Sensors
The best solution i have found (so far) for monitoring of the Vega GPU is to use HWMonitorSMC2 which is a fork of HWSensors3 by blusseau, kozlek & slice2009
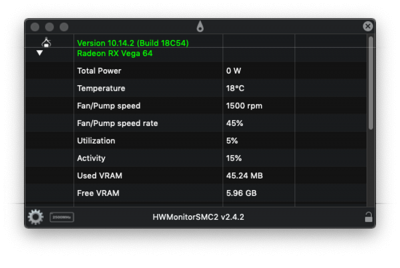
Installation is fairly straight forward but you should first remove any old version(s) of HWMonitor, FakeSMC and its associated sensor plugins. Then download the latest dmg of HWSensors3 from this SourceForge page, unzip the dmg you downloaded and open it.
There are two versions of the Monitoring App in the dmg, the one you want is called HWMonitorSMC2, copy this from the dmg to your Applications folder.
Next Install the included FakeSMC.kext and IntelCPUMonitor.kext from the folder called "Extensions" into /L/E and also update the copy of FakeSMC in /EFI/Clover/Kexts/Other.
Finally you also need to install a plugin for monitoring your motherboard sensors. My Z97 system uses a Winboard chip so I installed the W836x.kext. See the Readme pdf file in the "Extensions" folder of the dmg for descriptions of the other plugins.
Note: Do not Install the RadeonMonitor kext as it does not support Vega GPU's, it's only for legacy AMD GPU's.
Once you have everything installed, reboot and run the HWMonitorSMC2 application .... you should see a new icon in your top menu (Square with a Waveform in it), click on it and you should see some basic sensor values.
There is currently a bug in the App that stops us getting to the settings on the first run so click on the 'X' to quit the App then run it again, click on the icon in the top menu again and then on the cog icon at the bottom of the monitoring window.
On the settings screen enable the option "Use the IOAccelerator's monitoring for GPUs", and enable/disable any other options as you wish, this is how i configure it on my system :-
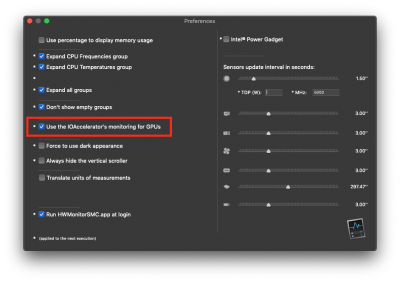
With these settings you should now be able to monitor your Vega GPU in real time, you can move the monitoring window to another monitor if you need to keep it open while running benchmarks .. etc.
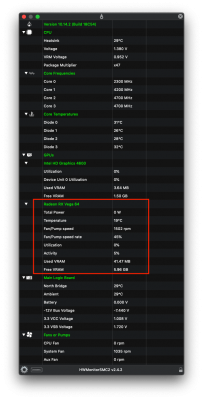
Vega Total Power Sensor
By default the VGTab injector kext sets the Device Property PP_DisablePowerContainment to 1 (true) to allow a custom SoftPowerPlayTable to overclock the Vega and thus draw more power. Unfortunately this also appears to disable the Total Power (in Watts) data point sensor meaning that it will always display 0 Watts in the HWMonitorSMC2 App.
If you are not applying an overclock to your Vega you can set this Property to 0 (false) which will re-enable the Total Power data point sensor, you can use a standard editor, XCode, PlistEdit Pro or Clover Configurator to edit this value:-
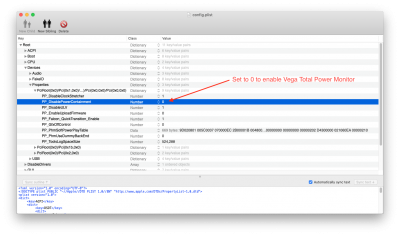
With PP_DisablePowerContainment set to 0 (false) you should now see how much power (in Watts) your Vega GPU is using, however you should be aware that the Vega fan, temp and power stats are coming from MacOS not directly from the Vega.
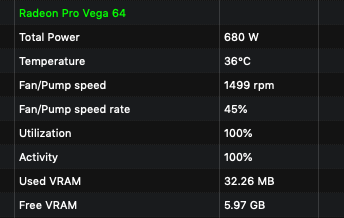
From my testing in Mojave 10.14.2 there appears to be an issue with the Total Power reading when the Vega is being used for Open CL/GL such as a benchmark (FurMark,Valley, Heaven ... etc) in that the larger the rendered output window the higher the power reading .. which is not correct as the size of the rendered output should not effect the Total Power the Vega is drawing from your PSU. If i run one of those benchmarks at full screen on my 21:9 monitor (3440x1440) the Total Power stat displays 680W which is clearly incorrect.
This issue can be confirmed by executing the following terminal command while running a benchmark full screen:-
Code:
ioreg -l |grep \"PerformanceStatistics\" | cut -d '{' -f 2 | tr '|' ',' | tr -d '}' | tr ',' '\n'|grep 'Temp\|Fan\|Power'Which shows that the Total Power stat is incorrect as computed by MacOS :-
Code:
MonkeyMac-Pro-2018:~ Jay$ ioreg -l |grep \"PerformanceStatistics\" | cut -d '{' -f 2 | tr '|' ',' | tr -d '}' | tr ',' '\n'|grep 'Temp\|Fan\|Power'
"Fan Speed(%)"=45
"Fan Speed(RPM)"=1501
"Temperature(C)"=33
"Total Power(W)"=683
MonkeyMac-Pro-2018:~ Jay$
Hopefully this issue/error it will be fixed by Apple in the next MacOS release.
Unfortunately HWMonitorSMC2 currently has no graphing abilities and in an ideal world it would access the Vega's diagnostic and monitoring sensors directly rather than using the MacOS IOAccelerator Module. Hopefully these features will be added to it in the future ... alternatively it is possible that the standard fork of HWMonitor will eventually get full support for Vega GPU's (@RehabMans fork of @Kozlekek HWSensors only supports Vega GPU die temp).
If you need further help with HWMonitorSMC2 or want to report an issue to the developers the official support thread is:-
https://www.insanelymac.com/forum/topic/299861-hwsensors3/
Final Thoughts
I hope this method of injecting the Vega power and fan Device Properties via Clover helps anyone having issues when using the VGTab kext in-conjunction with WhatEverGreen or simply want to resolve the Vega fan/temps issue without having to use the VGTab kext.
Note: This is currently an experimental method, but as it essentially does the same as the VGTab kext it should work for most people as long as you do not make any mistakes with the config.plist edits. It worked for me so i'm posting it here so that others can try it. Please post any success or failures below so we can further understand its effect.
Cheers
Jay
Update: Latest version of the VGTab Utility is V 0.04 which is attached below or can be download from @lihaoyun6 guide.
Attachments
Last edited:

