
- Joined
- Jan 26, 2014
- Messages
- 1,331
- Motherboard
- Asus P5LP-LE
- CPU
- Core 2 Duo
- Graphics
- Nvidia GeForce GT 640
- Mac
- Mobile Phone
So if you recently installed High Sierra and have an AMD graphics card and were greeted at the end of the installation with black screens and Lilu.kext and WhateverGreen.kext wasn't able to resolve it, then try patching the framebuffer that corresponds to your graphics card to try resolving it. Initially I wasn't going to write this guide as there are plenty of other internet resources for doing this procedure, but after reading some AMD black screen post on High Sierra, I felt it is needed to have a dedicated guide here at Tonymacx86.com.
Originally I had absolutely no problems with my VisionTek AMD Radeon 7970 in all versions of macOS as long as I had the IGPU set as primary in UEFI/Bios settings, it always worked OOB. But then came High Sierra to mess that all up. The changes in High Sierra are mainly Metalv2. Apple is changing the way all the graphics drivers are working to support eGPU setups better. Before High Sierra I was using injectATI=true with Hamachi or Futomaki framebuffers, I could even not injectATI and use the RadeonFramebuffer with not problems. Since High Sierra AMD cards are pretty much required to be injected via some method, for a fully functional card. I noticed in the AMD7000Controller info.plist CFG_USE_AGDC was set to false on Hamachi framebuffer and all other that aren't listed in the info.plist, which lead me to start patching different framebuffers. I likely could have went a different method of using a dummy kext to override the default values in the native info.plist but it wasn't needed for me. Others may find that this is a needed step, it trying all framebuffers and still in failure.
Change log
Use Florian's version of radeon_bios_decode 12/2/2017
Add RadeonDeInit=True 11/15/2017
fix some typos and make changes to template, added some credits 10/27/2017
add missing info 10/25/2017
initial 10/23/17
Requirements:
Extracting the GFX rom file from the GFX card. This can be done with DPCIManager in macOS or GPUZ in windows. I will not be covering the windows method though.

Save it to a location for use later.
Step 2.
Pick a proper framebuffer for you card. It should have the same number of ports as your card. You may have to try patching all the framebuffers with the same number of ports to find the right one, I will cover this later in the guide. So dump all the AMD framebuffers with Pavo's Sierra script. It's a python script so open terminal and type php one space then drag in the script and hit enter. It will then list all the default framebuffers connector information in hex values. Open a new text edit document and copy and paste the data to it for future reference.
Step 3.
Gather the information from the rom file using radeon_bios_decode and redsock_bios_decoder. So open terminal and drag radeon_bios_decode into terminal one space and type < one space and drag in the rom file and press enter. Repeat the same process for redsock_bios_decoder and save the output to your text edit document for later use.
Step 4.
Getting the connector information from the decoders. Looking at my example from my AMD Radeon HD 7970.
radeon_bios_decode output. Get radeon_bios_decode from here attached to first post in thread.
and redsock_bios_decoder output
From this information we can construct our connector code
Notice the numbers that are colored these are the numbers of interest. I will start with the connector at index 0 for and explanation of how this works.
Some guides may use Connector at index for hotplugid values and when you use Florian's version of radeon_bios_decode it will reveal the correct hotplugid. So use the version attached to this thread or in the Compatibility thread.
Display Port at index 0 will use HotPlugID 05
So pulling these numbers together for the connector at index 0 is as follows.
Code construction: 12040501
The first two digits of the constructed code from the decoders is Transmitter (12) the next two are the encoder(04) the next two are hotplug ID (05) the next two are sense ID (01)
For my example I had to use the Namako framebuffer the Hamachi and Futomaki framebuffers would not work in High Sierra mainly due to all the graphics changes in Metel v2. So the Namako unpatched Frambuffer connectors are as follows.
The numbers in red are where we change to the number we construct from the decoders (12040501)
The numbers in green are the connector type
The numbers in blue are the ATY, Control Flags
The numbers in purple are Features
Now my connector types are completely wrong with this frame buffer as I need DP, DP, HDMI, and DVI-I, So I needed to change the green numbers in the framebuffer. Here's a list of all the different connector types and their respective digits.
Connector Type LVDS 0 × 00000002 = 02 00 00 00 Note: Laptop Monitor
Connector Type DVIDL 0 × 00000004 = 04 00 00 00 Note: Dual Link DVI
Connector Type VGA 0 × 00000010 = 10 00 00 00
Connector Type SV 0 × 00000080 = 08 00 00 00
Connector Type DP = 0 × 00000400 00 04 00 00
Connector Type HDMI 0 × 00000800 = 00 08 00 00
Connector Type DVISL 0 × 00000200 = 00 02 00 00 Note: Single Link DVI
For my example I need to change all the connector sections of this framebuffer.
Old:
020000000001000000010151000000002205020200000000 (LVDS)
020000000001000000010261010000001204010100000000 (LVDS)
000400000403000000010343000000001102030300000000 (DP)
000400000403000000010433000000002103040400000000 (DP)
New:
000400000001000000010151000000002205020200000000 (DP)
000400000001000000010261010000001204010100000000 (DP)
000800000403000000010343000000001102030300000000 (HDMI)
000200000403000000010433000000002103040400000000 (DVI-I)
Now I need to change the control Flags to match the connectors which are completely wrong at this point for my card. Here's a list that explains them.
0×0002 : LVDS ControlFlag : 0×0040 and 0×0100
0×0004 : DVI-DL ControlFlag : 0×0016, 0×0014, and 0×0214
0×0010 : VGA ControlFlag : 0×0010
0×0080 : S-Video ControlFlag : 0×0002
0×0200 : DVI-SL ControlFlag : 0×0014, 0×0214, and 0×0204
0×0400 : DisplayPort ControlFlag : 0×0100, 0×0104, 0×0304, 0×0604, and 0×0400
0×0800 : HDMI ControlFlag : 0×0204
Translated in to standard control flags:
Connector Type DP 04 03 00 00
Connector Type HDMI 04 02 00 00
Connector Type DVIDL 14 02 00 00
Connector Type DVISL 04 02 00 00
Connector Type S-VD 02 00 00 00
Connector Type LVDS 00 01 00 00
Note: some connectors have multiple control flags that can be used if the first isn't working like on the Display port or DVI
Secondary control flags that can be tried:
Connector Type DP 04 06 00 00
Connector Type DP 04 01 00 00
Connector Type DP 00 01 00 00
Connector Type DP 00 04 00 00
Connector Type DVI-DL 14 00 00 00
Connector Type DVI-DL 16 00 00 00
Connector Type DVI-SL 14 00 00 00
Connector Type DVI-SL 14 02 00 00
Connector Type LVDS 40 00 00 00
Bringing that together old vs new now.
Old:
000400000001000000010151000000002205020200000000 (DP)
000400000001000000010261010000001204010100000000 (DP)
000800000403000000010343000000001102030300000000 (HDMI)
000200000403000000010433000000002103040400000000 (DVI-I)
New:
000400000403000000010151000000002205020200000000 (DP)
000400000403000000010261010000001204010100000000 (DP)
000800000402000000010343000000001102030300000000 (HDMI)
000200001402000000010433000000002103040400000000 (DVI-I)
Now I need to change the feature a bit and this is a section I don't fully understand yet but it is said that you can simply just zero the last two digits of the purple section the third pair of the purple section represent the order of connector activation. So I change it like so old vs new
Old:
000400000403000000010151000000002205020200000000 (DP)
000400000403000000010261010000001204010100000000 (DP)
000800000402000000010343000000001102030300000000 (HDMI)
000200001402000000010433000000002103040400000000 (DVI-I)
New:
000400000403000000010400000000002205020200000000 (DP)
000400000403000000010300010000001204010100000000 (DP)
000800000402000000010100000000001102030300000000 (HDMI)
000200001402000000010200000000002103040400000000 (DVI-I)
I changed mine to have the connector activation start at HDMI then DVI then DP then DP since my monitors are connected to the HDMI and DVI. You should be able to order then how you want them activated.
Now notice that lonely red 1 it needs to become a zero.
Old:
000400000403000000010400000000002205020200000000 (DP)
000400000403000000010300010000001204010100000000 (DP)
000800000402000000010100000000001102030300000000 (HDMI)
000200001402000000010200000000002103040400000000 (DVI-I)
New:
000400000403000000010400000000002205020200000000 (DP)
000400000403000000010300000000001204010100000000 (DP)
000800000402000000010100000000001102030300000000 (HDMI)
000200001402000000010200000000002103040400000000 (DVI-I)
Lastly we add our constructed code from earlier old vs new
Old:
000400000403000000010400000000002205020200000000 (DP)
000400000403000000010300000000001204010100000000 (DP)
000800000402000000010100000000001102030300000000 (HDMI)
000200001402000000010200000000002103040400000000 (DVI-I)
New:
000400000403000000010400000000001204050100000000 (DP)
000400000403000000010300000000002205040200000000 (DP)
000800000402000000010100000000001102010400000000 (HDMI)
000200001402000000010200000000001000030600000000 (DVI-I)
Now to compare the original Framebuffer Namako to the patched
Original:
020000000001000000010151000000002205020200000000 (LVDS)
020000000001000000010261010000001204010100000000 (LVDS)
000400000403000000010343000000001102030300000000 (DP)
000400000403000000010433000000002103040400000000 (DP)
Patched:
000400000403000000010400000000001204050100000000 (DP)
000400000403000000010300000000002205040200000000 (DP)
000800000402000000010100000000001102010400000000 (HDMI)
000200001402000000010200000000001000030600000000 (DVI-I)
Now we can simplify this process by using this set based on your connectors.
LVDS 02000000 00010000 08010000 00000000 + (add your code construction) 00000000
VGA 10000000 10000000 00010000 00000000 + (add your code construction) 00000000
DP 00040000 04030000 00010000 00000000 + (add your code construction) 00000000
DVI-SL 00020000 04020000 00010000 00000000 + (add your code construction) 00000000
DVI-DL 04000000 14020000 00010000 00000000 + (add your code construction) 00000000
HDMI 00080000 04020000 00010000 00000000 + (add your code construction) 00000000
Step 5.
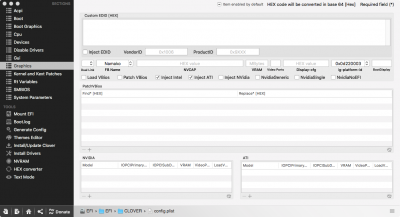
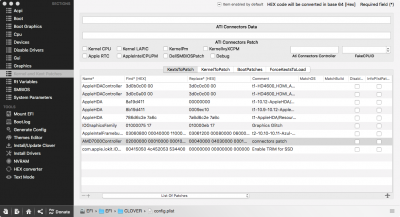
Clover injection and patch on the fly. In the graphics section of your config.plist you need to select your framebuffer that you wanna patch and inject ATI. Also for me I still need the IGPU helper, which to me is fine as I use it.
Then you need to add the AMDXXXXController to the KextsToPatch section. For me it was like this.
Note your hex connector patch is translated to base64. This is easiest done with clover configurator. It will automatically convert it for you.
Step 6.
Once you have the needed changes in your config.plist you need to reboot. You will likely not see a change on the first reboot. You will have the rebuild kextcaches first. Also you will need to rebuild them after updates. To do so open terminal and type.
hit enter then type in your password and hit enter then type.
and hit enter. Then reboot again and if you did everything correctly your graphics card should be working properly.
Notes.
You must use RadeonDeInit=True in the graphics section of your config.plist and have clover version 4296 or greater for full UEFI mode with CSM disabled in UEFI/BIOS for working sleep.
You should remove WhateverGreen.kext from your system if you installed it and it didn't work. If it did work for you why are you here?
You may have to change the injected framebuffer in your config.plist and the find data to match it from Pavo's script. Until you find one that is working for you.
You will need to be able to reach the desktop some how by some means to do this process. May need to use a Nvidia helper card or an IGPU. I was able to do it with the IGPU. But I could also get all my monitors working with a safe boot, so I could have went that route.
If you request for help you must provide problem reporting files and your patched framebuffer data along with framebuffer you intend to patch. I will help you not do it for you.
If this method has worked for you hit the like button.
Problem reporting/Support request
If you are having trouble upload your clover folder as a zip omitting themes folder, your GFX card rom, and your IOReg and I do what I can to assist you as I have time.
Credit:
Florian for their version of radeon_bios_decode and their compatibility thread here
Pavo for the script to dump framebuffers
Toleda for pointing out errors in the template
Vlada for their guide on framebuffer patching
Clover developers
Apple
Originally I had absolutely no problems with my VisionTek AMD Radeon 7970 in all versions of macOS as long as I had the IGPU set as primary in UEFI/Bios settings, it always worked OOB. But then came High Sierra to mess that all up. The changes in High Sierra are mainly Metalv2. Apple is changing the way all the graphics drivers are working to support eGPU setups better. Before High Sierra I was using injectATI=true with Hamachi or Futomaki framebuffers, I could even not injectATI and use the RadeonFramebuffer with not problems. Since High Sierra AMD cards are pretty much required to be injected via some method, for a fully functional card. I noticed in the AMD7000Controller info.plist CFG_USE_AGDC was set to false on Hamachi framebuffer and all other that aren't listed in the info.plist, which lead me to start patching different framebuffers. I likely could have went a different method of using a dummy kext to override the default values in the native info.plist but it wasn't needed for me. Others may find that this is a needed step, it trying all framebuffers and still in failure.
Change log
Use Florian's version of radeon_bios_decode 12/2/2017
Add RadeonDeInit=True 11/15/2017
fix some typos and make changes to template, added some credits 10/27/2017
add missing info 10/25/2017
initial 10/23/17
Requirements:
- Native AMDXXXXController.kext
- Rerun the installer if you've been tampering with it
- A full UEFI system with CSM disable if an IGPU or helper graphics card is not available
- If you don't have an IGPU or helper Nvidia card and go the full UEFI method you must use RadeonDeInit=True in the graphics section of you config.plist
- Older systems will require a Helper card in which scenario might as well not use AMD.
- A way to retrieve the rom file for your graphics card can be done in Windows.
- Ability to use terminal.app can be done on versions earlier than High Sierra.
- You still need to be able to dump some stuff in terminal on High Sierra.
- redsock_bios_decoder attached to thread
- radeon_bios_decode
- Pavo's script to dump all AMD framebuffers available here
- DPCIManager to dump the GFX rom file from macOS or GPUZ to dump it from windows
- Clover Configurator
Extracting the GFX rom file from the GFX card. This can be done with DPCIManager in macOS or GPUZ in windows. I will not be covering the windows method though.
Save it to a location for use later.
Step 2.
Pick a proper framebuffer for you card. It should have the same number of ports as your card. You may have to try patching all the framebuffers with the same number of ports to find the right one, I will cover this later in the guide. So dump all the AMD framebuffers with Pavo's Sierra script. It's a python script so open terminal and type php one space then drag in the script and hit enter. It will then list all the default framebuffers connector information in hex values. Open a new text edit document and copy and paste the data to it for future reference.
Step 3.
Gather the information from the rom file using radeon_bios_decode and redsock_bios_decoder. So open terminal and drag radeon_bios_decode into terminal one space and type < one space and drag in the rom file and press enter. Repeat the same process for redsock_bios_decoder and save the output to your text edit document for later use.
Step 4.
Getting the connector information from the decoders. Looking at my example from my AMD Radeon HD 7970.
radeon_bios_decode output. Get radeon_bios_decode from here attached to first post in thread.
Code:
ATOM BIOS Rom:
    SubsystemVendorID: 0x1545 SubsystemID: 0x7970
    IOBaseAddress: 0x0000
    Filename: SV2A01.001
    BIOS Bootup Message: TAHITI XT PCIE 3G/384B GDDR5 DLDVI-I/HDMI/2XMINI-DP 925E/1375M
PCI ID: 1002:6798

Connector at index 0
   Type [@offset 43422]: DisplayPort (10)
   Encoder [@offset 43426]: INTERNAL_UNIPHY2 (0x21)
   i2cid [@offset 43540]: 0x90, OSX senseid: 0x1
   HotPlugID: 5
Connector at index 1
   Type [@offset 43432]: DisplayPort (10)
   Encoder [@offset 43436]: INTERNAL_UNIPHY2 (0x21)
   i2cid [@offset 43567]: 0x91, OSX senseid: 0x2
   HotPlugID: 4
Connector at index 2
   Type [@offset 43442]: HDMI-A (11)
   Encoder [@offset 43446]: INTERNAL_UNIPHY1 (0x20)
   i2cid [@offset 43594]: 0x93, OSX senseid: 0x4
   HotPlugID: 1
Connector at index 3
   Type [@offset 43452]: DVI-I (2)
   Encoder [@offset 43456]: INTERNAL_UNIPHY (0x1e)
   i2cid [@offset 43631]: 0x95, OSX senseid: 0x6
   HotPlugID: 3
Connector at index 4
   Type [@offset 43462]: DVI-I (2)
   Encoder [@offset 43466]: INTERNAL_KLDSCP_DAC1 (0x15)
   i2cid [@offset 43631]: 0x95, OSX senseid: 0x6
   HotPlugID: 3
Code:
SV2A01.001  :
TAHITI XT PCIE 3G/384B GDDR5 DLDVI-I/HDMI/2XMINI-DP 925E/1375M
Subsystem Vendor ID: 1545
       Subsystem ID: 7970
Object Header Structure Size: 389
Connector Object Table Offset: 48
Router Object Table Offset: 0
Encoder Object Table Offset: 118
Display Path Table Offset: 12
Connector Object Id [19] which is [DISPLAY_PORT]
    encoder obj id [0x21] which is [INTERNAL_UNIPHY2 (osx txmit 0x12 [duallink 0x2] enc 0x4)] linkb: false
Connector Object Id [19] which is [DISPLAY_PORT]
    encoder obj id [0x21] which is [INTERNAL_UNIPHY2 (osx txmit 0x22 [duallink 0x2] enc 0x5)] linkb: true
Connector Object Id [12] which is [HDMI_TYPE_A]
    encoder obj id [0x20] which is [INTERNAL_UNIPHY1 (osx txmit 0x11 [duallink 0x1] enc 0x2)] linkb: false
Connector Object Id [2] which is [DVI_I]
    encoder obj id [0x1e] which is [INTERNAL_UNIPHY (osx txmit 0x10 [duallink 0x0] enc 0x0)] linkb: false
Connector Object Id [2] which is [DVI_I]
    encoder obj id [0x15] which is [INTERNAL_KLDSCP_DAC1 (osx txmit 0x00 enc 0x10?)] linkb: false
From this information we can construct our connector code
Notice the numbers that are colored these are the numbers of interest. I will start with the connector at index 0 for and explanation of how this works.
Some guides may use Connector at index for hotplugid values and when you use Florian's version of radeon_bios_decode it will reveal the correct hotplugid. So use the version attached to this thread or in the Compatibility thread.
Display Port at index 0 will use HotPlugID 05
So pulling these numbers together for the connector at index 0 is as follows.
Code construction: 12040501
The first two digits of the constructed code from the decoders is Transmitter (12) the next two are the encoder(04) the next two are hotplug ID (05) the next two are sense ID (01)
For my example I had to use the Namako framebuffer the Hamachi and Futomaki framebuffers would not work in High Sierra mainly due to all the graphics changes in Metel v2. So the Namako unpatched Frambuffer connectors are as follows.
Code:
Namako (4) @ 0xed900
LVDS, LVDS, DP, DP[/COLOR]
020000000001000000010151000000002205020200000000
020000000001000000010261010000001204010100000000
000400000403000000010343000000001102030300000000
000400000403000000010433000000002103040400000000
The numbers in red are where we change to the number we construct from the decoders (12040501)
The numbers in green are the connector type
The numbers in blue are the ATY, Control Flags
The numbers in purple are Features
Now my connector types are completely wrong with this frame buffer as I need DP, DP, HDMI, and DVI-I, So I needed to change the green numbers in the framebuffer. Here's a list of all the different connector types and their respective digits.
Connector Type LVDS 0 × 00000002 = 02 00 00 00 Note: Laptop Monitor
Connector Type DVIDL 0 × 00000004 = 04 00 00 00 Note: Dual Link DVI
Connector Type VGA 0 × 00000010 = 10 00 00 00
Connector Type SV 0 × 00000080 = 08 00 00 00
Connector Type DP = 0 × 00000400 00 04 00 00
Connector Type HDMI 0 × 00000800 = 00 08 00 00
Connector Type DVISL 0 × 00000200 = 00 02 00 00 Note: Single Link DVI
For my example I need to change all the connector sections of this framebuffer.
Old:
020000000001000000010151000000002205020200000000 (LVDS)
020000000001000000010261010000001204010100000000 (LVDS)
000400000403000000010343000000001102030300000000 (DP)
000400000403000000010433000000002103040400000000 (DP)
New:
000400000001000000010151000000002205020200000000 (DP)
000400000001000000010261010000001204010100000000 (DP)
000800000403000000010343000000001102030300000000 (HDMI)
000200000403000000010433000000002103040400000000 (DVI-I)
Now I need to change the control Flags to match the connectors which are completely wrong at this point for my card. Here's a list that explains them.
0×0002 : LVDS ControlFlag : 0×0040 and 0×0100
0×0004 : DVI-DL ControlFlag : 0×0016, 0×0014, and 0×0214
0×0010 : VGA ControlFlag : 0×0010
0×0080 : S-Video ControlFlag : 0×0002
0×0200 : DVI-SL ControlFlag : 0×0014, 0×0214, and 0×0204
0×0400 : DisplayPort ControlFlag : 0×0100, 0×0104, 0×0304, 0×0604, and 0×0400
0×0800 : HDMI ControlFlag : 0×0204
Translated in to standard control flags:
Connector Type DP 04 03 00 00
Connector Type HDMI 04 02 00 00
Connector Type DVIDL 14 02 00 00
Connector Type DVISL 04 02 00 00
Connector Type S-VD 02 00 00 00
Connector Type LVDS 00 01 00 00
Note: some connectors have multiple control flags that can be used if the first isn't working like on the Display port or DVI
Secondary control flags that can be tried:
Connector Type DP 04 06 00 00
Connector Type DP 04 01 00 00
Connector Type DP 00 01 00 00
Connector Type DP 00 04 00 00
Connector Type DVI-DL 14 00 00 00
Connector Type DVI-DL 16 00 00 00
Connector Type DVI-SL 14 00 00 00
Connector Type DVI-SL 14 02 00 00
Connector Type LVDS 40 00 00 00
Bringing that together old vs new now.
Old:
000400000001000000010151000000002205020200000000 (DP)
000400000001000000010261010000001204010100000000 (DP)
000800000403000000010343000000001102030300000000 (HDMI)
000200000403000000010433000000002103040400000000 (DVI-I)
New:
000400000403000000010151000000002205020200000000 (DP)
000400000403000000010261010000001204010100000000 (DP)
000800000402000000010343000000001102030300000000 (HDMI)
000200001402000000010433000000002103040400000000 (DVI-I)
Now I need to change the feature a bit and this is a section I don't fully understand yet but it is said that you can simply just zero the last two digits of the purple section the third pair of the purple section represent the order of connector activation. So I change it like so old vs new
Old:
000400000403000000010151000000002205020200000000 (DP)
000400000403000000010261010000001204010100000000 (DP)
000800000402000000010343000000001102030300000000 (HDMI)
000200001402000000010433000000002103040400000000 (DVI-I)
New:
000400000403000000010400000000002205020200000000 (DP)
000400000403000000010300010000001204010100000000 (DP)
000800000402000000010100000000001102030300000000 (HDMI)
000200001402000000010200000000002103040400000000 (DVI-I)
I changed mine to have the connector activation start at HDMI then DVI then DP then DP since my monitors are connected to the HDMI and DVI. You should be able to order then how you want them activated.
Now notice that lonely red 1 it needs to become a zero.
Old:
000400000403000000010400000000002205020200000000 (DP)
000400000403000000010300010000001204010100000000 (DP)
000800000402000000010100000000001102030300000000 (HDMI)
000200001402000000010200000000002103040400000000 (DVI-I)
New:
000400000403000000010400000000002205020200000000 (DP)
000400000403000000010300000000001204010100000000 (DP)
000800000402000000010100000000001102030300000000 (HDMI)
000200001402000000010200000000002103040400000000 (DVI-I)
Lastly we add our constructed code from earlier old vs new
Old:
000400000403000000010400000000002205020200000000 (DP)
000400000403000000010300000000001204010100000000 (DP)
000800000402000000010100000000001102030300000000 (HDMI)
000200001402000000010200000000002103040400000000 (DVI-I)
New:
000400000403000000010400000000001204050100000000 (DP)
000400000403000000010300000000002205040200000000 (DP)
000800000402000000010100000000001102010400000000 (HDMI)
000200001402000000010200000000001000030600000000 (DVI-I)
Now to compare the original Framebuffer Namako to the patched
Original:
020000000001000000010151000000002205020200000000 (LVDS)
020000000001000000010261010000001204010100000000 (LVDS)
000400000403000000010343000000001102030300000000 (DP)
000400000403000000010433000000002103040400000000 (DP)
Patched:
000400000403000000010400000000001204050100000000 (DP)
000400000403000000010300000000002205040200000000 (DP)
000800000402000000010100000000001102010400000000 (HDMI)
000200001402000000010200000000001000030600000000 (DVI-I)
Now we can simplify this process by using this set based on your connectors.
LVDS 02000000 00010000 08010000 00000000 + (add your code construction) 00000000
VGA 10000000 10000000 00010000 00000000 + (add your code construction) 00000000
DP 00040000 04030000 00010000 00000000 + (add your code construction) 00000000
DVI-SL 00020000 04020000 00010000 00000000 + (add your code construction) 00000000
DVI-DL 04000000 14020000 00010000 00000000 + (add your code construction) 00000000
HDMI 00080000 04020000 00010000 00000000 + (add your code construction) 00000000
Step 5.
Clover injection and patch on the fly. In the graphics section of your config.plist you need to select your framebuffer that you wanna patch and inject ATI. Also for me I still need the IGPU helper, which to me is fine as I use it.
Code:
<key>Graphics</key>
    <dict>
        <key>EDID</key>
        <dict>
            <key>Inject</key>
            <false/>
        </dict>
        <key>FBName</key>
        <string>Namako</string>
        <key>Inject</key>
        <dict>
            <key>ATI</key>
            <true/>
            <key>Intel</key>
            <true/>
            <key>NVidia</key>
            <false/>
        </dict>
        <key>RadeonDeInit</key>
        <true/>
        <key>NvidiaSingle</key>
        <false/>
        <key>ig-platform-id</key>
        <string>0x0d220003</string>
    </dict>
Code:
<dict>
                <key>Comment</key>
                <string>connectors patch</string>
                <key>Disabled</key>
                <false/>
                <key>Find</key>
                <data>
                AgAAAAABAAAAAQFRAAAAACIFAgIAAAAAAgAAAAABAAAA
                AQJhAQAAABIEAQEAAAAAAAQAAAQDAAAAAQNDAAAAABEC
                AwMAAAAAAAQAAAQDAAAAAQQzAAAAACEDBAQAAAAA
                </data>
                <key>Name</key>
                <string>AMD7000Controller</string>
                <key>Replace</key>
                <data>
                AAQAAAQDAAAAAQEBAAAAABIEAQEAAAAAAAQAAAQDAAAA
                AQIBAAAAACIFAgIAAAAAAAgAAAACAAAAAQMAAAAAABEC
                AwQAAAAAACAAAAQCAAAAAQQAAAAAABAABAYAAAAA
                </data>
</dict>Step 6.
Once you have the needed changes in your config.plist you need to reboot. You will likely not see a change on the first reboot. You will have the rebuild kextcaches first. Also you will need to rebuild them after updates. To do so open terminal and type.
Code:
sudo touch /System/Library/Extensions/
Code:
sudo kextcache -Boot -U/Notes.
You must use RadeonDeInit=True in the graphics section of your config.plist and have clover version 4296 or greater for full UEFI mode with CSM disabled in UEFI/BIOS for working sleep.
You should remove WhateverGreen.kext from your system if you installed it and it didn't work. If it did work for you why are you here?
You may have to change the injected framebuffer in your config.plist and the find data to match it from Pavo's script. Until you find one that is working for you.
You will need to be able to reach the desktop some how by some means to do this process. May need to use a Nvidia helper card or an IGPU. I was able to do it with the IGPU. But I could also get all my monitors working with a safe boot, so I could have went that route.
If you request for help you must provide problem reporting files and your patched framebuffer data along with framebuffer you intend to patch. I will help you not do it for you.
If this method has worked for you hit the like button.
Problem reporting/Support request
If you are having trouble upload your clover folder as a zip omitting themes folder, your GFX card rom, and your IOReg and I do what I can to assist you as I have time.
Credit:
Florian for their version of radeon_bios_decode and their compatibility thread here
Pavo for the script to dump framebuffers
Toleda for pointing out errors in the template
Vlada for their guide on framebuffer patching
Clover developers
Apple
Attachments
Last edited: