- Joined
- Dec 24, 2015
- Messages
- 155
- Motherboard
- Asus Maximus X Code Z-370
- CPU
- i7-8700K
- Graphics
- Vega 64
- Mac
- Mobile Phone
Hi all,
This is a follow up to my guide for installing Sierra. I switched my GPU to RX Vega 64 as I was reading that it works OOB. The Nvidia 960 was not giving me any trouble. It was just a hassle to wait for Nvidia drivers to get updated and then applying the kext patches again etc., etc.
Configuration
Asus Z170 Premium
Core i5 6600K
XFX RX Vega 64 8GB Air Cooled
HyperX 32 GB 3200Mhz
Samsung 950 Pro NVME
Samsung Evo 850 256GB SSD
Patriot Blast 450GB SSD
Patriot Blast 1 TB SSD
2 x Samsung UE590D 4k Displays running at 60Hz
I have managed to get almost everything working except the following.
Whats not working?
1. Any electron based apps like Visual studio code, Opera etc freeze the system and overload the GPU (all the lights on the GPU light up). This is a known issue with High Sierra and AMD Vega cards. This should get better as the new iMac Pro is released.
2. The Bluetooth driver is still unreliable and the Magic Mouse stutters every now and then. So for now, I have switched to Logitech K780 and Mx Master 2 and nothing could be better. Try It!!
3. Handoff. I suspect that the Bluetooth driver is the culprit here
4. One of the two Ethernet ports still doesn't work with the suggestions posted on my previous guide.
Steps
This is by far the most painless and stable build for me. And I learned a lot about Clover. So now the plist and other things in my Clover are kind of lean and clean.
Preparing the Installation Media
Bluetooth
In order to fix Bluetooth, go to this GitHub page and follow the instructions.
To install the kexts, I use KextBeast. In this case you will need to install BrcmPatchRAM2.kext and BrcmFirmwareRepo.kext. I always install the custom kexts in /Library/Extensions. Reboot and you will have the Bluetooth working (its flaky as I mentioned).
Audio
Get the latest VoodooHDA from here and install. Reboot and you will have your audio working.
Things I learned
This EFI is very different from the other guides that I have written because its much simpler and has only the things that are absolute to make it work (well, I think its minimal haha).
I think this is one of the hottest topics in the Vega world because a lot of us have been facing problems with Vega while some have claimed that it works OOB. So let me start by saying this
Vega GPUs (RX Vega 64, RX Vega 56, RX Vega Frontier Edition) do not work OOB with this build as opposed to what you may see on YouTube or other threads. Here is what I had to do in order to get the full GPU support
This is a follow up to my guide for installing Sierra. I switched my GPU to RX Vega 64 as I was reading that it works OOB. The Nvidia 960 was not giving me any trouble. It was just a hassle to wait for Nvidia drivers to get updated and then applying the kext patches again etc., etc.
Configuration
Asus Z170 Premium
Core i5 6600K
XFX RX Vega 64 8GB Air Cooled
HyperX 32 GB 3200Mhz
Samsung 950 Pro NVME
Samsung Evo 850 256GB SSD
Patriot Blast 450GB SSD
Patriot Blast 1 TB SSD
2 x Samsung UE590D 4k Displays running at 60Hz
I have managed to get almost everything working except the following.
Whats not working?
1. Any electron based apps like Visual studio code, Opera etc freeze the system and overload the GPU (all the lights on the GPU light up). This is a known issue with High Sierra and AMD Vega cards. This should get better as the new iMac Pro is released.
2. The Bluetooth driver is still unreliable and the Magic Mouse stutters every now and then. So for now, I have switched to Logitech K780 and Mx Master 2 and nothing could be better. Try It!!
3. Handoff. I suspect that the Bluetooth driver is the culprit here
4. One of the two Ethernet ports still doesn't work with the suggestions posted on my previous guide.
Steps
This is by far the most painless and stable build for me. And I learned a lot about Clover. So now the plist and other things in my Clover are kind of lean and clean.
Preparing the Installation Media
- Follow this great guide to create the install media.
- Download the latest clover and install as mentioned in the guide. HOWEVER, the latest clover 4243 does not work in High Sierra for me.
- Once downloaded, Mount the EFI of your USB using Clover Configurator and replace the contents of EFI folder with the attached EFI.
- Make sure that your EFI has apfs.efi driver in drivers64UEFI folder.
- Open the config.plist in the Clover Configurator and make the following edits in SMBIOS
- On the terminal, run uuidgen to generate a UUID and replace the SmUUID
- Generate a new serial number.
- Copy this same serial number in the Board Serial number and append any 5 (five) random hex compatible letters. For example, if your serial number is C02VYV2V313J, then a valid Board Serial number can be C02VYV2V313JABCDE.
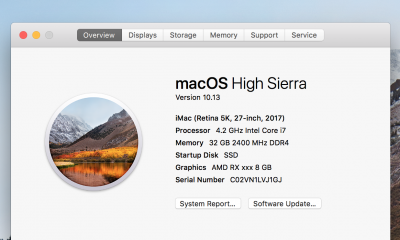
- You will notice that the Product Name is iMac 19,1 even though it is not available in the SMBIOS wizard. Thats because it is the SMBIOS of the upcoming iMac Pro (c. Pike Alpha). Look at this post for more context.
- Don't change the BIOS version or Board-id. This will wreck your SMBIOS. Basically, don't mix match iMac19,1 with any other model.
- Save and exit
- Open BIOS and update to the latest.
- Load the defaults and reboot.
- Open BIOS again and
- Disable IOAPIC under Advanced/PCH configuration
- Change Secure Boot to Other OS under Boot
- Disable CSM under boot. This is really important if you want to get all the GPU ports working.
- Don't worry about disabling the onboard GPU as it gets disabled automatically if a GPU is plugged into the PCIE slot.
- Save and reboot.
- Plug the USB to any port or even a USB hub and log in into BIOS
- Move the installer USB to the top of the boot device. DO NOT try to boot from the installer device directly, it will crash.
- Once the installer USB is on the top, save and exit.
- You will see the clover at this point and you can choose Boot from Install High Sierra......
- Finish the installation.
- It will boot a couple of times. Starting from first reboot, always select your HDD instead of installer USB in clover boot menu.
- With the USB still plugged in, you will be able to log in into High Sierra.
- Follow the steps 2-5 from the section "Preparing the installation media" and copy everything from the installer USB to your Macintosh USB.
- Eject the installer USB and reboot.
- You should be able to log into High Sierra after reboot.
Bluetooth
In order to fix Bluetooth, go to this GitHub page and follow the instructions.
To install the kexts, I use KextBeast. In this case you will need to install BrcmPatchRAM2.kext and BrcmFirmwareRepo.kext. I always install the custom kexts in /Library/Extensions. Reboot and you will have the Bluetooth working (its flaky as I mentioned).
Audio
Get the latest VoodooHDA from here and install. Reboot and you will have your audio working.
Things I learned
This EFI is very different from the other guides that I have written because its much simpler and has only the things that are absolute to make it work (well, I think its minimal haha).
- Previously, I was using a patched DSDT and I was under an impression that it is a must have. However, I realized that I didn't need it. So in the attached EFI, you will not find the patched DSDT. If you think you need it, check out my Sierra guide and get it from the EFI attached there.
- In order to get full RAM speed detection, there is a setting called XMPDetection under Boot in Clover. If you set it to Yes, you will see the maximum RAM speed.
- There were a lot of flags in Acpi and Graphics. I didn't need most of them. Infact, there is no patch in Graphics section. However, I did need the AppleGraphicsPolicy kext patch under Kernel and Kext Patches
I think this is one of the hottest topics in the Vega world because a lot of us have been facing problems with Vega while some have claimed that it works OOB. So let me start by saying this
Vega GPUs (RX Vega 64, RX Vega 56, RX Vega Frontier Edition) do not work OOB with this build as opposed to what you may see on YouTube or other threads. Here is what I had to do in order to get the full GPU support
- Disable CSM compatibility mode in the BIOS. This is a must. Otherwise, you will get a small pixelated window with the pointer in the center on all but the first port on the GPU. If you are dual booting, then you do need this to be turned on. I don't know how to help you in that case. Follow this thread to know more.
- Delete the CSM Video driver from the drivers64UEFI folder. You don't need it for the above mentioned reason.
- A patch for the AppleGraphicsPolicy kext by Pike.
- To avoid crashes, run apps like Google Chrome without GPU acceleration.
Kext: AppleGraphicsDevicePolicy
Find: <626f6172 642d6964>
Replace: <626f6172 642d6978>
(c)Pike R. Alpha
Last edited by a moderator: