- Joined
- Oct 22, 2010
- Messages
- 323
- Motherboard
- z68a-d3-b3
- CPU
- i7-3770k
- Graphics
- GTX 650
OK, guys, this is a very easy to do guide from scratch you can do upgrade as well however I wanted to do a clean install.
For a Direct upgrade Guide Tony has a fantastic Guide posted here
https://www.tonymacx86.com/threads/update-directly-to-macos-mojave.260654/
Note: At the present time of creating this guide there are no nvidia webdrivers available at the moment but there are various methods that work but its safe to say that supported GPU's work
[UPDATES]
10.14.1 -[Oct-30-2018] https://www.tonymacx86.com/threads/...d2h-b3-evga-gtx650.261045/page-3#post-1840966
10.14.2 -[Dec-06-2018] https://www.tonymacx86.com/threads/...d2h-b3-evga-gtx650.261045/page-4#post-1866928
10-14.3 -[Jan-22-2019] https://www.tonymacx86.com/threads/guide-gigabyte-z68ma-d2h-b3-evga-gtx650.261045/post-1899576
10-14.6 -[July-30-2019] https://www.tonymacx86.com/threads/guide-gigabyte-z68ma-d2h-b3-evga-gtx650.261045/post-1988789
10-14.6(Supplemental update) -[Aug-08-2019] https://www.tonymacx86.com/threads/guide-gigabyte-z68ma-d2h-b3-evga-gtx650.261045/post-1992538
10-14.6(Supplemental update 2) -[Sept-26-2019] https://www.tonymacx86.com/threads/guide-gigabyte-z68ma-d2h-b3-evga-gtx650.261045/post-2009465
Audio,Video,Sleep Works (video currently if you have a supported GPU)
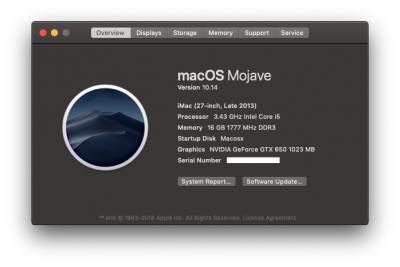
Step 1 -Build a USB stick that is bootable with Mojave
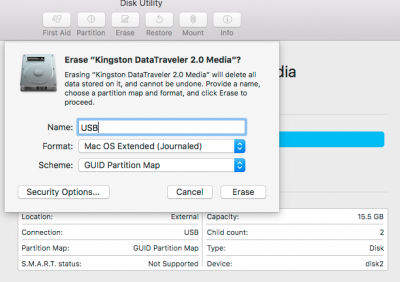
Download Mojave on a machine and use the following commands to install it on a USB stick. To use command below, rename the drive to USB which is the name of the volume. Make sure to delete everything form the drive and to use disk utility and make sure its GUID and partition type is Mac OS Extended (Journaled)
Note: If you do not rename the USB stick to USB command below will not work. So, if use a diff volume name, simply change the name to your volume name in the command was well.
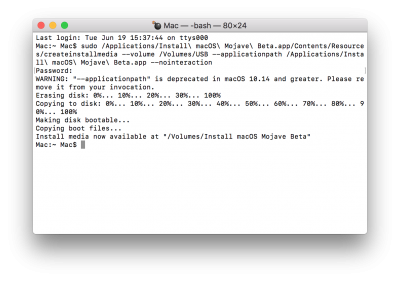
Open Terminal and Paste the following command
Step 2 We need to install Clover Configulator to mount the EFI partition on the USB installer which we just created. At this point, you need to install Clover on this partition. You have Several choices you can download the Clover from Tonymacx86 Download section, or you can get it from the actual Clover site, or just drag the one I will be providing in the attachment below.
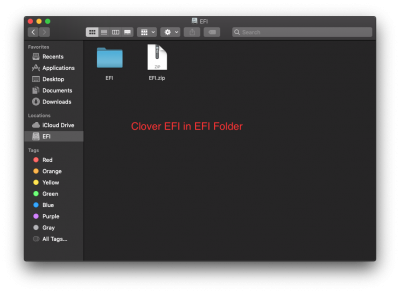
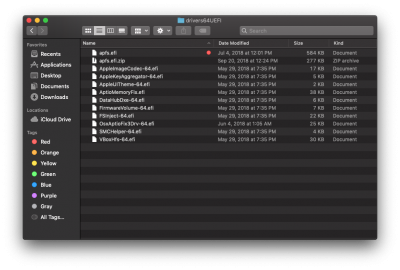
NOTE: please remember to copy apfs.efi over to /Volumes/EFI/EFI/CLOVER/drivers64UEFI/ after mounting your EFI partition or else Clover will boot but you will have an empty section where the drive icon is suppose to be (my EFI folder already has it). Also, if you want to know where to find this file, mount Mojave installer, go in the contents and its located here in the installer files /usr/standalone/i386.
Clover Download:
https://www.tonymacx86.com/resources/categories/clover-builds.12/
https://sourceforge.net/projects/cloverefiboot/
Step 3 Reboot the machine and use the f12 command and select the USB drive and boot from it. Once it boots up here is what you do. You erase the disk (name it whatever you wish), select Macintosh OS Extended (Journaled) format and GUID Partition Map scheme. Then click Erase.
NOTE: Do not select APFS format as this will prevent the installation from completing. The file system will automatically convert to APFS during the installation process if your target disk is a solid-state drive (SSD).
Also, if you have already installed Mojave, the partition type may already be APFS. You will need to revert it first back to Macintosh OS Extended (Journaled). Click Partition and remove these partitions and make sure it becomes Macintosh OS Extended (Journaled).
Step 4 The install process
The first stage of the install process should take about 5 to 10 minutes. (If the screen dims you can press a key to wake it.)
The computer will restart at least once during the next stage. When it does, press F12 to ensure that it boots from the USB Installer. At the Clover menu, select Boot macOS Install from Macintosh HD and press Enter to continue.
Step 5 Post install (once You have Mojave installed)
Get rid of that annoying message of asking you to allow install for every app
Open Applications > Utilities > Terminal and enter the following command to allow apps downloaded from unidentified developers:
Paste following command in terminal
This is an older message that appeared in the past. If the Thunderbolt Firmware Update 1.2 appears in Software Update, you can remove it by opening the Terminal and entering the following command:
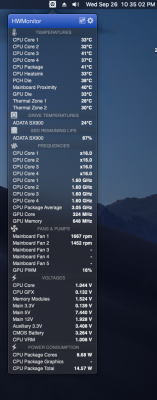
I also recommend getting a app that is truly valuable, HWSensors good to know whats going on with temperatures and fans etc.
Kexts included
AppleALC.kext
Lilu plugin for audio
FakeSMC.kext
System Management Controller emulator
Lilu.kext
unified kext, process and framework patcher
RealtekRTL8111.kext
enables wired networking
WhateverGreen.kext
Lilu plugin providing various GPU fixes
For a Direct upgrade Guide Tony has a fantastic Guide posted here
https://www.tonymacx86.com/threads/update-directly-to-macos-mojave.260654/
Note: At the present time of creating this guide there are no nvidia webdrivers available at the moment but there are various methods that work but its safe to say that supported GPU's work
[UPDATES]
10.14.1 -[Oct-30-2018] https://www.tonymacx86.com/threads/...d2h-b3-evga-gtx650.261045/page-3#post-1840966
10.14.2 -[Dec-06-2018] https://www.tonymacx86.com/threads/...d2h-b3-evga-gtx650.261045/page-4#post-1866928
10-14.3 -[Jan-22-2019] https://www.tonymacx86.com/threads/guide-gigabyte-z68ma-d2h-b3-evga-gtx650.261045/post-1899576
10-14.6 -[July-30-2019] https://www.tonymacx86.com/threads/guide-gigabyte-z68ma-d2h-b3-evga-gtx650.261045/post-1988789
10-14.6(Supplemental update) -[Aug-08-2019] https://www.tonymacx86.com/threads/guide-gigabyte-z68ma-d2h-b3-evga-gtx650.261045/post-1992538
10-14.6(Supplemental update 2) -[Sept-26-2019] https://www.tonymacx86.com/threads/guide-gigabyte-z68ma-d2h-b3-evga-gtx650.261045/post-2009465
Audio,Video,Sleep Works (video currently if you have a supported GPU)

Step 1 -Build a USB stick that is bootable with Mojave
Download Mojave on a machine and use the following commands to install it on a USB stick. To use command below, rename the drive to USB which is the name of the volume. Make sure to delete everything form the drive and to use disk utility and make sure its GUID and partition type is Mac OS Extended (Journaled)
Note: If you do not rename the USB stick to USB command below will not work. So, if use a diff volume name, simply change the name to your volume name in the command was well.

Open Terminal and Paste the following command
Code:
sudo /Applications/Install\ macOS\ Mojave.app/Contents/Resources/createinstallmedia --volume /Volumes/USB /Applications/Install\ macOS\ Mojave.app --no interaction
Step 2 We need to install Clover Configulator to mount the EFI partition on the USB installer which we just created. At this point, you need to install Clover on this partition. You have Several choices you can download the Clover from Tonymacx86 Download section, or you can get it from the actual Clover site, or just drag the one I will be providing in the attachment below.

NOTE: please remember to copy apfs.efi over to /Volumes/EFI/EFI/CLOVER/drivers64UEFI/ after mounting your EFI partition or else Clover will boot but you will have an empty section where the drive icon is suppose to be (my EFI folder already has it). Also, if you want to know where to find this file, mount Mojave installer, go in the contents and its located here in the installer files /usr/standalone/i386.

Clover Download:
https://www.tonymacx86.com/resources/categories/clover-builds.12/
https://sourceforge.net/projects/cloverefiboot/
Step 3 Reboot the machine and use the f12 command and select the USB drive and boot from it. Once it boots up here is what you do. You erase the disk (name it whatever you wish), select Macintosh OS Extended (Journaled) format and GUID Partition Map scheme. Then click Erase.
NOTE: Do not select APFS format as this will prevent the installation from completing. The file system will automatically convert to APFS during the installation process if your target disk is a solid-state drive (SSD).
Also, if you have already installed Mojave, the partition type may already be APFS. You will need to revert it first back to Macintosh OS Extended (Journaled). Click Partition and remove these partitions and make sure it becomes Macintosh OS Extended (Journaled).
Step 4 The install process
The first stage of the install process should take about 5 to 10 minutes. (If the screen dims you can press a key to wake it.)
The computer will restart at least once during the next stage. When it does, press F12 to ensure that it boots from the USB Installer. At the Clover menu, select Boot macOS Install from Macintosh HD and press Enter to continue.
Step 5 Post install (once You have Mojave installed)
Get rid of that annoying message of asking you to allow install for every app
Open Applications > Utilities > Terminal and enter the following command to allow apps downloaded from unidentified developers:
Paste following command in terminal
Code:
sudo spctl --master-disableThis is an older message that appeared in the past. If the Thunderbolt Firmware Update 1.2 appears in Software Update, you can remove it by opening the Terminal and entering the following command:
Code:
softwareupdate --ignore ThunderboltFirmwareUpdate1.2I also recommend getting a app that is truly valuable, HWSensors good to know whats going on with temperatures and fans etc.

Kexts included
AppleALC.kext
Lilu plugin for audio
FakeSMC.kext
System Management Controller emulator
Lilu.kext
unified kext, process and framework patcher
RealtekRTL8111.kext
enables wired networking
WhateverGreen.kext
Lilu plugin providing various GPU fixes
Attachments
Last edited:
