- Joined
- Dec 3, 2011
- Messages
- 70
- Motherboard
- Gigabyte GA-Z87X-D3H
- CPU
- i5-4670K
- Graphics
- RX 580
- Mac
- Classic Mac
- Mobile Phone
After a bumpy start this 10.8.3 install went smoothly. The main issue was related to the BIOS with VT-d needing to be disabled which was not documented in the other GA-Z77-DS3H posts, this was identified using the switch -v on boot and reading a few forum posts.
Network, audio, DVI, VGA and both DVI ports on the GPU working. The machine is very fast booting up.
Hardware
Gigabyte GA-Z77-DS3H
EVGA GTX 650 2Gb
RAM - 8Gb (2 x 4Gb) Corsair Vengeance 1600MHz
HD1 - SATA 1TB (boot)
HD2 - SATA 500Gb (data)
SATA DVD
Recycled case found on street
Logitech K120 keyboard
Razer Naga Molten mouse
Software
UniBeast
Mac OS X 10.8.3
MultiBeast
Step 1 - Configure the motherboards BIOS (F9)
1. Connect your monitor to the motherboards DVI port.
2. Turn on the machine and use the Delete key to enter the BIOS.
3. Load Optimized Defaults.
MIT / Extreme Memory Profile (X.M.P.) = Profile1
BIOS Features / Intel Virtualization Technology = Disabled
BIOS Features / VT-d = Disabled
Peripherals / SATA Mode Selection = AHCI
Peripherals / xHCI Hand-off = Enabled
Peripherals / EHCI Hand-off = Enabled
4. Save and Reset.
Step 2
1. Turn on the computer.
2. Hit F12 to select the boot device.
3. Select your USB drive (UniBeast).
4. At the UniBeast page type the -x boot flag.
5. Use Disk Utility to prepare your drive.
6. Install the OS.
7. Click Restart or wait for the computer to automatically reboot.
Note: the screen may go to sleep during the OS install process and will display the mouse pointer on a white screen. To get back to the install screen just hit the space bar.
Step 3
1. Hit F12 to select the boot device.
2. Select your boot drive and type the -x boot flag.
3. Set up your OS (you can skip most of the screens).
4. Sign-in using your password.
4. Download MultiBeast (your Ethernet port should be working).
5. Run MultiBeast.
Note: you may have to allow the MultiBeast application to run by changing the settings in the Security & Privacy control panel found in the System Preferences.
5. Select
MultiBeast / UserDSDT or DSDT -Free
MultiBeast / Drivers & Bootloaders / Drivers / Audio / Realtek ALC8xx / Without DSDT / ALC887/888b / v100302 Current
MultiBeast / Drivers & Bootloaders / Drivers / Network / Atheros - Shailua's ALXEthernet
Important: don't select everything at once, go very slowly.
Note: you do not need a DSDT with the GA-Z77-DS3H motherboard.
4. Click Continue to install.
5. Authenticate.
6. Quit MultiBeast.
7. Shut Down.
8. Remove the USB key (UniBeast).
Step 4
1. Turn on the computer and boot into Mac OS X.
2. Edit org.chemeleon.Boot.plist or run MultiBeast to change GraphicsEnabler = No.
MultiBeast / Customization / Boot Options / GraphicsEnabler = No
3. Click Continue to install.
4. Authenticate.
5. Quit MultiBeast.
6. Shut Down.
7. Install your GPU (GTX 650).
8. Turn on the computer and boot into Mac OS X.
9. Done!
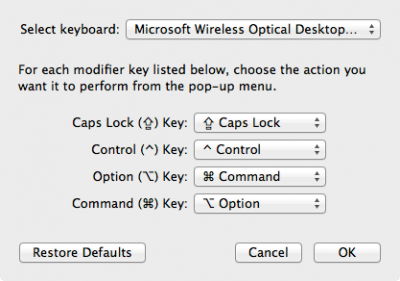
Lastly I changed the mapping for the Logitech K120 keyboard:
1. Open System Preferences and select the ‘Keyboard’ preference pane.
2. Click the Modifier Keys button and switch the mapping. When you’re done, click OK and close the preference pane.
See attached image for the Modifier Keys settings.
Network, audio, DVI, VGA and both DVI ports on the GPU working. The machine is very fast booting up.
Hardware
Gigabyte GA-Z77-DS3H
EVGA GTX 650 2Gb
RAM - 8Gb (2 x 4Gb) Corsair Vengeance 1600MHz
HD1 - SATA 1TB (boot)
HD2 - SATA 500Gb (data)
SATA DVD
Recycled case found on street
Logitech K120 keyboard
Razer Naga Molten mouse
Software
UniBeast
Mac OS X 10.8.3
MultiBeast
Step 1 - Configure the motherboards BIOS (F9)
1. Connect your monitor to the motherboards DVI port.
2. Turn on the machine and use the Delete key to enter the BIOS.
3. Load Optimized Defaults.
MIT / Extreme Memory Profile (X.M.P.) = Profile1
BIOS Features / Intel Virtualization Technology = Disabled
BIOS Features / VT-d = Disabled
Peripherals / SATA Mode Selection = AHCI
Peripherals / xHCI Hand-off = Enabled
Peripherals / EHCI Hand-off = Enabled
4. Save and Reset.
Step 2
1. Turn on the computer.
2. Hit F12 to select the boot device.
3. Select your USB drive (UniBeast).
4. At the UniBeast page type the -x boot flag.
5. Use Disk Utility to prepare your drive.
6. Install the OS.
7. Click Restart or wait for the computer to automatically reboot.
Note: the screen may go to sleep during the OS install process and will display the mouse pointer on a white screen. To get back to the install screen just hit the space bar.
Step 3
1. Hit F12 to select the boot device.
2. Select your boot drive and type the -x boot flag.
3. Set up your OS (you can skip most of the screens).
4. Sign-in using your password.
4. Download MultiBeast (your Ethernet port should be working).
5. Run MultiBeast.
Note: you may have to allow the MultiBeast application to run by changing the settings in the Security & Privacy control panel found in the System Preferences.
5. Select
MultiBeast / UserDSDT or DSDT -Free
MultiBeast / Drivers & Bootloaders / Drivers / Audio / Realtek ALC8xx / Without DSDT / ALC887/888b / v100302 Current
MultiBeast / Drivers & Bootloaders / Drivers / Network / Atheros - Shailua's ALXEthernet
Important: don't select everything at once, go very slowly.
Note: you do not need a DSDT with the GA-Z77-DS3H motherboard.
4. Click Continue to install.
5. Authenticate.
6. Quit MultiBeast.
7. Shut Down.
8. Remove the USB key (UniBeast).
Step 4
1. Turn on the computer and boot into Mac OS X.
2. Edit org.chemeleon.Boot.plist or run MultiBeast to change GraphicsEnabler = No.
MultiBeast / Customization / Boot Options / GraphicsEnabler = No
3. Click Continue to install.
4. Authenticate.
5. Quit MultiBeast.
6. Shut Down.
7. Install your GPU (GTX 650).
8. Turn on the computer and boot into Mac OS X.
9. Done!
Lastly I changed the mapping for the Logitech K120 keyboard:
1. Open System Preferences and select the ‘Keyboard’ preference pane.
2. Click the Modifier Keys button and switch the mapping. When you’re done, click OK and close the preference pane.
See attached image for the Modifier Keys settings.