- Joined
- May 6, 2015
- Messages
- 57
- Motherboard
- GA-Z97MX-Gaming 5
- CPU
- i7 4790k
- Graphics
- GTX 1080ti SC2
- Mac
- Mobile Phone
Thanks to ammulder, tonymac, toleda.
Changelog
v2 [06-Oct-2015]: HDMI audio. Extra clover screenshots.
v1 [04-Oct-2015]: Original post.
Hardware list
1. Intel Core i7-4790K
2. Cooler Master Hyper 212 EVO
3. Gigabyte GA-Z97MX-Gaming 5
4. EVGA GeForce GT 740 4GB
5. Crucial Ballistix Tactical 32GB Kit (8GBx4) DDR3
6. Samsung 500GB 850 Evo SSD
7. IOGEAR Bluetooth 4.0 GBU521
8. TP-LINK TL-WDN4800 PCI-e Adapter
9. Corsair CS550M 550 Watt ATX Modular PSU
10. Nanoxia Deep Silence 4 Mini Tower
11. Apple wireless keyboard
12. Apple wireless mouse
Working so far
1. Graphics via PCI-e (sans Flash on Safari).
2. WiFi networking (I don't have use for cables on 2015).
3. Bluetooth (keyboard and mouse automatically recognized on login screen).
4. iCloud sync.
5. Almost working HDMI sound. Works fine in general, but Flash videos seem to cut off randomly.
TODO
1. HDMI audio fix for flash videos on Safari, Firefox. A little more testing.
2. Proper power management, whatever that means.
3. Benchmarks with Yosemite and GPU.
4. Test iMessage/Facetime.
STEP 1: Download OS X El Capitan
1. Open Mac App Store on your old Yosemite installation or real Mac.
2. Log in with your Apple ID.
3. Download OS X El Capitan.
The Application Install OS X El Capitan will appear in /Applications.
STEP 2: Prepare Bootable USB Drive
This step extracts the OS X Installer contents, then installs Clover bootloader to the USB stick.
I used an USB 3.0 16 GB flash drive.
1. Insert the USB drive
2. Open /Applications/Utilities/Disk Utility
3. Highlight the USB drive in left column

4. Click on the Partition tab
5. Click Current and choose 1 Partition
6. Click Options...
7. Choose GUID Partition Table
8. Under Name: type USB (if you use a different name you'll have to chance the command in step 12)
9. Under Format: choose Mac OS Extended (Journaled)
10. Click Apply then Partition
11. Open /Applications/Utilities/Terminal
12. Type the following, enter password and hit enter. This command completely erases the USB, then creates native OS X installer media from the Install OS X El Capitan Application.
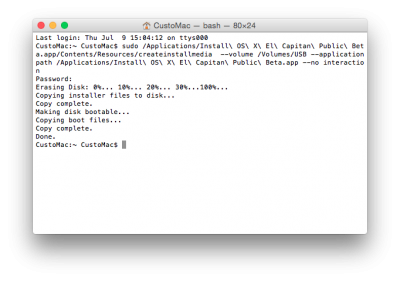
Upon completion, the USB will be renamed Install OS X El Capitan.
13. Download the latest version of Clover from source forge (I used Clover_v2.3k_r3270).
14. Open Clover package installer.
15. Hit Continue, Continue, Change Install Location...
16. Choose the USB, now called Install OS X El Capitan.
17. Hit Customize and install Clover to the same USB.
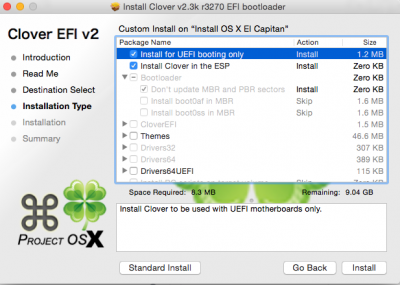
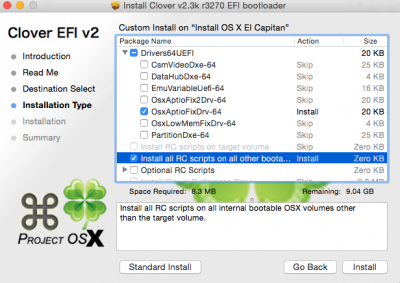
18. Navigate to /EFI/CLOVER/ and replace default config.plist with the one inside attached config.plist-Standard-LATEST.zip.
19. Navigate to /EFI/CLOVER/kexts and delete all folders, except for Other. You can try to use the folder named 10.11 as expected, but I had trouble with that and my previous install of Yosemite.
20. Navigate to /EFI/CLOVER/kexts/Other/ and add FakeSMC.kext
21. Navigate to /EFI/CLOVER/kexts/Other/ and add NullCPUPowerManagement.kext
22. Navigate to /EFI/CLOVER/drivers64UEFI/ remove VBoxHfs-64.efi and add HFSPlus.efi.
Your Clover Installation USB is now finished.
STEP 3 (Optional): Prepare EFI partition on install drive
This is only useful if you are going to install over an existing Yosemite instance. In my case, both with Yosemite and El Capitan, for reasons unknown, and don't have time to waste finding out, every single time, after installing OS X, my USB drive's EFI partition is no longer recognised, which means I have to either repeat last step OR use the EFI on install (internal) drive.
Since I no longer have access to a real mac (sold my Mac Mini to get back into the hackintosh world), I spent around 3 or 4 hours trying to figure out how to boot after this.
Things that came to my mind were a VM loaded with any flavour of OS X, or borrow a real mac.
In the end I performed a manual EFI copy from a Windows boot (on same PC) but it's not recommended and should be the last resource, power user method, since it involves a combination of HFS+ software and command line inputs.
So, if you are in the same dilemma as me, or know that will probably get into one, better test NOW if your USB drive can boot correctly, and if so, back off the installation, get back to your old Yosemite instance and update the EFI partition (basically, delete the EFI folder inside, but be careful if you have a Windows folder; leave it intact) by doing the same as last step, starting from #14 and switching USB to internal EFI partition.
The thing is, my old EFI from Yosemite couldn't boot El Capitan installation (or, the rest of it), so that's why I had to leave it as a clone of my USB EFI partition.
The error I had was "OsxAptioFixDrv: Error - requested memory exceeds out allocated relocation block".
STEP 4: Install El Capitan
I won't go into detail about doing this.
If I can edit OPs as a regular used, my intent is to update this guide with the TODOs and also post some images of my BIOS configuration.
I used a couple saved configurations, same I used for Yosemite, and they worked wonders.
Basically one sets GPU to internal Intel, other sets GPU to GT 740.
1. Turn off computer.
2. Insert the USB drive, preferably on USB 2.0 port (I used a frontal one).
3. Set BIOS configuration (I'm using F4 btw) to use internal graphics card. I didn't have to disable any Virtualisation option ever, neither had to remove any RAM sticks, neither had to remove video card. Basically all was connected (even both mini-HDMI for GT 740 and HDMI for internal HD4000 GPU).
4. Remove bluetooth adapter and use a regular USB keyboard and mouse from now on.
5. Boot from UEFI USB.
6. Install El Capitan. Reboot, keep on configuring it (see Step 3 if after reboot the USB drive is not recognised, specifically, its UEFI partition needed to boot), until you reach login screen and can actually login to your fresh install.
That's it. At this point my screen was flickering like crazy every 3-4 seconds, maybe due to using the internal GPU.
STEP 5: Clone EFI partition from USB to internal (Test internal boot)
If you already did this on step 3, then there is no reason to re-do. But for the sake of it, I did.
So follow Step 3 (delete EFI folder is it exists, etc). It's basically Step 2 starting from #14.
1. Turn off computer.
2. Remove USB drive.
3. Start computer.
4. Start BIOS utility, set boot device to the internal UEFI partition.
5. Start El Capitan.
If everything went fine, you just booted from internal drive and no longer require the USB. Otherwise, then put back the USB drive and check Clover installation on the internal EFI partition.
STEP 6: Post-Installation: GPU and System definitions
This is where the though part is and where you start, one by one, enabling all the hardware that is not working at this point. For me, it was the GT 740.
1. Download and install the alternate graphics drivers from NVIDIA (I'm using 346.03.02f0).
2. (Optional) Download and install CUDA if you need it (I'm using 7.5.20).
3. Download clover configurator (I'm using 4.24.0 Vibrant Edition).
4. Mount your internal EFI partition (thanks to Apple you have to resort to the manual way or create a bash script and invoke it every time, instead of doing the Debug trick on Disk Manager app), via:
disk0s1 is just an example, and you should check which one is yours via the first command. Chances are, since you're using the El Capitan drive as primary in the first port, it should be the same.
5. Open Clover configurator and open config.plist from the internal EFI partition you just mounted.
6. Configure what you need, specially the booting of NVIDIA drivers, since you installed them already and no longer need to inject Intel.

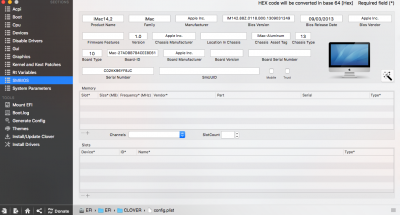

7. Save changes, reboot.
8. Load BIOS utility and set primary GPU to GT 740.
9. Reboot and load from internal UEFI partition.
At this point you should have a working El Capitan installation, using the GT 740.
STEP 7: Post-Installation: HDMI Audio via GT 740
Original guide here. I'm basically posting what I needed.
1. Download and install IOReg (use "View Raw" link).
2. Open IOReg:
a) Search for string "display".
b) Write down your display ID (e.g. PEG0, P0P1, P0P2, NPE3)
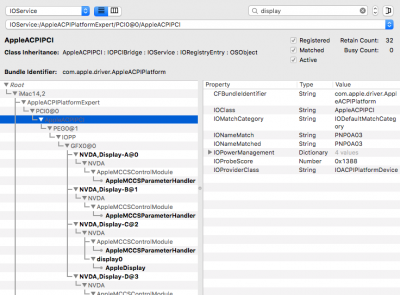
3. Download your corresponding SSDT's zip, according to #2.
4. Rename downloaded SSDT to SSDT.aml.
5. Mount your internal EFI partition.
6. Copy SSDT.aml to /EFI/CLOVER/ACPI/patched. If SSDT.aml already exists, then read the original guide. It shouldn't exist if you followed these very same instructions on this thread, as I never copied anything there.
7. Reboot.
At this point you should have HDMI audio working.
Changelog
v2 [06-Oct-2015]: HDMI audio. Extra clover screenshots.
v1 [04-Oct-2015]: Original post.
Hardware list
1. Intel Core i7-4790K
2. Cooler Master Hyper 212 EVO
3. Gigabyte GA-Z97MX-Gaming 5
4. EVGA GeForce GT 740 4GB
5. Crucial Ballistix Tactical 32GB Kit (8GBx4) DDR3
6. Samsung 500GB 850 Evo SSD
7. IOGEAR Bluetooth 4.0 GBU521
8. TP-LINK TL-WDN4800 PCI-e Adapter
9. Corsair CS550M 550 Watt ATX Modular PSU
10. Nanoxia Deep Silence 4 Mini Tower
11. Apple wireless keyboard
12. Apple wireless mouse
Working so far
1. Graphics via PCI-e (sans Flash on Safari).
2. WiFi networking (I don't have use for cables on 2015).
3. Bluetooth (keyboard and mouse automatically recognized on login screen).
4. iCloud sync.
5. Almost working HDMI sound. Works fine in general, but Flash videos seem to cut off randomly.
TODO
1. HDMI audio fix for flash videos on Safari, Firefox. A little more testing.
2. Proper power management, whatever that means.
3. Benchmarks with Yosemite and GPU.
4. Test iMessage/Facetime.
STEP 1: Download OS X El Capitan
1. Open Mac App Store on your old Yosemite installation or real Mac.
2. Log in with your Apple ID.
3. Download OS X El Capitan.
The Application Install OS X El Capitan will appear in /Applications.
STEP 2: Prepare Bootable USB Drive
This step extracts the OS X Installer contents, then installs Clover bootloader to the USB stick.
I used an USB 3.0 16 GB flash drive.
1. Insert the USB drive
2. Open /Applications/Utilities/Disk Utility
3. Highlight the USB drive in left column

4. Click on the Partition tab
5. Click Current and choose 1 Partition
6. Click Options...
7. Choose GUID Partition Table
8. Under Name: type USB (if you use a different name you'll have to chance the command in step 12)
9. Under Format: choose Mac OS Extended (Journaled)
10. Click Apply then Partition
11. Open /Applications/Utilities/Terminal
12. Type the following, enter password and hit enter. This command completely erases the USB, then creates native OS X installer media from the Install OS X El Capitan Application.
Code:
sudo /Applications/Install\ OS\ X\ El\ Capitan.app/Contents/Resources/createinstallmedia --volume /Volumes/USB --applicationpath /Applications/Install\ OS\ X\ El\ Capitan.app --nointeraction
Upon completion, the USB will be renamed Install OS X El Capitan.
13. Download the latest version of Clover from source forge (I used Clover_v2.3k_r3270).
14. Open Clover package installer.
15. Hit Continue, Continue, Change Install Location...
16. Choose the USB, now called Install OS X El Capitan.
17. Hit Customize and install Clover to the same USB.


18. Navigate to /EFI/CLOVER/ and replace default config.plist with the one inside attached config.plist-Standard-LATEST.zip.
19. Navigate to /EFI/CLOVER/kexts and delete all folders, except for Other. You can try to use the folder named 10.11 as expected, but I had trouble with that and my previous install of Yosemite.
20. Navigate to /EFI/CLOVER/kexts/Other/ and add FakeSMC.kext
21. Navigate to /EFI/CLOVER/kexts/Other/ and add NullCPUPowerManagement.kext
22. Navigate to /EFI/CLOVER/drivers64UEFI/ remove VBoxHfs-64.efi and add HFSPlus.efi.
Your Clover Installation USB is now finished.
STEP 3 (Optional): Prepare EFI partition on install drive
This is only useful if you are going to install over an existing Yosemite instance. In my case, both with Yosemite and El Capitan, for reasons unknown, and don't have time to waste finding out, every single time, after installing OS X, my USB drive's EFI partition is no longer recognised, which means I have to either repeat last step OR use the EFI on install (internal) drive.
Since I no longer have access to a real mac (sold my Mac Mini to get back into the hackintosh world), I spent around 3 or 4 hours trying to figure out how to boot after this.
Things that came to my mind were a VM loaded with any flavour of OS X, or borrow a real mac.
In the end I performed a manual EFI copy from a Windows boot (on same PC) but it's not recommended and should be the last resource, power user method, since it involves a combination of HFS+ software and command line inputs.
So, if you are in the same dilemma as me, or know that will probably get into one, better test NOW if your USB drive can boot correctly, and if so, back off the installation, get back to your old Yosemite instance and update the EFI partition (basically, delete the EFI folder inside, but be careful if you have a Windows folder; leave it intact) by doing the same as last step, starting from #14 and switching USB to internal EFI partition.
The thing is, my old EFI from Yosemite couldn't boot El Capitan installation (or, the rest of it), so that's why I had to leave it as a clone of my USB EFI partition.
The error I had was "OsxAptioFixDrv: Error - requested memory exceeds out allocated relocation block".
STEP 4: Install El Capitan
I won't go into detail about doing this.
If I can edit OPs as a regular used, my intent is to update this guide with the TODOs and also post some images of my BIOS configuration.
I used a couple saved configurations, same I used for Yosemite, and they worked wonders.
Basically one sets GPU to internal Intel, other sets GPU to GT 740.
1. Turn off computer.
2. Insert the USB drive, preferably on USB 2.0 port (I used a frontal one).
3. Set BIOS configuration (I'm using F4 btw) to use internal graphics card. I didn't have to disable any Virtualisation option ever, neither had to remove any RAM sticks, neither had to remove video card. Basically all was connected (even both mini-HDMI for GT 740 and HDMI for internal HD4000 GPU).
4. Remove bluetooth adapter and use a regular USB keyboard and mouse from now on.
5. Boot from UEFI USB.
6. Install El Capitan. Reboot, keep on configuring it (see Step 3 if after reboot the USB drive is not recognised, specifically, its UEFI partition needed to boot), until you reach login screen and can actually login to your fresh install.
That's it. At this point my screen was flickering like crazy every 3-4 seconds, maybe due to using the internal GPU.
STEP 5: Clone EFI partition from USB to internal (Test internal boot)
If you already did this on step 3, then there is no reason to re-do. But for the sake of it, I did.
So follow Step 3 (delete EFI folder is it exists, etc). It's basically Step 2 starting from #14.
1. Turn off computer.
2. Remove USB drive.
3. Start computer.
4. Start BIOS utility, set boot device to the internal UEFI partition.
5. Start El Capitan.
If everything went fine, you just booted from internal drive and no longer require the USB. Otherwise, then put back the USB drive and check Clover installation on the internal EFI partition.
STEP 6: Post-Installation: GPU and System definitions
This is where the though part is and where you start, one by one, enabling all the hardware that is not working at this point. For me, it was the GT 740.
1. Download and install the alternate graphics drivers from NVIDIA (I'm using 346.03.02f0).
2. (Optional) Download and install CUDA if you need it (I'm using 7.5.20).
3. Download clover configurator (I'm using 4.24.0 Vibrant Edition).
4. Mount your internal EFI partition (thanks to Apple you have to resort to the manual way or create a bash script and invoke it every time, instead of doing the Debug trick on Disk Manager app), via:
Code:
diskutil list
mkdir /Volumes/EFI
sudo mount -t msdos /dev/[B]disk0s1[/B] /Volumes/EFI
disk0s1 is just an example, and you should check which one is yours via the first command. Chances are, since you're using the El Capitan drive as primary in the first port, it should be the same.
5. Open Clover configurator and open config.plist from the internal EFI partition you just mounted.
6. Configure what you need, specially the booting of NVIDIA drivers, since you installed them already and no longer need to inject Intel.


7. Save changes, reboot.
8. Load BIOS utility and set primary GPU to GT 740.
9. Reboot and load from internal UEFI partition.
At this point you should have a working El Capitan installation, using the GT 740.
STEP 7: Post-Installation: HDMI Audio via GT 740
Original guide here. I'm basically posting what I needed.
1. Download and install IOReg (use "View Raw" link).
2. Open IOReg:
a) Search for string "display".
b) Write down your display ID (e.g. PEG0, P0P1, P0P2, NPE3)

3. Download your corresponding SSDT's zip, according to #2.
4. Rename downloaded SSDT to SSDT.aml.
5. Mount your internal EFI partition.
6. Copy SSDT.aml to /EFI/CLOVER/ACPI/patched. If SSDT.aml already exists, then read the original guide. It shouldn't exist if you followed these very same instructions on this thread, as I never copied anything there.
7. Reboot.
At this point you should have HDMI audio working.
