
- Joined
- Sep 19, 2012
- Messages
- 48
- Motherboard
- GA-X99-UD4
- CPU
- i7 5820K
- Graphics
- GTX 1080 MSI ARMOR OC 8 gb
Hi guys!
First of all I would like to thank the community for this amazing forum. This is my first thread despite this being my 4th build - I always found my answers in other users threads
In this post I will share my steps of getting this rig running. Will try to make it more “beginner- friendly” (I consider myself a beginner).

BUILD
Motherboard: Gigabyte X79-UD5 F12 BIOS
CPU: Intel Core i7-3930k (6 Core) @ 4.2 ghz
RAM: Corsair Vengeance (4 x 8GB) DDR3 1600
GPU: Zotac GeForce GTX560 2GB
PSU: Corsair TX850W
CPU Cooler: Corsair WaterCooler Hydro Series H100
Case: Corsair Carbide 400R
HD: 1tb Seagate
SDD: 240gb Kingston HyperX
WORKING/NOT WORKING:
So far, everything is working.
Speedstep is working with stock speed and consume around 19w on idle, with peaks of 100w under load (running GeekBench 3)
When running the CPU with OC, speedstep don't work and the processor keep runnig at the maximum clock I set. Despite this, the consume while idle is "very low", around 22w with peak of 150w while load (at 4.5ghz OC). I'll update here if I manage to make speedster work with OC.
The USB ports and Sound stop working after a wake from "deep-sleep", so I disable the sleep on Energy Saver options
Also I didn't test the Wi-Fi and Bluetooth as I didn't install the optional mini PCI card.
BIOS
The only difference for this setup from the basics settings shown on Unibeast Guide is that I had to disable USB 3.0 controller or I’ll get Kernel Panics and random reboots. But despite that after the install my front panel USB 3.0 ports are working. I’m not sure why. And disable "CPU EIST Function".
STEPS
1) You will need a working Yosemite to create the USB installation drive, just follow the Unibeast Guide (steps 1 and 2) http://www.tonymacx86.com/el-capita...-el-capitan-any-supported-intel-based-pc.html
2) After the USB drive setup is complete mount the EFI partition with Clover Configurator (Tools/Mount EFI -> Check Partition and choose the one on your USB drive), open the config.plist (EFI/CLOVER/config.plist) and set as follows:


At the bottom left of Clover Configurator select "Install Drivers" and make sure you install "OSxAptioFix2Drv-64.efi", "OsxFatBinaryDrv-64.efi" and "VBoxHfs-64.efi"

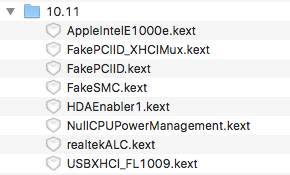
3) Copy those kexts files to EFI/Clover/kexts/10.11
 4) Follow the steps 3 and 4 on the Unibeast Guide, when it restarts you should boot from your USB on last time but this time you choose your El Capitan partition on Clover menu.
http://www.tonymacx86.com/el-capita...y-supported-intel-based-pc.html#uefi_settings
5) When at El Capitan desktop, download and install the last version of Clover on the HD where you just installed El Capitan. After that open Clover Configurator, mount the EFI partition on the USB drive and copy its content to your Desktop. Now mount the new EFI partition created by Clover on your HD and copy the EFI folder from your Desktop to the new EFI partition.
http://www.tonymacx86.com/el-capita...y-supported-intel-based-pc.html#uefi_settings
6) Reboot and mount your EFI partition using Clover Configurator and run the audio_cloverALC-110 command by Toleda to fix the sound. After you run the command you should see the "realtekALC.kext" file in your EFI/Clover/Kexts/10.11 Folder and 3 new entries on your config.plist. https://github.com/toleda/audio_Clov...10.command.zip

7) Download and Install the Combo Update for El Capitan 10.11.2 if your USB Install was made with a previous version (Mine was 10.11.0):
https://support.apple.com/kb/DL1850?locale=en_US
8) Download and Install Nvidia Web Drivers (if you are using MacPro6.1 on SMBIOS you will have to use AGDPfix app by shilohhh to prevent a blackscreen after boot.): http://www.nvidia.com/download/driverResults.aspx/96651/
9) Optional: If you want to see the the System information on your tray you can download Multibeast 8.0.1 and Install HWMonitor choosing Drivers/Misc/(v) FakeSMC v6.18.1394 (v) FakeSMC Plugins v6.18.13.94 (v) FakeSMC HWMonitor Application v6.18.13.94 and VoodooTSCSync 6 Core (if your processor has 6 cores)
Now your system should be running. Just reboot and test it.
TROUBLESHOOTING

BENCHMARKS
GeekBench 3 Scores (64 bits):
GeekBench 3 Scores (32 bits):
Good Luck!")
First of all I would like to thank the community for this amazing forum. This is my first thread despite this being my 4th build - I always found my answers in other users threads
In this post I will share my steps of getting this rig running. Will try to make it more “beginner- friendly” (I consider myself a beginner).
BUILD
Motherboard: Gigabyte X79-UD5 F12 BIOS
CPU: Intel Core i7-3930k (6 Core) @ 4.2 ghz
RAM: Corsair Vengeance (4 x 8GB) DDR3 1600
GPU: Zotac GeForce GTX560 2GB
PSU: Corsair TX850W
CPU Cooler: Corsair WaterCooler Hydro Series H100
Case: Corsair Carbide 400R
HD: 1tb Seagate
SDD: 240gb Kingston HyperX
WORKING/NOT WORKING:
So far, everything is working.
Speedstep is working with stock speed and consume around 19w on idle, with peaks of 100w under load (running GeekBench 3)
When running the CPU with OC, speedstep don't work and the processor keep runnig at the maximum clock I set. Despite this, the consume while idle is "very low", around 22w with peak of 150w while load (at 4.5ghz OC). I'll update here if I manage to make speedster work with OC.
The USB ports and Sound stop working after a wake from "deep-sleep", so I disable the sleep on Energy Saver options
Also I didn't test the Wi-Fi and Bluetooth as I didn't install the optional mini PCI card.
BIOS
The only difference for this setup from the basics settings shown on Unibeast Guide is that I had to disable USB 3.0 controller or I’ll get Kernel Panics and random reboots. But despite that after the install my front panel USB 3.0 ports are working. I’m not sure why. And disable "CPU EIST Function".
STEPS
1) You will need a working Yosemite to create the USB installation drive, just follow the Unibeast Guide (steps 1 and 2) http://www.tonymacx86.com/el-capita...-el-capitan-any-supported-intel-based-pc.html
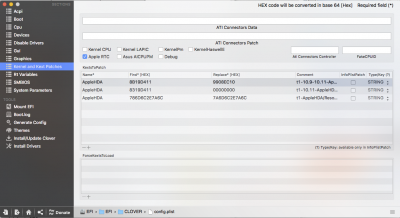
2) After the USB drive setup is complete mount the EFI partition with Clover Configurator (Tools/Mount EFI -> Check Partition and choose the one on your USB drive), open the config.plist (EFI/CLOVER/config.plist) and set as follows:
- ACPI: (v) FixUSB / (v) FixHPET / (v) AddDTGP / (v) Smart UPS
- Boot: -v / dart=0 / darkwake=0 / npci=0x2000 / kext-dev-mode=1 / rootless=0
- CPU: type = "0x0A01" / (v) C6
- Devices: USB (v) inject / (v) Add ClockID / (v) FixOwnership / Audio (1)
[*=left]Graphics: (v) inject NVIDIA
- Kernel and Kext Patches: (v) Apple RTC
- Rt Variables: BooterConfig = 0x28 / CsrActiveConfig = 0x3
- SMBIOS: Press the magic wand and select "MacPro3,1"
- System Parameters: Inject Kexts (Yes) / (v) No caches (v) Inject System ID
At the bottom left of Clover Configurator select "Install Drivers" and make sure you install "OSxAptioFix2Drv-64.efi", "OsxFatBinaryDrv-64.efi" and "VBoxHfs-64.efi"
3) Copy those kexts files to EFI/Clover/kexts/10.11
- FakeSMC.kext(http://www.tonymacx86.com/downloads.php?do=file&id=282)
- FakePCIID_XHCIMux.kext and FakePCIID.kext (https://bitbucket.org/RehabMan/os-x-fake-pci-id/downloads)
- USBXHCI_FL1009.kext (FL1009 chipset USB3.0 solution for El Capitan)
- NullCPUPowerManagement.kext (http://www.tonymacx86.com/downloads.php?do=file&id=268)
- AppleIntelE1000e.kext (http://www.tonymacx86.com/downloads.php?do=file&id=263)
- HDAEnabler1.Kext (https://github.com/toleda/audio_kext_enabler/blob/master/HDAEnabler1.kext.zip)
http://www.tonymacx86.com/el-capita...y-supported-intel-based-pc.html#uefi_settings
5) When at El Capitan desktop, download and install the last version of Clover on the HD where you just installed El Capitan. After that open Clover Configurator, mount the EFI partition on the USB drive and copy its content to your Desktop. Now mount the new EFI partition created by Clover on your HD and copy the EFI folder from your Desktop to the new EFI partition.
http://www.tonymacx86.com/el-capita...y-supported-intel-based-pc.html#uefi_settings
6) Reboot and mount your EFI partition using Clover Configurator and run the audio_cloverALC-110 command by Toleda to fix the sound. After you run the command you should see the "realtekALC.kext" file in your EFI/Clover/Kexts/10.11 Folder and 3 new entries on your config.plist. https://github.com/toleda/audio_Clov...10.command.zip
7) Download and Install the Combo Update for El Capitan 10.11.2 if your USB Install was made with a previous version (Mine was 10.11.0):
https://support.apple.com/kb/DL1850?locale=en_US
8) Download and Install Nvidia Web Drivers (if you are using MacPro6.1 on SMBIOS you will have to use AGDPfix app by shilohhh to prevent a blackscreen after boot.): http://www.nvidia.com/download/driverResults.aspx/96651/
9) Optional: If you want to see the the System information on your tray you can download Multibeast 8.0.1 and Install HWMonitor choosing Drivers/Misc/(v) FakeSMC v6.18.1394 (v) FakeSMC Plugins v6.18.13.94 (v) FakeSMC HWMonitor Application v6.18.13.94 and VoodooTSCSync 6 Core (if your processor has 6 cores)
Now your system should be running. Just reboot and test it.
TROUBLESHOOTING
- If you have an error message on your first boot then reset and try again. You can also press "O" at Clover boot menu and edit your boot arguments adding "-f" to it.
- If your USB 3.0 is not working, you can try to enable it on you BIOS and boot into your Yosemite partition and try to plug and mount a pendrive in the front panel. If it works reboot your system and once again enter in the BIOS and Disable the USB 3.0, save and proceed the boot into El Capitan. If the USB 3.0 doesn't work in Yosemite or this is the first time you use Clover to boot into Yosemite you can try to remove the “GenericUSBXHCI.kext” from your System/Library/Extensions folder (on Yosemite partition). Remember to mount your EFI partition and copy the Kexts that are in EFI/Clover/Kexts/10.11 to the /10.10 folder.
- UPDATE 12/16/15 - If you want to activate your USB 3.0 on the BIOS - You can download RehabMan's GenericUSBXHCI.kext and install it using kextbeast.
- If you can't boot try use "nv_disable=1" so you can install the NVIDIA Web Drivers and run AGDPFix if using MacPro 6.1 smbios.
- If you want to enable TRIM support for your SSD you need to mount the EFI partition with Clover Configurator, open your config.plist, go to "Kernel and Kext Patches" tab and add a line as follow on "KextsToPatch":Name: "IOAHCIBlockStorage" / Find*[HEX]: "4150504C452053534400" / Replace* [HEX]: "00000000000000000000" / Comment: "TRIM Support"
- UPDATE 09/23/16 - Attached my " config.plist", ATTENTION! It's set to Mac PRO 6.1 so you may have to use nv_disable=1 for the first boot so you can install the nvidia drivers and run AGDPFIx. I recommend that you open it on Clover Configuration to generate your own serial (magic wand / mac pro / shake...shake...shake...)
BENCHMARKS
GeekBench 3 Scores (64 bits):
| Clock | Single-Core | Multi-Core |
| @3.5ghz(stock) | 3133 | 18865 |
| @4.2ghz(OC) | 3693 | 22190 |
| @4.5ghz(OC vcore = 1.35) | 3933 | 23601 |
| @4.6ghz(OC vcore = 1.4) | 4017 | 24099 |
GeekBench 3 Scores (32 bits):
| Clock | Single-Core | Multi-Core |
| @3.5ghz(stock) | 2856 | 16883 |
| @4.2ghz(OC) | 3372 | 20093 |
| @4.5ghz(OC vcore = 1.35) | 3592 | 21498 |
| @4.6ghz(OC vcore = 1.4) | 3662 | 21884 |
Good Luck!
Attachments
Last edited:
