Contribute
Register

[Guide] Dell XPS 9560 Mojave VirtualSMC, I2C Trackpad, Clover UEFI Hotpatch

Status
Not open for further replies.
If I'm understanding you correctly, no the power button led light does not stay on during sleep. Doesn't matter if it's using battery or ac. Looks like you have a 9343 so I'm sorry but I don't think I can help you.
thanks for the answer, the dell xps it seems the only pc not light at the power button on sleep. strange, many PCs have this flashing light.sorry again but nothing I found to support for the 9343
 
I'm a stubborn idiot haha. I two just for July 4th weekend really. I think once you fix something in Hackintosh, you get a feeling of accomplishment and you're back at trying for perfection.

Have you been reading up on the ACPI specs? B/c even though I said I've given up on USB-C/TB... I really haven't.

I found this recently and I think I can implement it. Whether it works is a different story. Maybe you want to try too? In short, the idea is kind of like how we disable Optimus Nvidia on our laptops. How he's hooking into already existing methods the hardware uses but applying notify commands to his port.


I asked him b/c in his GitHub repo commits he says he had to remove a "beta" TB EFI driver. It's not stable enough. Funny enough that driver is made by racermaster who I believe was working on TB fix as well with our laptops.

According to OSY, person who wrote this guide, devices have to be plugged in at boot but then fully hot pluggable. I feel not much different than our situation but he doesn't use express card trick.
Wow. And it's pretty recent also. Yup I'll try to see how to adapt it by doing the renaming/clover hotpatch and change RP05 to RP15 in the config to see how it goes.

Reading the acpi spec? lol I'm very slow atm. There's so many times the same things at the beginning. Since I'm no coder I try to literally read it from start to finish. Maybe I should only read the parts related on aml langage, ACPI objets and methods... I'm still at noob level 0.

Take a look at this first then. https://www.tonymacx86.com/threads/guide-disabling-discrete-graphics-in-dual-gpu-laptops.163772/

It's basic hot patching but it explains a lot of what's going on. Would help with familiarizing with ACPI spec. Then you could actually use the files we have and follow along. Download KNN's full release files, he has .dsl files commented pretty well with what is happening. Hope that helps. Cheers!
 
iirc knn actually used 13,3 to begin with because when we were on sierra and hs we were spoofing Skylake for a while. Now we don't b/c macOS natively supports it now.

I chose 14,1 due to rehabman's advice and just looking at the hardware it made sense. Same gen CPU KabyLake, no dgpu, no touchid(T2 chip), you can compare the hardware yourself and see. In my opinion 15,1 wouldn't match up as well. Maybe a change is necessary.... I dunno. If you want to test it out for us, that'd be great.

14,3 would have been my second choice b/c it actually has a 7700HQ but it has dGPU, touchID...
@blazinsmonkey thank you! I changed to 15,1 on KNNSpeed's Guide to get wake on lid opening working way back when. But I was getting issues w TouchID. So, your choice all makes sense now :)
 
I did a long sleep test. 27 hours of sleep resulted in battery down 5 percent. I think this is very good
@blazinsmokey thank you for posting your new settings. I have been playing with it since you first posted it and power consumption is fantastic. Battery consumption when unplugged and the lid is closed is excellent. Thank you so much for this.

The DW1830 card does drop out after sleep once in a while. But, instead of removing the plist file, resetting permissions and rebooting. I just close the lid for a few minutes and it is active again. Never had the ability to do this before w the High Sierra install. Do you think this could be a power related issue?
 
The DW1830 card does drop out after sleep once in a while. But, instead of removing the plist file, resetting permissions and rebooting. I just close the lid for a few minutes and it is active again. Never had the ability to do this before w the High Sierra install. Do you think this could be a power related issue?

Doubt it's power, we are all using the same power implementations if you have a clean install and my files. Have you had a chance to test and see how it responds in Windows? Maybe it's just a faulty card or double check your installation.
 
I just wanted to say a huge thank you, blazinsmokey.
I managed to install everything without too much trouble. Your guide is very well written and was easy enough to follow.

A few points that I didn't see in the guide (Apologies if I missed something):

1: Filevault. This works fine and I have experienced no difficulties. The AppleKeyFeeder driver is vital, in order to be able to type in the password screen and unlock the drive. At least with a DE keyboard, I can only input numbers and simple letters (Upper and lower case) in the password box but I haven't really tried to find work-arounds.

2. SSD. The Intel 660p NVME drive seems to be working fine. I read a few reports that the 600 Intel drive had serious issues with Hackintosh but so far I haven't experienced any issues with the 660p. For both the 660p and the original Dell-fitted Toshiba XG5, I had to use the 'IONVMeFamily Preferred Block Size 0x10 -> 0x01' patch in Clover.

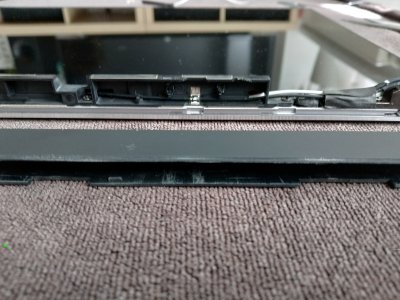
3. WiFi. Installing the 3rd WiFi/BT antenna is actually not too tricky but it does require removing the display, then the plastic shroud that covers the antennas and finally modifying the plastic - see the photos in my 3rd post for reference. I was expecting it to be more trouble than it was but the hardest part was sliding the plastic shroud off - it's installed quite tightly from the factory!

The shroud slides from left to right - assuming you have the screen laying on it's back like I did in the picture. I ended up standing the display on it's side and tapping the shroud with a piece of wood and a hammer to loosen it. Was scary but only took 2 taps. It took 1 hour to complete the task.

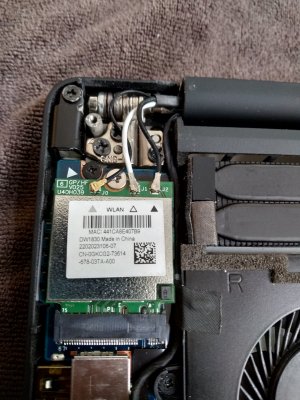
The middle antenna socket seems to be for bluetooth, in case anybody wondered. I attached the 3rd, DIY antenna to it because the signal it receives is not quite as strong as the 2 original antennas that Dell fitted. It seems to pick up a weaker signal but it is still strong enough to walk around the house and stream audio to headphones in other rooms - good enough for me.

I tried both the DW1560 and the DW1830 - the latter gave me the best results.

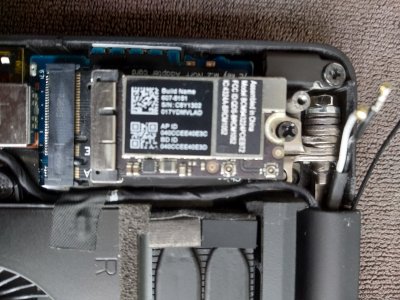
If you grind away slightly at the inside of the back casing, it is also possible to fit the native 2011 Macbook Air WiFi card, which works well out of the box. There's a small bump of metal that sticks out of the case back and just happens to touch the card and stop the case from closing. It is limited to 'N' speed and requires a 6+2 to NGFF adapter.

It's also physically possible to it the larger AC Macbook cards (Such as the BCM94360CS2) however it blocks the screw post for the corner screw. You'd have to grind away at the post in order for the card to fit correctly and the case to close cleanly. I wasn't happy with this option but I suppose that a NGFF extender might even work and allow it to fit without grinding away at the post - but then the antennas would need to be extended.

4. Cooling. I used Thermal Grizzly liquid metal on both the CPU and GPU. I also installed cooling pads on the VRM's. Both are pretty easy to do. The mounting pressure is actually very good and there has been no leakage of the liquid metal. In general usage, the temps are under 50oC.

5. Keyboard. There is a free app called Ukulele, which will allow you to create custom keyboard layouts. My keyboard is German (DE QWERTZ) and many of the characters were not correctly mapped. You can load the default Apple keymap and swap around the keys so that they match what is on the XPS keyboard. If I can find out where I saved the installable DE keymap file, I will upload it later on. It's not super hard to create your own and leads to a much nicer experience when typing.

6. Dual boot with Windows. I have the larger battery and I cannot see any way of cramming a secondary drive into my system. I rarely need to use Windows but sometimes it is necessary. I had good success with using WinToUSB and the original NVME drive that was in my XPS and is now in a USB adapter stick. Windows installed fine and it works nicely (Surprisingly well) - only weirdness is that Bitlocker does not seem to like the XPS' TPM and I had to modify the Group Policy to enable Bitlocker without the TPM. Actually that's not a bad idea as it allows you to theoritically plug the drive into any Intel system and boot in emergencies. I can now just insert the stick and boot via USB if I ever need Windows - it's not ideal but it works OK.

I actually would appreciate some help please... I have followed a number of guides and am running up against a wall when it comes to Facetime and iMessage. No matter what I do, I still get the 'call apple' and a customer code when I try to sign in. iCloud works just fine and I know that the Apple account works fine for my real Macbook to use Facetime and iMessage. SMBIOS settings all seem to in order as well as Aptiomemoryfix to enable NVRAM (Confirmed that it is working). WiFi is set as En0 and also as built-in. Tried clearing all devices from Apple account, clearing all of the data sored for these services too. It's not my first rodeo with Hackintosh systems but I was never tried to enable Facetime or iMessages before. Does anybody have any idea what might be tripping me up?

I'll try and upload some photos when I can. Thanks again for your amazing guide!

I attached my custom keymap for a German keyboard. Just double click on the file inside the zip archive. You will then find the custom keymap in the Keyboard Input Sources. Use the Windows key to select the characters such as the @ sign (Windows key + q) for example.
 

Attachments

  • QWERTZ Hackintosh.zip
    6.9 KB · Views: 100
Last edited:
Native BCM Macbook Air Wifi Card and 6+2 adapter. It's actually necessary to cut the adapter as well

# IMG_20190704_135418.jpg

IMG_20190704_135430.jpg

You can see the screw post to which I refer, on the left side of the card.
 
Installing the 3rd Antenna:

1. I used a soldering iron to melt the thin strips of plastic to make space for the antenna. If you are not a barbarian, then a needle file will give a more beautiful appearance... But since it'll never be seen once closed... I went the barbarian route.

IMG_20190704_134138.jpg


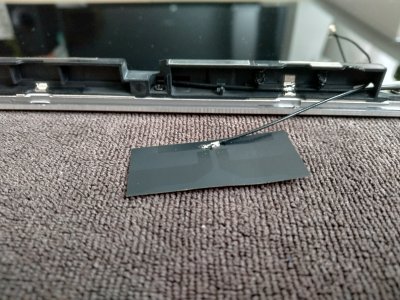
2. The antenna itself - it's like a piece of plastic tape and can be folded - which makes it easy to fit inside the recess that has been created. The antenna is just a generic antenna purchased from eBay - it costs 5€ (Free shipping to Germany) but I've seen lots of similar antennas on international eBay. Do yourself a favor and buy an antenna that already has the smaller connector to attach to the WiFi card or you will also need to buy a pigtail adapter cable.

IMG_20190704_134231.jpg


3. The antenna folded into the recess. Be a bit careful with the antenna - the solder joint is not very strong. It stays in place just via compression and the plastic shroud can then be slid over the whole thing and covers up the shoddy, soldering-iron savagery.


IMG_20190704_134706.jpg


4. The finished product (I actually found out the the DIY aerial works best on the middle socket - to give the WiFi the best possible signal... So my current cable layout, from left to right is: original white, DIY black, original black)

IMG_20190705_103245.jpg
 

Attachments

  • IMG_20190704_134138.jpg
    IMG_20190704_134138.jpg
    4.7 MB · Views: 71
  • IMG_20190704_134231.jpg
    IMG_20190704_134231.jpg
    5.2 MB · Views: 64
  • IMG_20190704_134701.jpg
    IMG_20190704_134701.jpg
    4.9 MB · Views: 66
  • IMG_20190704_134706.jpg
    IMG_20190704_134706.jpg
    5.1 MB · Views: 71
  • IMG_20190705_103245.jpg
    IMG_20190705_103245.jpg
    4.9 MB · Views: 70
Last edited:
@Benni wow thanks for the share and information

Could you list all the files need for FileVault and I'll add it to the guide for those that need this functionality. Or if it's too much trouble, upload your Clover and I'll figure it out.

I actually meticulously check my WiFi speeds after wake b/c this was a problem for me like in Sierra. Option+click wifi icon and I look for my channel accessing at 5GHz, 80Mhz and Tx Rate of 876Mbps. I just woke my laptop not too long ago and all is in order. I'm not sure what the deal is for some people, have you tried disabling network/wake for wifi access in energy preferences? I actually have nothing checked in all energy preferences section for battery and AC.

iMessage and FaceTime, I've always followed these instructions. Logout of all iCloud, Appstore etc before proceeding. I've been following this since 10.10.x. I think the selfsolve site is now checkcoverage. Plus now you can show/hide hidden files with ( cmd+shift+. ) so no need for a couple of them terminal commands. I would try the below and if it doesn't work right away give it a few days. I've heard people having it just suddenly work after a day or two.

As for the instructions:
  1. Open CloverConfigurator and mount your EFI
  2. Open your config.plist
  3. In the Rt Variables section, make sure everything is clear.
  4. Go to the SMBIOS section and click on the magic wand. Match the specs options as best you can to your machine. On the two sections that say shake, click a few times to generate a random serial. Click ok.
  5. Go to https://selfsolve.apple.com/ and search for that serial number that was generated. If you get an error message, that is good. It means you aren't using a serial number assigned to a real Mac. If you don't get an error, repeat step 4 and search for the new serial instead.
  6. Open terminal and run "uuidgen".
  7. Copy this UUID and paste it in the "SmUUID" field in the SMBIOS section.
  8. In the "Board Serial Number" field, paste in your system serial number (the one generated by the magic wand) and add 5 random letters and numbers to the end to reach a total of 17 characters.The reason for step 7 and 8 is to keep your ROM (last 12 digits of the UUID that was generated) and MLB (Board Serial Number) values constant and unique on each boot of the OS. If the values change from boot to boot, iMessage will notice and fail to activate and there is potential that Apple will notice and blacklist your UUID, serial, or Apple ID. All Clover-generated ROM and MLB values are automatically blacklisted, as well.
  9. Export config.plist
  10. In terminal, run the commands:
  11. defaults write com.apple.finder AppleShowAllFiles TRUE
  12. killall Finder
  13. Navigate to /Users/[Username]/Library/Chaches and delete all files or folders beginning with: (if there is nothing there with these file names, that is ok)
  14. com.apple.Messages
  15. com.apple.imfoundation.IMRemoteURLConnectionAgent
  16. Navigate to /Users/[Username]/Library/Preferences and delete all files or folders beginning with: (if there is nothing there with these file names, that is ok)
  17. com.apple.iChat.
  18. com.apple.imagent.
  19. com.apple.imessage.
  20. com.apple.imservice.
  21. Navigate to /Users/[Username]/Library and delete the folder "Messages"(if there is nothing there with that file name, that is ok).
  22. Empty the trash. If it says files are still in use, reboot and empty it immediately upon startup.
  23. Open up Disk Utility, select your OSX partition, and rebuild the permissions. Reboot when this is completed.
  24. The moment of truth: open up iMessage and attempt to sign in. It worked for me on the first try.
  25. If it worked, you can re-hide hidden files and folders with the terminal commands:
  26. defaults write com.apple.finder AppleShowAllFiles FALSE
  27. killall Finder
 
Status
Not open for further replies.
Back
Top