I just wanted to say a huge thank you, blazinsmokey.
I managed to install everything without too much trouble. Your guide is very well written and was easy enough to follow.
A few points that I didn't see in the guide (Apologies if I missed something):
1:
Filevault. This works fine and I have experienced no difficulties. The AppleKeyFeeder driver is vital, in order to be able to type in the password screen and unlock the drive. At least with a DE keyboard, I can only input numbers and simple letters (Upper and lower case) in the password box but I haven't really tried to find work-arounds.
2.
SSD. The Intel 660p NVME drive seems to be working fine. I read a few reports that the 600 Intel drive had serious issues with Hackintosh but so far I haven't experienced any issues with the 660p. For both the 660p and the original Dell-fitted Toshiba XG5, I had to use the 'IONVMeFamily Preferred Block Size 0x10 -> 0x01' patch in Clover.
3.
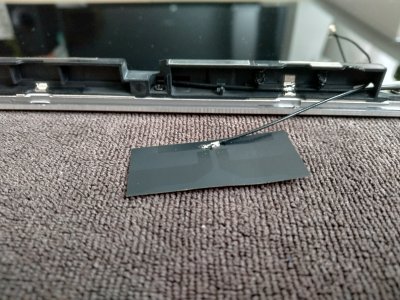
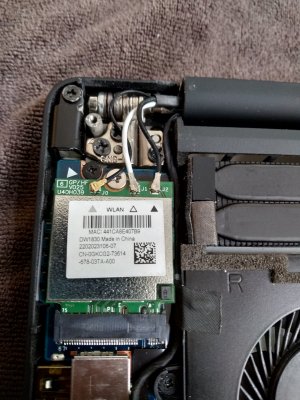
WiFi. Installing the 3rd WiFi/BT antenna is actually not too tricky but it does require removing the display, then the plastic shroud that covers the antennas and finally modifying the plastic - see the photos in my 3rd post for reference. I was expecting it to be more trouble than it was but the hardest part was sliding the plastic shroud off - it's installed quite tightly from the factory!
The shroud slides from left to right - assuming you have the screen laying on it's back like I did in the picture. I ended up standing the display on it's side and tapping the shroud with a piece of wood and a hammer to loosen it. Was scary but only took 2 taps. It took 1 hour to complete the task.
The middle antenna socket seems to be for bluetooth, in case anybody wondered. I attached the 3rd, DIY antenna to it because the signal it receives is not quite as strong as the 2 original antennas that Dell fitted. It seems to pick up a weaker signal but it is still strong enough to walk around the house and stream audio to headphones in other rooms - good enough for me.
I tried both the DW1560 and the DW1830 - the latter gave me the best results.
If you grind away slightly at the inside of the back casing, it is also possible to fit the native 2011 Macbook Air WiFi card, which works well out of the box. There's a small bump of metal that sticks out of the case back and just happens to touch the card and stop the case from closing. It is limited to 'N' speed and requires a 6+2 to NGFF adapter.
It's also physically possible to it the larger AC Macbook cards (Such as the
BCM94360CS2) however it blocks the screw post for the corner screw. You'd have to grind away at the post in order for the card to fit correctly and the case to close cleanly. I wasn't happy with this option but I suppose that a NGFF extender might even work and allow it to fit without grinding away at the post - but then the antennas would need to be extended.
4.
Cooling. I used Thermal Grizzly liquid metal on both the CPU and GPU. I also installed cooling pads on the VRM's. Both are pretty easy to do. The mounting pressure is actually very good and there has been no leakage of the liquid metal. In general usage, the temps are under 50oC.
5.
Keyboard. There is a free app called Ukulele, which will allow you to create custom keyboard layouts. My keyboard is German (DE QWERTZ) and many of the characters were not correctly mapped. You can load the default Apple keymap and swap around the keys so that they match what is on the XPS keyboard. If I can find out where I saved the installable DE keymap file, I will upload it later on. It's not super hard to create your own and leads to a much nicer experience when typing.
6.
Dual boot with Windows. I have the larger battery and I cannot see any way of cramming a secondary drive into my system. I rarely need to use Windows but sometimes it is necessary. I had good success with using WinToUSB and the original NVME drive that was in my XPS and is now in a USB adapter stick. Windows installed fine and it works nicely (Surprisingly well) - only weirdness is that Bitlocker does not seem to like the XPS' TPM and I had to modify the Group Policy to enable Bitlocker without the TPM. Actually that's not a bad idea as it allows you to theoritically plug the drive into any Intel system and boot in emergencies. I can now just insert the stick and boot via USB if I ever need Windows - it's not ideal but it works OK.
I actually would appreciate some help please... I have followed a number of guides and am running up against a wall when it comes to Facetime and iMessage. No matter what I do, I still get the 'call apple' and a customer code when I try to sign in. iCloud works just fine and I know that the Apple account works fine for my real Macbook to use Facetime and iMessage. SMBIOS settings all seem to in order as well as Aptiomemoryfix to enable NVRAM (Confirmed that it is working). WiFi is set as En0 and also as built-in. Tried clearing all devices from Apple account, clearing all of the data sored for these services too. It's not my first rodeo with Hackintosh systems but I was never tried to enable Facetime or iMessages before. Does anybody have any idea what might be tripping me up?
I'll try and upload some photos when I can. Thanks again for your amazing guide!
I attached my custom keymap for a German keyboard. Just double click on the file inside the zip archive. You will then find the custom keymap in the Keyboard Input Sources. Use the Windows key to select the characters such as the @ sign (Windows key + q) for example.


")