Contribute
Register

[Guide] Dell XPS 9530 using Clover UEFI

Status
Not open for further replies.
For HD4600 basic requirements, read here: http://www.tonymacx86.com/yosemite-...tel-hd4200-hd4400-hd4600-mobile-yosemite.html

Generally, "RM,device-id" is not used unless you want to do something strange.

You need to use config.plist/Devices/FakeID/IntelGFX=0x04128086. That will make the framebuffer and accelerator kext load. But the accelerator kext will still fail probe. That's where FakePCIID kexts come in... with FakePCIID.kext and FakePCIID_HD4600_HD4400.kext it will trick the accelerator into thinking the device really is 0x0412 instead of native 0x0416.

Of course, you still need to inject a proper ig-platform-id (config.plist/Graphics/ig-platform-id, and config.plist/Graphics/Inject/Intel=true).

For UHD, you have additional requirements:
- patched IOKit
- DVMT-prealloc 96mb in BIOS
- framebuffer patched to match 96mb
- framebuffer patched for larger cursor bytes and framebuffer size

Keep in mind that Clover kext patching can only work on kexts that it loads... So, if you don't have the kexts in cache yet (because you previously booted with Graphics/Inject/Intel=false), you must boot without caches (Clover will load and patch the kexts), then rebuild caches. Next boot can be from cache since Clover will be able to patch the kexts that are now in cache.

It is best to use an external monitor during this process for analysis of ioreg/etc and to make edits when you forgot one or more of the requirements.

Just updated to 10.10.5 with same IOKit patch, lid wake is ok!

Now the only issue for me is the injected headphone will lose sound after next boot. This won't be fixed until rebuilding caches and eject headphone. The log of CodecCommander v2.4 is listed below:

8/21/15 1:36:14.000 PM kernel[0]: CodecCommander: Version 2.4.0 starting.
8/21/15 1:36:14.000 PM kernel[0]: CodecCommander: Evaluating device "IOService:/AppleACPIPlatformExpert/PCI0@0/AppleACPIPCI/HDEF@1B" [8086:8c20].
8/21/15 1:36:14.000 PM kernel[0]: CodecCommander: ....CodecVendor Id: 0x10ec0668
8/21/15 1:36:14.000 PM kernel[0]: CodecCommander: ....Codec Address: 0
8/21/15 1:36:14.000 PM kernel[0]: CodecCommander: ....Subsystem Id: 0x1028060d
8/21/15 1:36:14.000 PM kernel[0]: CodecCommander: ....PCI Sub Id: 0x1028060d
8/21/15 1:36:14.000 PM kernel[0]: CodecCommander: Node ID 0x14 supports EAPD, will update state after sleep.
8/21/15 1:36:14.000 PM kernel[0]: CodecCommander: Node ID 0x15 supports EAPD, will update state after sleep.
8/21/15 2:37:17.000 PM kernel[0]: CodecCommander: Version 2.4.0 starting.
8/21/15 2:37:17.000 PM kernel[0]: CodecCommander: Evaluating device "IOService:/AppleACPIPlatformExpert/PCI0@0/AppleACPIPCI/HDEF@1B" [8086:8c20].
8/21/15 2:37:17.000 PM kernel[0]: CodecCommander: ....CodecVendor Id: 0x10ec0668
8/21/15 2:37:17.000 PM kernel[0]: CodecCommander: ....Codec Address: 0
8/21/15 2:37:17.000 PM kernel[0]: CodecCommander: ....Subsystem Id: 0x1028060d
8/21/15 2:37:17.000 PM kernel[0]: CodecCommander: ....PCI Sub Id: 0x1028060d
8/21/15 2:37:17.000 PM kernel[0]: CodecCommander: Node ID 0x14 supports EAPD, will update state after sleep.
8/21/15 2:37:17.000 PM kernel[0]: CodecCommander: Node ID 0x15 supports EAPD, will update state after sleep.

Download patchmatic: https://bitbucket.org/RehabMan/os-x-maciasl-patchmatic/downloads/RehabMan-patchmatic-2015-0107.zip
Extract the 'patchmatic' binary from the ZIP. Copy it to /usr/bin, such that you have the binary at /usr/bin/patchmatic.

In terminal,
Code:
if [ -d ~/Downloads/RehabMan ]; then rm -R ~/Downloads/RehabMan; fi
mkdir ~/Downloads/RehabMan
cd ~/Downloads/RehabMan
patchmatic -extract

Note: It is easier if you use copy/paste instead of typing the commands manually.

Post contents of Downloads/RehabMan directory (as ZIP).

Also, post ioreg: http://www.tonymacx86.com/audio/58368-guide-how-make-copy-ioreg.html. Please, use the IORegistryExplorer v2.1 attached to the post! DO NOT reply with an ioreg from any other version of IORegistryExplorer.app.

And output from:
Code:
kextstat|grep -y acpiplat
kextstat|grep -y appleintelcpu
kextstat|grep -y applelpc

Also, post EFI/Clover folder.

View attachment CLOVER.zip
View attachment ioreg.zip
View attachment RehabMan.zip

And output from kextstat

View attachment kextstat.zip
 

Hi,


First of all, many thanks to you the-Darkvoid, Rehabman and I guess many other contributors whose input allowed me to successfully install 10.10.5 on a Dell XPS 15, the version which comes with 3840*2160 screen resolution.

Since the install was not so straightforward, mainly because of the higher screen resolution (the initial post here is for the 3800*something screen resolution, with the 3840 version you end up with a black screen after install and so there are a few more steps to go) I thought I would share my « experience ». This is essentially based on these posts here and here from Bozster and all credits go to him, thank you! :); as well as this post from Rehabman.

Among the attachments to my own post you will find the complete hardware config for my machine (there are 43 pages in there, so it is rather complete)


BIOS settings


OK, so first follow the procedure described in the main post here by the-Darkvoid but once you get to the part where you configure the bios, do the following:

System Agent (SA) Configuration

  • Graphics Configuration
    • DVMT Pre-Allocated: 128MB

We do this because we will later use 128/48/48 configuration for the frame buffer, this is from Bozster posts. There might be other configurations working and some might be better suited, I have no idea, I just know it works perfectly well like this. You are welcome to try other settings though.


Installing OS X Yosemite


Then carry on with the « Installing OS X Yosemite » part, but note:

- the link to the config.plist is not working, you want to get the full set of config.plist from Rehabman’s repo here: https://github.com/RehabMan/OS-X-Clover-Laptop-Config. Click the « Download ZIP » button.
The config.plist you want to use is « config_HD4600_4400_4200.plist »

- during osX install, as silly as it may look, do not forget to select the proper keyboard, which should be « your language »-PC, it does not appear by default. The mac option key will then be the windows key.

- IMPORTANT: after you complete OS X installation, upon next boot from the USB key, booting your HDD installed OS X, DO NOT log in. I could never reach the desktop, I ended up with a spinning wheel each time.
So the first time you actually boot the HDD partition from the USB key, once you get to the login screen simply hit restart and again boot from the USB and boot your HDD partition. Then you should be able to login and see the desktop.
No idea why it does that, even booting without caches did not do the trick.


Once you are on the desktop, use a microscope, or better launch settings/Screens (mine is in french, I do not know the exact names in english) and while holding down the « option » key press the « scaled » button and select 1920x1080.

If you forgot to select the proper keyboard upon install, it is also time you change this.

Do not close the screen configuration pane, and put it at the top left edge of your screen, you will be glad to have done so later on…


Post-installation


Now, before you proceed with the-Darkvoid’s instructions under « Post-installation », note the following:

- upon using the F4 key do dump the Bios ACPI tables, hit both F4 and then « Fn » + F4 as I am not sure how the keyboard is actually setup at this stage. Will save you a reboot…

- I ran into a strange issue with the git clone https://github.com/the-darkvoid/XPS9530-OSX.git command. The contents of some important folders would not get cloned, they were just (repeatedly) empty. These are XPS9530-OSX/externals/Laptop-DSDT-Patch and XPS9530-OSX/externals/ssdtPRgen (this one took me a while to figure out…)
If this happens to you, there might be some arguments you can use together with the « git clone » command but it was quicker to just grab the needed files from https://github.com/RehabMan/Laptop-DSDT-Patch and https://github.com/Piker-Alpha/ssdtPRGen.sh, again using the « Download ZIP » button.
Make sure you unzip all files at the root of their respective directories, not within a nested folder.

- you will need a couple more tools available, one to rebuild caches (I used DPCIManager), one to edit plists (Pref Setter) and finally you will need SwitchResX to deal with screen resolution issues.

- after having completed the-Darkvoid’s setup, do not reboot, we still need to modify the config.plist which resides at /Volumes/EFI/EFI/CLOVER/config.plist (the one on your hdd, be careful not to edit the one on the USB stick).


Modifying the config.plist should come last, before reboot and is done through Pref Setter. Changes here are based on Bozster and Rehabman posts which I mentioned earlier:

- find Root/Graphics/ig-platform-id and replace «0x0a260006 » with « 0xa2e0008 »

- find Root/KernelAndKextPatches/KextsToPatch/Item 2
replace « Find <0600260a 01030303 00000002 00003001 00006000> » with « Find <0800 2e0a 0103 0303 0000 0004 0000 2002 0000 5001>
replace « Replace <0600260a 01030303 00000006 00002002 00002002> » with « Replace <0800 2e0a 0103 0303 0000 0008 0000 0003 0000 0003> »

if you wish to keep track of what you just did, replace «Enable 96MB BIOS, 34MB Framebuffer, 34MB Cursor for Azul framebuffer 0x0a260006 » with « Enable 128MB BIOS, 48MB Framebuffer, 48MB Cursor for Azul framebuffer 0xa2e0008 », these are only comments.


First boot


Next reboot without the USB key but boot normally, i.e. do not select any specific boot options, including booting without caches.

Here again do not login at first reboot (you never know :) ), hit restart and reboot as above, with no specific boot options.


Now, login and after a quick glimpse on the desktop, behold your totally black screen. The Desktop is there actually (lost in the dark void… ok sorry :rolleyes:) , but the resolution is setup at the maximum 1920x1080 HiDPI @60Hz which Mac OS cannot use.

This is where having left the screen pref pane open comes in handy. If you hit « ctrl » + up (arrow) you will be able to see spaces, and your cursor; if you hit « cmd »+tab (or alt + tab as they appear on your pc keyboard) and then let go the cmd while holding the tab button down, you will be allowed a short peep into your desktop.

Use a combination of both the above to « option » clic on the « scaled » or « scaled resolutions button » within the screens pref pane and select 1680x945.

Now you should see the desktop. (There might be a way to force this resolution prior to reboot, but way above my skills).


You will notice some things are not working, including some functions buttons, sound, etc… This will be resolved later on by rebuilding caches.


Before we do that (although the actual order does not matter so much, but since a reboot is needed anyway…) we need to deal with screen resolution. The problem is addressed simply, Bozster posts again: although mac os will not work at 1920x1080 HiDPI @60Hz it will do so with a « tailored » made resolution of 1920x1080 HiDPI @57Hz, so what we need to do is simply create this custom resolution using SwitchResX.

Note that you could also use Rehabman’s post about setting up custom HIDPI resolutions but you will still need SwitchResX to do a little clean up of the built-in resolutions so let’s just use it to create the custom resolution as well.


So launch the switchresX installer which will pop up Settings and then its own window.
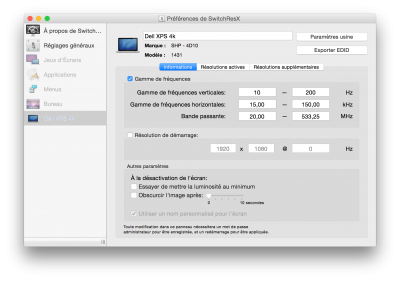
I attach captures of the proper settings, apologies but my system is in french and so are the screenshots but it is straight forward.

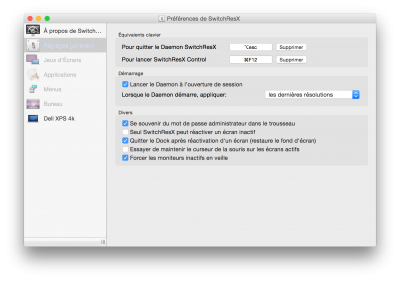
General settings: daemon should launch at startup and SRX should remember the admin password.

unknown screen settings/Informations: as per switchresx 2.png. Note the odd behavior of the left hand frequencies which require two attempts to register the change. Save using alt-S (=cmd - S). This will also allow you to edit the « unknown screen » name. You cannot do it before it would seem.

unknown screen settings/Additional resolutions (or something like that): switchresx 3 and 4.png. Use the + button at bottom to create your custom resolutions. Once you are done, apply with alt-S, new resolutions will only show up after reboot.


Let’s use the opportunity to rebuild caches: upon restart, when the Clover boot screen shows up, hit « space » and select « Boot without caches ».

Once you are logged in again, leave SwitchResX aside for the moment and launch DPCIManager. Hit « rebuild permissions » and « rebuild caches ».

Reboot normally.


Now sound, keys, etc… should all work as expected. Touchscreen as well.

EDIT: there is still an issue with the headset, they will cease working upon reboot (not if you turn off the computer and start again. Please see above posts from SYSCTL).


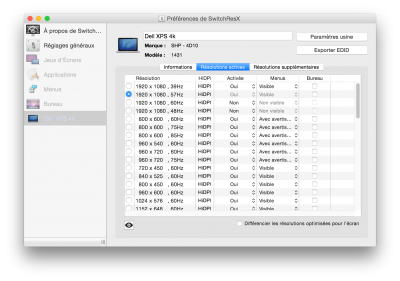
Go to Settings/SwitchResX and select « Active resolutions » from your screen config (the former unknown screen).

Select 1920x1080 HiDPI @57Hz et voilà! (hopefully). Do not forget to save: alt-S . Check switchresx 5.png.

You should also disable the « deadly » resolutions from there (1920x1080 HiDPI @60Hz, 48Hz, 3840x2160 @60hz and 48hz) to avoid mistakenly selecting any of them. This will require that the SRX dameon is launched upon startup to remain in effect though (general settings).


Now you should be good.


I have not tested iMessage so far, do not know if it is supposed to work OOB.


Since my config is slightly different, if you the-Darkvoid want me to test anything, please do ask. Although to me it is working fine. I still need to run some kind of benchmark however.


Again, many thanks to those who made this installation possible!


switchresx 1.pngswitchresx 2.pngswitchresx 3.pngswitchresx 4.pngswitchresx 5.pngView attachment HWiNFO64 Report.pdf
 
First of all. Thanks to your document.

I used also xps 9530 4k model.

I almost succeed because of your document.

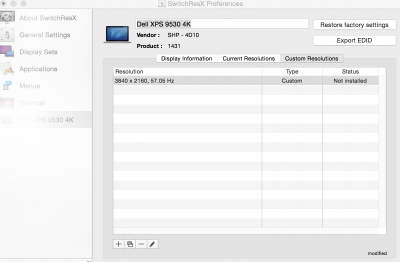
but I don't know how to install custom resolution in switchresx.

I reached "not installed" status.

Please tell me to install custom resolution.

I attached my custom resolution screen.

???? 2015-09-03 ?? 11.30.48.png
 
First of all. Thanks to your document.

I used also xps 9530 4k model.

I almost succeed because of your document.

but I don't know how to install custom resolution in switchresx.

I reached "not installed" status.

Please tell me to install custom resolution.

I attached my custom resolution screen.

View attachment 149639

Reboot?
 
Congratulations!

Do you test your lid wake after sleep (using 0x0a2e0008)? (0x0a260006 will be better)

And do your headphone work properly after reboot?


Hi, thank you! Such a relief to know I am not stuck with Win... :banghead:

Lid wake after sleep: when I open the lid the screen comes back to life. But maybe you mean to ask about hibernation? I am not sure I can tell the difference, when I know I am not going to need the computer for a while I just switch it off. I will leave it on and lid closed for a while and let you know.

Headphones: you got me! I remember now I had seen this mentioned when scrolling through the 80 pages + of the topic but since at that time I was far from success, this specific issue did not register. And so, no, it does not work upon reboot.

EDIT: I saw your related posts because they are just above mine :crazy: . I would assume you are still stuck with this? I am afraid I absolutely cannot help you there. Personally, given the speed at which the laptop boots, I am OK with just switching it off and start again. I will try to have a look on other forums though, if I ever come across a solution, I will share it here.
 
Status
Not open for further replies.
Back
Top