
- Joined
- Aug 28, 2018
- Messages
- 41
- Motherboard
- Razer Blade 14 2015 4K
- CPU
- i7-4720HQ
- Graphics
- HD 4600 + GTX 970M
- Mac
What is working?
Wifi
Bluetooth
Audio
Trackpad
USB-C (hot-plug works but give it 2 seconds to plug back in after unplug and it breaks sleep if you keep it plugged in while entering sleep)
Sleep (This took me weeks to figure out and test, as sleep is a menace on Catalina with Kernel panics)
iCloud, iMessage.
Power Management
What isn’t working?
SD card (disable it in bios, as it consumes 0.5Watts. Who uses it anyway?)
Facetime Cam (I don’t know why, and I don’t use it either, but you can figure it out on your own)
GUIDE
Follow the guide below to create USB, after creating your usb come back to this guide
https://www.tonymacx86.com/threads/...alina-on-any-supported-intel-based-pc.285366/
After you must have created the USB bootable install, Mount EFI of the USB installer and replace the clover folder with that of mine you will download in the end of this post. Boot and install to our preferred disk!
POST INSTALL
After install, make sure what you do first is disabling hibernate with the command below:
1. Properly define your system
Go into Config.plist in your EFI clover folder and change your Symbios to MacBook Pro 13,2 (this is very important for power management to work). After you are done, rebuild cache and repair permission (I recommend Hackintool), then reboot.
2. Getting Power Management to work
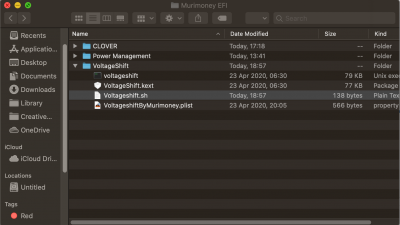
After you've rebooted, download CPUfriend. Put your CPUfriend folder and Power Management folder you got from my EFI side by side because you'll be needing them.


Open Terminal and enter these commands (pick Mac-66E35819EE2D0D05.plist that matches your cpu from the screeshot above and drag into terminal) :
Go to tools folder in CPUfriend folder and copy your Cpudataprovider.kext created and paste in kext folder in your Clover EFI and reboot. (always remember to press F11 in clover boot loader to clear NVRAM every reboot until you are done with post installation).
3. UnderVolting
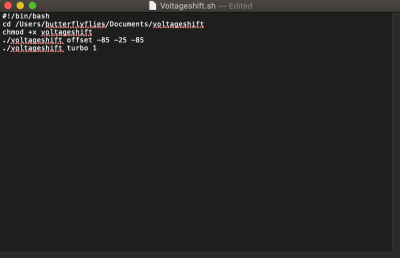
Type the code below credit to Arhep:
Open Terminal and type cd and pres spacebar once
then drag VoltageShift folder in to Terminal
Then type (or copy/paste as you only needed first time)
Next check you voltage info (it should display -0 for all)
Then (replace XXX with real numbers)
Replace X´s with your settings
I´m using -85 -40 -85 because I use i5 6200U and it´s stable but you have to test whats optimal for your cpu
If you go too low, the only ”risk” is that system freezes and you just have to force shutdown and when booted again all values are reset to -0
And you can just start over
No risk of damage to hardware.
But we can't make our Voltageshift settings stick as Catalina has broken its ability to apply settings automatically.
To fix the above problem, first off, you have to disable password prompt when you load a script or code that requires system in terminal. If not, Voltageshift will not work automatictically with my method. So to achieve this, we are editing our sudoer file.
Open Terminal:
Type in and enter
In terminal, hold "Shift + G" to get to bottom, then press "a" so you can edit code, the navigate with your arrow keys to the values in the screenshot below and add "NOPASSWD:" as seen in the screenshot then press escape to exit edit mode then hold "Shift + ;" and : will be created then type "wq" and press enter to exit. Make sure it doesn't return with error. if it does, you've done it wrong!!! Be careful not to corrupt your sudden file!!!
Watch out for the highlighted texts in the terminal screenshot to understand perfectly.
1.

2.

Now that we've prepared the pre-exquisite for Voltageshift to work on our system since VoltageShift for Catalina is broken as values do not stick after sleep or reboot, but I made a workaround, thanks to Apple's Login feature that allows you to start an app or script when you start the computer. To set up this feature, go to users settings in system preference and click on login items then choose the "Voltageshift.sh" script in my the efi folder you downloaded below.

But apple's Login feature is still not enough as Voltageshift values reset after wake from sleep. So you have to download "POWER MANAGEMENT app," it helps to apply your values after wake from sleep.
Configure the app to to apply script when computer wakes from sleep. Look at screenshot below.


After you are done with this, that's it. Credit goes to Maz-1 at Github, man has the best clover efi for our device. But this is updated with new kexts, and I added "SSDT EC.aml" I found on the internet to enable us boot Catalina 10.15.4 on our device. After you are done with power management, average power consumption should be btw 0.60w-1.2w and 0.5mv-0.9mv while temp is usually Cool at 39 to 43 at idle or light task while at 48-60degrees on heavy load (My place has an ambient temperature of 32-33degrees. My battery is old now, and can only hold 75% of its charge, and I still get 6hrs+ on regular use of word, Lightroom and photoshop. You should be able to get 10hrs easily on full capacity.

Wifi
Bluetooth
Audio
Trackpad
USB-C (hot-plug works but give it 2 seconds to plug back in after unplug and it breaks sleep if you keep it plugged in while entering sleep)
Sleep (This took me weeks to figure out and test, as sleep is a menace on Catalina with Kernel panics)
iCloud, iMessage.
Power Management
What isn’t working?
SD card (disable it in bios, as it consumes 0.5Watts. Who uses it anyway?)
Facetime Cam (I don’t know why, and I don’t use it either, but you can figure it out on your own)
GUIDE
Follow the guide below to create USB, after creating your usb come back to this guide
https://www.tonymacx86.com/threads/...alina-on-any-supported-intel-based-pc.285366/
After you must have created the USB bootable install, Mount EFI of the USB installer and replace the clover folder with that of mine you will download in the end of this post. Boot and install to our preferred disk!
POST INSTALL
After install, make sure what you do first is disabling hibernate with the command below:
Code:
sudo pmset -a hibernatemode 0
sudo rm /var/vm/sleepimage
sudo mkdir /var/vm/sleepimage
sudo pmset -a standby 0
sudo pmset -a autopoweroff 0
1. Properly define your system
Go into Config.plist in your EFI clover folder and change your Symbios to MacBook Pro 13,2 (this is very important for power management to work). After you are done, rebuild cache and repair permission (I recommend Hackintool), then reboot.
2. Getting Power Management to work
After you've rebooted, download CPUfriend. Put your CPUfriend folder and Power Management folder you got from my EFI side by side because you'll be needing them.
Open Terminal and enter these commands (pick Mac-66E35819EE2D0D05.plist that matches your cpu from the screeshot above and drag into terminal) :
Code:
cd /Users/your username/Desktop/CPUFriend/Tools

./ResourceConverter.sh --kext Mac-66E35819EE2D0D05.plist
Go to tools folder in CPUfriend folder and copy your Cpudataprovider.kext created and paste in kext folder in your Clover EFI and reboot. (always remember to press F11 in clover boot loader to clear NVRAM every reboot until you are done with post installation).
3. UnderVolting
Type the code below credit to Arhep:
Open Terminal and type cd and pres spacebar once
then drag VoltageShift folder in to Terminal
Then type (or copy/paste as you only needed first time)
Code:
sudo chown -R root:wheel VoltageShift.kextNext check you voltage info (it should display -0 for all)
Code:
./voltageshift infoThen (replace XXX with real numbers)
Code:
./voltageshift offset -XXX -XX -XXXReplace X´s with your settings
I´m using -85 -40 -85 because I use i5 6200U and it´s stable but you have to test whats optimal for your cpu
If you go too low, the only ”risk” is that system freezes and you just have to force shutdown and when booted again all values are reset to -0
And you can just start over
No risk of damage to hardware.
But we can't make our Voltageshift settings stick as Catalina has broken its ability to apply settings automatically.
To fix the above problem, first off, you have to disable password prompt when you load a script or code that requires system in terminal. If not, Voltageshift will not work automatictically with my method. So to achieve this, we are editing our sudoer file.
Open Terminal:
Type in and enter
Code:
sudo visudoIn terminal, hold "Shift + G" to get to bottom, then press "a" so you can edit code, the navigate with your arrow keys to the values in the screenshot below and add "NOPASSWD:" as seen in the screenshot then press escape to exit edit mode then hold "Shift + ;" and : will be created then type "wq" and press enter to exit. Make sure it doesn't return with error. if it does, you've done it wrong!!! Be careful not to corrupt your sudden file!!!
Watch out for the highlighted texts in the terminal screenshot to understand perfectly.
1.
2.
Now that we've prepared the pre-exquisite for Voltageshift to work on our system since VoltageShift for Catalina is broken as values do not stick after sleep or reboot, but I made a workaround, thanks to Apple's Login feature that allows you to start an app or script when you start the computer. To set up this feature, go to users settings in system preference and click on login items then choose the "Voltageshift.sh" script in my the efi folder you downloaded below.
But apple's Login feature is still not enough as Voltageshift values reset after wake from sleep. So you have to download "POWER MANAGEMENT app," it helps to apply your values after wake from sleep.
Configure the app to to apply script when computer wakes from sleep. Look at screenshot below.
After you are done with this, that's it. Credit goes to Maz-1 at Github, man has the best clover efi for our device. But this is updated with new kexts, and I added "SSDT EC.aml" I found on the internet to enable us boot Catalina 10.15.4 on our device. After you are done with power management, average power consumption should be btw 0.60w-1.2w and 0.5mv-0.9mv while temp is usually Cool at 39 to 43 at idle or light task while at 48-60degrees on heavy load (My place has an ambient temperature of 32-33degrees. My battery is old now, and can only hold 75% of its charge, and I still get 6hrs+ on regular use of word, Lightroom and photoshop. You should be able to get 10hrs easily on full capacity.
Attachments
Last edited: