
- Joined
- May 27, 2010
- Messages
- 2,364
- Motherboard
- Dell Optiplex 9030 All in One
- CPU
- i5-4690K
- Graphics
- HD 4600
- Mac
- Classic Mac
- Mobile Phone
Overview
The Optiplex 9030 is a 23" All in One system based on Haswell processors.
It comes in two main different types: Integrated graphics type and a variation with AMD R7 A265.
This guide is just for the integrated graphics HD4600 and HD4400 version.
I cannot recommend this enough as a great, stylish and inexpensive iMac substitute.
****EVERYTHING WORKS on MacOS********
Main features
Processors: Haswell ( 4th Generation Intel ) - i3 to i7 socketed Desktop CPUs
Audio: ALC668 - built in stereo speakers and amplifier; headset side connection; Audio line out on the rear.
USB: 2 x USB 3.0 side ports; 4 x USB 3.0 rear, 2 x USB 2.0 rear.
Display: 23" 1920 x 1080 full HD Matt screen.
Other ports: DP out, HDMI out, HDMI IN.
SD card reader.
Options:
Touchscreen,
AMD graphics.
Pricing/Availability: All machines are now used, so you can pick up from eBay.
First things first
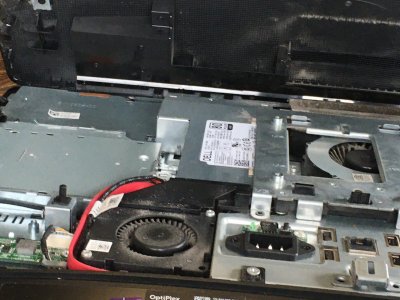
These machines being a few years old I highly recommend that you open them up and clean them on the inside. There will be dust, there will be dirt.
Take the back off of the machine by:
1. Unmounting the main unit from stand.
2. Place unit face down on a soft surface such as a towel ( to protect screen)
3. Slide the two tabs at the bottom of the main unit outwards to expose the red dots.
4. Locate the bottom edge of the removable back panel ( which is the edge just below all of the IO ports and power inlet ) and using finger force lever that edge away - upwards. You’ll hear a loud clicking noise as plastic tabs release. Then continue to tilt the now released back panel upwards and there will be more clicking as the panel releases itself.
With the plastic back released you can then see a a metal shield cover on the right. This can be removed easily enough without tools by depressing the little metal finger latch and sliding the shield to the right. Now you can see everything!
Once you've cleaned things up, think about the upgrades you might want.
Recommended upgrades.
1.Swap out the network card for a compatible one as the Intel one is not MacOS compatible. I chose to mount an adapter and then use an Apple Broadcom card for Native wifi/BT - specifically look for Broadcom BCM94630CS2 and corresponding WIFI wireless card module to NGFF M.2 .
2. Increase RAM if you want.
3. Replace processor with a more powerful (Haswell Desktop generation) one if you want.
4. Replace hard drive if you want with a SSD.
5. Mount an M.2 drive in there if you wish. NOTE: Must be 42mm PCI-e type NOT SATA type.
6. Replace CMOS battery.
Getting Ready for Install
Upgrade BIOS to most recent version ( A22 currently).
1.If windows is currently installed then you can do this directly from Windows after downloading the self executing Bios file from Dell Support.
2. If Windows is not currently installed then make a DOS bootable USB Drive, plug it in with the BIOS updating files on it from the dell website. Reboot pressing F12. Select BIOS Flash Update and follow the instructions.
Following successful update to A22 reboot and press F2. Inside the setup you must then go to: System Configuration, SATA Operation and in that tab select AHCI. Everything thing else is okay on defaults.
Preparing your USB Installer
Step 1:
Download most recent Clover Bootloader
Step 2:
Format USB Drive as HFS+J with GPT partition table - the instructions below assume you name it: Installer
Step 3:
Download macOS Catalina from the Mac App Store, after the download process has finished, now create the USB Installer by opening terminal and writing the following command:
Code:
sudo "/Applications/Install macOS Catalina.app/Contents/Resources/createinstallmedia" --volume /Volumes/Installer --nointeraction
Press "Enter" and it will ask for your User password, after you entered password, wait for the process to end, it might take around 10-30 minutes.
Step 4:
Download all the needed kexts for "Pre" and "Post" installation.
Kexts I used are:
AppleALC.kext
FakeSMC.kext
FakeSMC_ACPISensors.kext
FakeSMC_CPUSensors.kext
FakeSMC_LPCSensors.kext
Lilu.kext
WhateverGreen.kext
FakePCIID_XHCIM.kext
FakePCIID.kext
IntelMausi.kext
If you are not using an Apple native wifi card you’ll probably also want:
AirportBrcmFixup.kext
BT4LEContinuityFixup.kext
BrcmFirmwareRepo.kext
BrcmPatchRam2.kext
You do not need ( or want!! ) USBInjectAll.kext as it does not play nice with Catalina at the time of writing and, personally, I found all ports to be recognised correctly natively and at the right speeds.
Step 5:
Install your Clover Bootloader onto the USB Drive [ making sure to click on "Change Install Location..." to select it ] .
After you selected your USB Drive, click "Continue", now after this step, click on "Customize" and select the appropriate configuration for our hardware
- Clover for UEFI booting only
- Install Clover in the ESP
Make sure you don't touch the UEFI Drivers as they are already pre-configured .
Now click Install, it will open a prompt for your Username Password, write it and press Enter, the installation will start.
After bootloader installation ends, your EFI partition of the USB Drive will be mounted.
Open the EFI partition of your USB Drive and go to:
EFi/Clover/
Replace the config.plist with the config.plist attached
Into EFI/Clover/Drivers64UEFI make sure to add HFSPlus.efi (click on it to download it) - to give in total the following drivers in UEFI folder: AudioDxe.efi, DataHubDxe.efi, FSInject.efi, SMCHelper.efi, HFSplus.efi - you do not need any more than these.
Into EFI/Clover/kexts/Others make sure to add kexts listed above.
At the moment there is no need to add any ACPI patches.
I like at this stage to add a few extra tools into my installer USB so that they are ready for use once we get going.
Favourites are: Clover configurator, PlistEdit pro, MaciASL from Rehabman, Hackintool. I also like BBEdit as it can be useful for comparing .dsl files ( more of that later!). All these are free to download and use. Also add the Clover installation package to avoid needing to connect to the internet after your install. Put these on your install stick by dragging them to the Install OSX partition of the USB ( don't put them into the EFI part ).
Let’s go!
Eject your USB stick from your normal Mac/Hack and plug it into one of the ports of your Optiplex AIO.
Hold down F12 as you boot the Optiplex and you'll enter the boot menu. Select your USB drive.
Now it's a simple matter of following a normal install: Utilities/Disk utility to format your internal drive, then install to your hard drive. I'd suggest you install cleanly to an internally mounted SATA drive as you probably don't want to get into problems with M.2 drives just yet.
As usual there will be a few shutdowns and restarts until you finally get into the desktop at the very end of the install.
Don't sign in with Apple ID etc right now as you will still want to do some tweaks before you do that.
Post Install
Run Apps from anywhere is not enabled by default so open terminal and enter the following command:
sudo spctl --master-disableDisable Hibernation
sudo pmset -a hibernatemode 0
sudo rm /var/vm/sleepimage
sudo mkdir /var/vm/sleepimage
and disable the other hibernation related options:
sudo pmset -a standby 0
sudo pmset -a autopoweroff 0
Installing Kexts to Library/Extensions
Make a folder on your desktop and put all your needed kexts [ i.e. AppleALC.kext, FakeSMC.kext, FakeSMC_ACPISensors.kext, FakeSMC_CPUSensors.kext, FakeSMC_LPCSensors.kext, Lilu.kext, WhateverGreen.kext, FakePCIID_XHCIM.kext, FakePCIID.kext, IntelMausi.kext + any others you might need for wifi/BT ] into it.
Catalina Gatekeeper needs to be disabled to install kexts to your L/E and I find the best way is to use Hackintool.
At the bottom of the "Tools" tab in Hackintool you will see two "kext" symbols next to each other. Click the left one and it will prompt you to navigate to the location of the kexts you want to install:
Select all the kexts you want it to install and it will then disable the Gatekeeper and do the kext installation for you.
Modifying your config.plist
The config.plist attached does not have any valid serial number etc and you should generate the missing information. Clover Configurator is good for that, so I suggest opening your config.plist using Clover Configurator and navigating to the SMBIOS section which will look like this:
As you can see I pre-selected iMac14,2 as the model ( which works fine). Select the little Up/Down arrow ( bottom right ) to elect a new ,model type or to confirm the iMac14,2 selection - you will at that point find that all fields in SMBIOS magically fill in.
After that though I suggest clicking a few times on the two "Generate New" tabs for Serial Number and SmUUID to randomise things a bit more. Then "Save" the modified plist on your desktop as "Config.plist".
You can alternatively do this personalisation by generating appropriate system values from within Hackintool ( which is a thoroughly essential app in my opinion and manually copying them into your config.plist using PlistEdit Pro. In the past people have found that sometimes Clover Configurator can corrupt plist files - although in my experience this is fairly rare.
Patching your DSDT
If you want your SD card to work correctly then there is a patch we will need to make with Maciasl.
Clicking on Maciasl will automatically extract and open your System DSDT.
Before we can successfully apply our SD card patch we first need to correct some errors in the DSDT, so we will patch those first.
Click anywhere in the main window and then go up and click "Patch" - a window like this will open:
There are three fixes needed to get the DSDT to compile without errors.
You can select these from the left hand panel by looking for: " [syn] Fix *pnp/pnp lower case Error ", "[syn] Fix PARSEOP_ZERO Error" and "[syn] Fix ADGB Error".
Open and then Apply these fixes in turn.
Now we can apply our SD card reader patch. Open the tab below, select all text, copy and then paste it into an empty patching window. Then click "Apply".
# Inject Card reader info
Into device label PXSX parent_label RP07 remove_entry;
into device label RP07 insert
begin
Device (PXSX)\n
{\n
Name (_ADR, Zero)\n
Method (_PRW, 0, NotSerialized)\n
{\n
Return (GPRW (0x09, 0x04))\n
}\n
Method (_DSM, 4, NotSerialized) \n
{\n
If (LEqual (Arg2, Zero))\n
{\n
Return (Buffer (One)\n
{\n
0x03\n
})\n
}\n
Return (Package (0x08)\n
{\n
"AAPL,slot-name", \n
Buffer (0x09)\n
{\n
"Built-in"\n
}, \n
"device_type", \n
Buffer (0x11)\n
{\n
"Media Controller"\n
}, \n
"model", \n
Buffer (0x18)\n
{\n
"02 Micro SD Card Reader"\n
},\n
"compatible", \n
Buffer (0x0D)\n
{\n
"pci14e4,16bc"\n
}\n
})\n
}\n
Method (_RMV, 0, NotSerialized)\n
{\n
Return (HPCE)\n
}\n
}\n
end;
You can then click on Apply and after that Compile the DSDT to make sure it has compiled without "Errors" - don't worry about warnings or remarks, it is just errors we are concerned with. Save it on your desktop as DSDT with a file type of ACPI Machine Language Binary ( i.e. DSDT.aml) .
Finishing up
Now we have the modified config.plist and a patched DSDT.aml file on the desktop we can proceed to using the clover installer to install clover to an EFI partition on the hard drive.
Open the Clover package installer.
Click - continue, continue, customise.
Configure like this:
and Install.
After installation open the EFI/EFI/Clover folder that appeared on your desktop and:
1. Drag in your modified config.plist to replace the default one.
2. Open the ACPI folder and put your modified DSDT.AML file into the Patched folder.
3. Open Kexts/Other and in there put FakeSMC.kext ( as a minimum ).
4. In drivers/UEFI add Hfsplus.efi
Restart and you should then hopefully have speakers and headset socket audio ( I configured the plist for layout 27 of ALC668) , microphone, web camera, wifi/BT ( with replaced card), graphics, SD card reader, USB ports all working correctly.
What does not yet work:
1. Brightness via the keyboard or system preferences does not work ( yet - believe me I have tried! ) BUT the brightness up/down buttons on the right hand side of the screen do work.
Not tested yet:
1. Line out on rear - might work on layout 27 but haven't tried it. If not then there are other known layouts of ALC668 to experiment with.
2. Touch ( I have a non touch machine).
3. AMD graphics ( my machine has just integrated graphics, but I do have another motherboard on the way to be able to try - most likely though they will need to be disabled under MacOS).
4. NGF connector - I will be getting a suitable drive and testing soon.
Glitches:
HD4400 graphics have occasional hiccups. I have seen no such hiccups with HD4600 so I'd strongly suggest you select a version with HD4600 or do a CPU upgrade if you bought a cheap i3 machine - with i5 or i7 these machines work best anyway.
Let me know how you get on and share your fixes, upgrades please.
EDIT: 27 October. After a week or so of tweaks I have solved the DP and HDMI out issues. Now I can plug in each type either at boot or later to have multiple displays. The wonderful guide here is what finally solved this for me.
The device properties below are what I arrived at through working through the guide with Hackintool.
New config.plist uploaded with changes included.
One other change - now using iMac14,1 SMBIOS
Attachments


Last edited: