pastrychef
Moderator
- Joined
- May 29, 2013
- Messages
- 19,458
- Motherboard
- Mac Studio - Mac13,1
- CPU
- M1 Max
- Graphics
- 32 Core
- Mac
- Classic Mac
- Mobile Phone
Preface
First, I want to thank RehabMan for all of his contributions to the community. Everything in this guide was built upon his guides. The community would not be where it is without his time, effort, and dedication.
Secondly, I need to state that I am an absolute rank amateur when it comes to hackintoshing laptops. It took me an embarrassingly long time of almost a year before I was able to hackintosh this laptop without any assistance from anyone other than RehabMan's guides. If anyone notices any mistakes I've made, please feel free to correct me.
Needs, Choices, ExpectationsMy laptop needs are very basic, I always return to my desktop for any heavy lifting. I lived with an ancient 2009 MacBook all the way to 2017. What finally triggered my decision to get a replacement was the 8GB RAM limitation. I was experiencing way too much memory swapping which would bog down the entire system to an utter crawl.
I wanted to keep things as simple as possible. I didn't need any exotic features such as high end GPU, Thunderbolt, Retina resolutions, etc. My hope was, that by avoiding exotic features, it would also simplify installation.
I had a very simple set of criteria.
- It had to be cheap. If I wanted to spend a lot of money, I would have just bought a new MacBook.
- Support for at least 16GB RAM!!
- Decent battery life (decent for me would be ~4 hours).
- Decent screen resolution. By this I mean better than 1366x768 or 1280x800.
- 13-14" screen. I did not want a ginormous monster laptop.
- Haswell or Braodwell because of performance, TDP, price.
- Easily replaceable WiFi/Bluetooth card
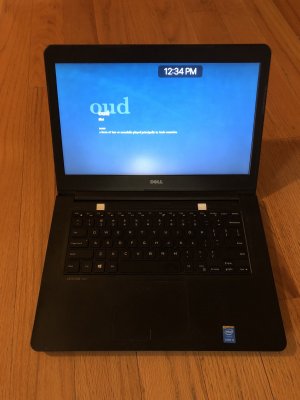
I found the Latitude 3450 used on eBay for about $200.
- It was cheap enough.
- Supported 16GB RAM.
- Battery life was weak but I knew I could switch to a higher capacity one which I did and it gives me about 4-5 hours.
- Screen resolution was 1366x768 but I was confident I could swap it for a better one if/when I successfully install macOS.
- 14" size. Overall dimensions were quite similar to the MacBook I was coming from.
- Intel i5-5200u Broadwell. Well documented and supported by the hackintosh community.
- M.2 based WiFi/Bluetooth.
My expectations were low. I was prepared for some things not working. If I managed to get basic macOS functionality, I would have been happy. At the end of the day, I was able to get everything working and am overjoyed!
Prerequisites
- This guide assumes that you have at least some experience hackintoshing. You should, at least, know what EFI partitions, EFI folders, config.plist, etc are.
- A working Mac and/or hackintosh.
- The stock Wi-Fi/Bluetooth M.2 card should be replaced with a Dell DW1560.
- You should read all the original guides I link to in each of the steps below!!!
Resource: [Guide] Booting the OS X installer on LAPTOPS with Clover | tonymacx86.com
On your working Mac or hackintosh, create your USB High Sierra installer.
1. Download the full High Sierra installer from Mac App Store.
2. Plug in your USB flash drive.
3. Launch Disk Utility and initialize the USB flash drive with the name Untitled.
4. Launch Terminal and enter:
Code:
sudo /Applications/Install\ macOS\ High\ Sierra.app/Contents/Resources/createinstallmedia --volume /Volumes/Untitled --applicationpath /Applications/Install\ macOS\ High\ Sierra.app5. When done, download and install Clover on the USB flash drive.
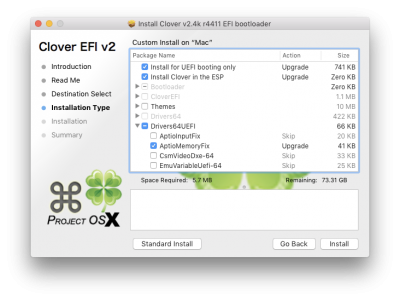
6. In the Clover installer, be sure to select the correct drive to install to(!), click Customize, and select:
7. Mount the EFI partition of your USB flash drive and install the latest versions of the following to /EFI/CLOVER/kexts/Other/.
- FakeSMC.kext (you can include all the sensors kexts too)
- FakePCIID.kext
- FakePCIID_Broadcom_WiFi.kext (part of FakePCIID)
- FakePCIID_Intel_HD_Graphics.kext (part of FakePCIID)
- FakePCIID_HDMI_Audio.kext (part of FakePCIID)
- USBInjectAll.kext
- Lilu.kext
- AppleALC
IntelGraphicsDVMTFixup.kext(No longer needed. Now integrated with latest WhateverGreen.kext)IntelGraphicsFixup.kext(No longer needed. Now integrated with latest WhateverGreen.kext)- RealtekRTL8111.kext
- VoodooPS2Controller.kext
- BrcmFirmwareData.kext
- BrcmPatchRAM2.kext
- ACPIBatteryManger.kext
8. Install the following to /EFI/CLOVER/drivers64UEFI/.
9. Delete the following from /EFI/CLOVER/drivers64UEFI/.
VBoxHfs.efi
10. Delete the following from /EFI/CLOVER/.
config.plist
11. Download RehabMan's pre-made config.plist.
12. Extract the zip file and copy config_HD5300_5500_6000.plist to /EFI/CLOVER/.
13. Rename config_HD5300_5500_6000.plist to config.plist.
14. Plug the USB flash drive in to the Latitude 3450 and install macOS.
15. After you have installed macOS, mount the EFI partitions of your USB flash drive and your main system drive.
16. Copy the entire EFI folder from the USB flash drive to the EFI partition of your main system drive.
DSDT patching
Resource: [Guide] Patching LAPTOP DSDT/SSDTs | tonymacx86.com
1. Reboot your computer.
2. At the Clover boot menu, press F4.
3. Download the DSDT_patching_tools.zip below.
4. Install iasl to /usr/bin/. Assuming that you unzipped the DSDT_patching_tools.zip in your download folder, you can use this Terminal command:
Code:
cd ~/Downloads/DSDT_patching_tools[/INDENT][/INDENT][/INDENT][/INDENT][/INDENT][/INDENT]
[INDENT][INDENT][INDENT][INDENT][INDENT][INDENT]sudo cp iasl /usr/bin
5. Install MaciASL to your Applications folder.
6. Mount the EFI partition of your main system drive.
7. Navigate to /EFI/CLOVER/ACPI/origin/ and copy the DSDT.aml to the DSDT_patching_tools folder.
8. In Terminal, enter the following:
Code:
cd ~/Downloads/DSDT_patching_tools[/INDENT][/INDENT][/INDENT][/INDENT][/INDENT][/INDENT]
[INDENT][INDENT][INDENT][INDENT][INDENT][INDENT]iasl -da -dl -fe refs.txt DSDT.aml
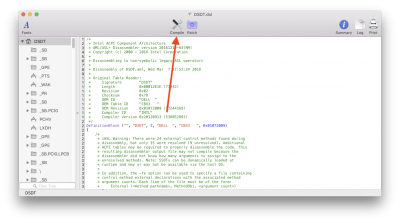
9. You should see a new file named DSDT.dsl in the DSDT_patching_tools folder. Open it with MaciASL.
10. Click the Compile button at the top of the MaciASL window.
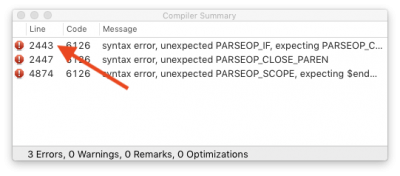
11. A window should pop up saying there are errors. Click on the first line.
12. This will bring you back to the main MaciASL window. Here, you will find the exact same error mentioned in RehabMan's Patching LAPTOP DSDT/SSDTs guide. We need to fix it as he detailed verbatim:
Change this:
Code:
                If (LEqual (PM6H, One))[/INDENT][/INDENT][/INDENT][/INDENT][/INDENT][/INDENT]
[INDENT][INDENT][INDENT][INDENT][INDENT][INDENT]                {[/INDENT][/INDENT][/INDENT][/INDENT][/INDENT][/INDENT]
[INDENT][INDENT][INDENT][INDENT][INDENT][INDENT]                    CreateBitField (BUF0, \_SB.PCI0._Y0C._RW, ECRW)  // _RW_: Read-Write Status[/INDENT][/INDENT][/INDENT][/INDENT][/INDENT][/INDENT]
[INDENT][INDENT][INDENT][INDENT][INDENT][INDENT]                    Store (Zero, ECRW (If (PM0H)[/INDENT][/INDENT][/INDENT][/INDENT][/INDENT][/INDENT]
[INDENT][INDENT][INDENT][INDENT][INDENT][INDENT]                            {[/INDENT][/INDENT][/INDENT][/INDENT][/INDENT][/INDENT]
[INDENT][INDENT][INDENT][INDENT][INDENT][INDENT]                                CreateDWordField (BUF0, \_SB.PCI0._Y0D._LEN, F0LN)  // _LEN: Length[/INDENT][/INDENT][/INDENT][/INDENT][/INDENT][/INDENT]
[INDENT][INDENT][INDENT][INDENT][INDENT][INDENT]                                Store (Zero, F0LN)[/INDENT][/INDENT][/INDENT][/INDENT][/INDENT][/INDENT]
[INDENT][INDENT][INDENT][INDENT][INDENT][INDENT]                            }))[/INDENT][/INDENT][/INDENT][/INDENT][/INDENT][/INDENT]
[INDENT][INDENT][INDENT][INDENT][INDENT][INDENT]                }
To this:
Code:
                If (LEqual (PM6H, One))[/INDENT][/INDENT][/INDENT][/INDENT][/INDENT][/INDENT]
[INDENT][INDENT][INDENT][INDENT][INDENT][INDENT]                {[/INDENT][/INDENT][/INDENT][/INDENT][/INDENT][/INDENT]
[INDENT][INDENT][INDENT][INDENT][INDENT][INDENT]                    CreateBitField (BUF0, \_SB.PCI0._Y0C._RW, ECRW)  // _RW_: Read-Write Status[/INDENT][/INDENT][/INDENT][/INDENT][/INDENT][/INDENT]
[INDENT][INDENT][INDENT][INDENT][INDENT][INDENT]                    Store (Zero, ECRW)[/INDENT][/INDENT][/INDENT][/INDENT][/INDENT][/INDENT]
[INDENT][INDENT][INDENT][INDENT][INDENT][INDENT]                }[/INDENT][/INDENT][/INDENT][/INDENT][/INDENT][/INDENT]
[INDENT][INDENT][INDENT][INDENT][INDENT][INDENT]If (PM0H)[/INDENT][/INDENT][/INDENT][/INDENT][/INDENT][/INDENT]
[INDENT][INDENT][INDENT][INDENT][INDENT][INDENT]                            {[/INDENT][/INDENT][/INDENT][/INDENT][/INDENT][/INDENT]
[INDENT][INDENT][INDENT][INDENT][INDENT][INDENT]                                CreateDWordField (BUF0, \_SB.PCI0._Y0D._LEN, F0LN)  // _LEN: Length[/INDENT][/INDENT][/INDENT][/INDENT][/INDENT][/INDENT]
[INDENT][INDENT][INDENT][INDENT][INDENT][INDENT]                                Store (Zero, F0LN)[/INDENT][/INDENT][/INDENT][/INDENT][/INDENT][/INDENT]
[INDENT][INDENT][INDENT][INDENT][INDENT][INDENT]                            }
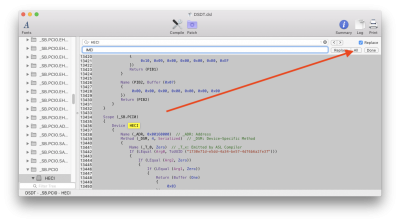
13. Press Command+F to find HECI and replace all with IMEI.
14. Click on the Patch button at the top of the MaciASL window.
15. Select the following patches and patch your DSDT.dsl. (I did them in the order listed. I don't know if doing it in a different order has any adverse affects.)
- [syn] Rename _DSM methods to XDSM
- [igpu] Brightnewss fix (Haswell/Broadwell)
- [audio] Audio Layout 3
- [bat] Dell Inspiron 5548 Broadwell
- [sys] Fix _WAK Arg0 v2
- [sys] Fix Mutex with non-zero SyncLevel
- [sys] IRQ Fix
- [sys] RTC Fix
- [sys] Haswell LPC
- [sys] SMBUS Fix
- [usb] USB3_PRW 0x6D (instant wake)
16. Close the Patches drop down window.
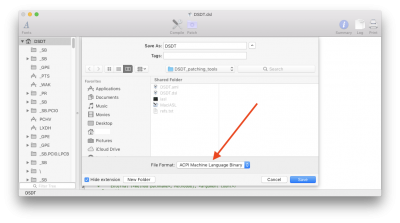
17. Go to the MaciASL menu bar and click on File, then select Save As...
18. Click on the File Format drop down menu and select ACPI Machine Language Binary.
19. Click on the Save button. When asked Cancel or Replace, click Replace.
20. Copy the DSDT.aml file from ~/Downloads/DSDT_patching_tools/ to /EFI/CLOVER/ACPI/patched/.
21. Download the config.plist attached below and install to /EFI/CLOVER/.
*Note: config.plist has lots of stuff disabled. They are leftovers from the original config_HD5300_5500_6000.plist. You can delete them if you like.
Final Tweaks
Backlight
As per the backlight guide, we need to download and install SSDT-PNL.aml, AppleBacklightInjector.kext, and add a KextsToPatch to config.plist.
To save you the trouble of having to go through git, I've attached the two required files to this post.
1. Download Backlight_Files.zip below.
2. Copy SSDT-PNL.aml to /EFI/CLOVER/ACPI/patched/.
3. Copy AppleBacklightInjector.kext to /EFI/CLOVER/kexts/Other/.
Keyboard & Trackpad
Earlier, we installed VoodooPS2Controller.kext to /EFI/CLOVER/kexts/Other/. But that was only to get preliminary keyboard controls. We need to properly install the remaining files for the keyboard and mouse to function properly.
1. Download the VoodooPS2Controller package.
2. Delete AppleACPIPS2Nub.kext and ApplePS2Controller.kext
Code:
sudo rm -rf /System/Library/Extensions/AppleACPIPS2Nub.kext[/INDENT][/INDENT][/INDENT][/INDENT][/INDENT][/INDENT]
[INDENT][INDENT][INDENT][INDENT][INDENT][INDENT]sudo rm -rf /System/Library/Extensions/ApplePS2Controller.kext
3. Install org.rehabman.voodoo.driver.Daemon.plist to /Library/LaunchDaemons/.
4. Install VoodooPS2Daemon to /usr/bin/.
*Note: The trackpad on this laptop is pretty bad. In my opinion, it is best to enable Tap to click and enable dragging.
Audio
1. Download the AppleHDA_ALC255.kext.zip below and install it to /Library/Extensions/ using KextBeast.
2. Download CodecCommander.kext and install it to /Library/Extensions/ using KextBeast.
Download AppleALC.kext (version 1.2.6 or newer) and install to /EFI/CLOVER/kexts/Other/.
Edit (Sept 30, 2018):
I don't normally use headphones but when I tested it, I found audio quality to be very poor. To fix this, install CodecCommander and SSDT-AppleALC.
iMessage
Whether you use iMessage or not, I still recommend that you follow the following guide to get clean Serial Number, UUID, etc.
Disable Hibernate
*Direct quote from above guide:
"Be aware that hibernation (suspend to disk or S4 sleep) is not supported on hackintosh.
You should disable it:
Code:
sudo pmset -a hibernatemode 0[/INDENT][/INDENT][/INDENT]
[INDENT][INDENT][INDENT]sudo rm /var/vm/sleepimage[/INDENT][/INDENT][/INDENT]
[INDENT][INDENT][INDENT]sudo mkdir /var/vm/sleepimage
Always check your hibernatemode after updates and disable it. System updates tend to re-enable it, although the trick above (making sleepimage a directory) tends to help.
And it may be a good idea to disable the other hibernation related options:"
Code:
sudo pmset -a standby 0[/INDENT][/INDENT][/INDENT]
[INDENT][INDENT][INDENT]sudo pmset -a autopoweroff 0
Install Karabiner (Optional)
Karabiner is a utility that can help you map different functions to different keys on your keyboard. It can be very useful for mapping things like volume control, Mission Control, etc. to Function Keys.
What works
Sleep/Wake (wake by pressing power button)
Ethernet
Wi-Fi
Bluetooth
Backlight control
Battery meter
Audio
Audio after sleep
HDMI
HDMI Audio
Headphone jack
Webcam
Mic
USB ports
Keyboard
Trackpad
AirDrop
AirPlay
FileVault (AsAmiShim.efi must be installed to /EFI/CLOVER/drivers64UEFI/)
What doesn't work
SD card reader
Wake-On-LAN over Wi-Fi
Trackpad Pinch To Zoom/Tap to Zoom
Untested
Handoff
iMessage
Wake-On-LAN over ethernet
Epilogue
It took me a long time to learn how to do all of this, but I think it was well worth it. The sense of accomplishment after successfully getting everything to work is immeasurable. I truly felt like a learned a great deal and that's priceless. Again, thanks to RehabMan for all his guides!!
The fact that I got a nearly perfectly functioning macOS laptop at a bargain basement price certainly increases the pleasure. What did it all end up costing?
$200 Latitude 3450 used from eBay.
$90 16GB RAM
$47 1600x900 LCD panel
$23 DW1560 Wi-Fi/Bluetooth card
$27 High capacity battery (OEM Dell 58wH 0PD19)
$18 Backlit keyboard
$120 Crucial 512GB SSD
$525
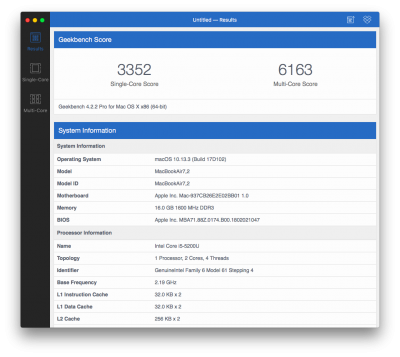
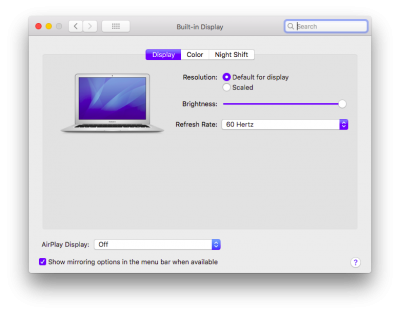
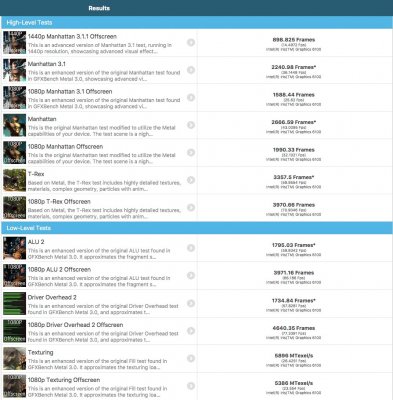
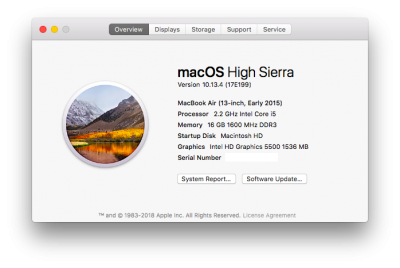
Not too bad for these specs. Performance most closely resembles a MacBookAir7,2. Major differences are (1) the MacBookAir7,2 tops out at 8GB RAM and (2) the MacBookAir7,2 uses NVMe SSDs. I'll happily take 16GB over an NVMe SSD. The fact that this laptop uses DDR3 helped overall cost too.
If you don't need the higher resolution screen, higher capacity battery, or 16GB of RAM, you can easily keep cost around $350. Many of these laptops can be found with 8GB pre-installed. A lower capacity SSD could reduce costs further. BTW, the stock battery gives about 2.5 hours of usage and the high capacity one doubles that. In my opinion, it's a heckuva bargain.
I'm not going delude you. This is a low end laptop and it shows. The quality of the materials used on this laptop is nowhere near that of Apple's, but I didn't need that level of quality. The biggest disappointment is the trackpad, but I've gotten fairly used to it and it's good enough for what I need it for. However, if anyone needs any sort of precision, use of a mouse or Magic Trackpad is highly, highly recommended. Also, in my opinion, using Tap To Click and Tap To Drag makes using this trackpad much more pleasant.
Finally, I want thank Jake Lo for helping me get this laptop functional before I learned how to do it on my own!!
Update:
Directions on how to set DVMT in BIOS can be found here.
Attachments
Last edited:

