- Joined
- Feb 10, 2013
- Messages
- 158
- Motherboard
- Asus Z170-K
- CPU
- i5-6600K
- Graphics
- Intel HD 530
- Mobile Phone
GUIDE – HOW TO EDIT THE DVMT SETTINGS FOR INSYDEH20 BIOS
This is a somewhat generic guide on how to change Bios settings for locked Bios used by Acer, HP and a few others who use InsydeH20 bios.
This guide has been used on an Acer V3-371-58C2 but should be very similar for other InsydeH20 bios. This laptop has Broadwell Intel Core i5-5200U with HD Graphics 5500 up to 2005 MB DVM.
DISCLAIMER: I take no responsibility for any bricking, system crashing, freezing, faults, damage or other issues that arise from this guide. Do this at your own risk. THIS PROCESS WILL MOST LIKELY VOID YOUR MANUFACTURER AND COMPUTER SELLERS/RETAILERS WARRANTY!!! Refer to your manufacturers’ terms and conditions on warranty as well as the store you purchased your computer from. Only proceed if you know YOUR WARRANTY IS NOW VOID and you don’t care about that. Note I cannot offer advice on how to unbrick your computer…………..
This guide is done entirely in Windows 7 or Windows 8. It may be possible to do in OSX but I have not done it that way so I won’t venture there.
A.PURPOSE
If you have a Broadwell CPU and InsydeH20 bios and want to install OSX you may in some instances need to set the DVMT to reflect between 64MB and 128MB in order to get the graphics to work with QE/CI. So I thought I would share how I got mine fixed…
B.REQUIREMENTS
1. You definitely need a second computer handy to trouble shoot if something goes wrong…..
2. A USB stick, size doesn’t matter but something at least 128MB would be good. I also suggest you don't use a USB3.0 stick.
3. Your Bios file. For mine, I used the .exe downloaded from Acer support. Ensure that you download the same version as what you have on your computer. Needless to say if these do not match you are likely to brick your computer, refer to disclaimer above.
4. EFI Shell from the attached zip file below.
5. Phoenixtool from the attached zip file below.
6. Universal IFR Extractor tool from the attached zip file below.
7. WinRAR, download this from the internet or use your favourite .zip file manager, I think windows can do this without WinRAR or WinZIP, however I used WinRAR.
8. I suggest that you create a folder where you will place all the files and downloaded folders and work from this folder only. This will keep things in one place and make it easy for you to access everything.
C.MAKE EFI BOOT USB
Extract the EFI-shell.zip you downloaded, format the USB in MBR FAT32 and copy the "BOOT" folder contained in the "EFI shell" folder to the USB i.e \BOOT\BOOTX64.efi.
It has been reported that you can also do this by copying the BOOT folder to \EFI\BOOT\BOOTX64.efi as some computers are not able to boot directly from the \BOOT\BOOTX64.efi hence the need to include this in a \EFI folder. However I have not tested it using this method.
Use a USB 2 flash disk and port, some USB 3 disks and ports may not work as expected. That’s it for the USB.
D.UNPACK THE EXE FILE
1. Right click the downloaded .zip file with your manufacturers bios files and select "Extract here". For Acer computers you will find a folder named “Windows”.
2. In the Windows folder you will find an .exe file, right click this and select “Extract here”. In my case the .exe in the Windows folder is named TJBI0115.exe
3. This will unpack the TJBI0115.exe and may give some kind of error but ignore this.
4. You will find several new files from this unpack, including one with a name similar to the TJBI0115.exe file you just unpacked. There will be other .exe files, ignore these others. For my case, the file we are after was named TJBI0115-BW.exe. Note this would probably have different names for your bios file.
5. Further unpack this freshly unpacked file as well, i.e. the one with a similar name as your initial .exe file, in my case I unpacked the TJBI0115-BW.exe file.
6. You will find several files including one that ends with the extension .fd (for Acer), in my case this file was named VA30B115.fd.
E.EXTRACT THE BIOS ROM
At this point you will have several files lying about, ensure you don’t lose sight of the files you are working with, best to create another folder and copy and paste the XXXXXX.fn file to the new folder so you won’t have too many files you are looking at.
PAY ATTENTION NOW, THIS IS THE ONLY VERY TRICKY BIT…….
1. Unzip the Phoenixtool256.zip. This will give you a folder called Phoenixtool256.
2. Open this folder, inside you will find a file called PhoenixTool.exe.
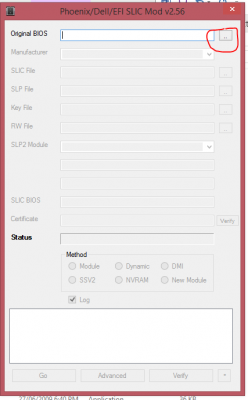
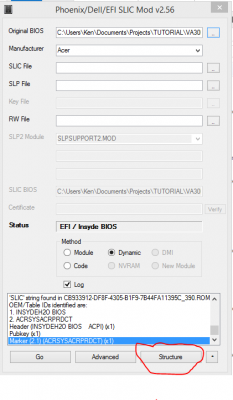
3. Double click the PhoenixTool.exe, this will open up a new window as below. In the “Original BIOS” line, click on the button to select a file
this will open…
4. Select the XXXXXX.fd file you extracted in step D above, and click “Open”
5. The tool will open and run and give a few messages and a pop-up message appears, just click “OK” and it will finish running.
6. Click on the “Structure” button as below.
F.IDENTIFY THE DXE CORE FILE
1. The next step is to identify the Bios ROM file with Bios variable that we need to change. After clicking the “Structure” button you will be presented with a window with collapsed items. Open these up and look for the line described as “DXE Core”
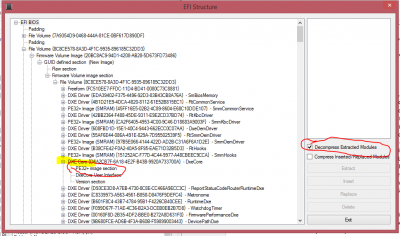
2. Collapse the DXE Core button and select the “PE32+ image section”.
3. Select the “Decompress Extracted Modules” check box and then click “Extract”
4. It will seem like nothing has happened but don’t worry, this will create a new folder called “DUMP” in the folder you had the XXXXXX.fd file in. You will be directed back to the PhoenixTool main menu window. You can close this window by clicking the close button.
G.IDENTIFY THE BIOS ROM FILE
1. In the folder where the rom XXXXXX.fd file was placed, you will find a new folder named “DUMP”. Inside this folder there will be many files all ending with .ROM extension. All except one are irrelevant to what we want to do at this stage and from this guide. Sort the files by size in your explorer window.
2. Identify the LARGEST file with the name starting with FE3542FE. For my example this was named “FE3542FE-C1D3-4EF8-657C-8048606FF670_1513.ROM” and was about 555KB big yours will be different but starts with the same FE3542FE name.
3. I suggest you copy this file and paste the copy in your working folder so you have less clutter and can keep the raw data extracted without modification safely.
H.EXTRACT THE BIOS DATA INTO HUMAN READBALE FORM
1. The .ROM you have is now ready to be extracted using the Universal-IFR-Extractor.exe tool.
2. Unzip the Universal-IFR-Extractor.zip if you have not done so already.
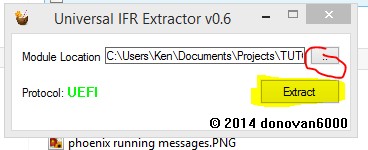
3. Drag and drop the file in step G.2 above to the “Universal IFR Extractor.exe” or alternatively double click the “Universal IFR Extrator.exe” file then select the “FE3542FEcxxxxx.ROM” file.
 .
.
4. Click on the extract button. This will open up a window that allows you to save the extracted file as a text file. Name this file as you wish. I named mine “variable extract.txt”.
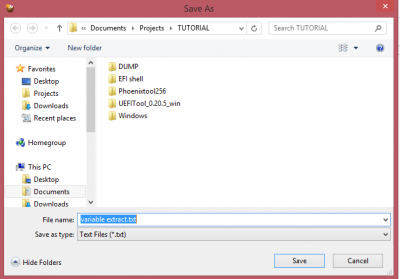
5. You can then close the Universal-IRF-Extractor window.
I.IDENTIFY THE DVMT VARIABLE SETTING AND APPLY
1. This is the nearly the end. Open up the text file you saved using your favourite text editor. In Windows I used WordPad, looks better in OSX in TextWrangler but any basic text editor will work fine. At this point I suggest you save a copy of this file onto your other computer in .txt format. I used my OSX desktop and opened the .txt file with Text Wrangler.
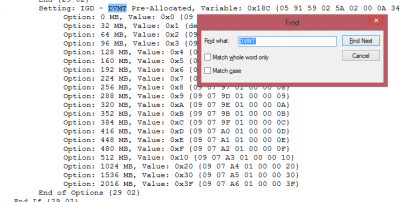
2. Use the search function in your text editor to find “DVMT”.
 .
.
3. This will give you the variables you are looking for to change the DVMT bios settings for your locked InsydeH20 bios!!!!
J.APPLY THE VARIABLE FOR YOUR BIOS
1. At this point you need to reboot your computer in legacy mode with the previously prepared USB stick, use your bios boot menu or hot key to select boot device and select the USB stick. Boot into the USB and it will give you a DOS prompt.
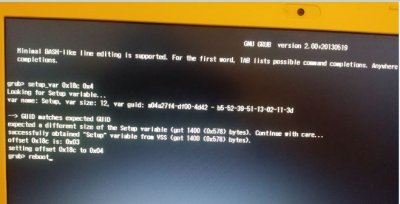
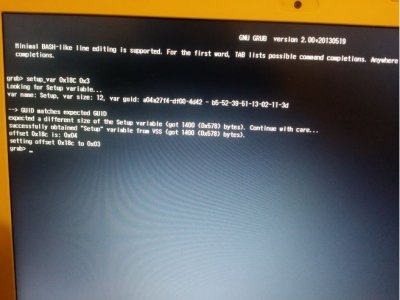
2. Refer back to the earlier post on how to enter the correct variable (hence why you should have another computer handy). From the screen shot on my set up, the DVMT pre-allocated variable for 96MB (which results in 64MB in Windows) is 0x18C 0x3, so I would type in the dos prompt
IMPORTANT NOTE!!!! THIS PROCESS IS LIKE A PASSWORD AND IS CASE SENSITIVE!!!! DO NOT ENTER INCORRECT CASE FOR THIS VARIABLE OR YOU MAY INADVERTENTLY CHANGE SOMETHING ELSE AND BRICK YOUR COMPUTER. DO NOT MESS THIS STEP UP!!! REFER TO ABOVE DISCLAIMER FOR DETAILS!!!!
Note also suggestion to try setup_var2 as mentioned here: https://www.tonymacx86.com/threads/...eh20-bios-laptops.165104/page-26#post-1350778
3. I noted that for the first time I changed this setting in the DOS prompt, I had to enter the change variable setting twice. This was because the first time I entered this, the result from the DOS prompt was the variable was now set to 0x18C 0x0 which is not what I wanted. The result should be 0x18C 0x3 for 96MB. This is important do not ignore the result that it gives, ensure it gives the desired DVMT setting as the result. If this fails, check the steps you did and the text you entered ensure its case sensitive and also refer to the disclaimer above.
K.CONCLUSION
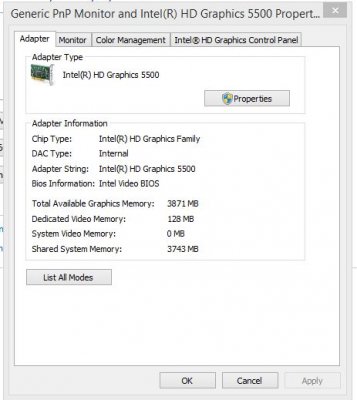
That’s it! You have now set the DVMT to what you want for Broadwell, reboot into Windows and check the DVMT set from the "Advanced settings" window under "Screen resolution". If this is correct (refer to the above HD5500 linked guide for how to calculate the DVMT that results) and you have your ig-platform-id set and CPUType (very important) in clover config.plist correctly you should get 1536MB memory under graphics (under i5-5200U Broadwell, probably different for other broadwell chips).
Ensure your config.plist file is correct and shows the valid ig-platform-id. Note that as at the time of writing this guide the only way to get OSX to correctly recognise the DVMT at 96MB or above is by booting into windows first then selecting Restart and then booting into OSX. If you do not do this, then OSX will freeze at some point. Read up on the Broadwell early work for more information, currently there is no identified solution for this odd behaviour in OSX but I think its just a matter of time before it is resolved. This is beyond the scope of this guide. Good luck and once again REFER TO THE DISCLAIMER ABOVE.
UPDATE 11 AUG 2015
The freezing issue has since been resolved in OSX 10.11 El Capitan in the public beta releases. hopefully this will carry through to the final release version. Refer to the broadwell threads for more details.
UPDATE 13 AUG 2015
Attached all necessary files and tools to make this a self sufficient guide without a need to refer to another linked guide, removed links in the guide to other guides, included links to other guides below.
Credits and thanks to Austere.J for the original guide and insight to doing this on InsydeH20 bios from his guide, refer to it here http://www.tonymacx86.com/yosemite-...phics-5500-os-x-yosemite-10-10-3-a.html.:clap:
Shout out to the creators of the EFI boot, phoenixtool, UEFI tools and universal IFR Extractor tool


 thanks for creating these wonderful tools....
This is a somewhat generic guide on how to change Bios settings for locked Bios used by Acer, HP and a few others who use InsydeH20 bios.
This guide has been used on an Acer V3-371-58C2 but should be very similar for other InsydeH20 bios. This laptop has Broadwell Intel Core i5-5200U with HD Graphics 5500 up to 2005 MB DVM.
DISCLAIMER: I take no responsibility for any bricking, system crashing, freezing, faults, damage or other issues that arise from this guide. Do this at your own risk. THIS PROCESS WILL MOST LIKELY VOID YOUR MANUFACTURER AND COMPUTER SELLERS/RETAILERS WARRANTY!!! Refer to your manufacturers’ terms and conditions on warranty as well as the store you purchased your computer from. Only proceed if you know YOUR WARRANTY IS NOW VOID and you don’t care about that. Note I cannot offer advice on how to unbrick your computer…………..
This guide is done entirely in Windows 7 or Windows 8. It may be possible to do in OSX but I have not done it that way so I won’t venture there.
A.PURPOSE
If you have a Broadwell CPU and InsydeH20 bios and want to install OSX you may in some instances need to set the DVMT to reflect between 64MB and 128MB in order to get the graphics to work with QE/CI. So I thought I would share how I got mine fixed…
B.REQUIREMENTS
1. You definitely need a second computer handy to trouble shoot if something goes wrong…..
2. A USB stick, size doesn’t matter but something at least 128MB would be good. I also suggest you don't use a USB3.0 stick.
3. Your Bios file. For mine, I used the .exe downloaded from Acer support. Ensure that you download the same version as what you have on your computer. Needless to say if these do not match you are likely to brick your computer, refer to disclaimer above.
4. EFI Shell from the attached zip file below.
5. Phoenixtool from the attached zip file below.
6. Universal IFR Extractor tool from the attached zip file below.
7. WinRAR, download this from the internet or use your favourite .zip file manager, I think windows can do this without WinRAR or WinZIP, however I used WinRAR.
8. I suggest that you create a folder where you will place all the files and downloaded folders and work from this folder only. This will keep things in one place and make it easy for you to access everything.
C.MAKE EFI BOOT USB
Extract the EFI-shell.zip you downloaded, format the USB in MBR FAT32 and copy the "BOOT" folder contained in the "EFI shell" folder to the USB i.e \BOOT\BOOTX64.efi.
It has been reported that you can also do this by copying the BOOT folder to \EFI\BOOT\BOOTX64.efi as some computers are not able to boot directly from the \BOOT\BOOTX64.efi hence the need to include this in a \EFI folder. However I have not tested it using this method.
Use a USB 2 flash disk and port, some USB 3 disks and ports may not work as expected. That’s it for the USB.
D.UNPACK THE EXE FILE
1. Right click the downloaded .zip file with your manufacturers bios files and select "Extract here". For Acer computers you will find a folder named “Windows”.
2. In the Windows folder you will find an .exe file, right click this and select “Extract here”. In my case the .exe in the Windows folder is named TJBI0115.exe
3. This will unpack the TJBI0115.exe and may give some kind of error but ignore this.
4. You will find several new files from this unpack, including one with a name similar to the TJBI0115.exe file you just unpacked. There will be other .exe files, ignore these others. For my case, the file we are after was named TJBI0115-BW.exe. Note this would probably have different names for your bios file.
5. Further unpack this freshly unpacked file as well, i.e. the one with a similar name as your initial .exe file, in my case I unpacked the TJBI0115-BW.exe file.
6. You will find several files including one that ends with the extension .fd (for Acer), in my case this file was named VA30B115.fd.
E.EXTRACT THE BIOS ROM
At this point you will have several files lying about, ensure you don’t lose sight of the files you are working with, best to create another folder and copy and paste the XXXXXX.fn file to the new folder so you won’t have too many files you are looking at.
PAY ATTENTION NOW, THIS IS THE ONLY VERY TRICKY BIT…….
1. Unzip the Phoenixtool256.zip. This will give you a folder called Phoenixtool256.
2. Open this folder, inside you will find a file called PhoenixTool.exe.
3. Double click the PhoenixTool.exe, this will open up a new window as below. In the “Original BIOS” line, click on the button to select a file

this will open…

4. Select the XXXXXX.fd file you extracted in step D above, and click “Open”
5. The tool will open and run and give a few messages and a pop-up message appears, just click “OK” and it will finish running.
6. Click on the “Structure” button as below.

F.IDENTIFY THE DXE CORE FILE
1. The next step is to identify the Bios ROM file with Bios variable that we need to change. After clicking the “Structure” button you will be presented with a window with collapsed items. Open these up and look for the line described as “DXE Core”

2. Collapse the DXE Core button and select the “PE32+ image section”.
3. Select the “Decompress Extracted Modules” check box and then click “Extract”
4. It will seem like nothing has happened but don’t worry, this will create a new folder called “DUMP” in the folder you had the XXXXXX.fd file in. You will be directed back to the PhoenixTool main menu window. You can close this window by clicking the close button.
G.IDENTIFY THE BIOS ROM FILE
1. In the folder where the rom XXXXXX.fd file was placed, you will find a new folder named “DUMP”. Inside this folder there will be many files all ending with .ROM extension. All except one are irrelevant to what we want to do at this stage and from this guide. Sort the files by size in your explorer window.
2. Identify the LARGEST file with the name starting with FE3542FE. For my example this was named “FE3542FE-C1D3-4EF8-657C-8048606FF670_1513.ROM” and was about 555KB big yours will be different but starts with the same FE3542FE name.
3. I suggest you copy this file and paste the copy in your working folder so you have less clutter and can keep the raw data extracted without modification safely.
H.EXTRACT THE BIOS DATA INTO HUMAN READBALE FORM
1. The .ROM you have is now ready to be extracted using the Universal-IFR-Extractor.exe tool.
2. Unzip the Universal-IFR-Extractor.zip if you have not done so already.
3. Drag and drop the file in step G.2 above to the “Universal IFR Extractor.exe” or alternatively double click the “Universal IFR Extrator.exe” file then select the “FE3542FEcxxxxx.ROM” file.
 .
.4. Click on the extract button. This will open up a window that allows you to save the extracted file as a text file. Name this file as you wish. I named mine “variable extract.txt”.

5. You can then close the Universal-IRF-Extractor window.
I.IDENTIFY THE DVMT VARIABLE SETTING AND APPLY
1. This is the nearly the end. Open up the text file you saved using your favourite text editor. In Windows I used WordPad, looks better in OSX in TextWrangler but any basic text editor will work fine. At this point I suggest you save a copy of this file onto your other computer in .txt format. I used my OSX desktop and opened the .txt file with Text Wrangler.
2. Use the search function in your text editor to find “DVMT”.
 .
.3. This will give you the variables you are looking for to change the DVMT bios settings for your locked InsydeH20 bios!!!!
J.APPLY THE VARIABLE FOR YOUR BIOS
1. At this point you need to reboot your computer in legacy mode with the previously prepared USB stick, use your bios boot menu or hot key to select boot device and select the USB stick. Boot into the USB and it will give you a DOS prompt.
2. Refer back to the earlier post on how to enter the correct variable (hence why you should have another computer handy). From the screen shot on my set up, the DVMT pre-allocated variable for 96MB (which results in 64MB in Windows) is 0x18C 0x3, so I would type in the dos prompt
Code:
setup_var 0x18C 0x3IMPORTANT NOTE!!!! THIS PROCESS IS LIKE A PASSWORD AND IS CASE SENSITIVE!!!! DO NOT ENTER INCORRECT CASE FOR THIS VARIABLE OR YOU MAY INADVERTENTLY CHANGE SOMETHING ELSE AND BRICK YOUR COMPUTER. DO NOT MESS THIS STEP UP!!! REFER TO ABOVE DISCLAIMER FOR DETAILS!!!!
Note also suggestion to try setup_var2 as mentioned here: https://www.tonymacx86.com/threads/...eh20-bios-laptops.165104/page-26#post-1350778
3. I noted that for the first time I changed this setting in the DOS prompt, I had to enter the change variable setting twice. This was because the first time I entered this, the result from the DOS prompt was the variable was now set to 0x18C 0x0 which is not what I wanted. The result should be 0x18C 0x3 for 96MB. This is important do not ignore the result that it gives, ensure it gives the desired DVMT setting as the result. If this fails, check the steps you did and the text you entered ensure its case sensitive and also refer to the disclaimer above.
K.CONCLUSION
That’s it! You have now set the DVMT to what you want for Broadwell, reboot into Windows and check the DVMT set from the "Advanced settings" window under "Screen resolution". If this is correct (refer to the above HD5500 linked guide for how to calculate the DVMT that results) and you have your ig-platform-id set and CPUType (very important) in clover config.plist correctly you should get 1536MB memory under graphics (under i5-5200U Broadwell, probably different for other broadwell chips).
Ensure your config.plist file is correct and shows the valid ig-platform-id. Note that as at the time of writing this guide the only way to get OSX to correctly recognise the DVMT at 96MB or above is by booting into windows first then selecting Restart and then booting into OSX. If you do not do this, then OSX will freeze at some point. Read up on the Broadwell early work for more information, currently there is no identified solution for this odd behaviour in OSX but I think its just a matter of time before it is resolved. This is beyond the scope of this guide. Good luck and once again REFER TO THE DISCLAIMER ABOVE.
UPDATE 11 AUG 2015
The freezing issue has since been resolved in OSX 10.11 El Capitan in the public beta releases. hopefully this will carry through to the final release version. Refer to the broadwell threads for more details.
UPDATE 13 AUG 2015
Attached all necessary files and tools to make this a self sufficient guide without a need to refer to another linked guide, removed links in the guide to other guides, included links to other guides below.
Credits and thanks to Austere.J for the original guide and insight to doing this on InsydeH20 bios from his guide, refer to it here http://www.tonymacx86.com/yosemite-...phics-5500-os-x-yosemite-10-10-3-a.html.:clap:
Shout out to the creators of the EFI boot, phoenixtool, UEFI tools and universal IFR Extractor tool


Attachments
Last edited by a moderator:


