
- Joined
- Dec 6, 2013
- Messages
- 299
- Motherboard
- ASUS Prime Z490-A
- CPU
- i7-10070K
- Graphics
- RX 6600
- Mac
- Classic Mac
- Mobile Phone
Hack Pro II: Gobias’s Comet Lake Build
Prime Z490-A - i7-10700K - RX 6600
Dual Boot macOS 13.6.6 Ventura & Windows 11 Pro
iMac 20,1 - OpenCore 0.9.9

Dual Boot macOS 13.6.6 Ventura & Windows 11 Pro
iMac 20,1 - OpenCore 0.9.9
Components
New
Motherboard: ASUS Prime Z490-AAmazon | Newegg
CPU: Intel Core i7-10700K
Amazon | Newegg
CPU Cooler: Noctua NH-D15S chromax.Black
Amazon | Newegg
CPU Cooler Heatsink Cover: Noctua NA-CH4 chromax.white
Amazon | Newegg
RAM: Crucial Ballistix 3200 MHz 16GB (8GBx2) BL2K8G32C16U4B
Amazon | Newegg
Case: Fractal Design Meshify 2 Compact White (FD-C-MES2C-05)
Amazon | Newegg
Splitter Cables for Case Fans: Noctua NA-SYC1 chromax.Black
Amazon | Newegg
USB Drives for macOS and Windows Installers: 2x Samsung BAR Plus 32GB (MUF-32BE4/AM)
Amazon | Newegg
Already Owned
Amazon |
- Note: I upgraded my graphics from the RX 580 to a Sapphire Pulse RX 6600. See the Upgrades section below and Update 14.
Amazon |
- Note: I upgraded my Windows drive from the 860 EVO to a WD_BLACK SN750 1TB NVMe SSD. See the Upgrades section below and Update 7.
- Note 2: I upgraded my macOS drive from the 860 EVO to a WD_BLACK SN850 2TB NVMe SSD. See the Upgrades section below and Update 11.
HDD: Seagate Barracuda 2TB (ST2000DM001)
Newegg
Power Supply: EVGA SuperNOVA 650 G+ (120-GP-0650-X1)
Amazon | Newegg
Wi-Fi/Bluetooth Adapter: YOUBO BCM94360CD
Amazon
Monitor: BenQ DesignVue PD2720U
Amazon | Newegg
DisplayPort Cable: KabelDirekt DisplayPort 1.4 6ft
Amazon
Keyboard: Logitech K750 for Mac
Amazon | Newegg
Mouse: Logitech MX Master 2S
Amazon | Newegg
- Note: After upgrading my macOS drive to an NVMe SSD (see Update 11), I started using one of my Samsung 860 EVO 500GB SSDs for my clone.
Startup Disk Clone SSD: Samsung 860 EVO 500GB (MZ-76E500B/AM)
Amazon | Newegg
Startup Disk Clone Enclosure: Inateck 2.5" Hard Drive Enclosure USB 3.0 (FE2002)
Amazon
Amazon | Newegg
- Note: I replaced this external HDD with a Crucial MX500 SSD and an SSD enclosure.
Upgrades Made after Original Build
NVMe SSD for Windows: WD_BLACK SN750 1TB NVMe PCIe 3.0 Internal Gaming SSD with Heatsink (WDS100T3XHC)Amazon | Newegg
- See Update 7
Alternative NVMe SSD if SN750 is sold out: WD_BLACK 1TB SN770 1TB NVMe PCIe 4.0 Internal Gaming SSD (WDS100T3X0E)
Amazon | Newegg
- If the SN750 is sold out, you can get the SN770, which is the newer PCIe 4.0 version of the SN750 (see this post for more info). Note that the SN770 does not come with a heatsink, so you'd have to buy one separately if you want one.
NVMe SSD for macOS: WD_BLACK SN850 2TB NVMe PCIe 3.0 Internal Gaming SSD without Heatsink (WDS200T1X0E)
Amazon | Newegg
- See Update 11
New Graphics Card: Sapphire Pulse RX 6600 8GB (11310-01-20G)
Amazon | Newegg
- See Update 14
Webcam: Logitech BRIO Webcam
Amazon | Newegg
- See Update 15
Speakers: Audioengine A2+ Wireless
Amazon
White Power Supply Extension Cables: CableMod 8+8 Series Classic ModFlex Sleeved Cable Extension Kit (White) (CM-CAB-CKIT-88KW-R)
Amazon
Time Machine SSD: Crucial MX500 4TB (CT4000MX500SSD1)
Amazon | Newegg
Time Machine SSD Enclosure: UGREEN 2.5" Hard Drive Enclosure USB-C 3.1 Gen 2 (50743)
Amazon | Newegg
Comments
The Build
Background
Sadly, a few months ago, the motherboard in my old Haswell build died after about 8 years, so I recently made a new Comet Lake build. I went with a Z490 motherboard and a Comet Lake CPU because those are the last Intel chips that are natively supported by macOS.
ASUS Z490-A Prime Motherboard
I chose this board because it’s popular for Hackintoshes, so it seemed like it would be easier to find solutions to issues than other motherboards.
Intel i7-10700K CPU
I probably would have been fine with an i5-10500 or i5-10600, but the i7-10700K was on sale for cheaper than I could find for the i5 CPUs, so I went with that.
Fractal Design Meshify 2 Compact Case
I wanted a case that was smaller than the huge Fractal Design Define R4 case I had for my old build. I decided on the Meshify 2 Compact based on reviews and the quality of my old Fractal Design case. I've never cared about showing off my components with a window panel, but I liked the look of the white case, which only came with a window panel.
Noctua NA-CH4 chromax.white Heatsink Cover
After setting everything up and looking at the components, though, I decided to get Notcua’s white CPU cooler heatsink cover to match the case. In hindsight, I think I might've preferred the look of white memory sticks as well, but black was cheaper.
Noctua NA-SYC1 chromax.Black Splitter Cables
One annoying thing that I realized while putting everything together is that my case has 3 fans, but my motherboard only has 2 headers, so I had to buy a Y splitter cable for the front fans.
Case Drive Cage
The case has a removable drive cage that I needed for my HDD. I actually didn't think that the cage would fit with my PSU based on the specs for the case, but it did, albeit with cables crammed tightly between the cage and the PSU.
Old HDD
I also realized that while I'm reusing many parts from my old build, my HDD is the only original part. Everything else is an upgrade or replacement. I'm a little surprised it's still running considering I originally had 2 of them, and the other one died after a few years. It will be the first thing to go (along with the drive cage) when I upgrade my drives (see below).
Upgrades I’m Considering
DrivesI upgraded both of my SATA SSDs to NVMe M.2 SSDs. See the Upgrades section above, Update 7, and Update 11.
Graphics Card
I upgraded my graphics card to an RX 6600. See the Upgrades section above and Update 14.
Memory
I debated getting 32GB of memory but decided against it due to costs, so I may add another 16GB in the future.
Guide
I referenced Shiloh’s Build for Tristan guide, which uses the same motherboard (and a few other parts), but I primarily followed the OpenCore Guide and set up my EFI folder from scratch.Note that I've attached 2 EFI folders to this guide for reference in case they're helpful to others: one for the macOS USB installer and one for my internal SSD that includes changes made during Post-Installation.
macOS USB Installer
I followed the OpenCore Install Guide to create my macOS USB Installer and followed the Desktop Comet Lake section of the guide to create my config.plist. The EFI folder for my USB installer is attached to this guide. Here are some important things to note:- macOS Version and USB Port Mapping: The port limit quirk needed for mapping USB ports is broken in macOS 11.3 and newer, so you must download an older version to map USB ports.
- I used Munki's InstallInstallMacOS utility to download macOS 10.5.7 Catalina (see the OpenCore Guide for more information).
- After later mapping USB ports and completing the rest of post-installation, I updated macOS to Big Sur (see further down in this guide).
- Kexts
- If you have an NVMe SSD, make sure to add the NVMe kext. It's not included in my EFI folders since I have a SATA SSD.
- SMCProcessor and SMCSuperIO are optional kexts bundled with VirtualSMC that are only needed for displaying system stats in apps like HWMonitor, HWMonitorSMC2, or iStat Menus. You can exclude them if you don’t care about stats.
- SMBIOS
- If you have an i7-10070K or lower (like me), use iMac 20,1.
- If you have an i9-10850K or higher, use iMac 20,2.
- You will need to generate your own values for the PlatformInfo section with GenSMBIOS.
- Audio: I used audio layout ID 7 based on Shiloh's guide, and it worked for me. It’s possible other layout IDs may work, too.
- dGPU
- The RX 580, my original GPU for this build, has been supported since macOS Sierra.
- The RX 6600, my current GPU, is only supported in macOS 12.1+ Monterey.
- This GPU, along with all AMD 5000 and 6000 series GPUs, also requires the
agdpmod=pikeraboot argument to prevent the screen from going black on the desktop:- In config.plist, under
NVRAM -> Add -> 7C436110-AB2A-4BBB-A880-FE41995C9F82, inboot-args, addagdpmod=pikera.
- In config.plist, under
- See Update 14 for more information on the RX 6600.
- This GPU, along with all AMD 5000 and 6000 series GPUs, also requires the
- iGPU: Because I only have one display, which is connected to my dGPU, I set my iGPU to only be used for computing tasks.
- Under
DeviceProperties -> Add -> PciRoot(0x0)/Pci(0x2,0x0)in config.plist, setAAPL,ig-platform-idto0300C89B. - If you are using your iGPU to drive a display, you’ll need to set this up according to the OpenCore Guide.
- Under
DeviceProperties -> Add -> PciRoot(0x0)/Pci(0x2,0x0)in config.plist, setAAPL,ig-platform-idto07009B3E. - You may also need to patch macOS to support your iGPU by adding a new entry for
device-idthat matches your Intel Graphics UHD 630 underDeviceProperties -> Add -> PciRoot(0x0)/Pci(0x2,0x0):device-id | Data | 00009BC8
- Under
- Under
- Ethernet: I had no Ethernet after installation because I set up a couple of things wrong in my config.plist. Make sure you set these options in your config.plist to get ethernet to work (they’re included in both of my EFI folders).
- Under
DeviceProperties -> Add, usePciRoot(0x0)/Pci(0x1C,0x4)/Pci(0x0,0x0)and NOTPciRoot(0x0)/Pci(0x1C,0x1)/Pci(0x0,0x0)like I did at first. Note that just one number is different:4instead of1. - Under
NVRAM -> Add -> 7C436110-AB2A-4BBB-A880-FE41995C9F82, inboot-args, includedk.e1000=0.- In macOS 12.3 Monterey, the ethernet boot argument changed to
e1000=0. See Update 6.
- In macOS 12.3 Monterey, the ethernet boot argument changed to
- Under
Windows USB Installer
Since my motherboard died, I didn't have a Windows computer to create a Windows 10 USB installer. Instead, I followed these steps to create the installer on my MacBook Pro.- Format a USB drive for the installer.
- Insert the USB drive.
- Open /Applications/Utilities/Disk Utility.
- Select View > Show All Devices.
- Highlight the top-level device for the USB drive in the left column.
- Click Erase.
- Under Name: name it whatever you want.
- Under Format: choose MS-DOS (FAT).
- Under Scheme: choose Master Boot Record.
- Click Erase.
- Download the Windows 10 Disc Image from Microsoft.
- Copy the disc image to the USB drive.
- Double-click on the disc image file to mount it.
- Open /Applications/Utilities/Terminal.
- Type
and pressBash:
diskutil listEnter. - Find the disk number for your USB drive. It should be something like disk1 or disk2.
- Type
but replaceCode:
diskutil eraseDisk MS-DOS "WINDOWS10" MBR diskNNwith the disk number (for example, if my drive was disk2, I would typediskutil eraseDisk MS-DOS "WINDOWS10" MBR disk2) and pressEnter. - Copy all the files to your USB drive except for one that is too big for a FAT32-formatted drive: Type
(note that if you downloaded a different language than English (US), then you will need to changeCode:
rsync -avh --progress --exclude=sources/install.wim /Volumes/CCCOMA_X64FRE_EN-US_DV9/ /Volumes/WINDOWS10EN-USto match what’s in the name of your disk image volume) and pressEnter. - Install Homebrew if it’s not already installed: type
and pressCode:
/bin/bash -c "$(curl -fsSL https://raw.githubusercontent.com/Homebrew/install/HEAD/install.sh)"Enter. - Use Homebrew to install wimlib. Type
and pressCode:
brew install wimlibEnter. - Use wimlib to split up and copy the one large file to your USB drive. Type
and pressCode:
wimlib-imagex split /Volumes/CCCOMA_X64FRE_EN-US_DV9/sources/install.wim /Volumes/WINDOWS10/sources/install.swm 4000Enter.
BIOS and Windows Drivers USB
I read a lot of reviews that said this board (and others with I225-V ethernet) has issues with ethernet not working out of the box in Windows and requires an updated driver, so in addition to the latest BIOS, I also downloaded all the latest drivers from the ASUS website to a FAT32-formatted USB drive. It turned out that my ethernet didn't work initially in Windows either, so this was a helpful step.BIOS Preparation
- Update BIOS(I’m using ver. 2301)
- Insert the USB drive with the BIOS file and boot up the computer.
- Press
DeleteorF2to enter BIOS. (note that to makeFkeys work on my K750 keyboard, I have to hold thefnkey at the same time, so you may need to do the same) - Press
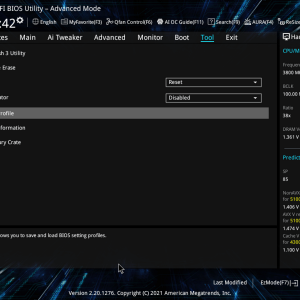
F7or click Advanced in the bottom right corner to enter Advanced Mode. - Go to the Tool menu.
- Select ASUS EZ Flash 3 Utility and press
Enter. - Select your USB drive and press
Enter. - Select the BIOS file on your USB drive and press
Enter.
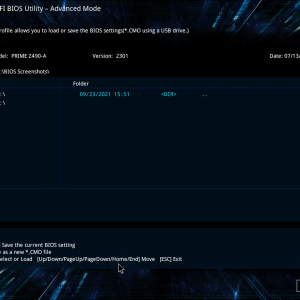
- (Optional) Load my BIOS profile. I attached two BIOS settings files to this guide. BIOS_setting.txt is a readable text file that lists all of my BIOS settings for reference. BIOS_Profile.CMO is a profile that can load all of my settings into your BIOS. If you choose to do this, I recommend using the same BIOS version as me (2301) and reviewing all the settings after loading them.
- Download BIOS_Profile.CMO to a USB drive.
- Insert the USB drive and boot up the computer.
- Press
DeleteorF2to enter BIOS. - Press
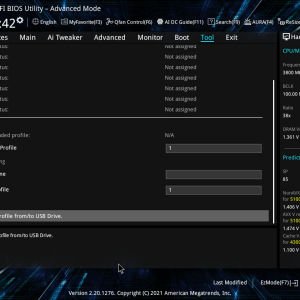
F7or click Advanced in the bottom right corner to enter Advanced Mode. - Go to the Tool menu.
- Select Load/Save Profile from/to USB Drive.
- Select your USB drive and press
Enter. - Select the BIOS_Profile.CMO file on your USB drive and press
Enter. - Review the settings that have been loaded.
- Adjust BIOS settings based on the OpenCore Guide. If you loaded my BIOS profile, I recommend reviewing these settings to make sure they’re correct. These are the important settings and what menus they’re locating in:
- Ai Tweaker
- Ai Overclock Tuner = XMP II (loads my RAM’s default XMP profile and sets the frequency to 3200 MHz rather than the default of 2666 MHz)
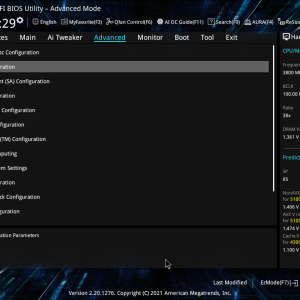
- Advanced > CPU Configuration
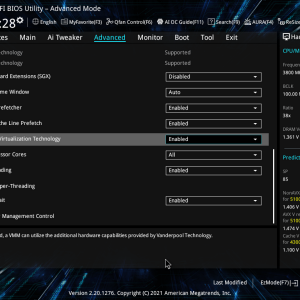
- Intel (VMX) Virtualization Technology = Enabled
- Hyper-Threading = Enabled
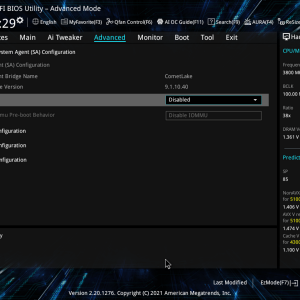
- Advanced > System Agent (SA) Configuration
- VT-d = Disabled
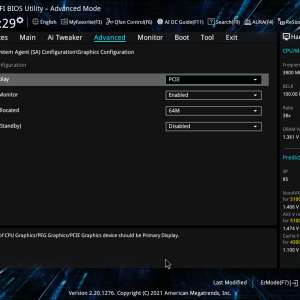
- Advanced > System Agent (SA) Configuration > Graphics Configuration
- Primary Display = PCIE (to use my dGPU for primary display)
- iGPU Multi-Monitor = Enabled (even though I’m not connecting a display to my iGPU, this is required to use the iGPU for computing tasks)
- DVMT Pre-Allocated = 64M
- RC6 (Render Standby) = Disabled
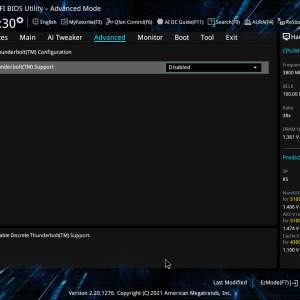
- Advanced > Thunderbolt(TM) Configuration
- Thunderbolt(TM) Support = Disabled (can be enabled after installation if you have a Thunderbolt card)
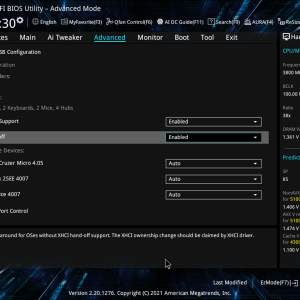
- Advanced > USB Configuration
- XHCI Hand-off = Enabled
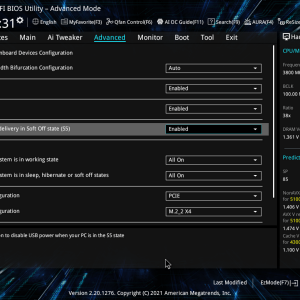
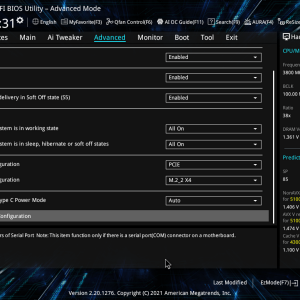
- Advanced > Onboard Device Configuration
- USB power delivery in Soft Off state (S5) = Enabled (Optional, for charging USB devices while in sleep)
- Advanced > Onboard Devices Configuration > Serial Port Configuration
- Serial Port = Off (note that my BIOS_setting.txt file incorrectly shows that Serial Port is set to Auto, but it should be Off)
- Advanced > PCI Subsystem Settings
- Above 4G Decoding = Enabled
- Boot > CSM (compatibility support module)
- Launch CSM = Disabled
- Boot > Secure Boot
- OS Type = Other OS
- Boot > Boot Configuration
- Fast Boot = Disabled
- Boot Logo Display = Full Screen
- Post Delay Time = 3 sec (Optional)
- Wait For 'F1' If Error = Disabled (Optional)
- Ai Tweaker
- Save Changes & Reset.
- Go to the Exit menu.
- Select Save Changes & Reset and press
Enter.


macOS Installation
- Disconnect all drives except for the one that will be your macOS startup disk.
- Insert your macOS USB installer drive and boot up the computer.
- Select your installer drive in BIOS.
- Select Install MacOS Catalina in OpenCore.
- Install macOS on your internal drive.
macOS Post-Installation
The final EFI folder for my startup disk is attached to this guide. This includes all the changes I made during post-installation:- I followed the OpenCore Post-Install Guide to
- I fixed the ethernet issue (explained in the macOS USB Installer section above). This fix is in both of my EFI folders.
- I fixed an issue where my computer was POSTing in safe mode on reboot
- Under
Kernel -> Quirksin config.plist, setDisableRtcChecksumtoTrue.
- Under
- I mapped my USB ports (see below).
- I fixed my instant wake issue (see below).
Mapping USB Ports
I first attempted to map my USB ports using Hackintool and following The New Beginner's Guide to USB Port Configuration as I had done with my old build. However, no ports would show up in Hackintool, so I followed the OpenCore Post-Install Guide to map my USB ports with USBMap, where my ports thankfully showed up. I still had some issues getting my ports properly, but @Edhawk helped me sort it out (thank you!).This motherboard has 26 total USB ports that show up in USBMap, but macOS only allows 15, so there are many possible ways one could map the ports. My USBMap.kext is included in my internal EFI folder for reference, but you will likely want to map your ports a little differently.
I chose to enable all of the High Speed (USB2 backward compatible) and SuperSpeed (USB3) ports for the headers connected to the front panel of my case. I set the USB2 header connected to my Wifi/Bluetooth card to type 255 (Internal). For the rear panel ports, I only enabled the SS ports for the USB3 ports and left the HS ports disabled, except for one that I connect to my monitor’s USB hub, to stay under the 15-port limit. I also enabled only one of the USB2 ports to stay under the limit. The diagram below shows which ports I’ve enabled (green ports are enabled and red ports are disabled).
Fixing Instant Wake Issue
My computer would not stay in sleep mode (even after mapping USB ports). I tried many fixes, but I eventually found one that worked. I used the GPRW Instant Wake Patch in the OpenCore Post-Install Guide to fix this issue (included in my internal EFI folder):- Download the GPRW SSDT.
- Place SSDT-GPRW.aml under OC/ACPI in your EFI folder.
- Open your config.plist in ProperTree and select File > OC Snapshot to add the SSDT to your config.
- Under
ACPI -> Patchin your config.plist, add the following new patch:- The Key should be the next number in the list of patches. For me, that was
2. The Type should be Dictionary. - Under the new patch, add the following (it may be easier to duplicate one of the existing patches in your config.plist and then replace the values):
- The Key should be the next number in the list of patches. For me, that was
| Key | Type | Value |
Base |
String | |
BaseSkip |
Number | 0 |
Comment |
String | change Method(GPRW,2,N) to XPRW, pair with SSDT-GPRW.aml |
Count |
Number | 0 |
Enabled |
Boolean | True |
Find |
Data | 47505257 02 |
Limit |
Number | 0 |
Mask |
Data | |
OemTableId |
Data | |
Replace |
Data | 58505257 02 |
ReplaceMask |
Data | |
Skip |
Number | 0 |
TableLength |
Number | 0 |
TableSignature |
Data |
This fix keeps my computer from instantly waking when I put it in sleep mode. However, I discovered that I can't wake my computer with my mouse or keyboard, so I have to use the power button instead. I’m still trying to fix this.
Updating to Big Sur
With all the major issues resolved and USB ports mapped, it was time to update to macOS Big Sur.- First, I updated my kexts.
- Next, since System Preferences wanted me to update to Monterey, which I'm holding off on for the moment, I used Munki's InstallInstallMacOS utility again, this time to update to Big Sur.
- Since the utility didn't have the very latest version of Big Sur (11.6.4), I used System Preferences to update macOS one more time.
- After all the updates were done, I used Migration Assistant to restore everything from the Time Machine backup of my old build.
Window Installation
- Disconnect all drives except for the one that will be your Windows startup disk.
- Insert your Windows USB installer drive and boot up the computer.
- Select your installer drive in BIOS.
- Install Windows.
Window Post-Installation
- Install drivers from the BIOS and Windows Drivers USB.
- Install Windows updates.
- Reconnect other drives.
- When you reboot, both the macOS and Windows disks should be listed in OpenCore.
- (Optional) If OpenCore is defaulting to the Windows disk, and you would prefer it to default to macOS:
- Boot into the macOS disk.
- Open System Preferences and select Startup Disk.
- Select your macOS disk and click Restart.
What Works, What Doesn’t, and What’s Untested
What’s Working in macOS
- Restart/Shutdown
- Sleep/Wake (resolved instant wake issue, but can only wake with power button)
- dGPU
- Native Audio
- HDMI/DisplayPort Audio via dGPU (see Update 14)
- Ethernet
- Wi-Fi
- Bluetooth
- USB ports that I mapped
- iCloud
- iMessage
- FaceTime (if DRM fix isn't enabled — see Update 15)
- Continuity
- Airdrop
- AirPlay to Mac
- Auto Unlock with Apple Watch
- This was initially giving me an error when I tried to enable it, but when I tried again today (3/29/22), it worked. Maybe it was fixed when I updated to macOS 11.6.5.
- Continuity Camera
- Continuity Markup
- Continuity Sketch
- Handoff
- Instant Hotspot
- iPhone Cellular Calls
- Sidecar
- Text Message Forwarding
- Universal Clipboard
- Security
- OpenCore GUI (see Update 3)
- Boot Chime (see Update 18)
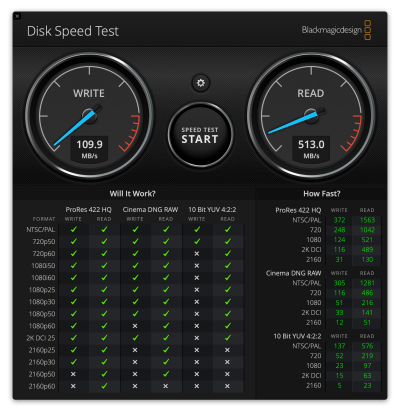
- TRIM
- TRIM isn't enabled by default for APFS SATA SSDs in macOS, and I initially didn’t enable it because I read that it slows boot times. However, I found that in disk speed tests, my write speeds were very slow (110 MB/s), but enabling TRIM (execute
sudo trimforce enablein Terminal) improved speeds some (to 290 MB/s; see benchmarks below). It also only added about 5 seconds to the boot time.
- TRIM isn't enabled by default for APFS SATA SSDs in macOS, and I initially didn’t enable it because I read that it slows boot times. However, I found that in disk speed tests, my write speeds were very slow (110 MB/s), but enabling TRIM (execute
- DRM: iTunes movies and Apple TV+ (see Update 4)
- Universal Control
What’s Not Working in macOS
- Sleep/Wake: wake with keyboard or mouse
- I tried all 3 methods for fixing Keyboard Wake Issues from the OpenCore Post-Install guide, but none of them worked.
- DRM: Netflix and Amazon Prime
- Note that Safari 14 and macOS 11 Big Sur are currently unsupported by WhateverGreen's DRM patches.
What’s Untested or Not Set Up Yet in macOS
- iGPU to drive a display
- As explained in the macOS USB Installer section above, I only have one display, which is connected to my dGPU, so I set my iGPU only to be used for computing tasks and have not tested using my iGPU to drive a display.
What’s Not Working in Windows
- Time zone sync (resolved by @tech1eguy's fix)
My time is correct in BIOS and macOS. However, every time I boot up Windows, my time zone is wrong, and I have to manually sync my time. I’ve tried several fixes I found online, but the issue persists.
- RGB customization (resolved by using SignalRGB — see Update 15)
I had this working initially and changed the motherboard’s RGB from the default rainbow colors to solid white. However, at some point, the RGB reverted back to rainbow colors, and when I went into the Armory Crate app, it showed that I had no RGB devices. I’ve tried uninstalling and reinstalling all the ASUS software, but the motherboard is still not showing up as an RGB device.
System Information
Original System Information
Current System Information
Benchmarks
Geekbench
CPU - macOS

CPU - Windows

OpenCL dGPU - macOS (RX 580 left, RX 6600 right)


OpenCL dGPU - Windows (RX 580 left, RX 6600 right)


OpenCL iGPU - Windows only

OpenCL Metal - macOS only (RX 580 left, RX 6600 right)


Vulcan dGPU - Windows (RX 580 left, RX 6600 right)


Vulcan iGPU - Windows only

CPU - Windows
OpenCL dGPU - macOS (RX 580 left, RX 6600 right)
OpenCL dGPU - Windows (RX 580 left, RX 6600 right)
OpenCL iGPU - Windows only
OpenCL Metal - macOS only (RX 580 left, RX 6600 right)
Vulcan dGPU - Windows (RX 580 left, RX 6600 right)
Vulcan iGPU - Windows only
Cinebench
(macOS left, Windows right)


LuxMark Simple
CPU - macOS only

iGPU - Windows only

dGPU - macOS (RX 580 left, RX 6600 right)


dGPU - Windows (RX 580 left, RX 6600 right)


CPU+dGPU - macOS only (RX 580 left, RX 6600 right)


iGPU+dGPU - Windows only (RX 580 left, RX 6600 right)


iGPU - Windows only
dGPU - macOS (RX 580 left, RX 6600 right)
dGPU - Windows (RX 580 left, RX 6600 right)
CPU+dGPU - macOS only (RX 580 left, RX 6600 right)
iGPU+dGPU - Windows only (RX 580 left, RX 6600 right)
LuxMark Medium
CPU - macOS only

iGPU - Windows only

dGPU - macOS (RX 6600)

dGPU - Windows (RX 6600)

CPU+dGPU - macOS only (RX 6600)

iGPU+dGPU - Windows only (RX 6600)

iGPU - Windows only
dGPU - macOS (RX 6600)
dGPU - Windows (RX 6600)
CPU+dGPU - macOS only (RX 6600)
iGPU+dGPU - Windows only (RX 6600)
LuxMark Complex
CPU - macOS only

iGPU - Windows only

dGPU - macOS (RX 6600)

dGPU - Windows (RX 6600)

CPU+dGPU - macOS only (RX 6600)

iGPU+dGPU - Windows only (RX 6600)

iGPU - Windows only
dGPU - macOS (RX 6600)
dGPU - Windows (RX 6600)
CPU+dGPU - macOS only (RX 6600)
iGPU+dGPU - Windows only (RX 6600)
Unigine Heaven
Something strange was going on with Unigine Heaven on macOS. Not only was the performance much worse on macOS than on Windows, but it was also worse than the same tests on my old build with the same GPU.
1080p High Disabled 4xAA - macOS only (RX 580)

1080p High Moderate 8xAA - macOS (RX 580)

1080p High Moderate 8xAA - Windows (RX 580 left, RX 6600 right)


1080p Ultra Extreme 8xAA - macOS (RX 580)

1080p Ultra Extreme 8xAA - Windows (RX 580 left, RX 6600 right)


1440p Ultra Normal 4xAA - Windows (RX 580 left, RX 6600 right)

1080p High Disabled 4xAA - macOS only (RX 580)
1080p High Moderate 8xAA - macOS (RX 580)
1080p High Moderate 8xAA - Windows (RX 580 left, RX 6600 right)
1080p Ultra Extreme 8xAA - macOS (RX 580)
1080p Ultra Extreme 8xAA - Windows (RX 580 left, RX 6600 right)
1440p Ultra Normal 4xAA - Windows (RX 580 left, RX 6600 right)
Unigine Valley
1080p High 4xAA - macOS (RX 580 left, RX 6600 right)


1080p High 4xAA - Windows (RX 580 left, RX 6600 right)


1080p Ultra 8xAA - macOS (RX 6600)

1080p Ultra 8xAA - Windows (RX 6600)

1440p High 8xAA - macOS (RX 6600)

1440p High 8xAA - Windows (RX 6600)

1440p Ultra 4xAA - macOS (RX 6600)

1440p Ultra 4xAA - Windows (RX 6600)

1080p High 4xAA - Windows (RX 580 left, RX 6600 right)
1080p Ultra 8xAA - macOS (RX 6600)
1080p Ultra 8xAA - Windows (RX 6600)
1440p High 8xAA - macOS (RX 6600)
1440p High 8xAA - Windows (RX 6600)
1440p Ultra 4xAA - macOS (RX 6600)
1440p Ultra 4xAA - Windows (RX 6600)
Unigine Superposition
1080p Medium - Windows only (RX 580 left, RX 6600 right)


1080p High - Windows only (RX 6600)

1080p High - Windows only (RX 6600)
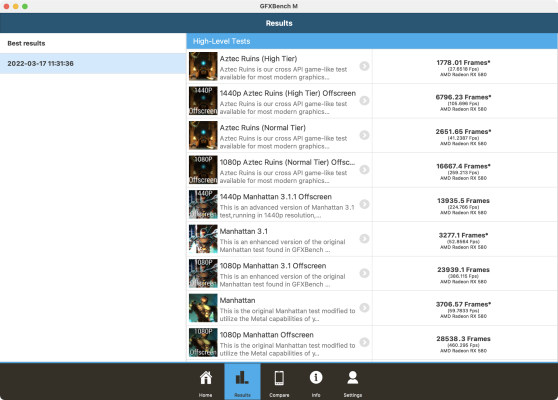
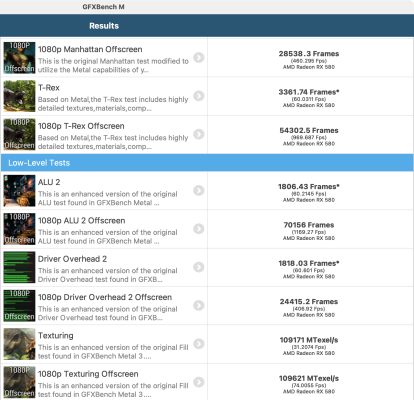
GFXBench Metal
macOS only (RX 580 left, RX 6600 right)


3DMark
Time Spy - Windows only (RX 6600)

Fire Strike - Windows only (RX 6600)

Fire Strike - Windows only (RX 6600)
Blackmagic Disk Speed Test
My macOS SSD had really slow write speeds for some reason, which wasn't the case when I first got the drive. After enabling TRIM, write speeds improved but were still much slower than expected. I guess it's a good thing that I'm planning on upgrading to NVMe SSDs soon.
WD_BLACK SN850

OLD Samsung 860 EVO - TRIM disabled (macOS only)

OLD Samsung 860 EVO - TRIM enabled (macOS only)

WD_BLACK SN850
OLD Samsung 860 EVO - TRIM disabled (macOS only)
OLD Samsung 860 EVO - TRIM enabled (macOS only)
CrystalDiskMark
CrystalDiskMark speed tests (Windows only) of my old Samsung 860 EVO and the new WD_BLACK SN750 I replaced it with.
WD_BLACK SN750

OLD Samsung 860 EVO

WD_BLACK SN750
OLD Samsung 860 EVO
Updates
Update 1: macOS 11.6.5Update 2: FileVault
Update 3: OpenCore GUI and Apple Secure Boot
Update 4: Fixing UI Scale and DRM
Update 5: OpenCore 0.8.0
Update 6: macOS Monterey
Update 7: NVMe SSD Upgrade for Windows
Update 8: macOS 12.4
Update 9: OpenCore 0.8.1
Update 10: OpenCore 0.8.2
Update 11: NVMe SSD Upgrade for macOS
Update 12: macOS 12.5
Update 13: OpenCore 0.8.3 and macOS 12.5.1
Update 14: RX 6600 Graphics Card Upgrade
Update 15: OpenCore 0.8.4, macOS 12.6, Logitech BRIO Webcam, and Partial Fix for RGB
Update 16: UEFI Secure Boot, Vault, and OpenCore 0.8.5
Update 17: Windows 10 Pro, Windows 11, and BitLocker
Update 18: Boot Chime and macOS 12.6.1
Update 19: OpenCore 0.8.7 and macOS 12.6.2
Update 20: OpenCore 0.9.1 and macOS Ventura
Update 21: OpenCore 0.9.2 and macOS 13.3.1 (a)
Update 22: OpenCore 0.9.4 and macOS 13.5.1
Update 23: OpenCore 0.9.5 and macOS 13.6
Update 24: OpenCore 0.9.7 and macOS 13.6.3
Update 25: OpenCore 0.9.9 and macOS 13.6.6
Attachments
-
USB Installer EFI.zip3.7 MB · Views: 317
-
Internal SSD EFI.zip3.7 MB · Views: 313
-
 Blackmagic 5GB.png797.6 KB · Views: 285
 -
 GFXBench Metal 1.png659 KB · Views: 198
 -
 GFXBench Metal 2.png633.7 KB · Views: 181
 -
 GFXBench Metal 1.png397.1 KB · Views: 596
 -
 GFXBench Metal 2.png377.6 KB · Views: 585
 -
BIOS Settings.zip30.7 KB · Views: 96
-
 Windows 11 Pro System Info.png116 KB · Views: 127
Last edited: