- Joined
- Apr 1, 2016
- Messages
- 3
- Motherboard
- Gigabyte Z97X Gaming 3
- CPU
- i7 4790
- Graphics
- Gigabyte GTX960
- Mac
- Classic Mac
- Mobile Phone
[Guide] Gigabyte Z97X Gaming 3 + i7 4790 + Gigabyte GTX960 G1 gaming
I tried to build a Hackintosh this week. I could not buy an iMac because I wanted to keep my screens and expandability, and could not buy a MacPro because of the shaming price. I'm an Apple fan since 1982, a very experienced OSX, iOS and Windows user, and a developer. Even though, I was very afraid of the result.
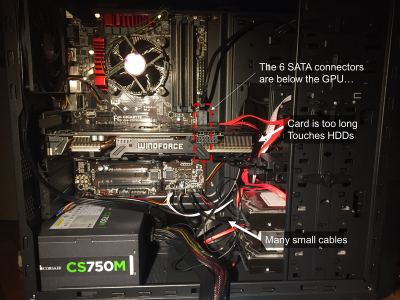
Many issues with the Cooler Master N300
Before you begin ; Steps 1 and 2
Recommended BIOS settings (Step 3)
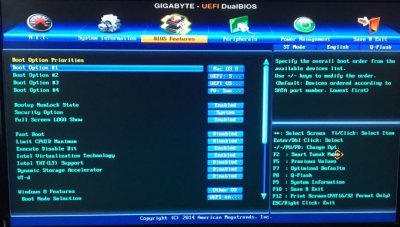
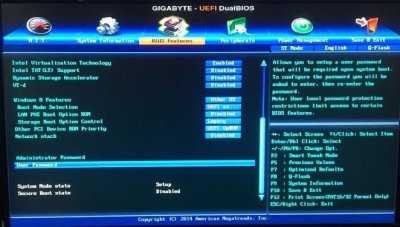
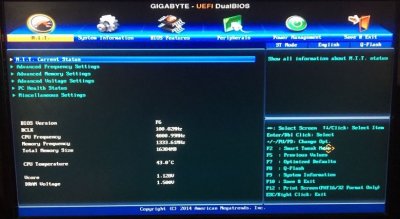
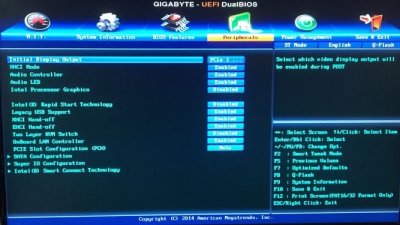
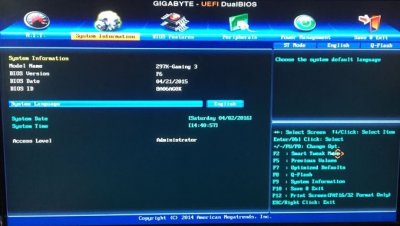
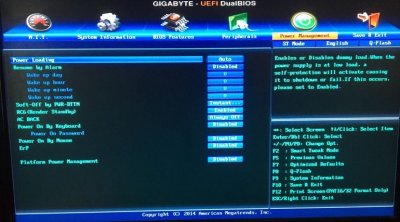
Gigabyte may prepare a new set of « optimized defaults », so here are a few screenshots with all options detailed. NB : xHCI was edited to "Auto", not "Enabled"
OSX installation from your USB stick (Step 4)
Surprisingly, this Step 4 ran without problem.
Step 5: Post-installation
Step 5.9 (Customize)
Step 5.11 (Build) :
Step 5.12: (pasted here and adapted from Stork's guide):
 Open the Terminal (Spotlight->Terminal), copy/paste this command and Return:Code:
diskutil list
 Note the disk number (diskxs1) of your El Capitan drive
 Run EFI Mounter v3 (on your USB stick), type in your admin password and select the diskxs1 of your El Capitan drive
 Open the EFI drive and navigate to /EFI/Clover where you'll see the config.plist file.
 Right click on config.plist and select Duplicate
 Right click on config.plist again > Open With > Other > TextEdit (or another text editor).
 Being very careful, insert the Highlighted code after "KextsToPatch" so it looks like the below.
Code:
<key>KextsToPatch</key>
<array>
<dict>
<key>Comment</key>
<string>change 15 port limit to 30 in XHCI kext (9-series)</string>
<key>Find</key>
<data>
g72M/v//EA==
</data>
<key>Name</key>
<string>AppleUSBXHCIPCI</string>
<key>Replace</key>
<data>
g72M/v//Hw==
</data>
</dict>
...
</array>
 Save it.
 Time to install the GPU driver. After reading this information, you can click on this link to go to NVidia Website, and download the good version for El Capitan. My file was WebDriver-346.03.06f01.pkg.
Step 5.13: Reboot.
Step 6

I tried to build a Hackintosh this week. I could not buy an iMac because I wanted to keep my screens and expandability, and could not buy a MacPro because of the shaming price. I'm an Apple fan since 1982, a very experienced OSX, iOS and Windows user, and a developer. Even though, I was very afraid of the result.
Configuration
Everything was bought from a french reseller "Grosbill". A bit more expensive than Amazon, but immediately available for about 1100€ .
- Motherboard: GIGABYTE Z97X-Gaming 3 | Chipset Intel Z97 - Socket 1150 - DDR3
- Processor: INTEL Core i7-4790 3.6GHz 8M Socket 1150 Haswell Refresh | Graphic HD 4600 Turbo Boost 84W | BX80646I74790
- RAM: Crucial Ballistix Tactical 16G (2x8Go) PC12800 (1600MHz)
- Graphic card: GIGABYTE NVIDIA GeForce GTX960 |GV-N960G1 GAMING-4G | 4096MB GDDR5
- Power supply*: CORSAIR CS750M Modulaire 750W
- Keyboard*: LOGITECH Wireless Keyboard K270
- Mouse*: LOGITECH Marathon Mouse M705
- Bluetooth Adapter*: ASUS USB-BT400
- Enclosure*: Cooler Master N300
- Wifi : TP-Link N900 TL-WDN4800
Most of these components were selected on March 2016 tonymacx86 Buyer's guide page for a CustoMac Pro, except those with a star *. It seems the important stuff is the motherboard, the graphic card, the quality of the RAM. If you look at the Geekbench browser and search for iMacs or MacPros, you'll get a good idea of the performance you can expect depending on the processor you choose. performances.
Many issues with the Cooler Master N300
- it is not adapted to the motherboard, because this latter is a little smaller than the ATX standard format, so you won't have 9 screws to fix the mobo on the case, but only 6. Not a big deal
- the enclosure is shipped with absolutely nothing, meaning you hava plastic brackets to block the 5,25" and 3,5" devices. Only two 5,25", and two 3,5". No adapter for a 2,5" SDD. I need to buy an additional ICYBOX adapter.
- a lot of tiny cables are everywhere in the case. Front panel cables are not grouped, so it is a mess to plug them on the motherboard.
.I would advice upgrading to a Fractal Design R5, which has a much better internal design.
- This graphics card is HUGE, and seems a bad combination with the Gigabyte Gaming 3 motherboard, because it is so big that it blocks the access to the 6 SATA outlets. That way, it is a real pain in the ass to plug SATA cables (you may prefer to unplug the card...)
- Was probably defectuous ; makes a big fan noise in vertical position at irregular intervals "airplane mode", that is completely stopped by a knock on the power supply... I will have to change it. UPDATE : I brought back the power supply to the reseller that did the swap with another immediately. Same noise ; same knock to make it stop. AVOID THIS POWER SUPPLY+++
Installation of OS X "El Capitan" 10.11.4
(Build 15E65)
(Build 15E65)
Before you begin ; Steps 1 and 2
I strictly followed this tonymacx86 guide, with "before you start", "Step 1", and "Step 2" were prepared on my 5-years old Mac Mini, and a generic 16 Gb USB stick. In Step 2, I selected UEFI Boot Mode.
Add few things on the USB stick
- The NVidia GTX 960 driver
- A tool to mount your Hackintosh's EFI partition (you'll have to modify a file to make the USB 3.0 work)
Here is how to setup the Z97X Gaming 3:You can find your motherboard BIOS version in the main bios page if you press F9 on the keyboard ; mine (Bios version) was "F6" (remember, this a version number, not a function key). It is a bit messy to configure that BIOS, so the best is to use the classic mode by typing F2 key.
- Load Optimized Defaults (F7 key)
- BIOS Features>VT-d>DISABLED
- Peripherals>xHCI Mode>Auto
- Peripherals>Intel Processor Graphics>DISABLED
- Peripherals>EHCI Hand-off>ENABLED
- Save and Exit (F10 key)
Gigabyte may prepare a new set of « optimized defaults », so here are a few screenshots with all options detailed. NB : xHCI was edited to "Auto", not "Enabled"


OSX installation from your USB stick (Step 4)
Your USB stick includes a boot selector called “Clover”. This latter is NOT on your main hard drive at the moment, meaning that even after the installation of OSX on your hard drive, you’ll need the USB stick (and Clover) to boot from the HDD, run the “Multibeast” app to inject Clover on the HDD, so that you can get rid of the USB stick to boot from the HDD. Sorry to explain this, but it took me a few hours and 2 installations to understand… This is the reason why the tonymacx86 guide, in step 5, will ask you to boot the USB stick (even if the OSX installation is finished), and not the fresh El Capitan HDD.
Please note that you need to plug the USB stick on a USB 2 (not blue) port++
Surprisingly, this Step 4 ran without problem.
Step 5: Post-installation
As explained in previous section, you need to let the USB stick plugged, force your BIOS to boot on it, THEN ask the Clover bootloader to boot the El Capitan HDD. OSX will require a few steps of setup. Once setup is done (Stork advises to not setup iCloud -which I did-), you are on the El Capitan Desktop, with the USB stick on topright.
Open the USB stick, and launch “Multibeast” (v.8.1.0).
Here are the options that worked fine with my configuration, depending on the tonymacx86 guide.
Step 5.7 (Quick Start) :
Open the USB stick, and launch “Multibeast” (v.8.1.0).
The aim of Multibeast is to prepare your HDD to boot by itself (thanks to Clover), and to install a few drivers for OSX. Unfortunately, there is no “check”, and no easy possibility to cancel your actions. Some may make your OSX crash, and force you to start over the process. Thus, you need to be VERY CAUTIOUS, with Multibeast.
Here are the options that worked fine with my configuration, depending on the tonymacx86 guide.
Step 5.7 (Quick Start) :
- UEFI Boot Mode
Step 5.8 (Drivers)
- Drivers>Audio : ACL1150 <- Choose this one for the Z97X Gaming 3
- Drivers>Disk : Nothing
- Drivers>Misc : FakeSMC v6.18-313-g671g31c.1707
- Drivers>Misc : FakeSMC Plugins v6.18-313-g671f31c.1707
- Drivers>Misc : FakeSMC HWMonitor Application v6.18-313-g671f31c.1707
- Drivers>Network : AtherosE2200Ethernet v2.1.0
- Drivers>USB : 7/8/9 Series USB Support
In Drivers>USB, you need to select 7/8/9 Series USB Support instead of 3[SUP]rd[/SUP] Party USB 3.0, in order to enable USB 3.0 support. But be very careful : after Multibeast is finished, you have to do modify the EFI as described below, and in Stork's guide, otherwise you will not be able to access your USB anymore, and may have to start everything over...
Step 5.9 (Customize)
- Customize>Graphics configuration : DO NOT CHECK ANYTHING
- Customize>SSDT options : DO NOT CHECK ANYTHING
- Customize>System Definitions : iMac 14,2 (meaning iMac “Core i7” 27-inch (Late 2013))
Step 5.11 (Build) :
- Now that all drivers are correctly checked, you need to “Build” your configuration.
When done, a nice message says everything is fine. You can close Multibeast
Step 5.12: (pasted here and adapted from Stork's guide):
 Open the Terminal (Spotlight->Terminal), copy/paste this command and Return:Code:
diskutil list
 Note the disk number (diskxs1) of your El Capitan drive
 Run EFI Mounter v3 (on your USB stick), type in your admin password and select the diskxs1 of your El Capitan drive
 Open the EFI drive and navigate to /EFI/Clover where you'll see the config.plist file.
  Right click on config.plist and select Duplicate
 Right click on config.plist again > Open With > Other > TextEdit (or another text editor).
There is a nice program called plistEditPro that helps doing it much easier.
 Being very careful, insert the Highlighted code after "KextsToPatch" so it looks like the below.
 Code:
<key>KextsToPatch</key>
<array>
<dict>
<key>Comment</key>
<string>change 15 port limit to 30 in XHCI kext (9-series)</string>
<key>Find</key>
<data>
g72M/v//EA==
</data>
<key>Name</key>
<string>AppleUSBXHCIPCI</string>
<key>Replace</key>
<data>
g72M/v//Hw==
</data>
</dict>
...
</array>
 Save it.
 Time to install the GPU driver. After reading this information, you can click on this link to go to NVidia Website, and download the good version for El Capitan. My file was WebDriver-346.03.06f01.pkg.
It is possible to download it before you install OSX, and copy it while you prepare the USB stick, besides Multibeast.app.
Note : You can find somewhere on the net that you have to enable boot argument « nvda_drv=1 », but I had not to do it.
Step 5.13: Reboot.
I did not do anything with it
What's working
- Boot time: Machine boots relatively fast, provided that the BIOS has started (this can take 10 sec, since I added 3 HDD in the case. Did not took any time with only one SSD). Logon screen arrives about 4 seconds after the Apple.
- Screens: I could setup the machine with 2 screens (could be more I guess), without any problem. NVidia driver is visible in the preferences panel, up to date. I did a few tests without the NVidia drivers, and it is obvious that they give some smoothness. There is no flicker, and the Mission Control blurring is fast.
- LAN is working good.
- WiFi: I installed the TL-WDN4800 card in a PCI-Express slot, rebooted, and WiFi worked fine without any configuration. Thanks to Apple keychain, even the old WPA password of my home network was immediately functional. Nothing to do.
- Performances using GeekBench 3, 32 bits, single and multicore are 3633 pts and 13740 pts, respectively. As far as I see on the Geekbench Browser, my i7-4790 Hackintosh ranks #2 in the 32-bit Single Core tests (top is 3884 for the iMac i7-4790K 4GHz and under my Hackintosh is the iMac i7-4771 3,5 GHz with 3501 points). Logical. In the 32 bits multicore tests, this Hackintosh is #15, again between the 2 iMacs, and under almost all Mac Pro after 2009. I could not access the 64-bit tests, but I believe it is roughly the same figure. The “unlocked” 4790-K is probably the fastest processor you can put on the Gaming 3 motherboard (and other socket 1150 mobo).
- Bluetooth: I bought the USUS Bluetooth 4.0 Adapter model USB-BT400. I just plugged it when the system was installed, went to the preferences under Bluetooth, and saw it. Nothing to do, nothing to install. Shared connection with my iPhone worked immediately (3G). Surprising!
- Webcam: Just plugged my Logitech HD C270 webcam. Works fine instantly in facetime.
- CUDA drivers : CUDA is for parallel computing using your GeForce GPU (info : http://www.nvidia.fr/object/cuda-parallel-computing-fr.html). There are drivers ready for your card here : http://www.nvidia.fr/object/mac-driver-archive-fr.html. I just downloaded the 7.5.26, installed it, and it worked fine (a new icon in the preferences), although I could not test.
What's not working
- Sound: Hum…No sound after wake-up. It is true that the sound can output on the black output, but it is really lower, and not usable.
It is written somewhere on the net that this is due to the “fake” system definition (remember iMac 14,2 above ?). That was the reason why I did not choose MacPro. However, this trick does not work on my system.
- iMessages : I can not receive iMessages on the Hackintosh, even after trying the various guides available here.
- Clover is really complicated to use. When you type instructions in the boot menu, it is difficult to see if they are saved, and usually, you can not remove anything, just add. A nightmare...

Windows 10
I only plugged another SSD on the SATA chain, and installed W10 from an external DVD drive, without problem. All components were immediately recognized...
Septembre 2016 - macOS Sierra update
Tried to do the "regular" update from 10.11.4 to Sierra. Downloaded installator through AppStore, then ran it. Installed correctly, but : nVidia to update (easy), Office 2016 completely crashes (no solution), Java to update (easy). Tried to modify EFI files using Clover Configurator, and everything crashed. Had to completely reinstall El Capitan using this tutorial. Hopefully, this did a "reparation", and I found back my desktop.Conclusion
This was a good experience, but it took me 3 days to make everything work, understand the installation steps, install all my programs, and do the USB 3.0 "trick". I had to reinstall everything twice, because if you do a mistake with Multibeast, you're doomed... Reason why I decided to write that tutorial I hope helped you. I still have serious issues with the sound and iMessages, no wifi (because no card), a noisy case, and most of all, I believe all further system updates will provoke nightmares. Finally, building a Hackintosh can not be advised to "normal" users until Multibeast allows cancellation of wrong choices (kext, panic mode, "injections", etc...), and tests which drivers are required and already installed.
Last edited:

