- Joined
- Apr 28, 2011
- Messages
- 909
- Motherboard
- Asus Prime Z690M-Plus D4
- CPU
- i7-12700KF
- Graphics
- RX 6600
- Mac
- Mobile Phone
Giacomoleopardo's Workstation for MasterEaster
Intel® Xeon® E5-2687W v2 - Asus P9X79 WS - Dual AMD Radeon R9 280X
Clover step by step install method
Components
Intel® Xeon® E5-2687W v2 - Asus P9X79 WS - Dual AMD Radeon R9 280X
Clover step by step install method
Components
Asus P9X79 WS Motherboard
http://www.amazon.com/dp/B00686I638/
http://www.newegg.com/Product/Product.aspx?Item=N82E16813131798
Intel® Xeon® Processor E5-2687W v2 Ivy Bridge-EP
http://www.amazon.com/Intel-E5-2687W-Eight-Core-Processor-BX80635E52687V2/dp/B00F28T7ZY/
http://www.newegg.com/Product/Product.aspx?Item=N82E16819116937
2x MSI Video Graphics Card AMD Radeon R9 280X GAMING 3G
http://www.amazon.com/dp/B00FR6XPL8/
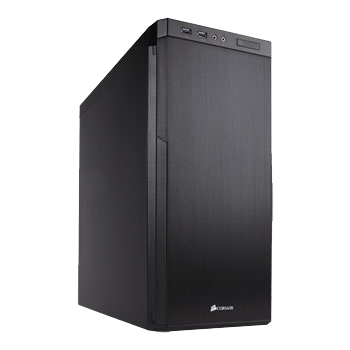
Carbide Series® 330R Quiet Mid-Tower Case - Corsair
http://www.amazon.com/dp/B00R0ZHWC2/
http://www.newegg.com/Product/Product.aspx?Item=N82E16811139056
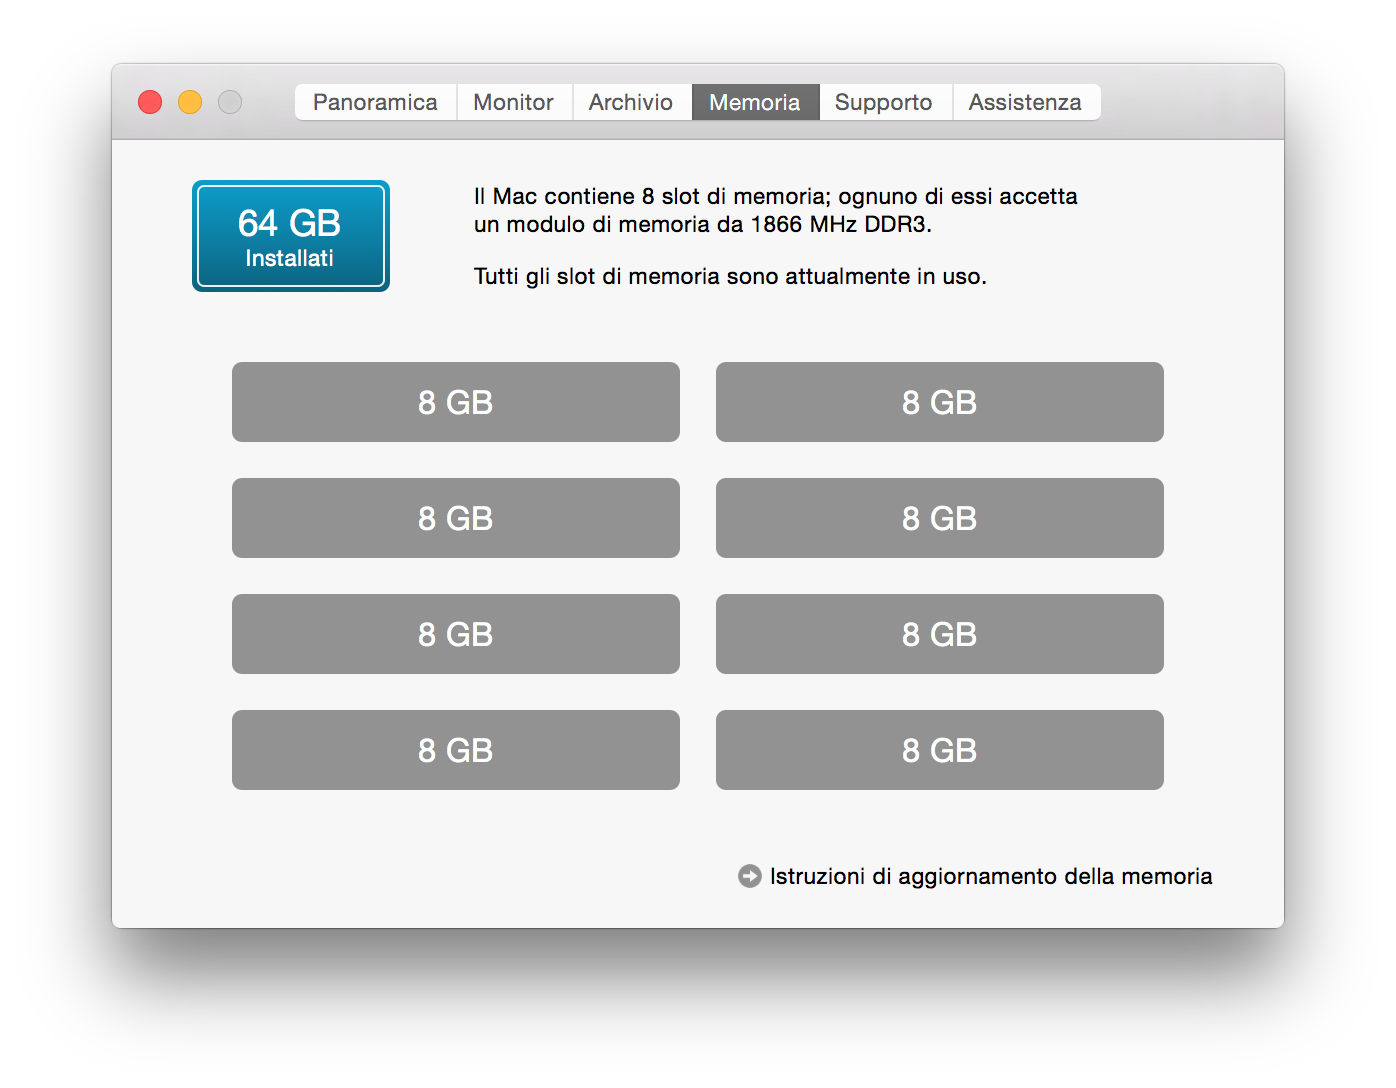
Corsair Vengeance 64 GB (8 x 8 GB) DDR3 1866 MHz CL9
http://www.amazon.com/dp/B009PV2I32/
http://www.newegg.com/Product/Product.aspx?Item=N82E16820233384t
Samsung 850 EVO 1 TB 2.5-Inch SATA III Internal SSD
http://www.amazon.com/dp/B00OBRFFAS/
http://www.newegg.com/Product/Product.aspx?Item=N82E16820147374
2x Seagate 2TB Desktop HDD SATA 6Gb/s 64MB Cache 3.5-Inch Internal Bare Drive
http://www.amazon.com/dp/B005T3GRN2/
http://www.newegg.com/Product/Product.aspx?Item=N82E16822148834
2x Seagate 1TB Desktop HDD SATA 6Gb/s 64MB Cache 3.5-Inch Internal Bare Drive
http://www.amazon.com/dp/B005T3GRNW/
http://www.newegg.com/Product/Product.aspx?Item=N82E16822148840
Corsair Hydro Series™ H100i GTX Extreme Performance Liquid CPU Cooler
http://www.amazon.com/dp/B00SV7IEJI/
http://www.newegg.com/Product/Product.aspx?Item=N82E16835181090
LG WH16NS40 Super Multi Blue Internal SATA 16x Blu-ray Disc Rewriter
http://www.amazon.com/dp/B00E7B08MS/
http://www.newegg.com/Product/Product.aspx?Item=N82E16827136269
Corsair RM Series 850 Watt ATX/EPS 80PLUS Gold-Certified Power Supply
http://www.amazon.com/dp/B00EB7UIXM/
http://www.newegg.com/Product/Product.aspx?Item=N82E16817139056
TP-LINK TL-WDN4800 Dual Band Wireless N900 PCI Express Adapter,2.4GHz 450Mbps/5Ghz 450Mbps
http://www.amazon.com/dp/B007GMPZ0A/
http://www.newegg.com/Product/Product.aspx?Item=N82E16833704133
StarTech 5.25in Trayless Hot Swap Mobile Rack for 3.5in Hard Drive - Internal SATA Backplane Enclosure
http://www.amazon.com/dp/B000KS8S9W/
http://www.newegg.com/Product/Product.aspx?Item=N82E16817998020
Already owned
Bluetooth dongle Belkin F8T016 (just for dual boot with Apple Wireless Keyboard)
http://www.amazon.com/dp/B001BROKXO/
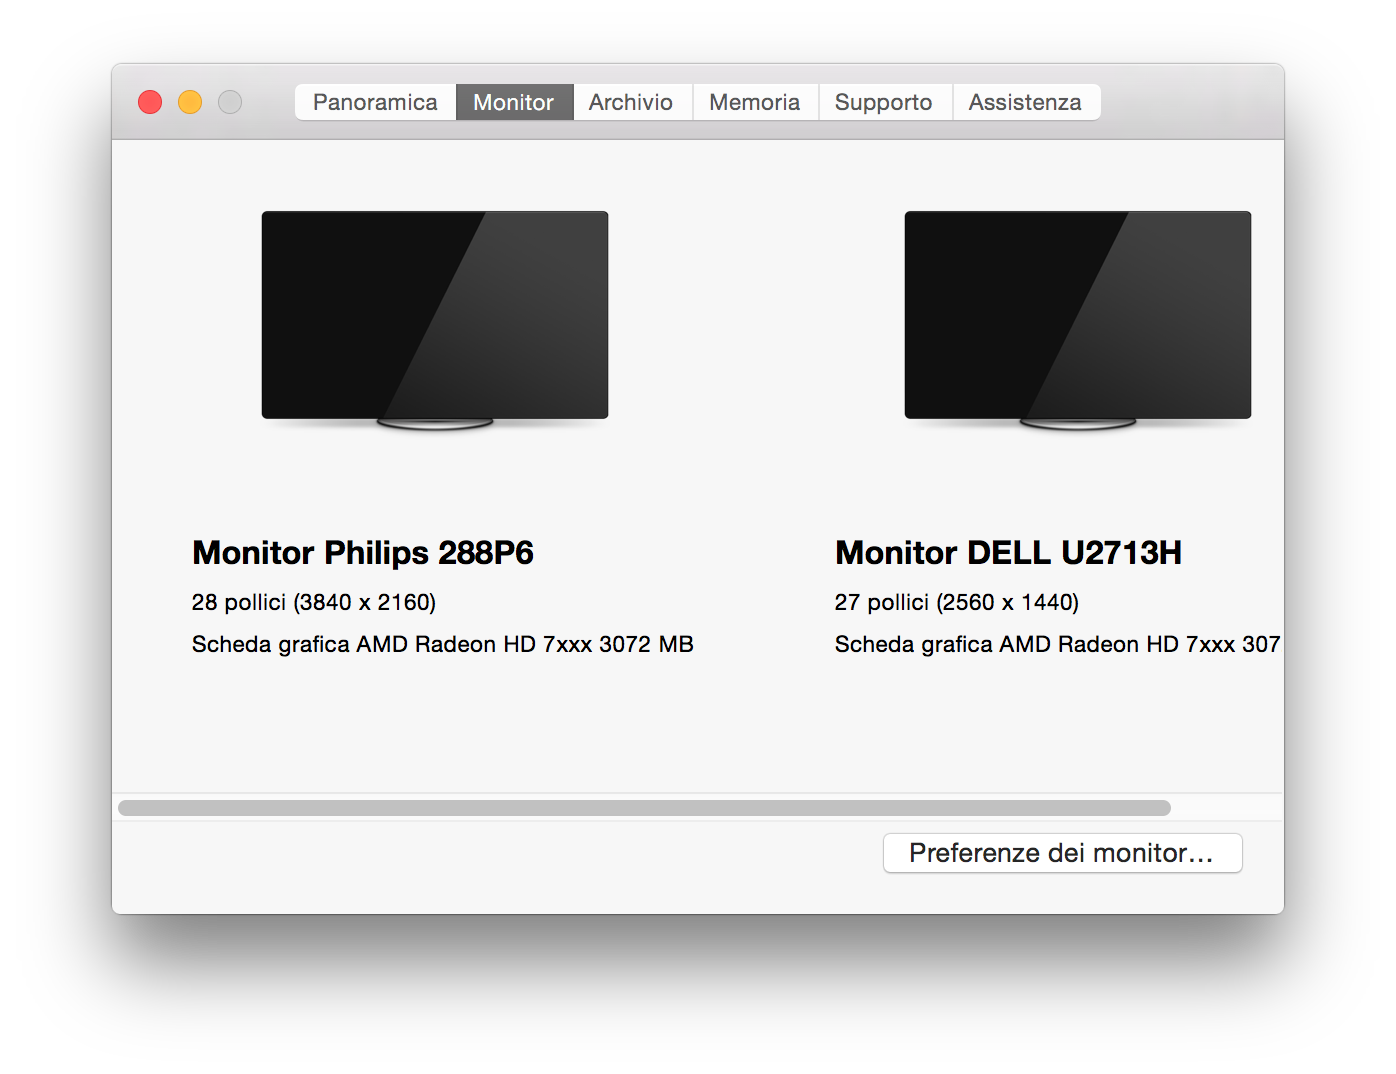
Philips 28-Inch 4K Ultra HD LED Monitor w/ 3840 x 2160 resolution
http://www.amazon.com/dp/B00K15LQZM/
http://www.newegg.com/Product/Product.aspx?Item=9SIA1G538G7353
Dell UltraSharp U2713H 104P6 27-Inch LED-lit Monitor
http://www.amazon.com/dp/B00BBIS0M0/
http://www.newegg.com/Product/Product.aspx?Item=N82E16824260125
A bunch of monitors (owned, borrowed, etc!) such as:
- 2x 27" Apple Cinema Display (MiniDisplay Port) - 2560 x 1440 - Audio via DisplayPort + USB
- 24" Apple Cinema Display (MiniDisplay Port) - 1920 x 1200 - no Audio
- 23,5 Asus VN247 (HDMI) - 1920 x 1080 - Audio via HDMI
- 24" 4K Dell P2415Q - Display Port - 1920 x 1080 HiDPI - Audio via DisplayPort
- 24" EIZO S2410W - DVI 1920 x 1200 - no Audio
- 24" Apple Cinema Display (MiniDisplay Port) - 1920 x 1200 - no Audio
- 23,5 Asus VN247 (HDMI) - 1920 x 1080 - Audio via HDMI
- 24" 4K Dell P2415Q - Display Port - 1920 x 1080 HiDPI - Audio via DisplayPort
- 24" EIZO S2410W - DVI 1920 x 1200 - no Audio
Apple Wireless Keyboard
http://www.amazon.com/dp/B005DLDO4U/
http://www.newegg.com/Product/Product.aspx?Item=9SIA3781XU7460
Comments
Have you ever noticed those huge advertising posters in the middle of a train station, perhaps at the airport, alongside the highway, or just covering the entire side of a building? Well this machine is going to take care about the entire creation process of those files. The guy, MasterEaster I mean, asked me for a powerful machine and of course my first thought was X99, DDR4 etc... Then he told me that was a stable platform for high-end production kind of thing, hence X79.
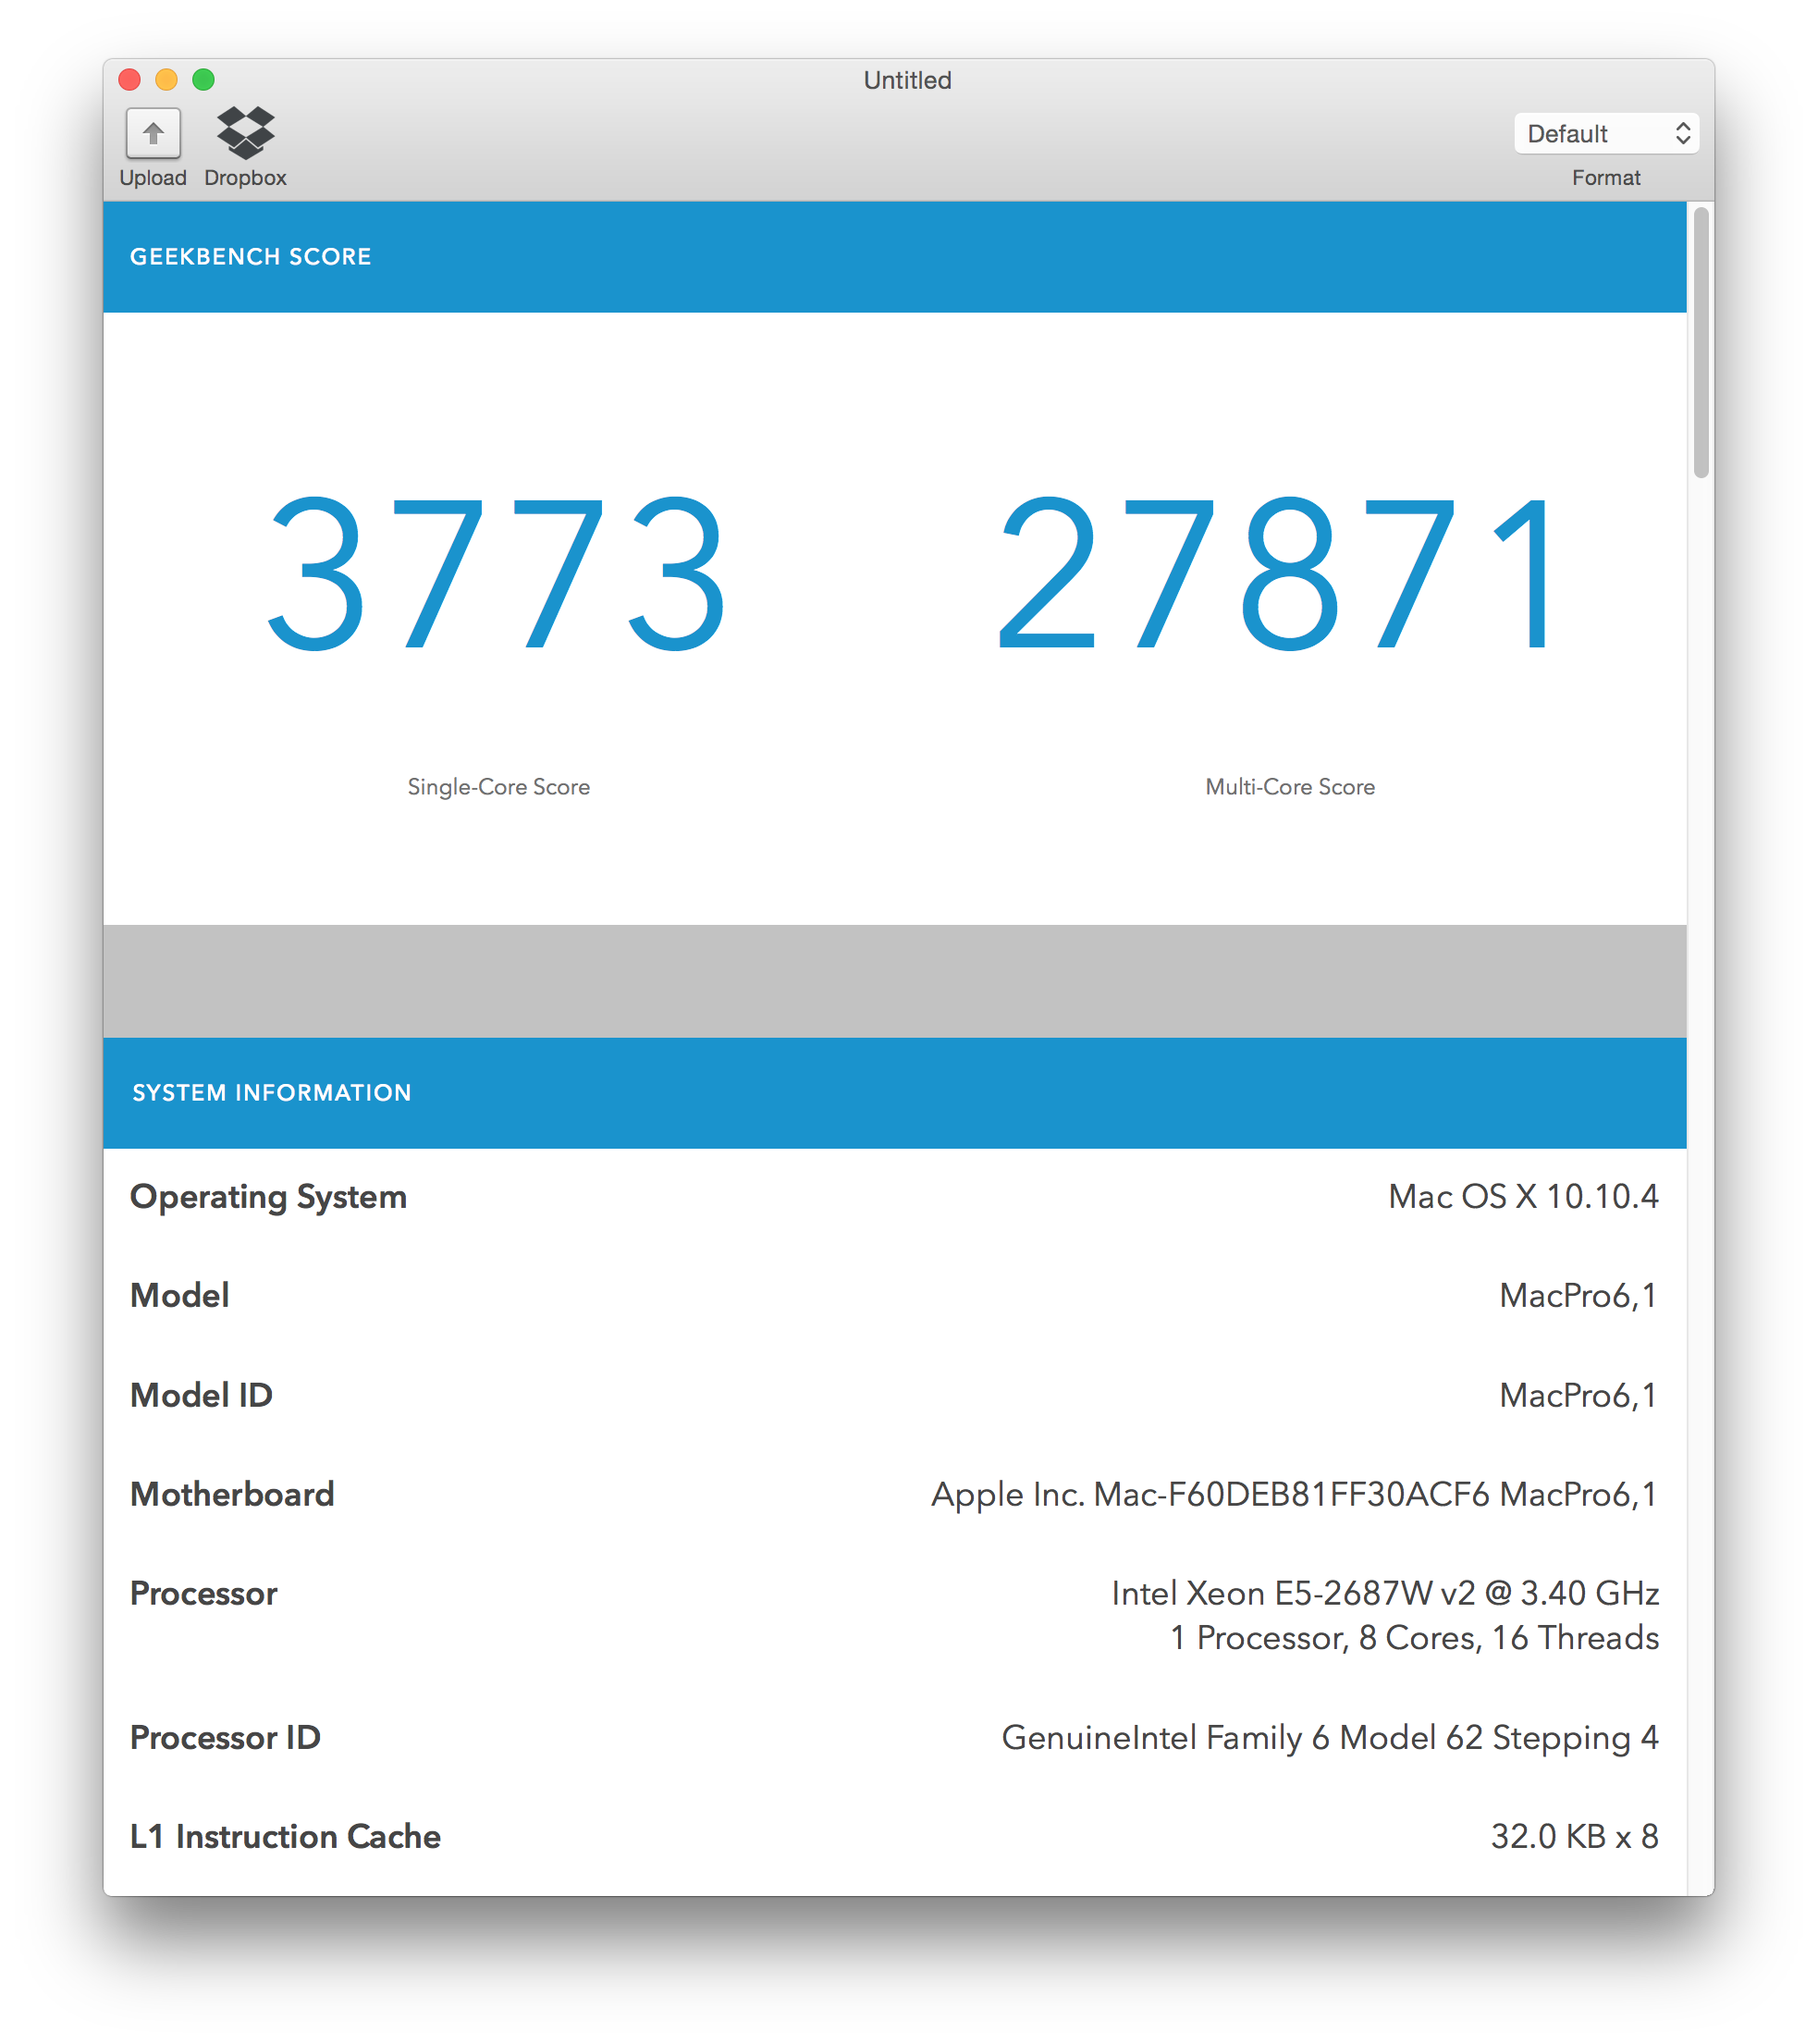
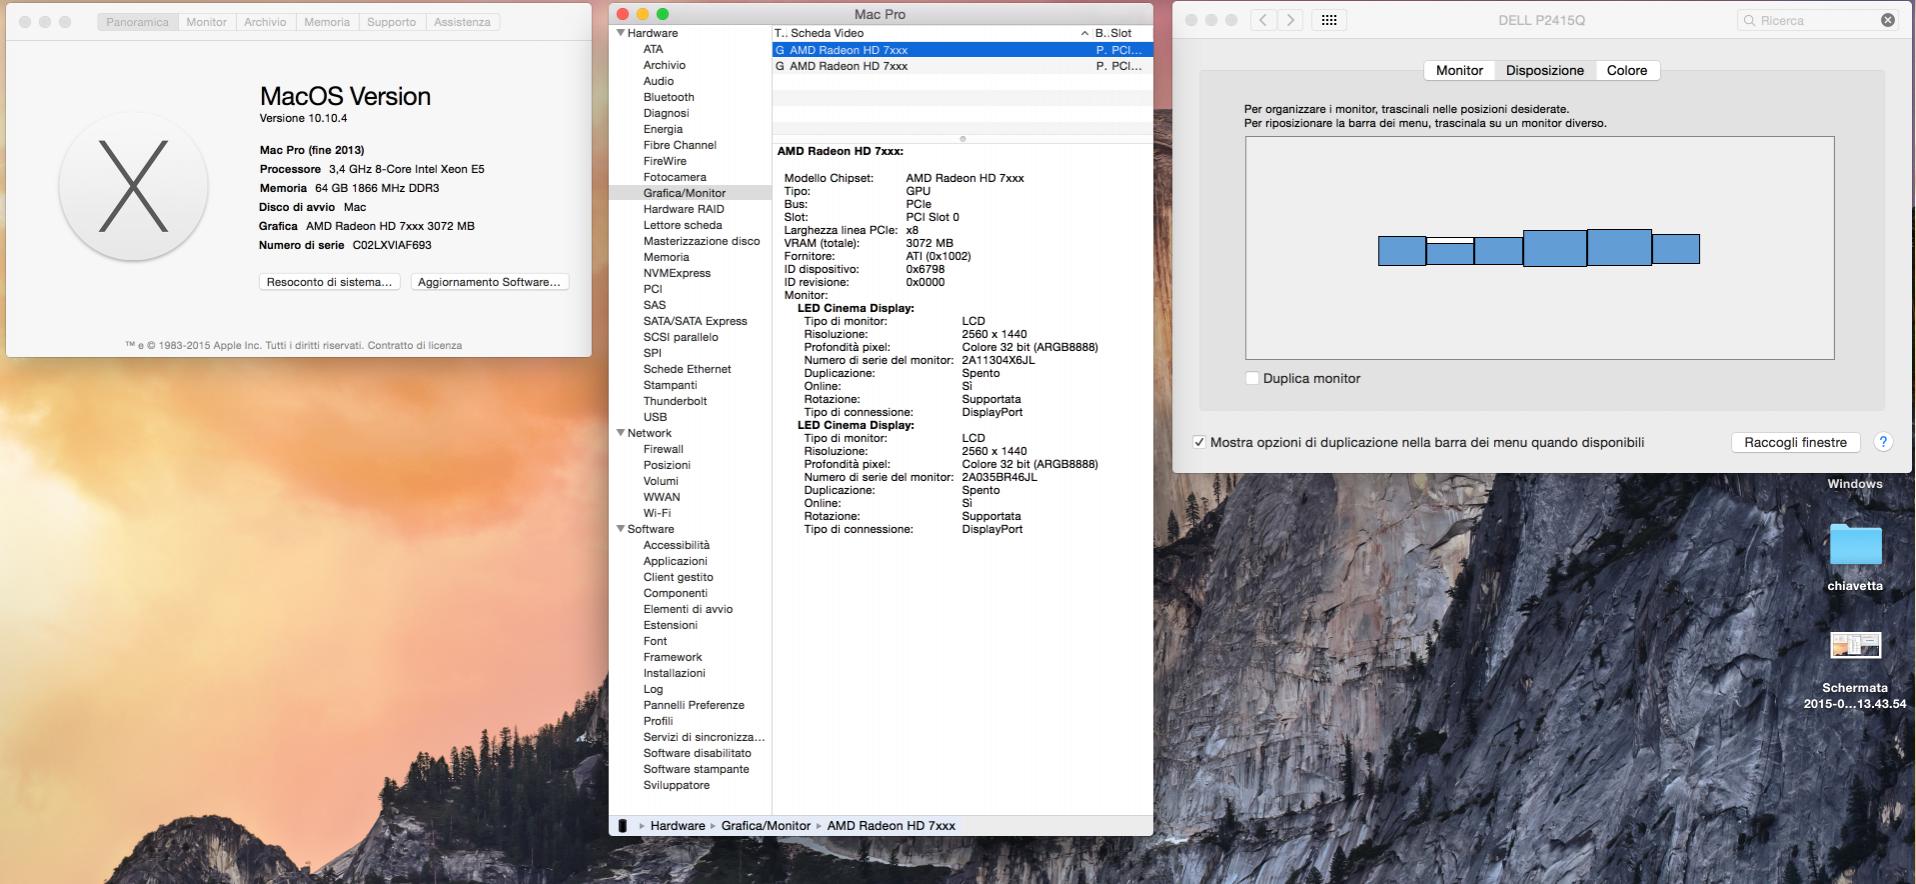
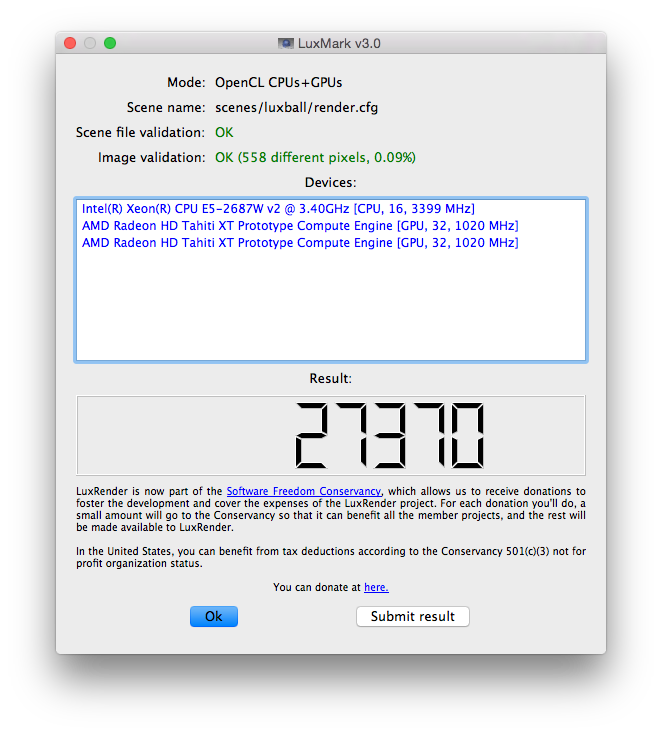
Well yes, two graphics cards, eight core CPU (too bad in Italy I didn't find The E5 2690 v2 with 10 cores), 64 GB DDR3 RAM (CAS latency 9!) @1866 MHz.
Stable, fully functional with OS X Yosemite, totally upgradable (see videos in post #2).
For those of you wondering why AMD, rather than nVidia, well, 'cause it's native support (even native ATY Framebuffer). I know a lot of troubles affect AMD cards regarding support or multi monitor configuration, but these ones basically work great in every situation (4K @ 60 Hz HiDPI included).
Installation
Index
Tools
Step 1 - Update Bios
Step 2 - Bios configuration
Step 3 - Pre Installation
Step 4 - OS X Yosemite installation
Step 5 - Post installation
Tools:
- Latest Asus P9X79 WS bios (Version 4802 at the moment)
- Clover Bootloader Installer
- Clover Configurator
- MaciASL Open Beta
- IORegistryExplorer 3.0.X (google for it) or IOJones
- Yosemite install App
- 8 GB (at least) USB pen drive
- A working Mac or Hackintosh
- Clover Bootloader Installer
- Clover Configurator
- MaciASL Open Beta
- IORegistryExplorer 3.0.X (google for it) or IOJones
- Yosemite install App
- 8 GB (at least) USB pen drive
- A working Mac or Hackintosh
Step 1 - Update Bios
- Download the latest proper bios
- Unzip it and copy the cap file onto a FAT formatted USB pen drive
- Boot PC, press Del key to access Bios
- Now go to Boot/Asus EZ Flash 2 Utility and from there locate the usb Drive and the bios update file (P9X79-WS-ASUS-4802.CAP at the moment) and click the file to flash your bios
Warning: make sure the flashing process won't interrupt, otherwise you'll need to replace bios chip or flash it with a SPI programmer!- Unzip it and copy the cap file onto a FAT formatted USB pen drive
- Boot PC, press Del key to access Bios
- Now go to Boot/Asus EZ Flash 2 Utility and from there locate the usb Drive and the bios update file (P9X79-WS-ASUS-4802.CAP at the moment) and click the file to flash your bios
Step 2 - Bios configuration
- Boot pc
- Press Del key to gain Bios settings
- Press F7 for Advanced settings
- Press F5 to load Optimized Defaults
- Follow these screenshots
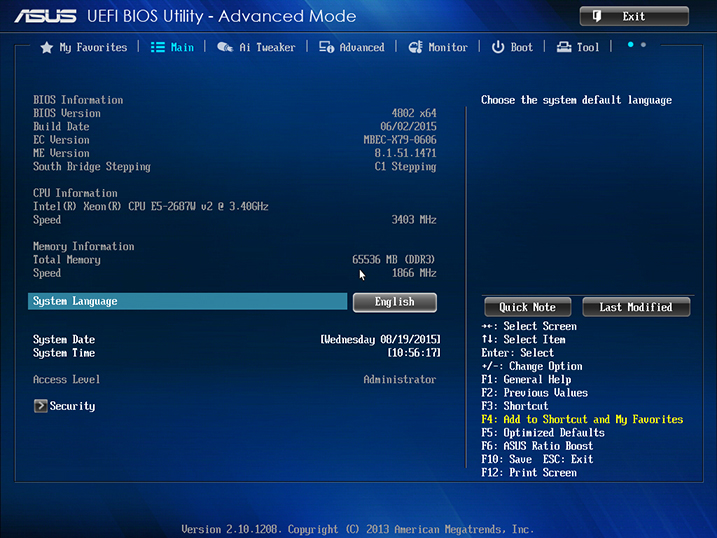
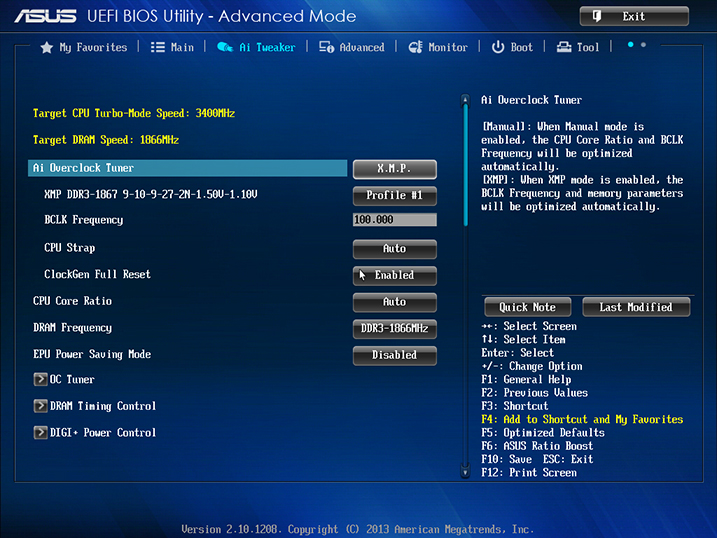
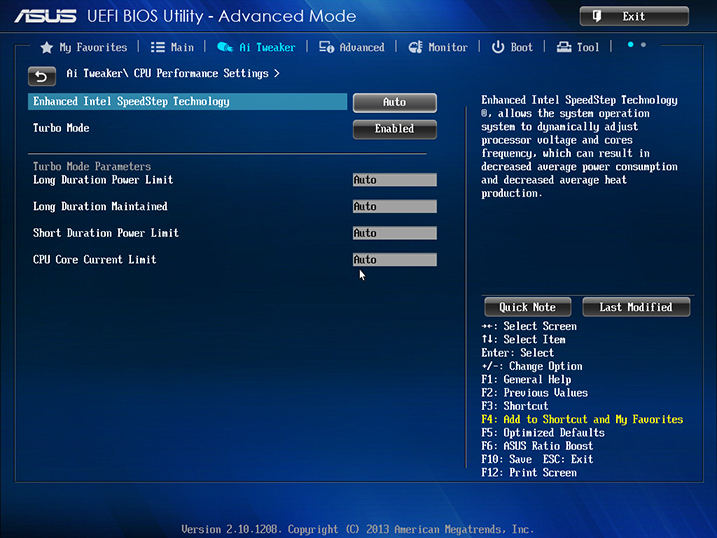

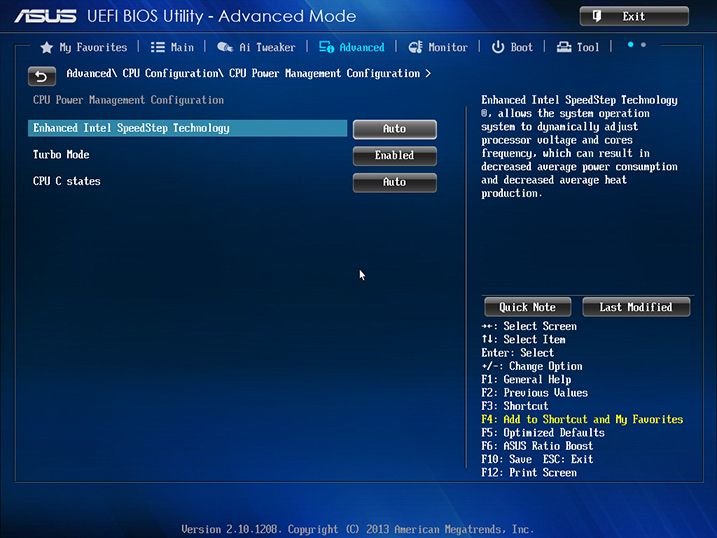
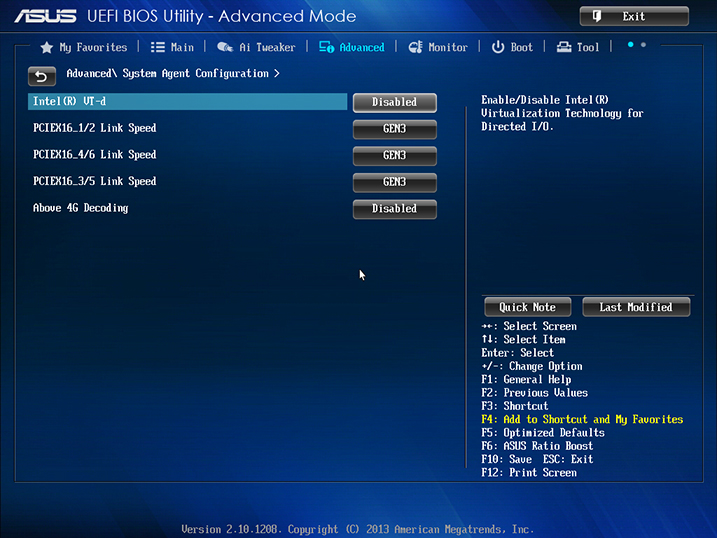
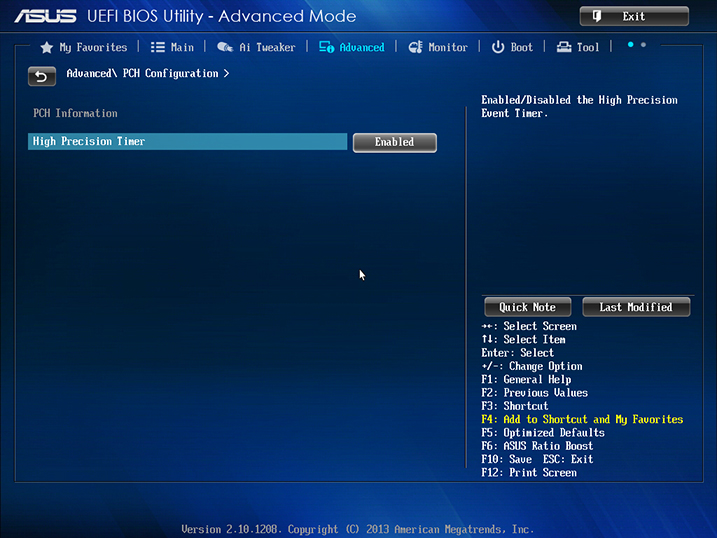
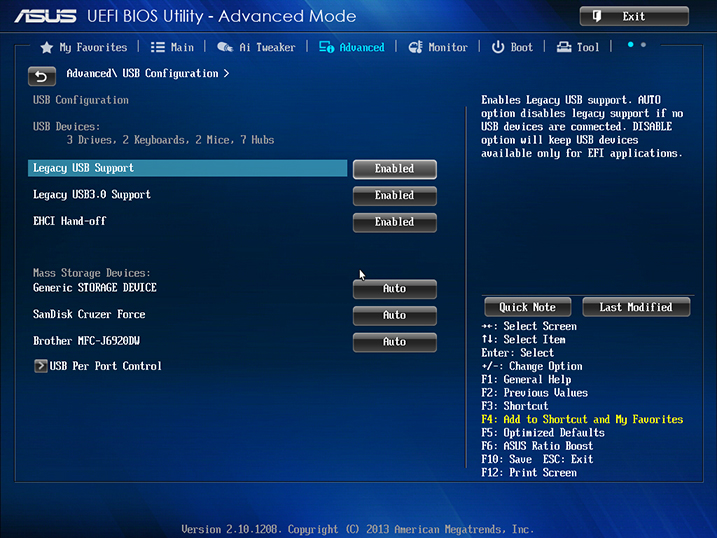
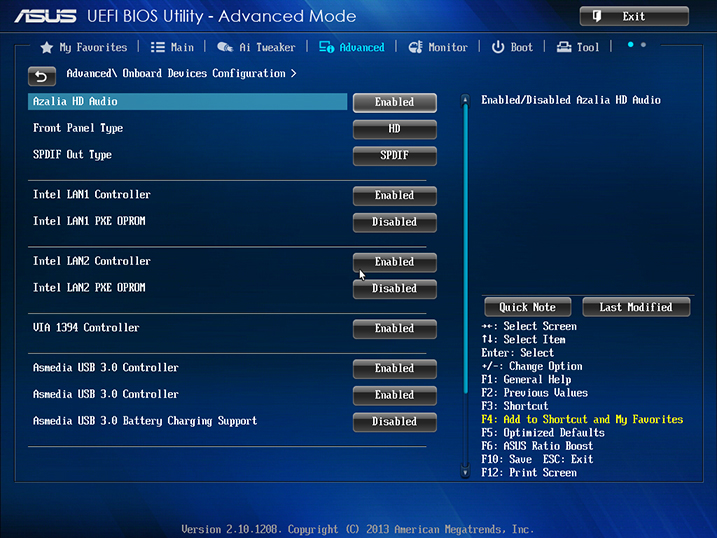
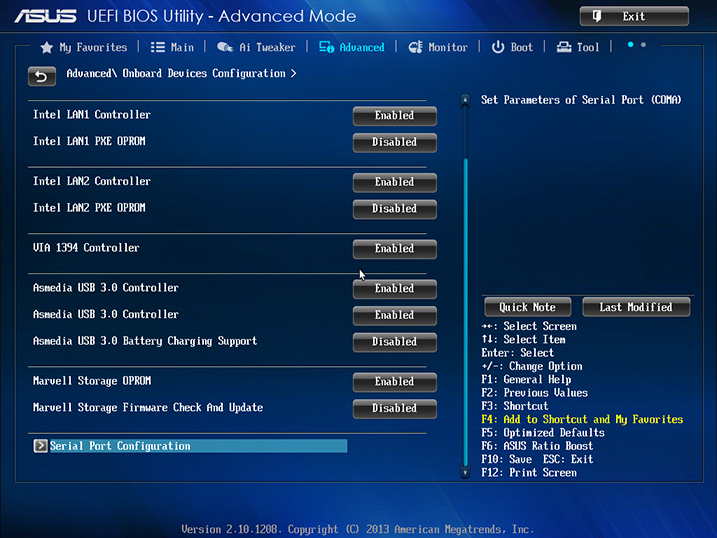
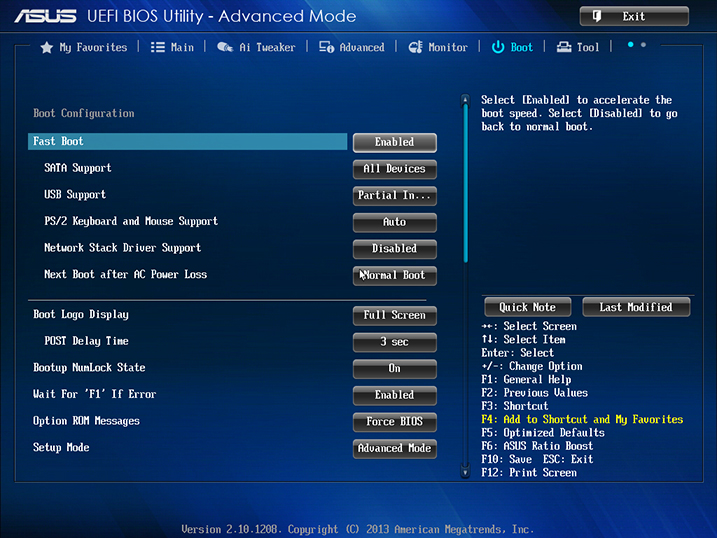
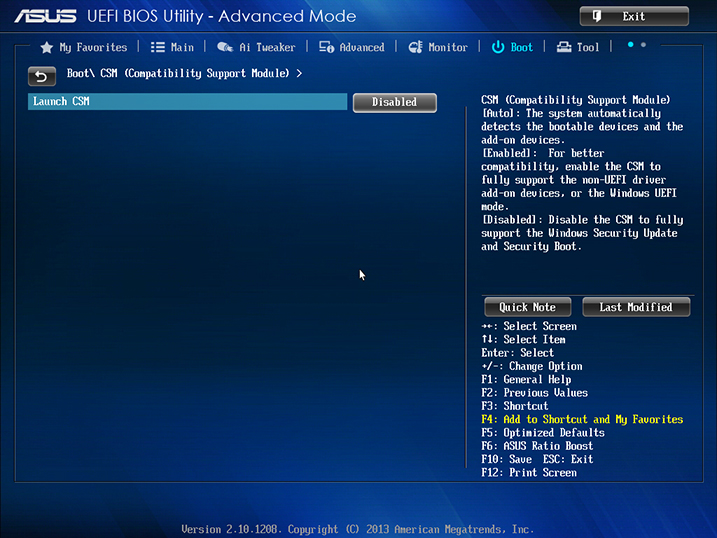
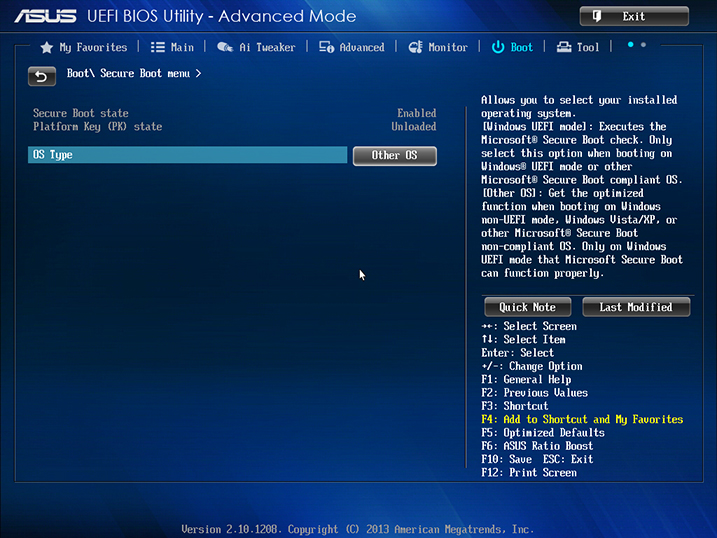 - Press F10 key to Save and Reboot
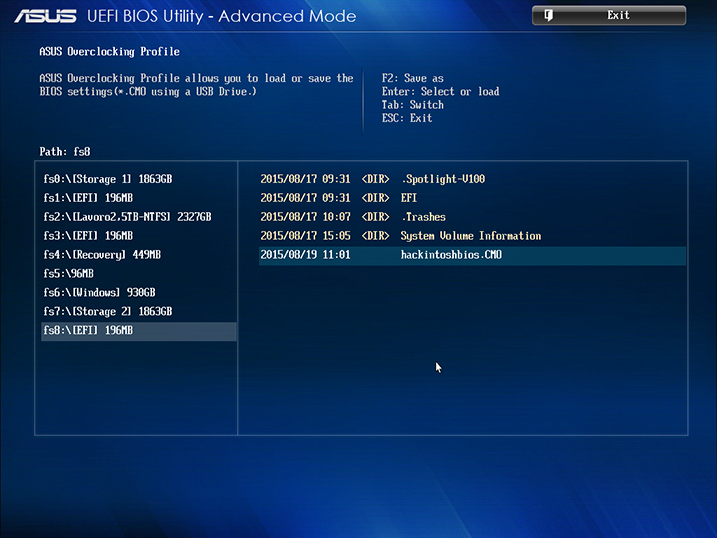
If you don't feel comfortable in settings Bios, you can always use my profile:
- Press Del key to gain Bios settings
- Press F7 for Advanced settings
- Press F5 to load Optimized Defaults
- Follow these screenshots
If you don't feel comfortable in settings Bios, you can always use my profile:
- Download it from the attachments at the bottom of this post (Giacomoleopardo P9X79 WS/hackintoshbios.CMO)
- Copy it onto a FAT formatted usb pendrive
- Boot into Bios and go to Tool/ASUS Overclocking Profile
- Select Load from USB (or whathever, can't remember the exact path)
- Choose USB pendrive (left side of the window)
- Choose hackintoshbios.CMO (right side of the window)
- Press Enter to load the profile
- Press F10 key to Save and Reboot
Step 3 - Pre Installation
We need to take care about a few things before the install process, to set up the USB install pendrive, such as:
Setting up the Initial DSDT.aml
The first real issue I got into trying to install with a generic USB Install pendrive was this one
 A panic due to something related to the numbers of cpu: "Should have 16 Threads, but only found 17 for Die 8" etc... So I figured out that I ought to give the system that info by DSDT injection. Then let's prepare an initial DSDT, we're going to complete that in post installation (see step 5 - post installation). Here's what I did:
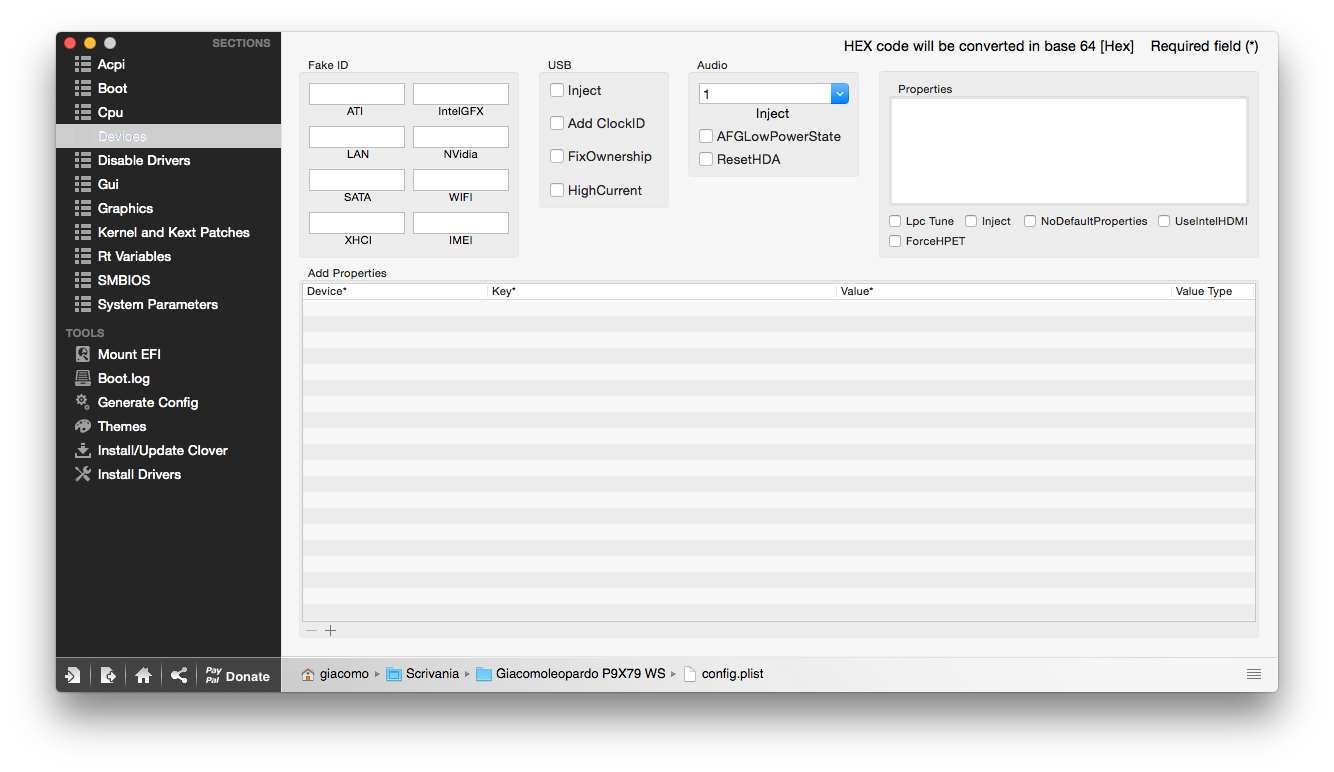
Setting up config.plist
A few clover configurator screenshots.


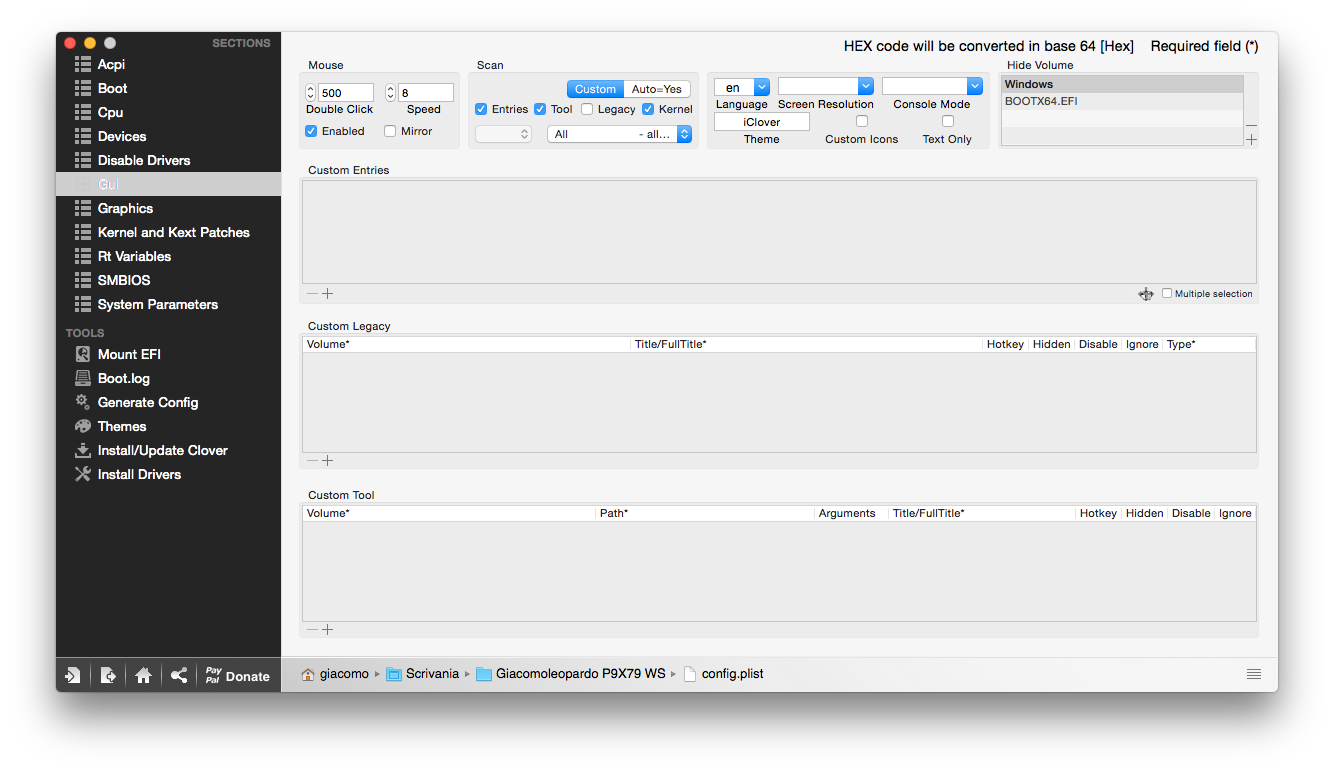
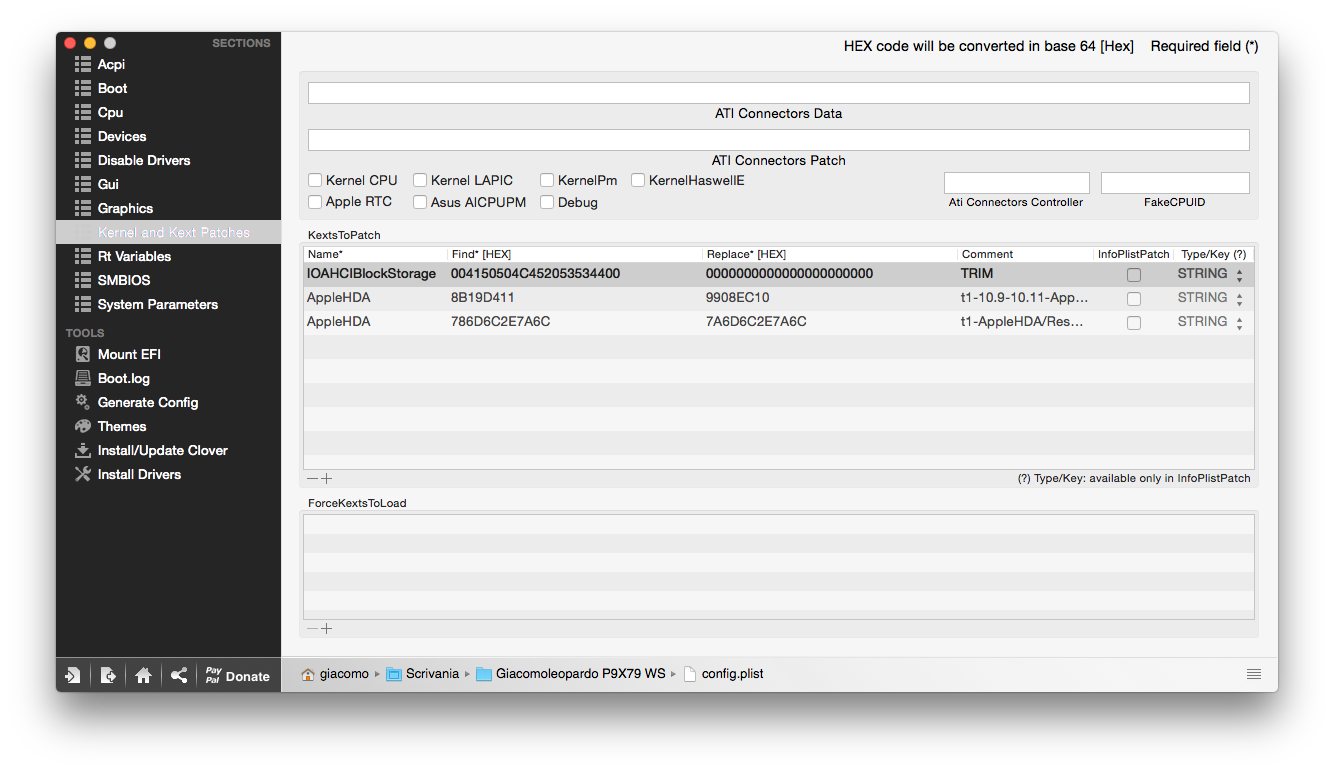
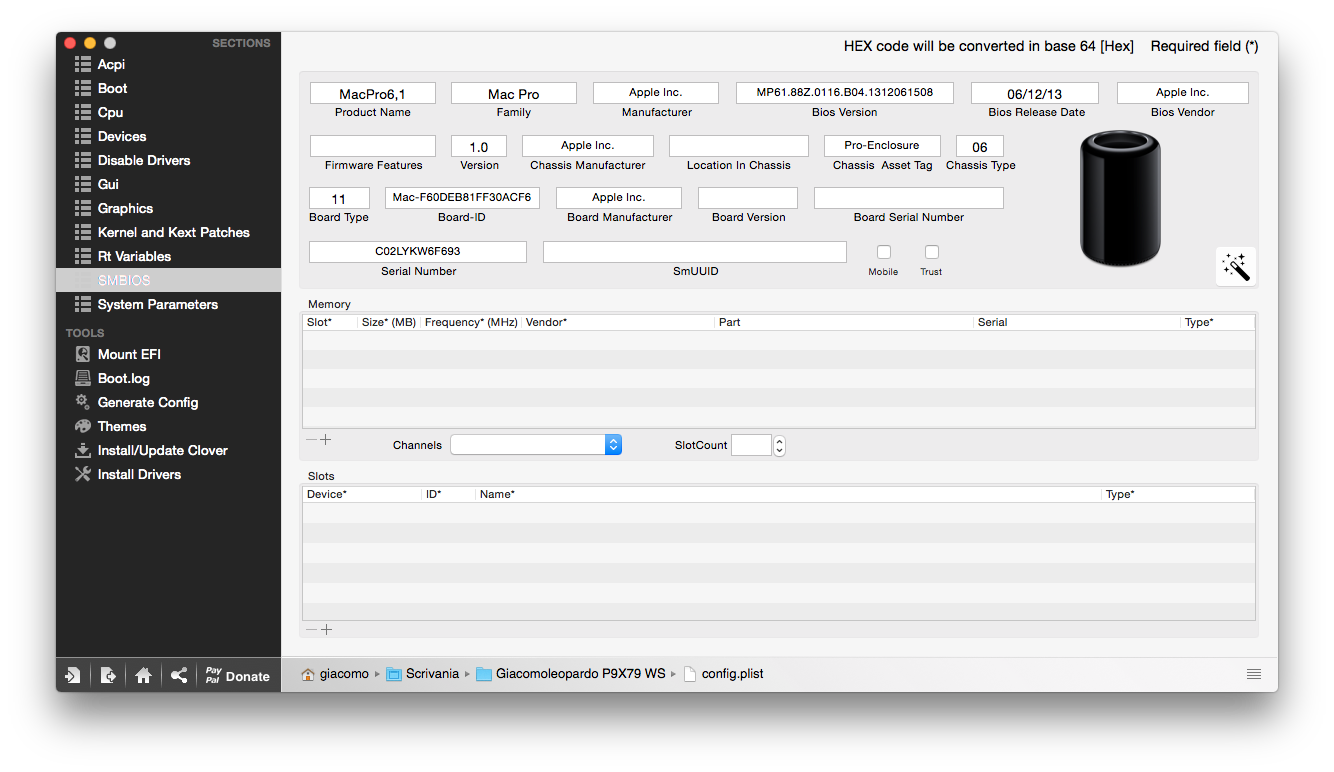
 Anyway, you can find it in the attached folder
  .
.
Setting up kexts folder
You need to gather all the needed kexts based on your hardware configuration and put them into kexts/10.10 folder. In my case:
Preparing bootable USB pen drive with UEFI Clover
Follow these steps to set up the USB pen drive installer:
The first real issue I got into trying to install with a generic USB Install pendrive was this one
- Installed Windows 10
- Downloaded AIDA64 Engineer from here
- Extracted DSDT.acpi and renamed dsdt aida.aml
- Edited DSDT as follows:
- Open MaciASL/Preferences/iASL and select ACPI 5.0, then click on Update iASL button. Close MaciASL
- Open dsdt aida.aml with MaciASL
- Click on Patch command
- Click on Open button (down left)
- Select from Giacomoleopardo P9X79 WS folder attached down here, DSDT/DSDT patches/01 - Toleda's clean.txt
- Click Apply button
- Click on Open button again
- Select from Giacomoleopardo P9X79 WS folder attached down here, DSDT/DSDT patches/02 - usb + lenght fix.txt
- Click Apply then Close buttons
- Find “processor” in DSDT, then based on your cpu’s threads number (mine is 16) leave just the first 17 (or whatever your number of threads is + 1, I mean from #0 to #16). Please note that they are counted in hexadecimal 0 to 9 are the same but Decimal 10 = Hexadecimal 0A, 11 = 0B, 12 = 0C, 13 = 0D, 14 = 0E, 15 = 0F, 16 = 10 etc…). Here you can find an easy way to translate numbers
My last would be
Code:Processor (C010, 0x0F, 0x00000410, 0x06) { Name (_HID, "ACPI0007") // _HID: Hardware ID Name (_UID, "PCI0-CP010") // _UID: Unique ID Name (_PXM, Zero) // _PXM: Device Proximity Method (_STA, 0, NotSerialized) // _STA: Status { If (LEqual (CSTA (Zero, 0x10), Zero)) { Return (Zero) } Else { Return (0x0F) } } }
Note C010, The last two numbers are the hexadecimal number of CPU’s thread
Then delete the first one, as well
So basically you need to delete everything until you findCode:Processor (C000, 0x80, 0x00000410, 0x06) { Name (_HID, "ACPI0007") Name (_UID, "PCI0-CP000") Name (_PXM, Zero) Method (_STA, 0, NotSerialized) { If (LEqual (CSTA (Zero, Zero), Zero)) { Return (Zero) } Else { Return (0x0F) } } }
That would be the last one to be deleted.Code:Processor (C31D, 0xE7, 0x00000410, 0x06) { Name (_HID, "ACPI0007") // _HID: Hardware ID Name (_UID, "PCI3-CP31D") // _UID: Unique ID Name (_PXM, 0x03) // _PXM: Device Proximity Method (_STA, 0, NotSerialized) // _STA: Status { If (LEqual (CSTA (0x03, 0x1D), Zero)) { Return (Zero) } Else { Return (0x0F) } } } - Click on Compile command and no errors should appear
- If you find a Warning reporting: “ResourceTag larger than Field (Size mismatch, Tag: 64 bits, Field: 32 bits)”
then replace CreateDWordField with CreateQWordField - If you find a Warning reporting: “ResourceTag smaller than Field (Size mismatch, Tag: 16 bits, Field: 32 bits)”
then replace CreateDWordField with CreateWordField - If you find a Remark reporting “Control Method should be made Serialized (due to creation of named objects within)”
then replace NotSerialized with Serialized - If you find a Warning reporting: “Not all control paths return a value (Name)”
then add Return (Zero) before the last “}” of the Method like this from
Code:Method (WX82, 2, NotSerialized) { ShiftLeft (One, Arg0, Local0) If (Arg1) { Or (LPCE, Local0, LPCE) } Else { Not (Local0, Local0) And (LPCE, Local0, LPCE) } }
to
Code:Method (WX82, 2, NotSerialized) { ShiftLeft (One, Arg0, Local0) If (Arg1) { Or (LPCE, Local0, LPCE) } Else { Not (Local0, Local0) And (LPCE, Local0, LPCE) } Return (Zero) } - Click again on Compile command and no errors should appear
- Save as DSDT.aml (ACPI Machine Language Binary)
- Initial DSDT.aml is finally ready to get to the install process
Setting up config.plist
A few clover configurator screenshots.
Setting up kexts folder
You need to gather all the needed kexts based on your hardware configuration and put them into kexts/10.10 folder. In my case:
- AHCI_3rdParty_SATA.kext (for Marvell controller)
- AppleIntelCPUPowerManagementInfo.kext (to check cpu p-states)
- FakeSMC.kext (mandatory for any hackintosh)
UPDATE #1 - IntelMausiEthernet.kext (for the first Intel LAN controller, the second one is not supported) AppleIntelE1000e.kext v. 3.2.4.2 (taken from MultiBeast 7.5.0) ---> No longer necessary! See UPDATE #2 or post #19
UPDATE #2
Thanks to forum member valitor we can use clover patch on the fly feature through a sort of "dummy kext" called IONetworkingFamilyInjector.kext (attached at the end of this post) which overlay the IONetworkingFamily.kext/Contents/Plugins/Intel82574L.kext with an extended device ID list that also matches the CT PCIe NIC of the native Intel 82574L NIC. See post #19 for more info. - Mieze's IntelMausiEthernet.kext for the other NIC Intel® 82579V Gigabit LAN Controller
Preparing bootable USB pen drive with UEFI Clover
Follow these steps to set up the USB pen drive installer:
- Make sure your Install OS X Yosemite.app would be in Applications folder
WARNING! I did the installation with OS X 10.10, with 10.10.3 and 10.10.4 I had some kind of cache panic, didn't have time to find why, but basically a 10.10 installation wouldn't give that problem - Plug your 8 GB USB in and open /Applications/Utilities/Disk Utility
- Open /Applications/Utilities/Disk Utility
- Highlight the USB drive in left column
- Click on the Partition tab
- Click Current and choose 1 Partition
- Click Options...
- Choose GUID Partition Table
- Under Name: type USB (You can rename it later)
- Under Format: choose Mac OS Extended (Journaled)
- Click Apply then Partition
- Open /Applications/Utilities/Terminal
- Type the following, enter password even if you don't see anything typed and hit enter. This command completely erases the USB, then creates native OS X installer media from the Install OS X Yosemite Application.
Code:sudo /Applications/Install\ OS\ X\ Yosemite.app/Contents/Resources/createinstallmedia --volume /Volumes/USB --applicationpath /Applications/Install\ OS\ X\ Yosemite.app --no interaction - Upon completion, the USB will be renamed Install OS X Yosemite
- Download the latest Clover installer from here
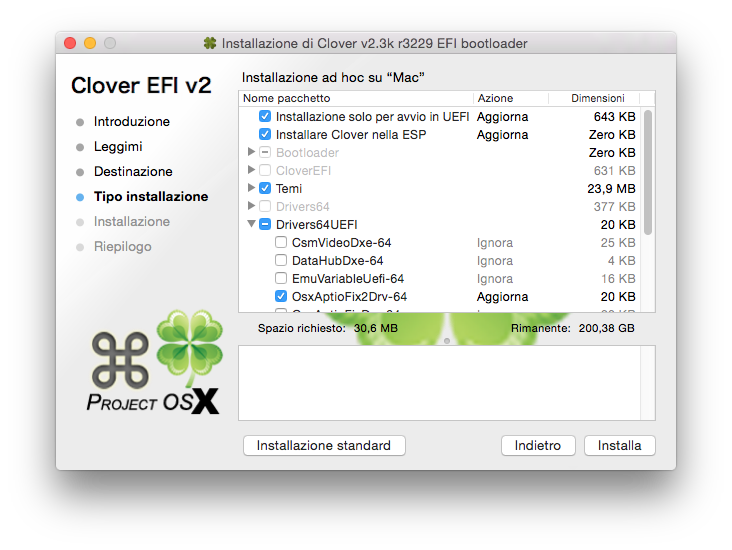
- Open Clover package installer
- Hit Continue, Continue, Change Install Location...
- Choose the USB, now called Install OS X Yosemite
- Hit Customize and install Clover to the same USB with the following Custom Install settings:
- The USB EFI partition will be mounted
- Put Initial DSDT.aml we prepared before in EFI/EFI/CLOVER/ACPI/patched and rename it DSDT.aml
- Replace config.plist in EFI/EFI/CLOVER
- Replace kexts folder in EFI/EFI/CLOVER
- Download HFSPlus.efi from here and copy it in EFI/EFI/CLOVER/drivers64UEFI
- Remove VBoxHfs-64.efi from EFI/EFI/CLOVER/drivers64UEFI
- Copy Clover installer package onto Install OS X Yosemite partition of the USB pen drive
Step 4 - OS X Yosemite installation
- Power on and press F8 key to get Boot menu
- Boot from UEFI USB (Uefi name of your USB)
- Follow the install process until desktop
- Copy on desktop the Clover installer package from Install OS X Yosemite partition of the USB pen drive
- Open Clover package installer
- Install Clover on the main OS partition (from now on Mac partition) with the same settings as above
- Open Applications/Terminal and type
and close Terminal
- Open Applications/Utilities/Disk Utility
- Select Debug/Show every partiton from the menu bar. Hidden partitions will show up in the left window
- Mount the USB EFI partition
- Replace ACPI folder, kexts folder, drivers64UEFI folder and config.plist from USB EFI/EFI/CLOVER to Mac EFI/EFI/CLOVER
- Reboot
- Boot from UEFI USB (Uefi name of your USB)
- Follow the install process until desktop
- Copy on desktop the Clover installer package from Install OS X Yosemite partition of the USB pen drive
- Open Clover package installer
- Install Clover on the main OS partition (from now on Mac partition) with the same settings as above
- Open Applications/Terminal and type
Code:
defaults write com.apple.DiskUtility DUDebugMenuEnabled 1- Open Applications/Utilities/Disk Utility
- Select Debug/Show every partiton from the menu bar. Hidden partitions will show up in the left window
- Mount the USB EFI partition
- Replace ACPI folder, kexts folder, drivers64UEFI folder and config.plist from USB EFI/EFI/CLOVER to Mac EFI/EFI/CLOVER
- Reboot
Step 5 - Post installation
Last steps:
- DSDT.aml final (with Audio and graphics patches)
- SSDT.aml (Power Management ---> CPU speedsteps)
- Audio Patching "On the fly"
- iCloud, iMessage and FaceTime issues
Patching Initial DSDT.aml
We need to locate our graphics card via IORegistryExplorer, then customize Toleda's 5series DSDT patch and patch the DSDT.aml.
Create custom SSDT.aml
Thanks to PikeRAlpha's work, and a lot of useful info founded here to create a proper SSDT.aml is now really a piece of cake!
Audio Patching "On the fly"
Clover gives us this amazing feature. During boot. it takes care of the hackintosh needed kext, including the dummy audio kext to patch real Apple HDA, without modifying it (System Updates resistant!)
Again, PikeRAlpha's and Toleda's work.
Setting up iCloud, iMessage and FaceTime
This could be very tricky, my advice is to get info and solutions from the iMessage Fix huge thread
We need to locate our graphics card via IORegistryExplorer, then customize Toleda's 5series DSDT patch and patch the DSDT.aml.
- Open IORegistryExplorer then search for display0, probably you'll find something like this
Please note that this is located in NPE3@2. Maybe you'll have different values (let's say P0P1@1)
- Now go to (attached) Giacomoleopardo P9X79 WS/DSDT/DSDT patches and open 03 - first VGA AMD.txt (if you have AMD card) or 03a - first VGA nVidia.txt (if you have nVidia card), find NPE3 and replace all with your value P0P1, then find 0x00020000 (NPE3@2) and replace all with 0x00010000 (P0P1@1)
- Save the patch file
- I have two graphics cards, so searching for display (not display0) in IORegistryExplorer I found this
The second card is located in NPE7@3. If this is your case, then open (attached) Giacomoleopardo P9X79 WS/DSDT/DSDT patches/04 - second VGA AMD.txt (or 04a - second VGA nVidia.txt) and replace all the values as before (depending in what you'll find, of course).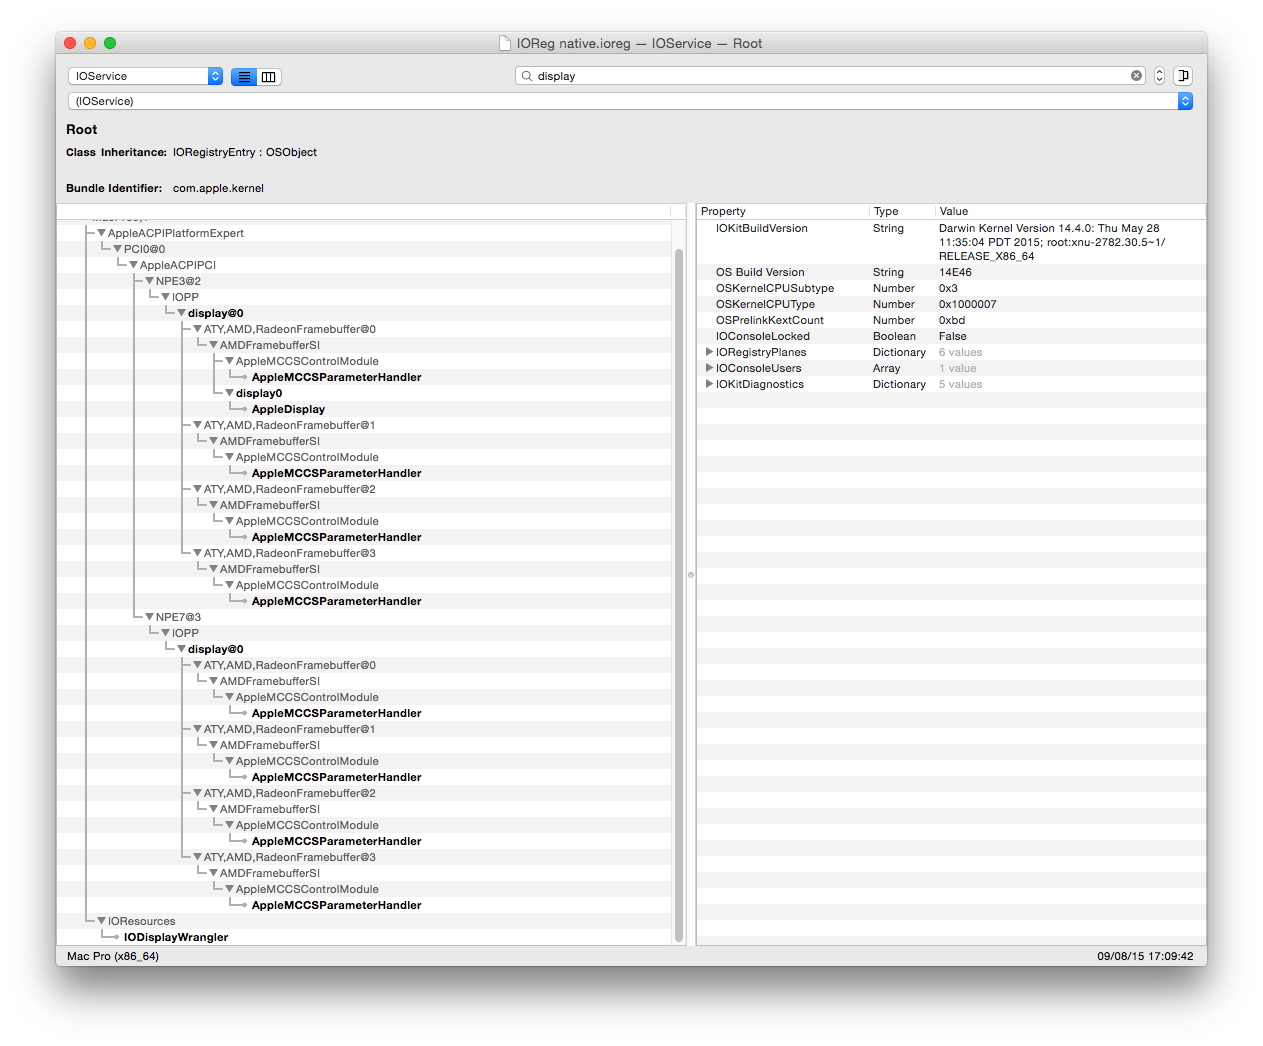
- Save all txt changes
- Open MaciASL, make sure ACPI 5.0 compiler is selected (see Initial DSDT.aml)
- Copy DSDT.aml from EFI/EFI/CLOVER/ACPI/patched to desktop and open it with MaciASL
- Click on Patch/Open and select your custom patches, then click Apply
- Again, click on Patch/Open and select (attached) Giacomoleopardo P9X79 WS/DSDT/DSDT patches/05 - Add dsdt/HDEF/Audio ID 1.txt, then click Apply
- Click on Close button
- Click on Compile command, no error should appear, the DSDT is ready, at last!
- Remove dsdt.aml from EFI/EFI/CLOVER/ACPI/patched and place the new one there
- Reboot and check in IORegistryExplorer (Search for display), the card(s) location should be like this

Create custom SSDT.aml
Thanks to PikeRAlpha's work, and a lot of useful info founded here to create a proper SSDT.aml is now really a piece of cake!
- Open Application/Terminal and type
That will download ssdtPRGen.sh to your user directory.Code:curl -o ~/ssdtPRGen.sh https://raw.githubusercontent.com/Piker-Alpha/ssdtPRGen.sh/master/ssdtPRGen.sh - Change the file mode (+x) with terminal command:
Code:
chmod +x ~/ssdtPRGen.sh - Drop ssdtPRgen.sh on the terminal window to auto fill the path then on the same line, after a space type
then hit Enter. The SSDT.aml file will be generated (among a bunch of other ones) in user/Library (hidden folder)/ssdtPRGen.Code:
-c 1 -w 3 - Copy SSDT.aml to EFI/EFI/CLOVER/ACPI/patched
- Reboot and check speedstep typing in Terminal
You'll find something like thisCode:cat /var/log/system.log | grep "AICPUPMI:"
Now we know that the CPU goes from 1200 to 4000 MHz.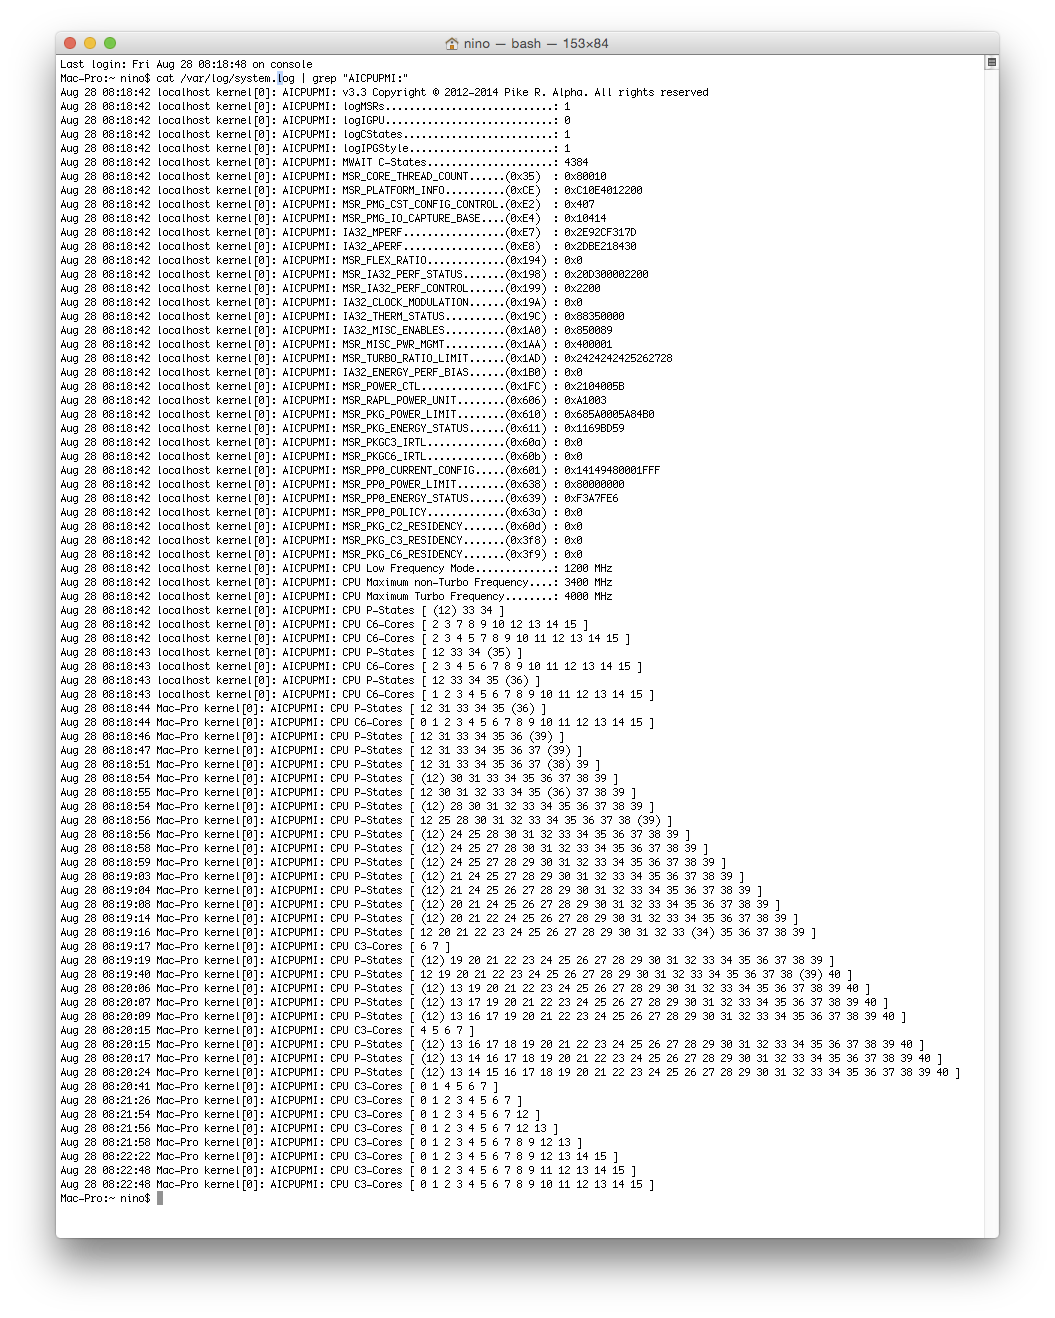
Audio Patching "On the fly"
Clover gives us this amazing feature. During boot. it takes care of the hackintosh needed kext, including the dummy audio kext to patch real Apple HDA, without modifying it (System Updates resistant!)
Again, PikeRAlpha's and Toleda's work.
- Mount EFI partition from Disk Utility (see steps above)
- Download audio_CloverALC-master.zip from Toleda's repo, unzip it and
unzip audio_cloverALC-100.command.zip as well. - Double click on audio_cloverALC-110_v1.0b.command, a Terminal window will appear, follow the instructions (basically typing "Y" a bunch of times)
- Reboot
- Check Audio and HDMI Audio (if you have supported displays) via System Preferences
Setting up iCloud, iMessage and FaceTime
This could be very tricky, my advice is to get info and solutions from the iMessage Fix huge thread
CREDITS
Tonymac - For gathering info on Clover installationPikeRAlpha - Too many things to enumerate!
Toleda - For great support, guides, and infos
shilohh - For the very useful guide on X79 speedsteps
jaymonkey - For iMessage solution and huge work
Slice & co. - For the amazing Clover, what else?
Mieze - For LAN kext and a lot of support
Azimuth1 - For monitors, headaches and trynotbuy
Valitor - For IONetworkingFamilyInjector.kext
Jump to the next post to check some pictures and a couple of video. Enjoy!
Attachments
Last edited by a moderator: