- Joined
- Apr 28, 2011
- Messages
- 909
- Motherboard
- Asus Prime Z690M-Plus D4
- CPU
- i7-12700KF
- Graphics
- RX 6600
- Mac
- Mobile Phone
Welcome to the Chameleon installation guide, based on Mavericks OS 10.9.5 with Chameleon bootloader
Updated Guide for Yosemite with Clover method available here
Components
Intel® Core™ i7-3770T Processor 8M Cache, up to 3.70 GHz
[AMAZON-uk]http://www.amazon.co.uk/dp/B008ACVF9A/[/AMAZON-uk]
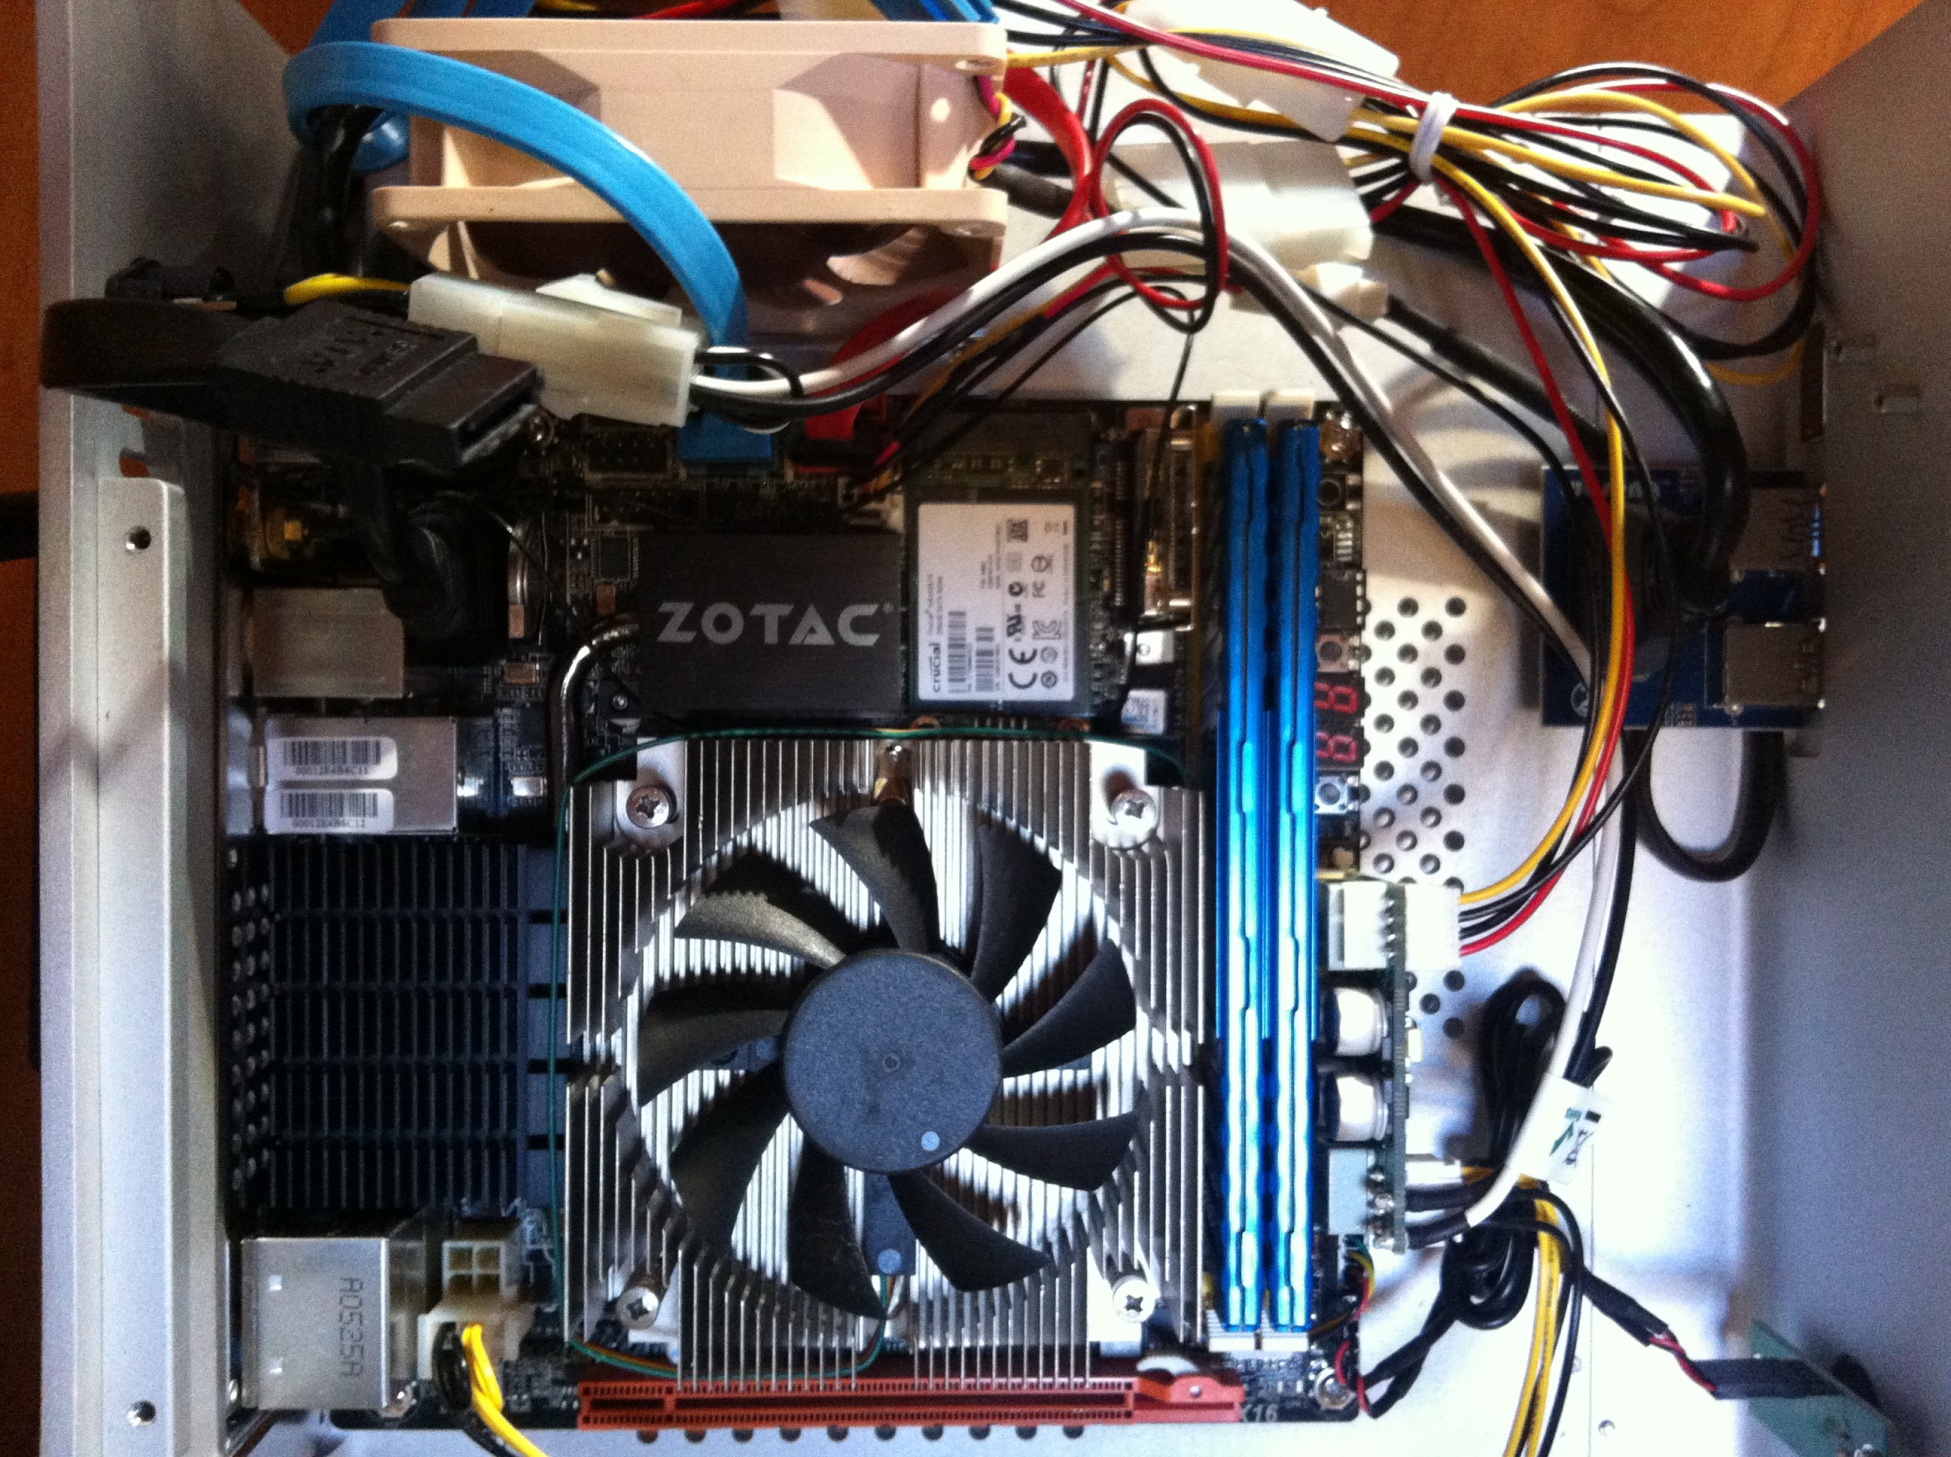
Zotac Z77 ITX WiFi
http://www.amazon.com/dp/B0089OJHBW/
Corsair Vengeance LP Blue 16 GB (2x8 GB) DDR3 1600MHz
http://www.amazon.com/dp/B009M0TCHQ/
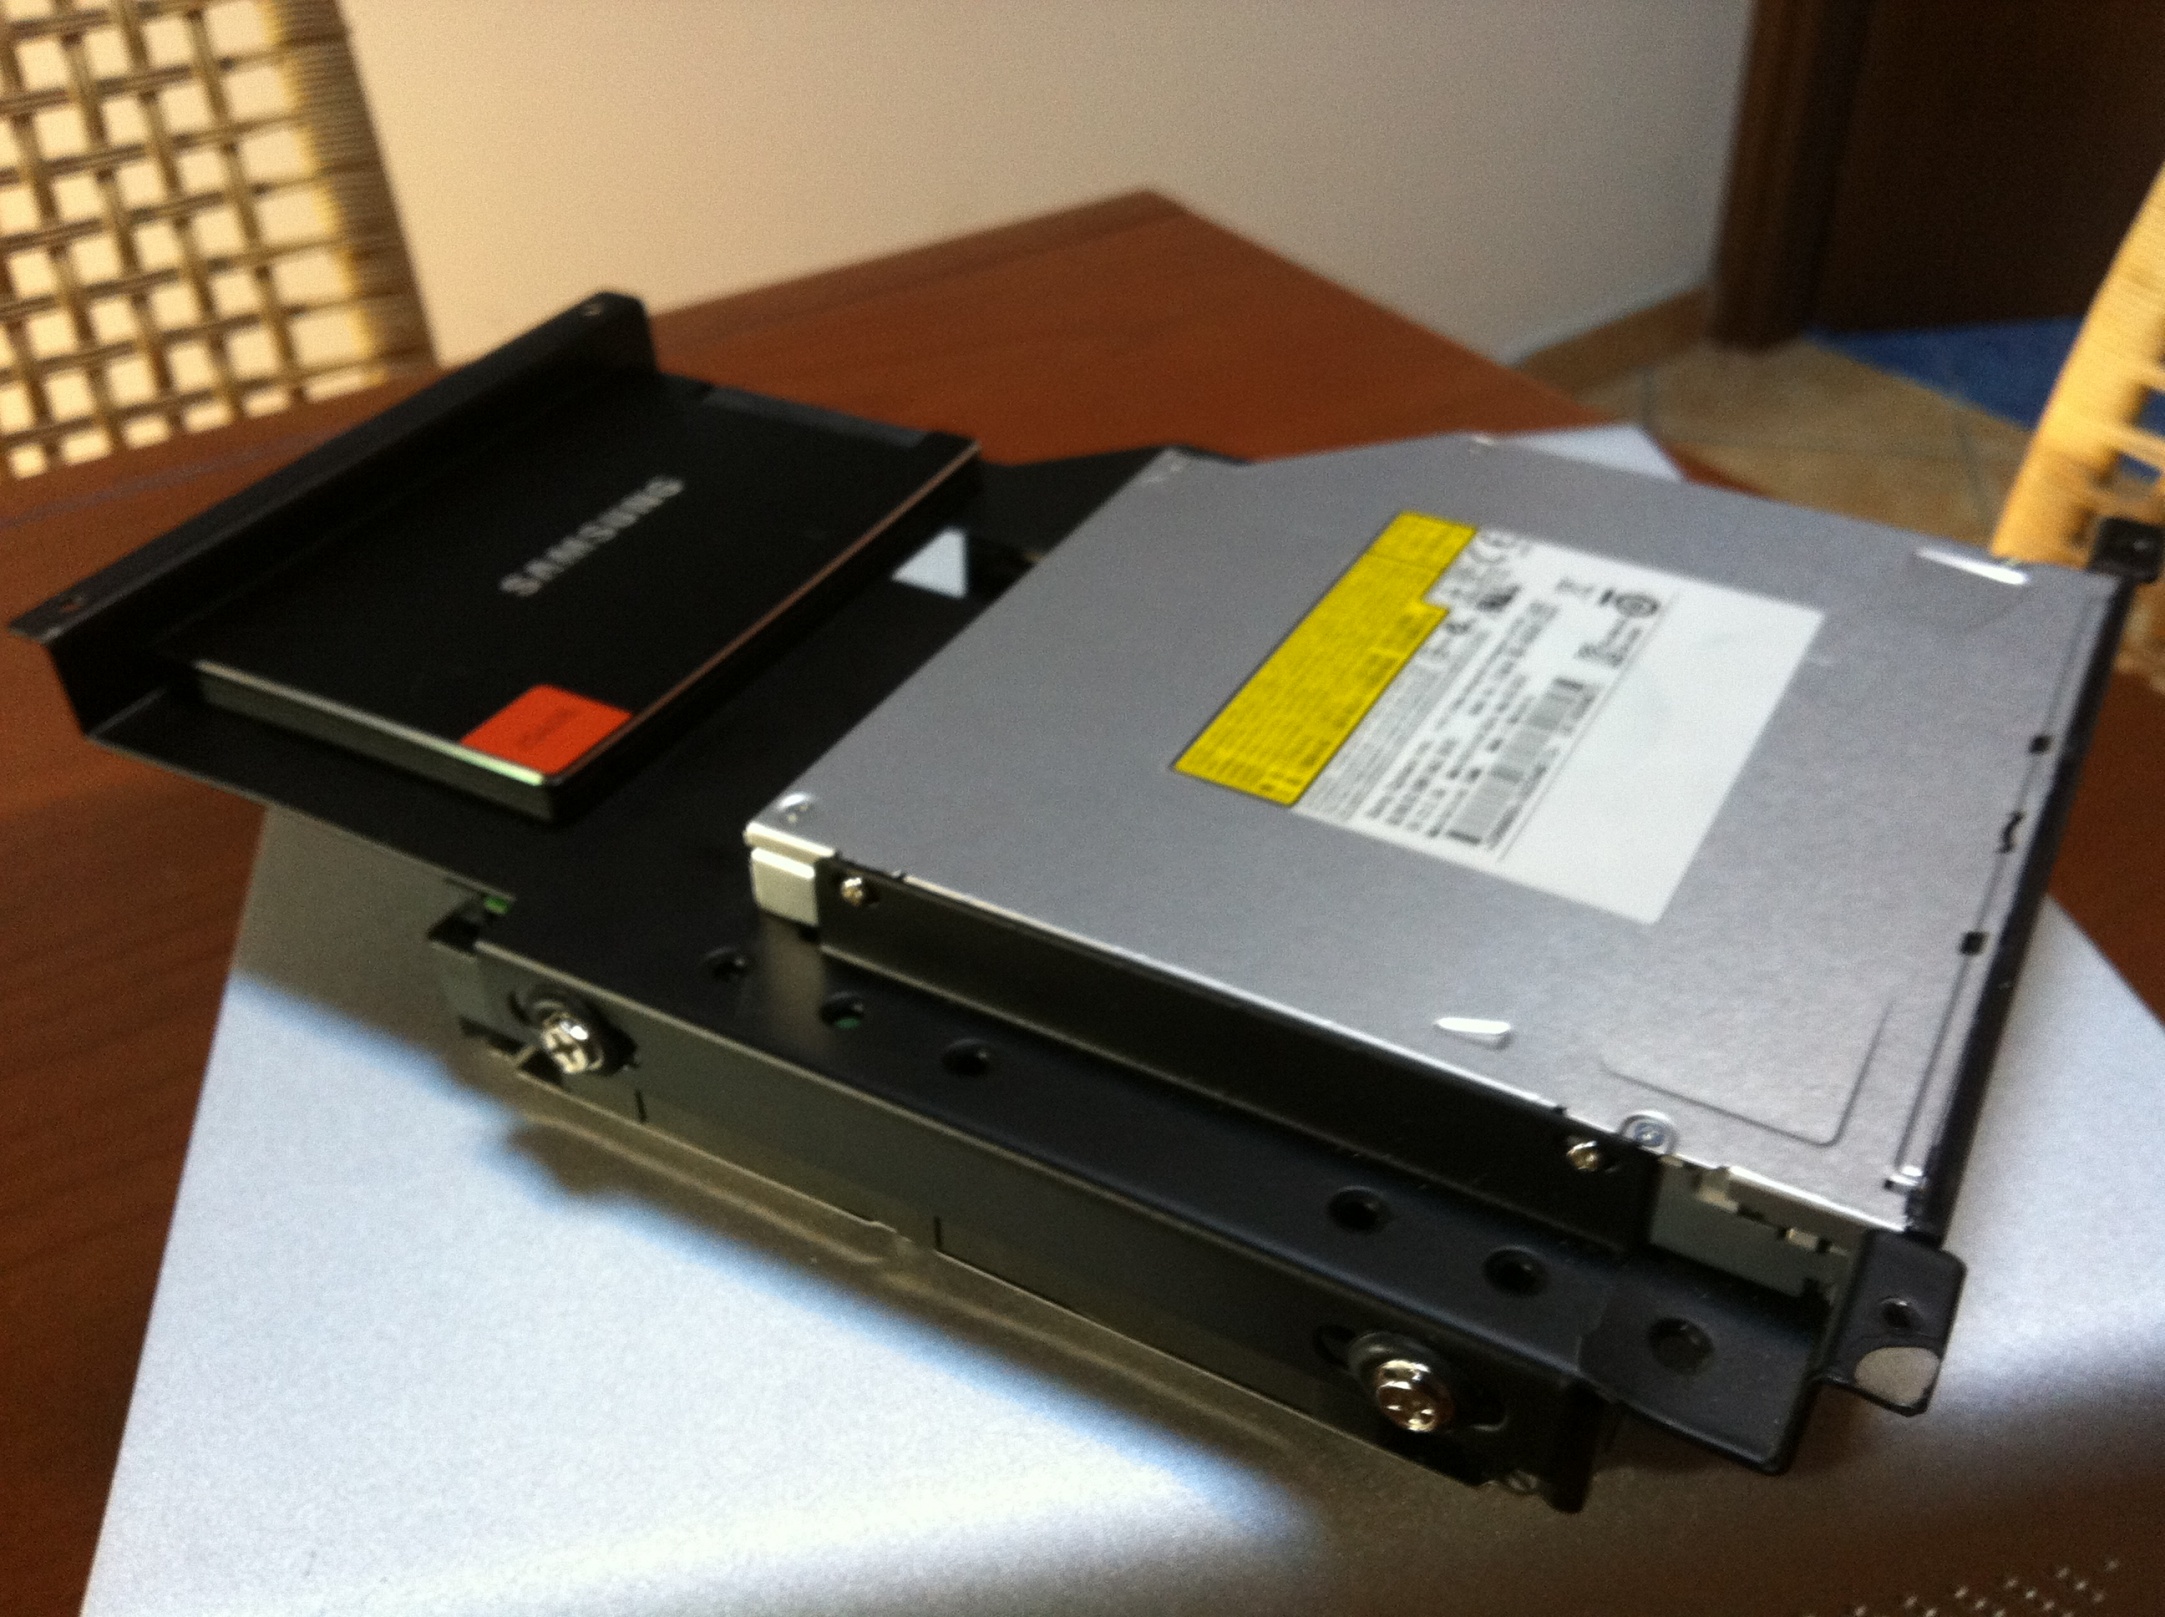
SAMSUNG 830 Series 2.5-Inch 256GB
http://www.amazon.com/dp/B0077CR66A/
Crucial m4 256GB mSATA Internal Solid State Drive
http://www.amazon.com/dp/B0085J17UA/
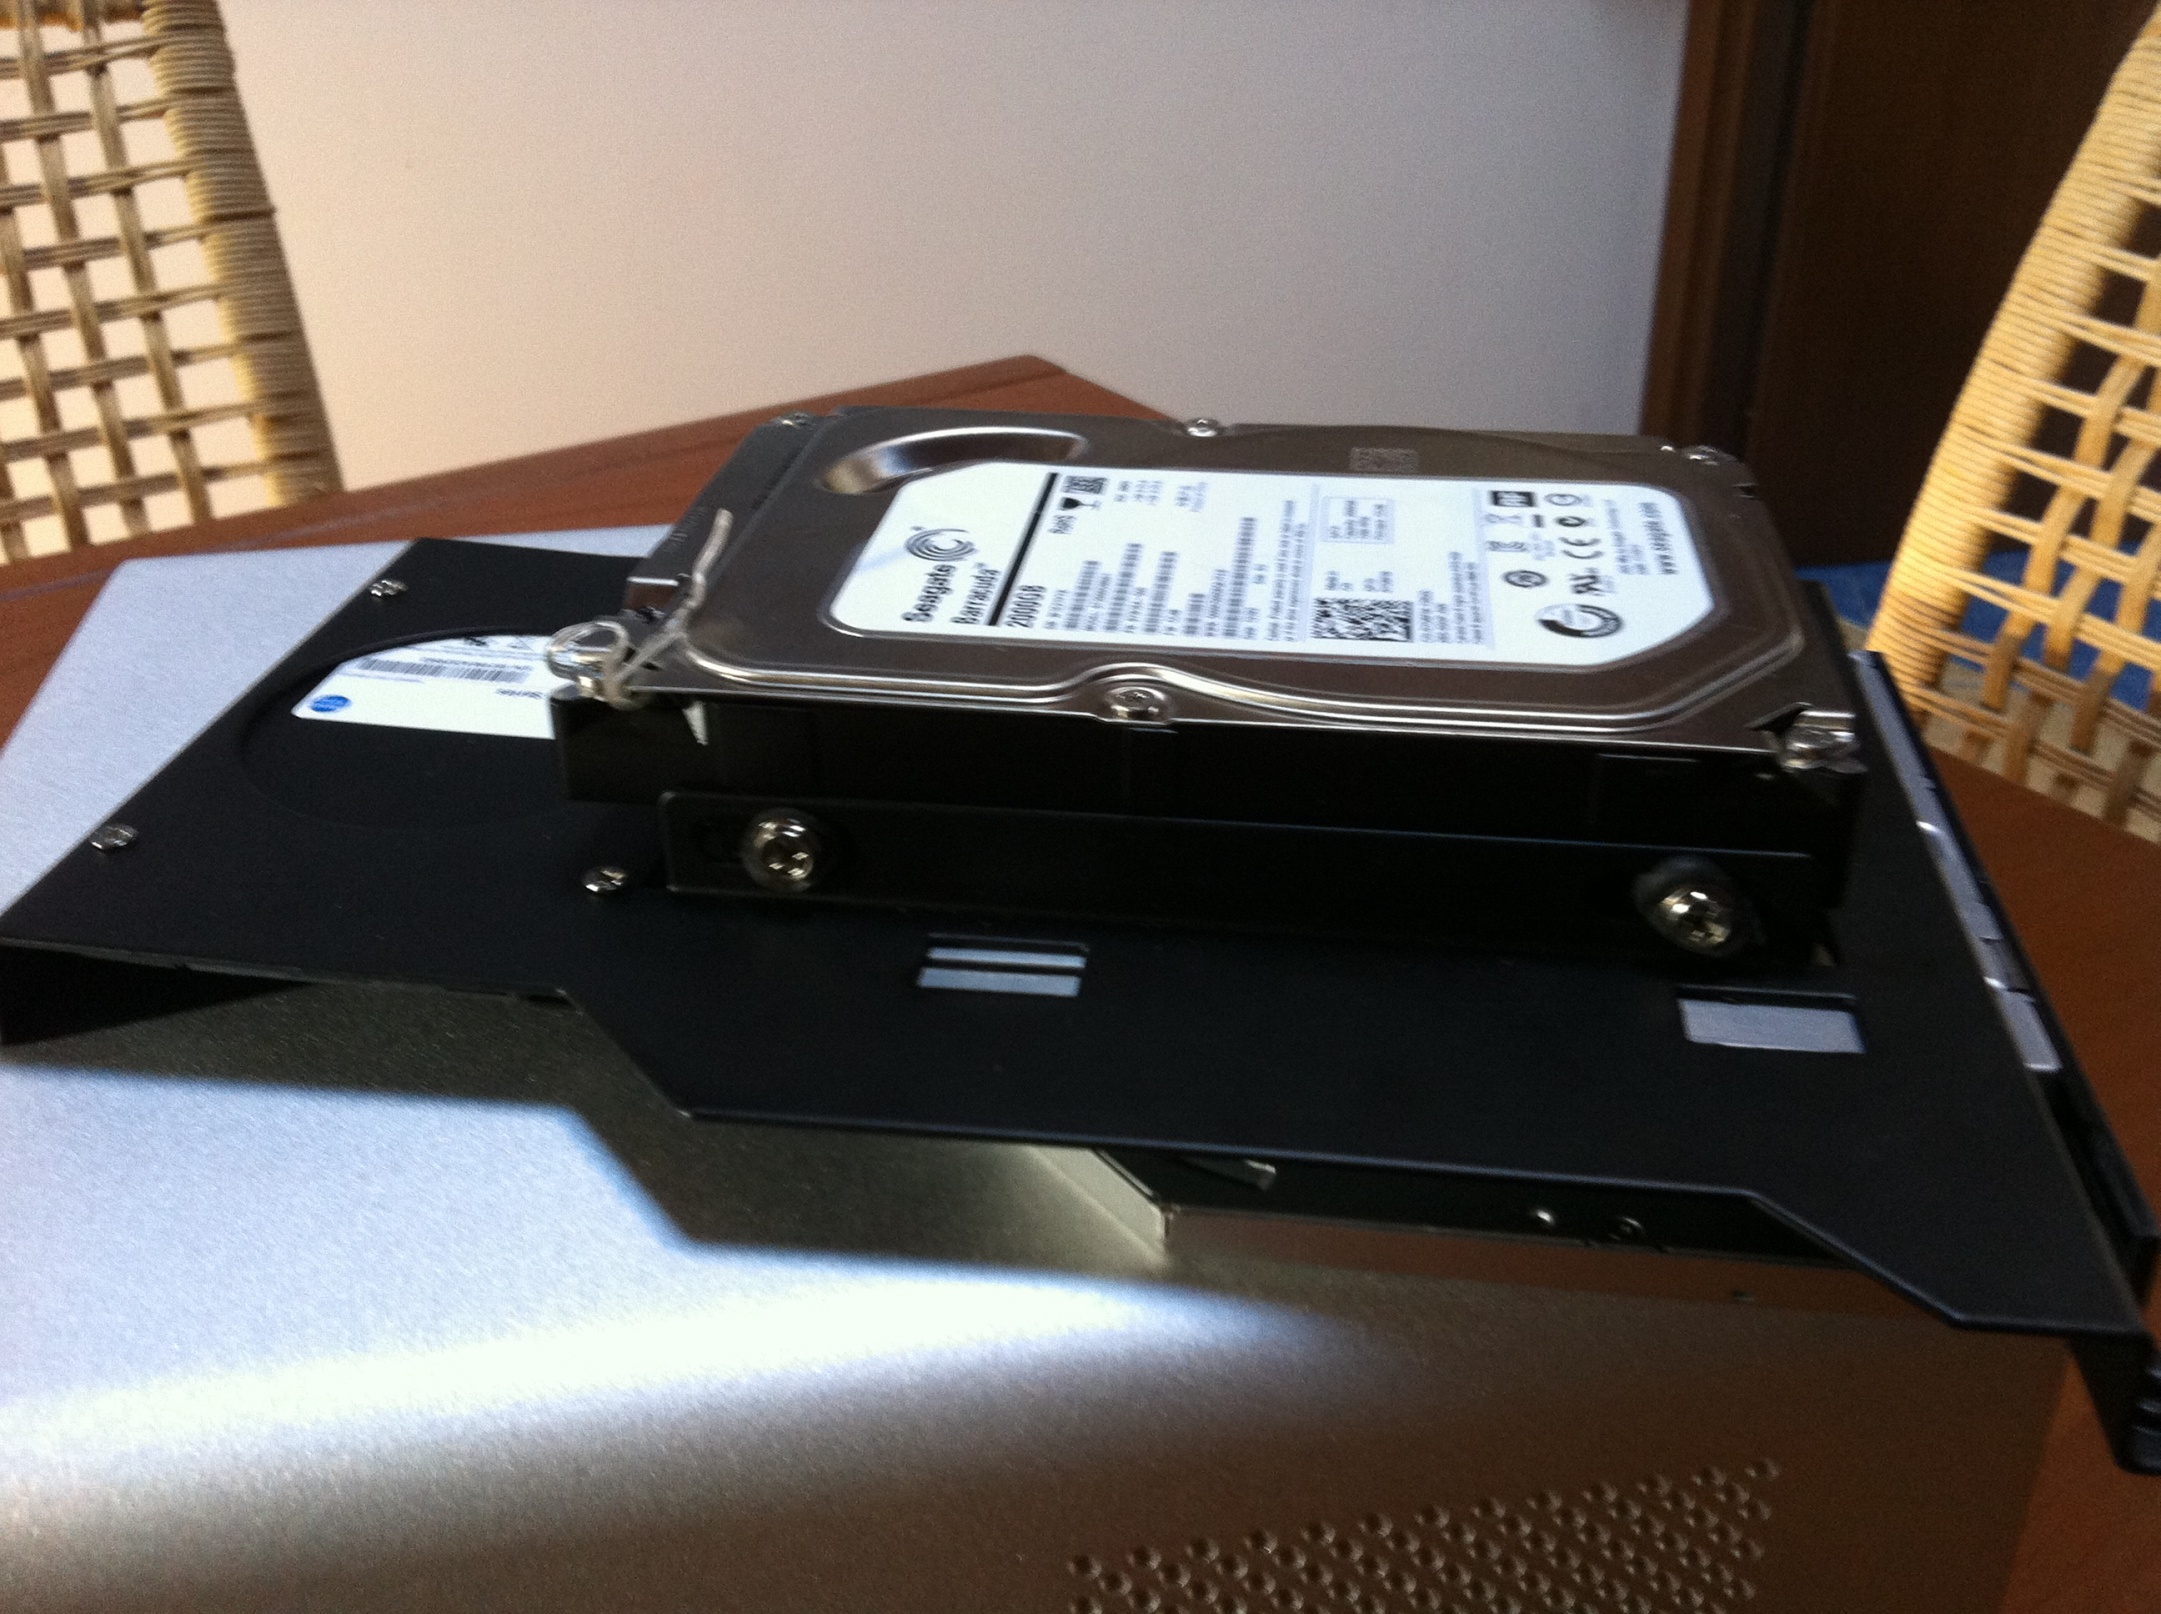
Seagate ST2000DM001 Barracuda 7200RPM 2 TB SATA 6 GB/s
http://www.amazon.com/dp/B005T3GRN2/
Gelid Slim Silence I-Plus CPU Cooler
http://www.amazon.com/dp/B0058W3IUO/
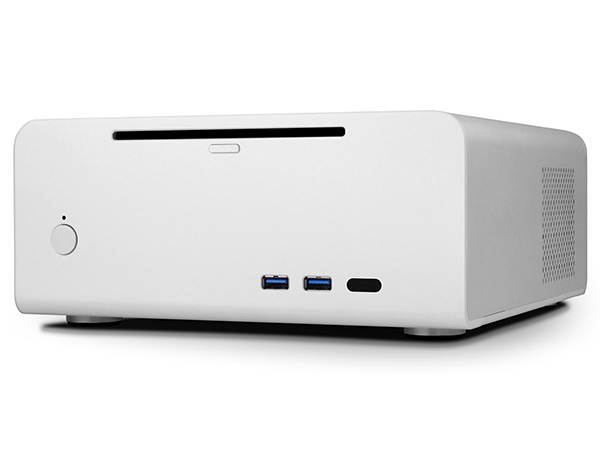
Streacom F7C EVO Chassis
[AMAZON-uk]http://www.amazon.co.uk/dp/B00958DA5K/[/AMAZON-uk]
PicoPSU-160-XT High Power 24 Pin Mini-ITX Power Supply
http://www.amazon.com/gp/product/B005TWE6B8/
192w AC-DC Power Adapter, 12v 16A
http://www.amazon.com/dp/B00905I1TI/
Sony Optiarc Blu Ray Slim RW BD5850H
http://www.newegg.com/Product/Product.aspx?Item=N82E16827118072
Belkin F8T016 Mini Bluetooth Adapter
http://www.amazon.com/dp/B001E96JBK/
Noctua NF-R8 PWM Cooling Fan
http://www.amazon.com/dp/B006GD30UC/
Apple Wireless Keyboard
http://www.amazon.com/dp/B005DLDO4U/
Apple Magic Mouse
http://www.amazon.com/dp/B002TLTGM6/
Apple Infrared Remote Control
http://www.amazon.com/dp/B002TPFNXS/
MacBook Pro Infrared board
http://www.powerbookmedic.com/MacBook-Pro-Infrared-board-p-18041.html
OSX Mavericks
http://www.apple.com/osx/
Comments
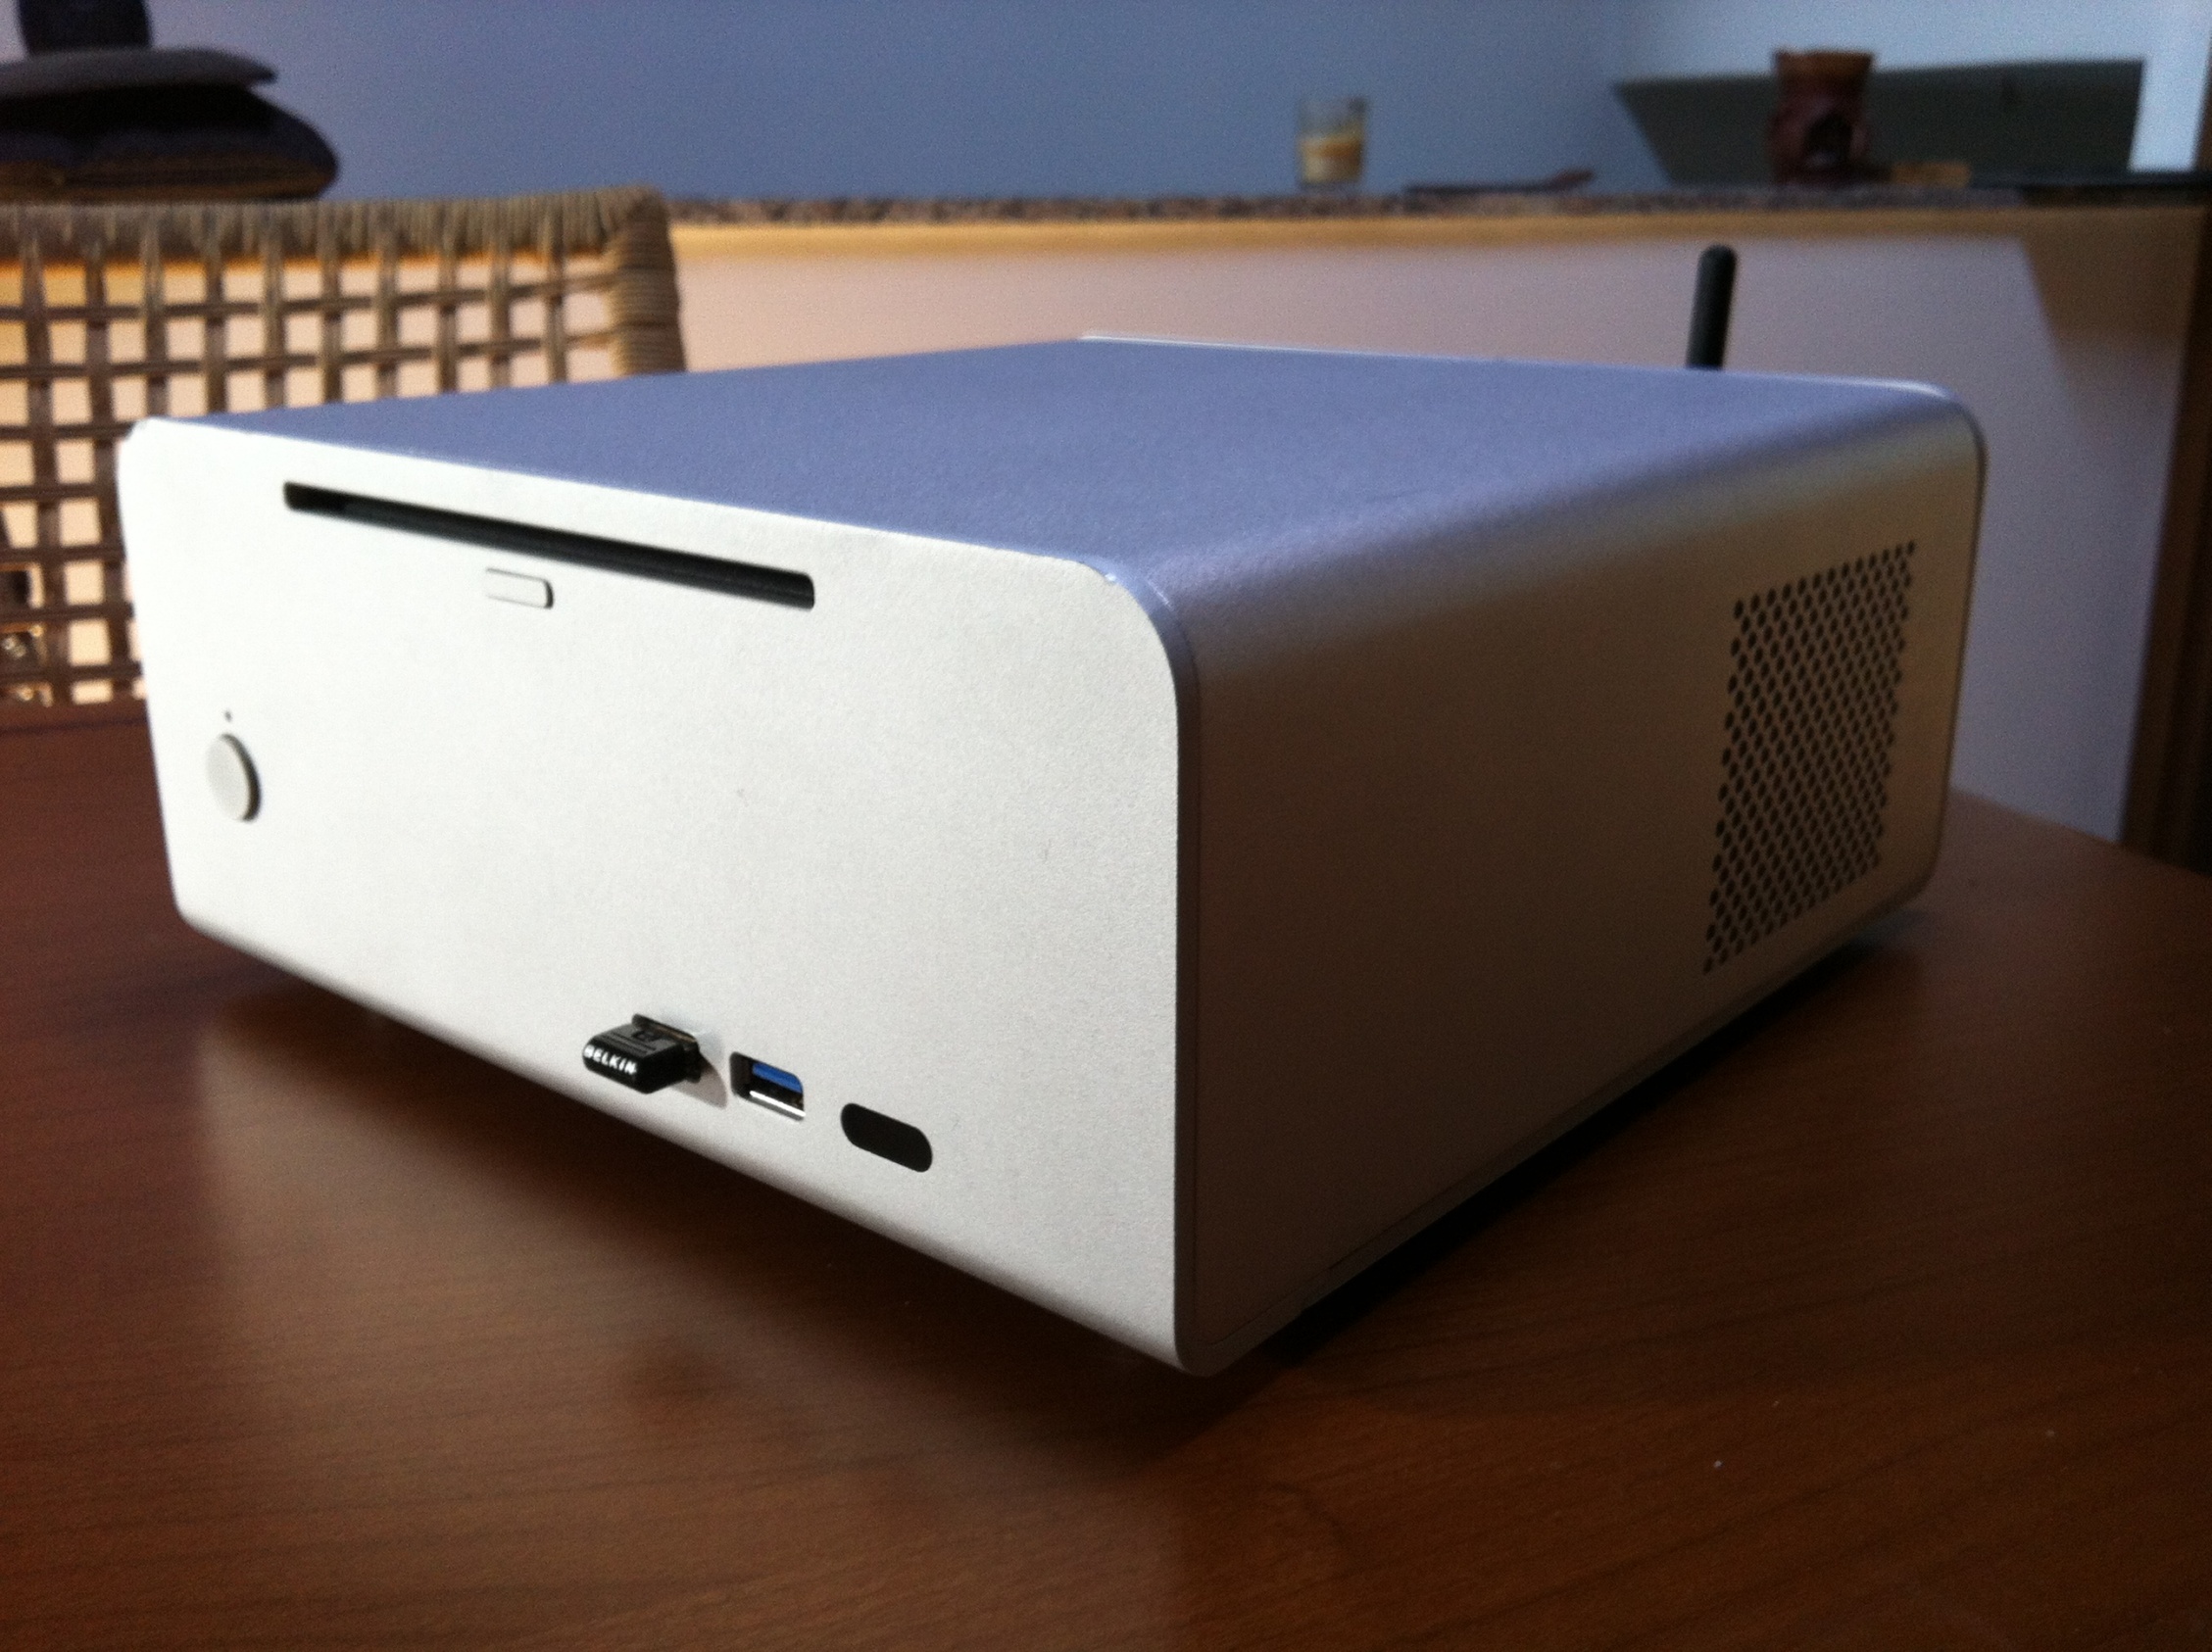
This machine was assembled for HTPC use and audio editing, but I ended up to use it for my daily stuff. No need powerful graphic card, HD 4000 is totally enough to me.
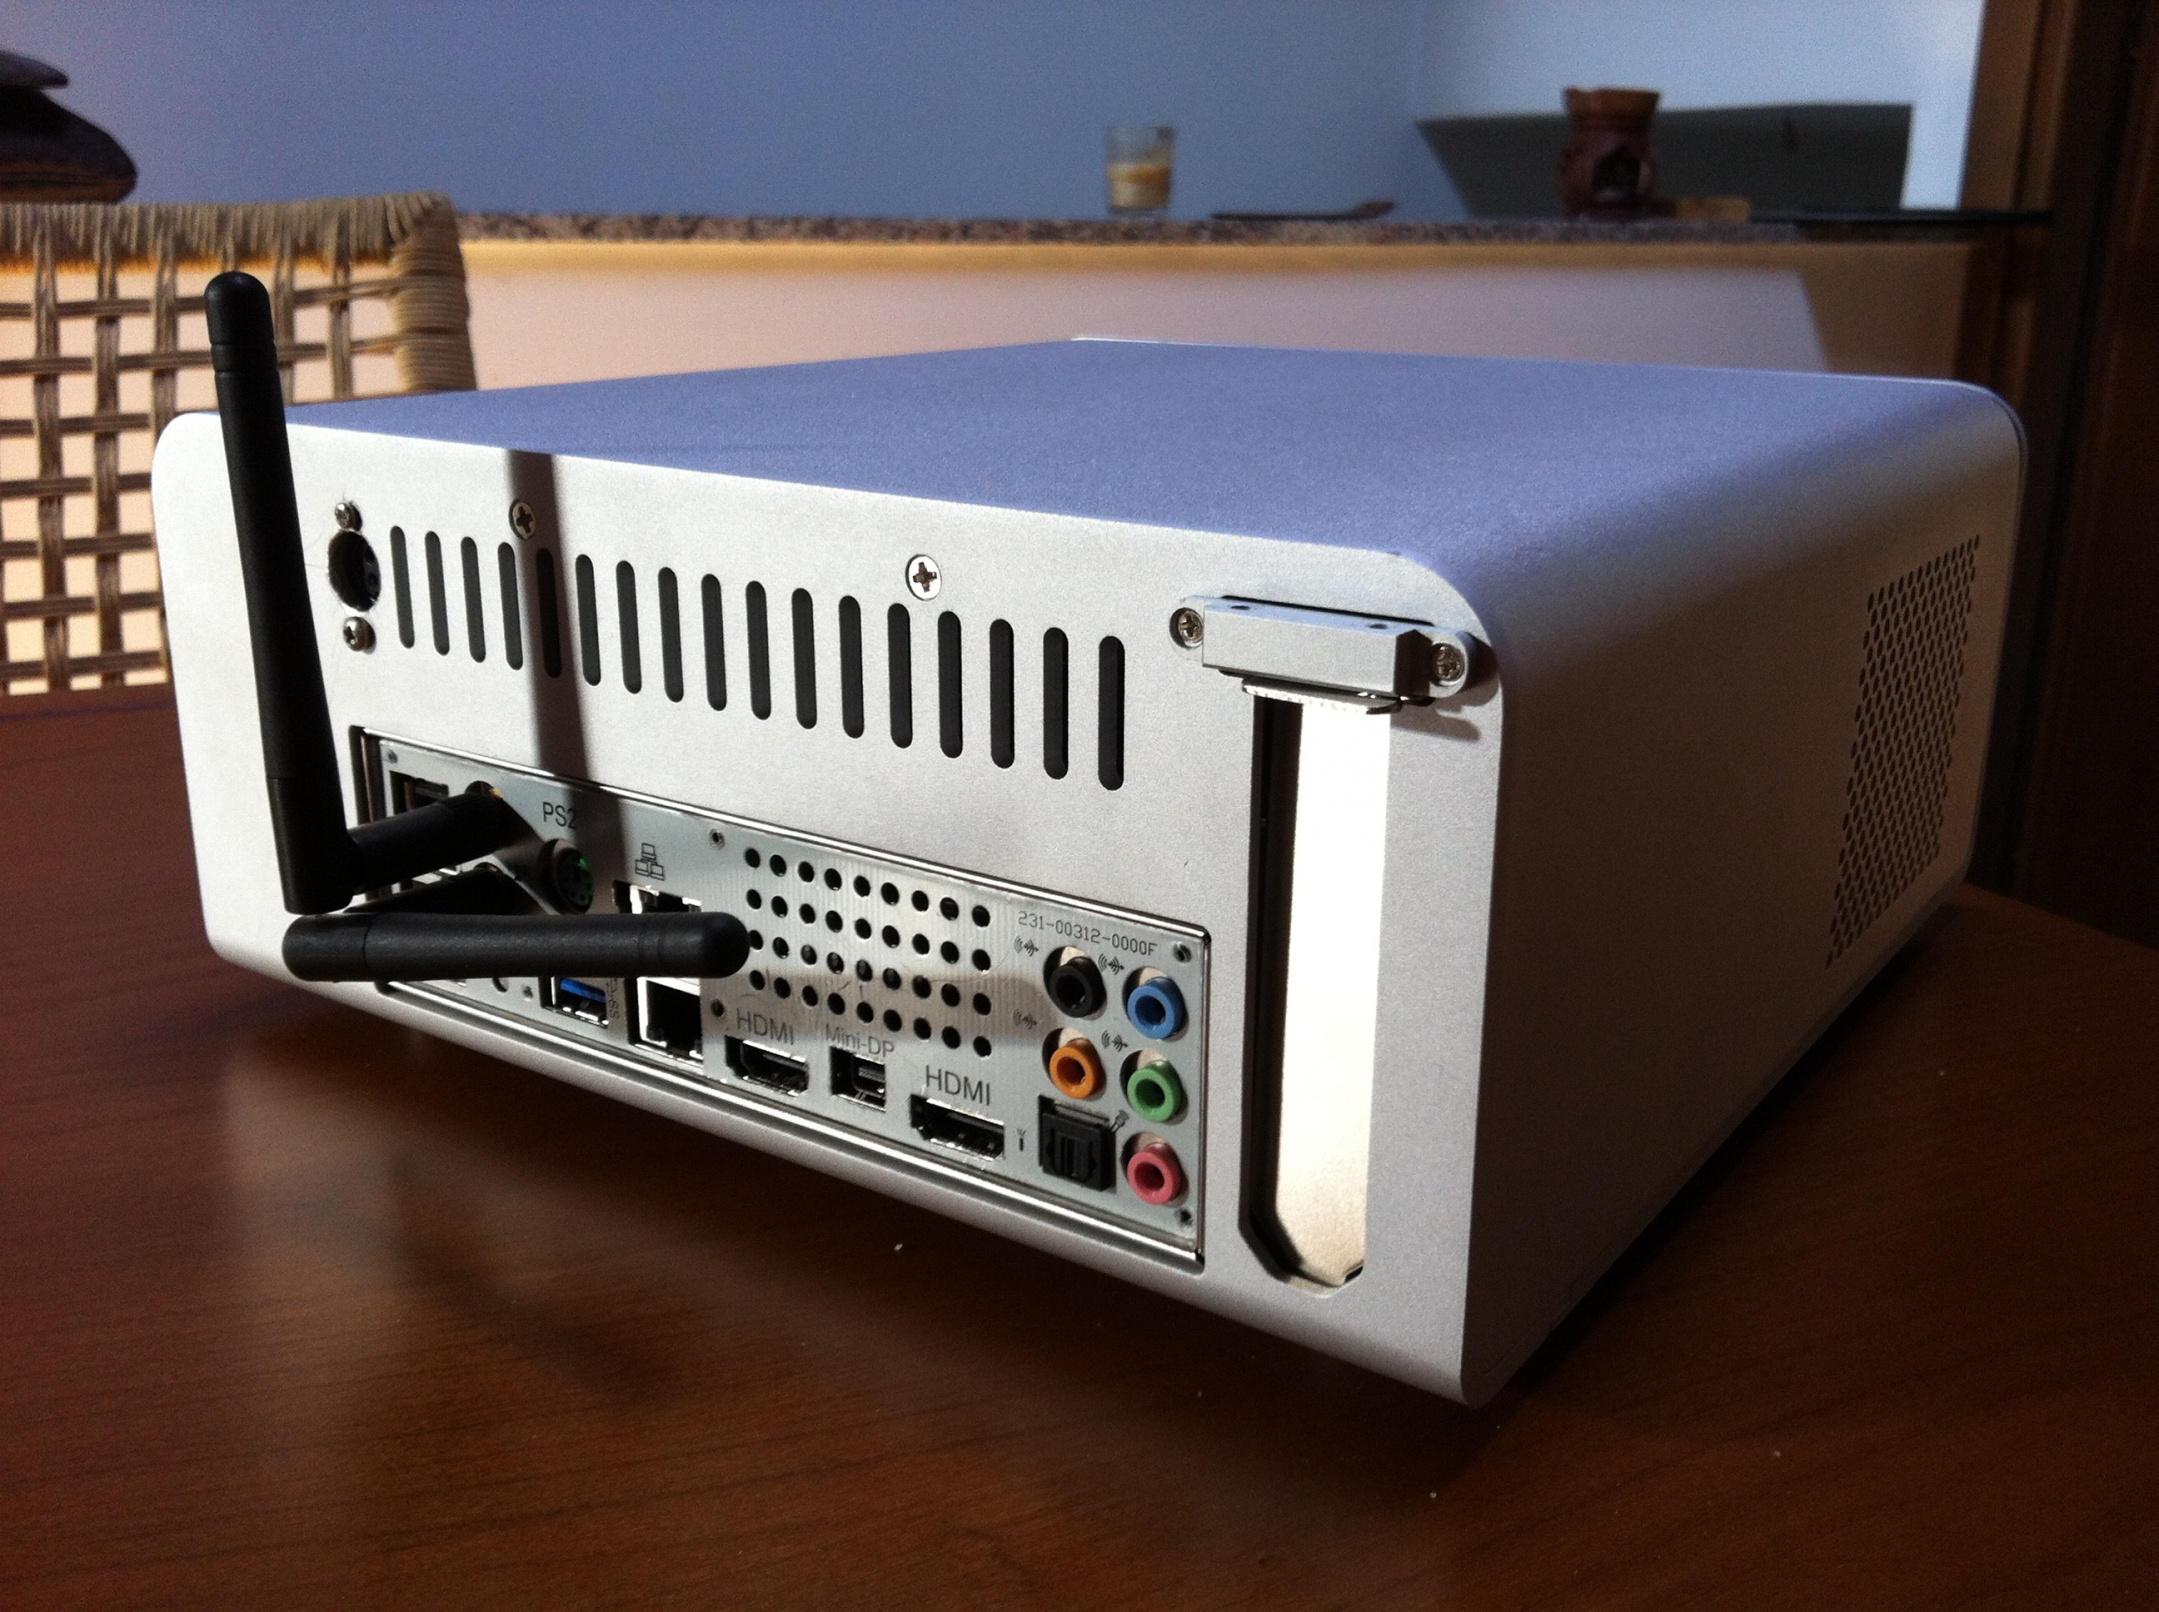
This board is really amazing, it has all the stuff I need, except:
- MiniDisplay Port: it doesn't support 27" Apple Cinema Display (non thunderbolt).
- DVI port: not there!
- DVI port: not there!
Beside that, everything is working fine:
- Full native Ivy Bridge Power Management with custom SSDT
- Auto and manual sleep
- HDMI audio (all video ports)
- WiFi on board (Atheros AR9285, DSDT editing required - onboard AR3001 Bluetooth partially working, not recommended)
- Both Ethernet ports fully functional
- Belkin 2.0 Bluetooth dongle (either in usb 2.0 and 3.0) Working in BIOS and Chameleon bootloader
- Wake on LAN
I've tried to make this guide as simple and detailed as possible. Please feel free to make it better with tips and tricks I've missed.
If you're interested in more details, or if you need Mountain Lion rather than Mavericks, please check my original guide, Giacomoleopardo Build - ZOTAC Z77-ITX WiFi - Core i7-3770T - MacMini 6,2
Installation
Tools:
- Latest Zotac bios
- UniBeast for Mavericks and MultiBeast for Mavericks
- MaciASL Open Beta for editing .aml files. By SJ_UnderWater
- KextBeast
- IOJones registry explorer. By SJ_UnderWater
- DPCIManager 1.5 Open Beta. By SJ_UnderWater
- Chameleon Wizard (registration required)
- Cache Rebuilder command (see attachments)
- Trim Enabler. By Groths
- Mavericks install App from AppStore (free if you already have a Snow Leopard 10.6.8 (or newer) Mac or Hack
- A working Mac or Hackintosh machine
Step 1 - Update Bios
- I flashed BIOS using Zotac Windows utility with new Zotac BIOS release. Of course I installed Windows 8 to do that. I guess it's possible to flash bios from dos as well, but since I never did that, I can't help about it. Thanks to CodeRush whom worked with Zotac developers, the unlocking process of bios is no longer needed! The latest bios has unlocked MSR 0xE2 module which gives us the opportunity to have native Ivy Bridge Power Management and everything is working as expected on OSX! Here's what I did:
- Booted the system into Windows
- downloaded new Zotac bios
- flashed BIOS following Zotac instructions (put the content of the unzipped folder into a new folder C:BIOS, then run the update command)
- loaded optimized default and set bios as stated in Step 2
Step 2 - Bios configuration
- Boot pc
- Press Del key to gain bios settings
- Press F9 to load Optimized Defaults
- Leave Main section by default
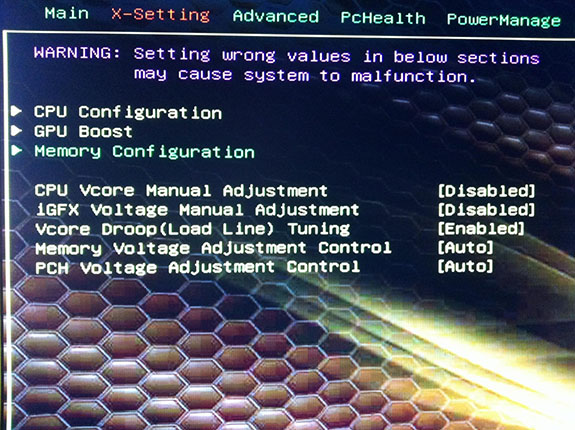
- X-Settings main window
- Press Del key to gain bios settings
- Press F9 to load Optimized Defaults
- Leave Main section by default
- X-Settings main window
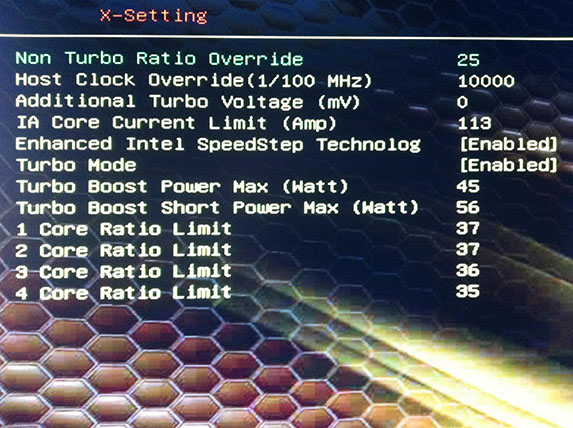
- X-Settings/CPU Configuration - Core Ratio Limits as default
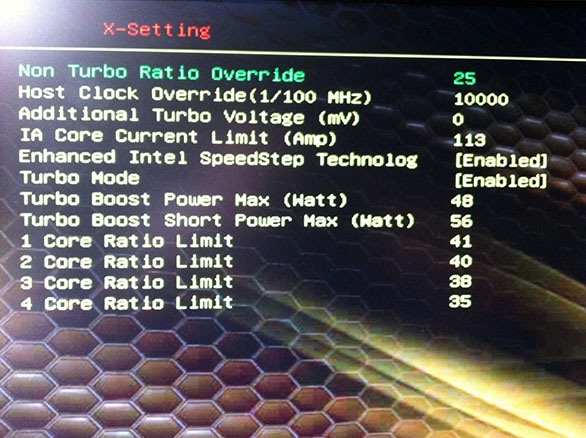
- X-Settings/CPU Configuration - Core Ratio Limits modified ---> see SSDT script in post #4\UPDATE 3 on the original install guide
- X-Settings/Gpu Boost: leave default
- X-Settings/Memory Configuration: Load XMP-Profile 1 if supported by your RAM
- Advanced/onBoard Device
- X-Settings/Memory Configuration: Load XMP-Profile 1 if supported by your RAM
- Advanced/onBoard Device
- Advanced/onBoard Device/Serial Port 0 Configuration

- Advanced/Storage Configuration

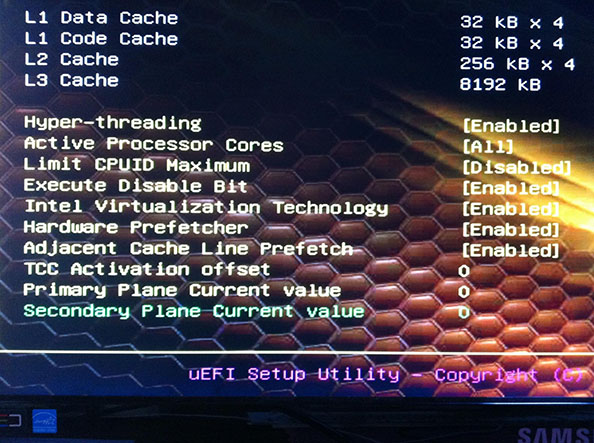
- Advanced/Cpu Configuration
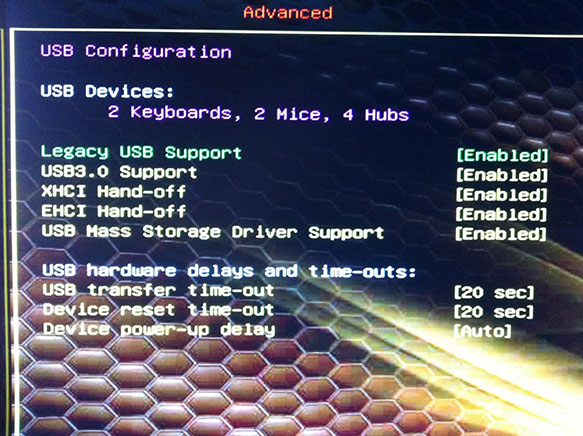
- Advanced/USB Configuration
- Advanced/Display Configuration ----> Note: this config is for HD4000 integrated graphics, for discrete graphics set Primary Display [PEG]

- PcHealt: leave default
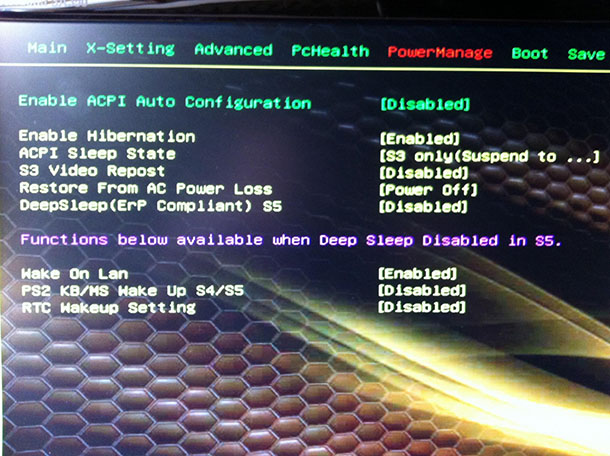
- PowerManage
- PowerManage
- Boot: set this section at your convenience. With Chameleon, choose Legacy Only, in Boot uEFI OS Selection
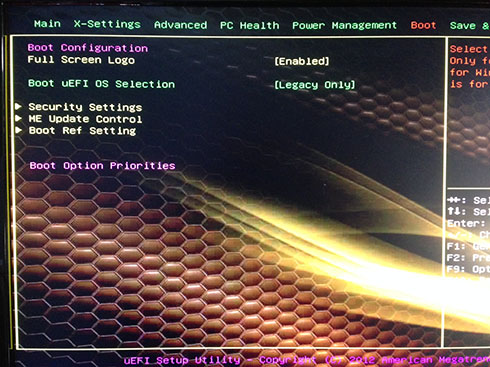
- Press F10 key to Save and Reboot
Step 3 - Mavericks Installation
- Install Mavericks with UniBeast method as explained in Tonymac's guide. Note: at step #4/2 press F8 to choose boot device, and at step 4/4 you'll probably have to type -x and dart=0 before hitting enter, otherwise you won't reach installation screen. Take your time, install process will take 15-20 minutes.
- Reboot from Unibeast and at Chimera screen choose your new OSX installed partition (still typing -x dart=0, if necessary)
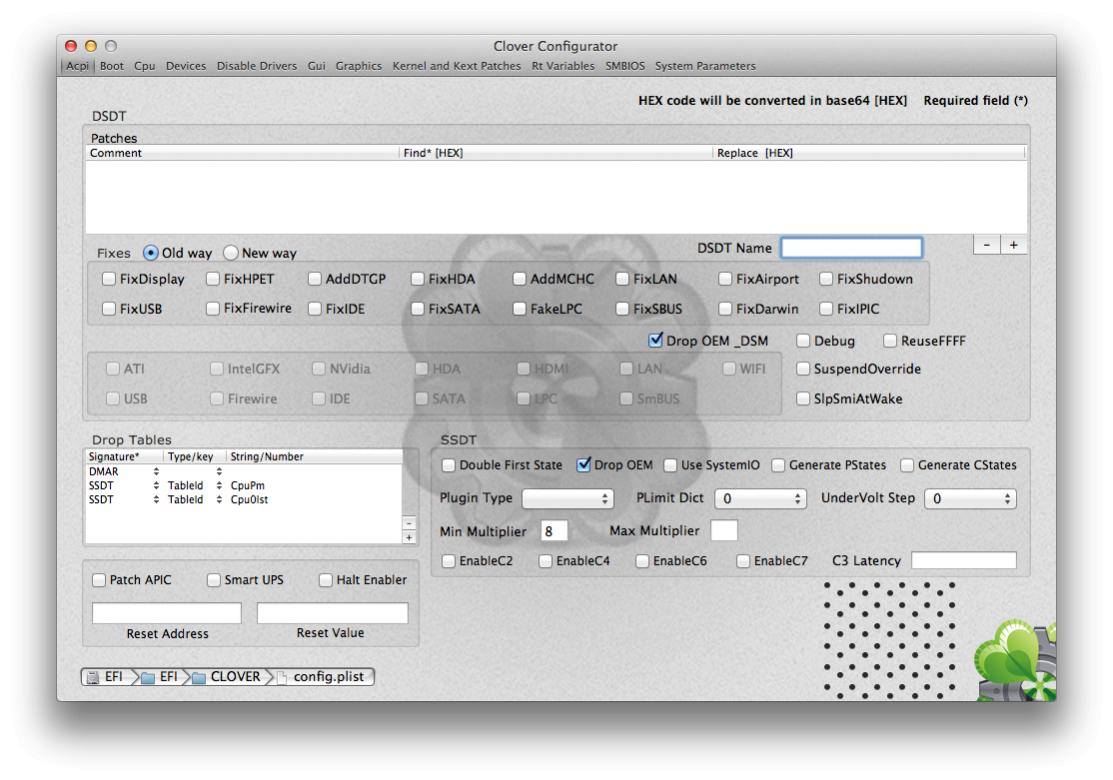
- Now it's time to edit DSDT
- Reboot from Unibeast and at Chimera screen choose your new OSX installed partition (still typing -x dart=0, if necessary)
- Now it's time to edit DSDT
Thanks to the massive work of forum moderator PJALM, and forum moderator SJ_UnderWater, now just two patches are necessary to make this board fully functional. Simply follow these steps.
- Download MaciASL from here, unzip it and open it. It automatically will open a "native" DSDT. It's important to know that these patches can be applied just one time, so if you want to re-patch dsdt you'll have to start from a native dsdt again. So my advice is: save a backup copy of this file just in case you need to re-patch it. To do that just go to MaciASL menu bar click on File/Save as, choose the directory where you want to keep your backup native dsdt, select Disassembled ASL file as File Format and name it "native dsdt.dsl" (add extension manually).
- in Menu bar open MaciASL\Preferences and select Sources in Preferences window
- set iASL as ACPI 5.0 as in the following picture
 - select Sources icon, click on "+" to add Name and URL of the patches that you need: in my case they are
- Close completely MaciASL and re-open it: again a native DSDT will appear as before, click on Patch command: now in the left side of the Patch window you should see all the patches we've just added like this
 - select in Zotac Z77-ITX but before applying, remember to delete the Atheros part from the patch itself (in the right window of MaciASL) I mean this part
That's the Atheros AR9285 WiFi card, which is not natively supported by osx. This patch was working in Mountain Lion 10.8.5, but is no longer working. So we need to apply PJALM AIO Patch without the Atheros part, then use toleda's Atheros patch (modified) as following:
- After removing Atheros part from PJALM AIO, click on Apply, then Close. Now click on Compile command: no Errors, Warnings nor Remarks should appear, but some Warnings may stay: they won't affect your installation; the mandatory thing is NOT TO HAVE ERRORS when compiling a DSDT! Go on
- Re-open patch windows and under PJALM Graphics select
- select toleda's patch for Atheros AR9x8x in MaciASL but before applying it, remember to change RP07 into RP01. That would be from this
into this
- Apply and Compile as usual (0 Errors).
- Go to MaciASL menu bar click on File/Save as, choose desktop as directory, select ACPI Machine Language Binary as File Format and name it "dsdt.aml" (add extension manually).
In post #1 of the original Mountain Lion guide you can find the red steps I made to patch dsdt manually (before PJALM All In One patches). I left them in the thread 'cause they're still valuable infos for more than somebody.- in Menu bar open MaciASL\Preferences and select Sources in Preferences window
- set iASL as ACPI 5.0 as in the following picture
- PJALM Zotac ---------> http://maciasl.sourceforge.net/pjalm/repos/zotac/
- PJALM Graphics ------> http://maciasl.sourceforge.net/pjalm/repos/graphics/
- Toleda Airport patch--> https://raw.github.com/toleda/airport_pcie-hm/master
- Close completely MaciASL and re-open it: again a native DSDT will appear as before, click on Patch command: now in the left side of the Patch window you should see all the patches we've just added like this
Code:
# Fix the Atheros AR9285 WiFi and rename it to ARPT
into device label PXSX parent_label RP01 set_label begin ARPT end;
into method label HPME parent_label RP01 code_regex (Notify\s\()PXSX(,\s0x02\)) replace_matched begin %1ARPT%2 end;
into device label ARPT parent_label RP01 replace_content begin
Name (_ADR, Zero)\n
Name (_PRW, Package (0x02) {0x09,0x04})\n
Name (_SUN, One)\n
Method (_DSM, 4, NotSerialized)\n
{\n
	Store (Package (0x10) {\n
		"AAPL,slot-name", "AirPort",\n
		"name", "Wireless Network Adapter",\n
		"model", Buffer () {"Atheros AR9285 802.11 a/b/g/n Wireless Network Adapter"},\n
		"device_type", Buffer (0x07) {"AirPort"},\n
		"device-id", Unicode ("0"),\n
		"subsystem-id", Buffer (0x04) {0x8F,0x00,0x00,0x00},\n
		"subsystem-vendor-id", Buffer (0x04) {0x6B,0x10,0x00,0x00},\n
		"built-in", Buffer (One) {0x01}\n
	}, Local0)\n
	DTGP (Arg0, Arg1, Arg2, Arg3, RefOf (Local0))\n
	Return (Local0)\n
}
end;- After removing Atheros part from PJALM AIO, click on Apply, then Close. Now click on Compile command: no Errors, Warnings nor Remarks should appear, but some Warnings may stay: they won't affect your installation; the mandatory thing is NOT TO HAVE ERRORS when compiling a DSDT! Go on
- Re-open patch windows and under PJALM Graphics select
- Generic Discrete Graphics (AMD/nVidia) to enable HDMI Audio if you have a discrete graphic card or
- Intel HD4000 to enable HDMI Audio if you have ONLY Intel HD 4000 onboard graphic)
- select toleda's patch for Atheros AR9x8x in MaciASL but before applying it, remember to change RP07 into RP01. That would be from this
Code:
# Maintained by: toleda for: github.com/toleda/wifi_ar9380-ar928x
# File: arpt1-ar928x-ar9380_v2.txt
# Credit: MasterChef, PikeRAlpha, THeKiNG
#
# Atheros AR9380/AR9280/AR9285/AR9287 WiFi dsdt edits
# Verify IOReg/pci168c device @1C,6/RP07 otherwise, edit patch file:
# Find: RP07
# Replace All: name (name = IOReg/pci168c device name, RP01, BR01, PEX1, etc.)
#
# If no PXSX, manually add Device (ARPT) after Name (_ADR, 0x001C000x) to dsdt and
# edit patch file:
# Find: PXSX
# Replace All: ARPT
# dsdt edit looks like:
#            Device (name)
#            {
#                Name (_ADR, 0x001C000x)
#                Device (ARPT)
#
# 1.  Insert device ARPT dsdt injection
into device Label PXSX parent_label [B][SIZE=4]RP07[/SIZE][/B] replace_content  begin
Name (_ADR, Zero)\n
Name (_SUN, One)\n
Name (_PRW, Package (0x02) {0x09,0x04})\n
    Method (_DSM, 4, NotSerialized)\n
    {\n
	    If (LEqual (Arg2, Zero)) { Return (Buffer() { 0x03 } ) }\n
	    Return (Package()\n
               {\n
		 "AAPL,slot-name","AirPort",\n
		 "built-in", Buffer () {0x00},\n
		 "device-type","AirPort",\n
		 "model","Atheros AR9x8x 802.11 a/b/g/n Wireless Network Controller",\n
		"name", "AirPort Extreme",\n
		 "compatible","pci168c,30"\n
	    })\n
    }\n
end;
into definitionblock code_regex . insert
begin Store ("arpt1-ar928x-ar9380_v2 dsdt edits, github.com/toleda", Debug) end
Code:
# Maintained by: toleda for: github.com/toleda/wifi_ar9380-ar928x
# File: arpt1-ar928x-ar9380_v2.txt
# Credit: MasterChef, PikeRAlpha, THeKiNG
#
# Atheros AR9380/AR9280/AR9285/AR9287 WiFi dsdt edits
# Verify IOReg/pci168c device @1C,6/RP07 otherwise, edit patch file:
# Find: RP07
# Replace All: name (name = IOReg/pci168c device name, RP01, BR01, PEX1, etc.)
#
# If no PXSX, manually add Device (ARPT) after Name (_ADR, 0x001C000x) to dsdt and
# edit patch file:
# Find: PXSX
# Replace All: ARPT
# dsdt edit looks like:
#            Device (name)
#            {
#                Name (_ADR, 0x001C000x)
#                Device (ARPT)
#
# 1.  Insert device ARPT dsdt injection
into device Label PXSX parent_label [SIZE=4][B]RP01[/B][/SIZE] replace_content  begin
Name (_ADR, Zero)\n
Name (_SUN, One)\n
Name (_PRW, Package (0x02) {0x09,0x04})\n
    Method (_DSM, 4, NotSerialized)\n
    {\n
	    If (LEqual (Arg2, Zero)) { Return (Buffer() { 0x03 } ) }\n
	    Return (Package()\n
               {\n
		 "AAPL,slot-name","AirPort",\n
		 "built-in", Buffer () {0x00},\n
		 "device-type","AirPort",\n
		 "model","Atheros AR9x8x 802.11 a/b/g/n Wireless Network Controller",\n
		"name", "AirPort Extreme",\n
		 "compatible","pci168c,30"\n
	    })\n
    }\n
end;
into definitionblock code_regex . insert
begin Store ("arpt1-ar928x-ar9380_v2 dsdt edits, github.com/toleda", Debug) end
- Go to MaciASL menu bar click on File/Save as, choose desktop as directory, select ACPI Machine Language Binary as File Format and name it "dsdt.aml" (add extension manually).
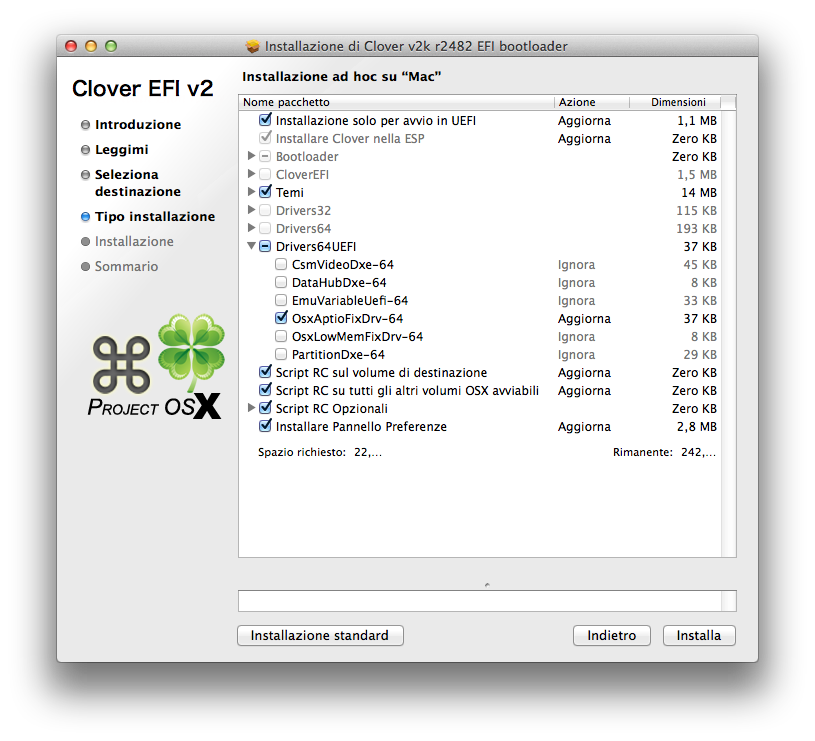
MultiBeast configuration
- Download and run the latest MultiBeast for Mavericks. Choose the options as stated down here
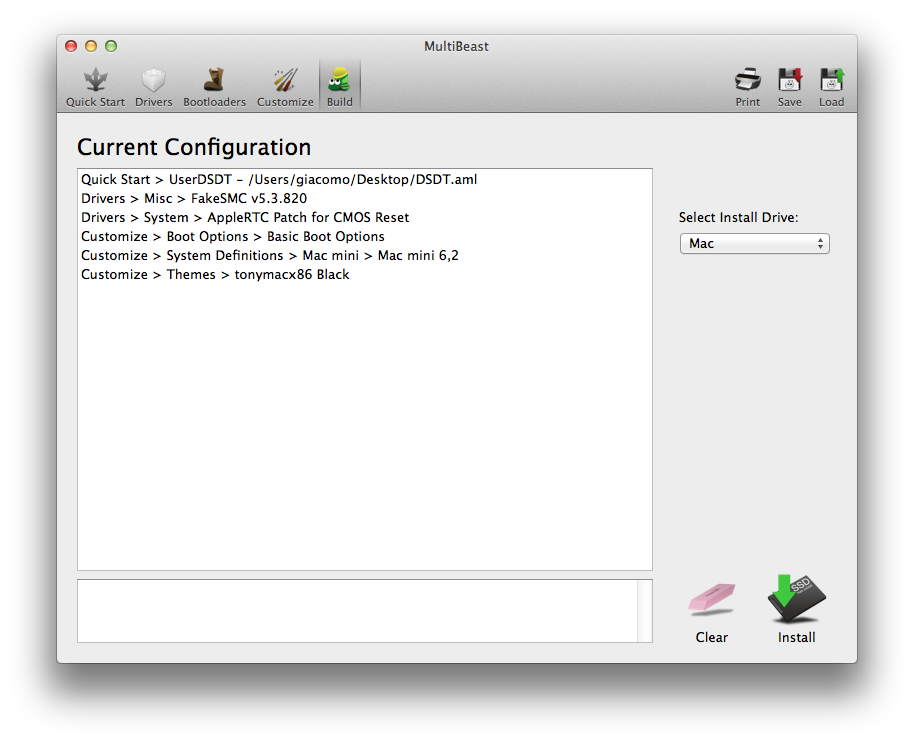 As you can notice, I didn't choose any Audio kext over here. That's why there's a way to enable full Audio with a new method discovered by PikeRAlpha. We'll deal with that at the end of this post
UPDATE #3
I've removed Lnx2Mac's Realtek kext from MultiBeast options. It seems to give some issues (Network not connected when hot plugging the ethernet cable, connected only after rebooting). I tried Mieze's RealtekRTL8111 v. 1.1.3 kext with full success. So download it from here, put it on desktop and run KextBeast.
END UPDATE #3
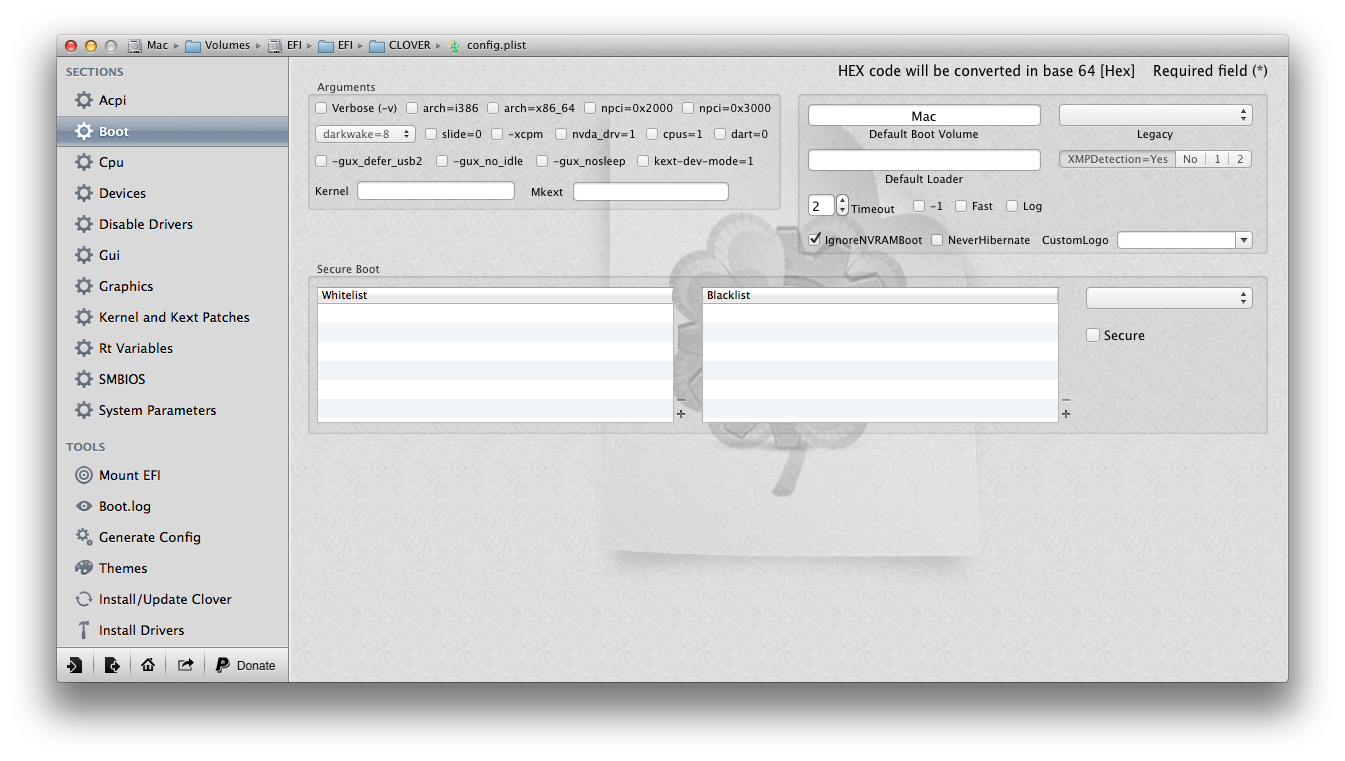
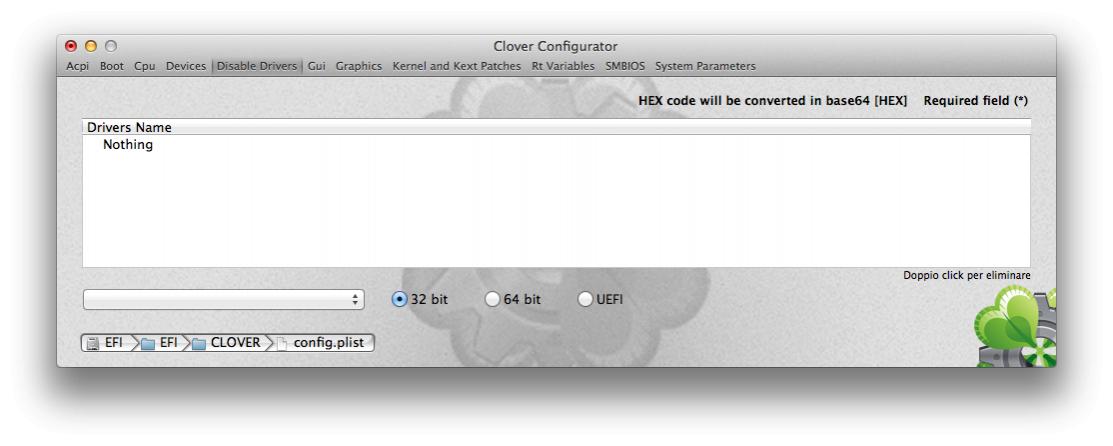
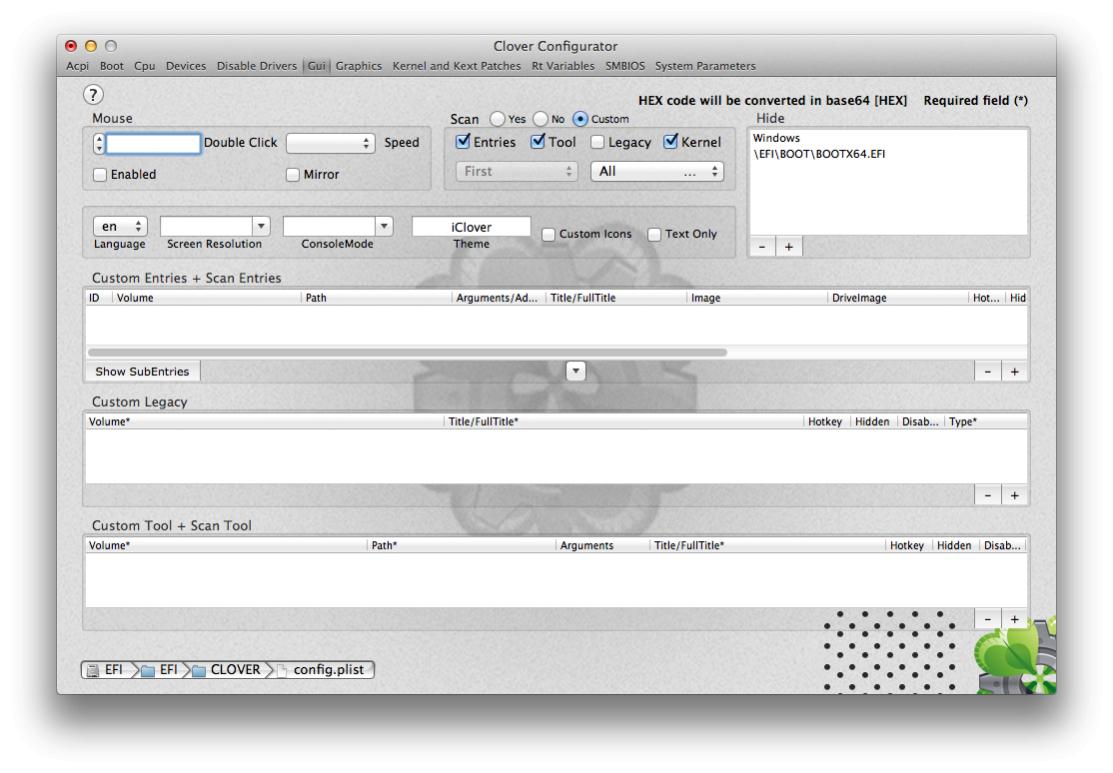
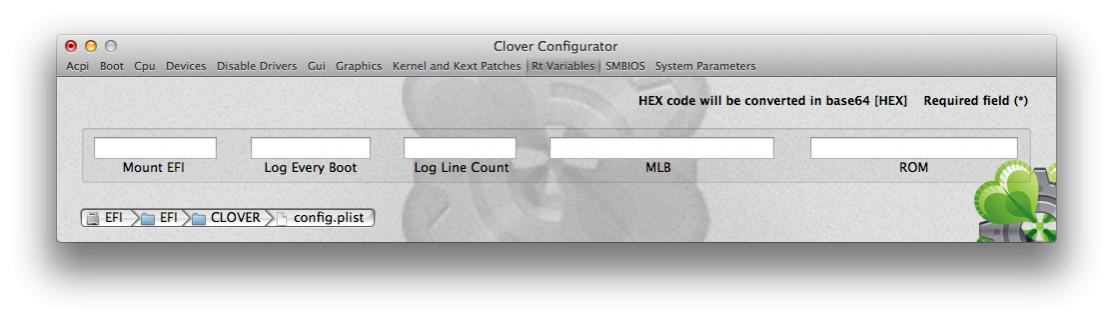
- Open Chameleon Wizard, update it, if it asks, and set it like this
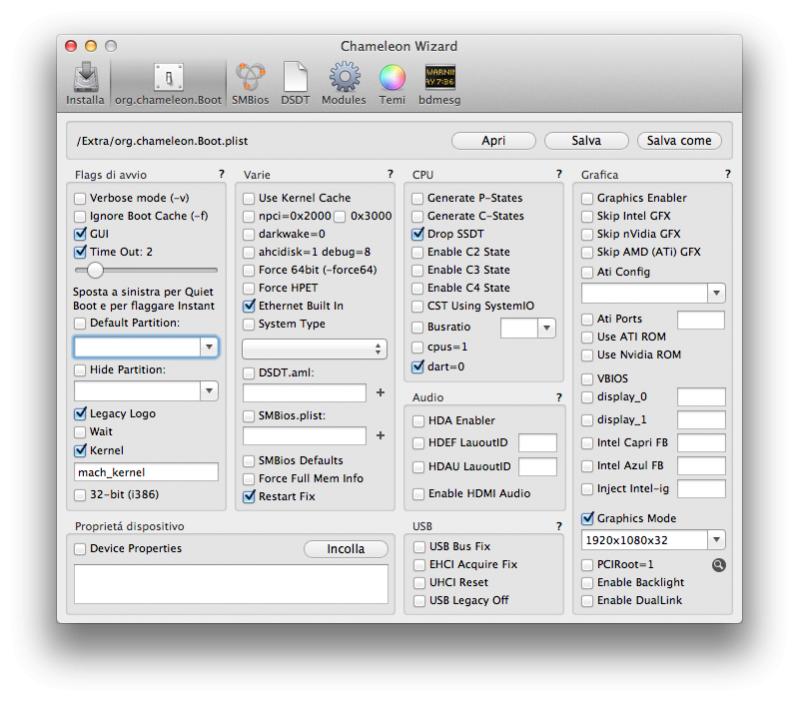
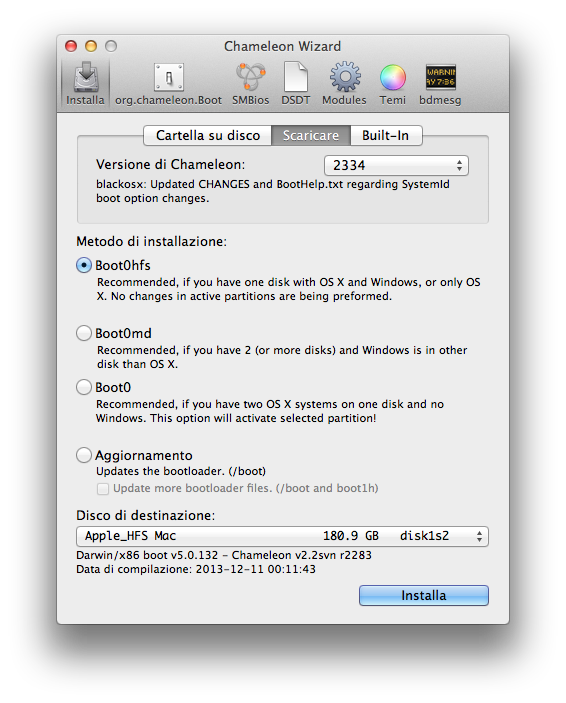 - Select the option according to your hardware configuration and click on Install button to Install Chameleon Bootloader. Then jump to org.chameleon.Boot icon and set like this (set Graphics Mode values according to your monitor's resolution)
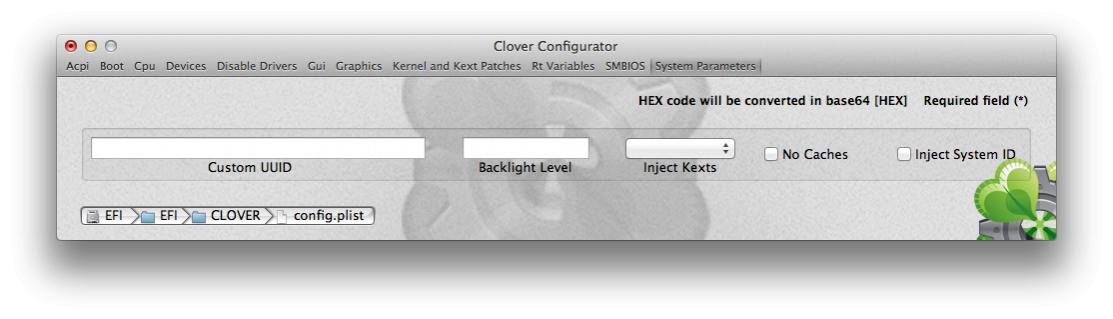
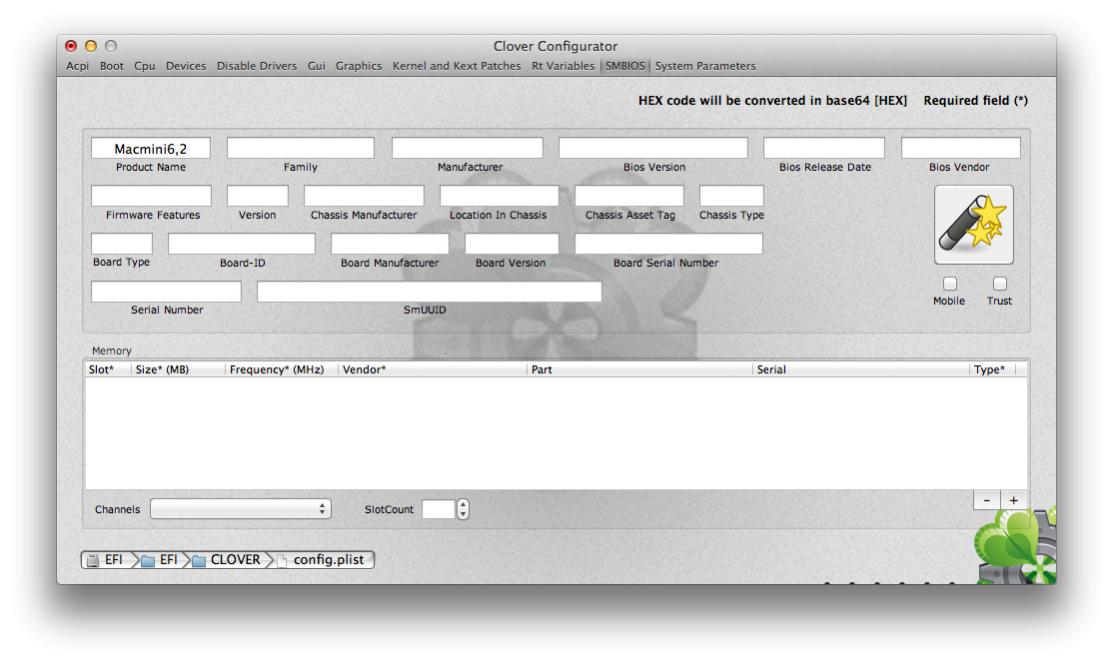
 - Select SMBios icon, click on Edit button and set it like this
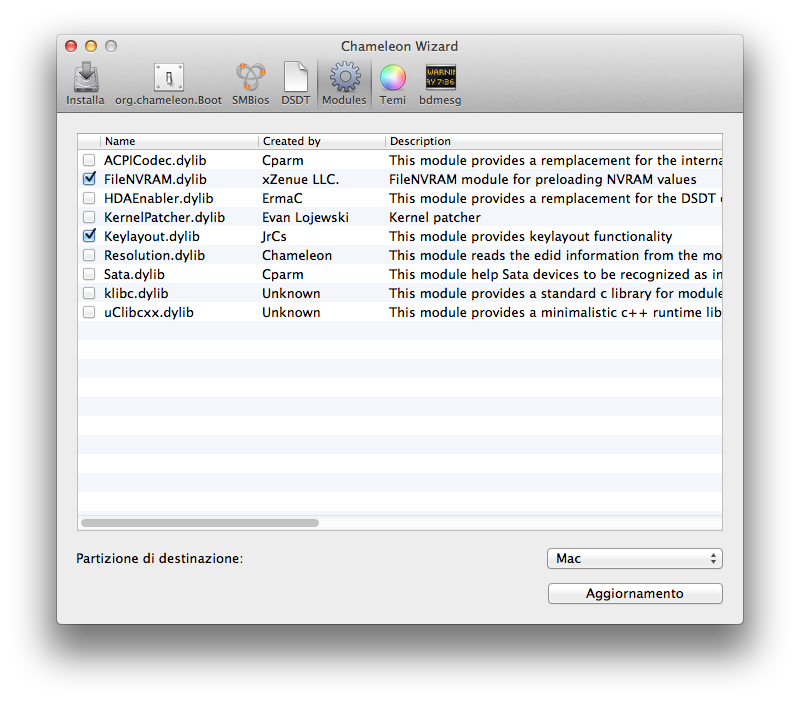
 - Save the SMBios config and select Modules icon (this step is required in order to avoid iMessage, FaceTime login issues). Set like this and click on Install (or Update, anyway: the down right command).
 - Finally your org.chameleon.Boot.plist should be pretty much like this
- Then add manually (with Text edit) darkwake=8 in
to enable the display when using Wake on Lan function (thanks to kevsmith4)
UPDATE #3
I've removed Lnx2Mac's Realtek kext from MultiBeast options. It seems to give some issues (Network not connected when hot plugging the ethernet cable, connected only after rebooting). I tried Mieze's RealtekRTL8111 v. 1.1.3 kext with full success. So download it from here, put it on desktop and run KextBeast.
END UPDATE #3
- Open Chameleon Wizard, update it, if it asks, and set it like this
Code:
<?xml version="1.0" encoding="UTF-8"?>
<!DOCTYPE plist PUBLIC "-//Apple//DTD PLIST 1.0//EN" "http://www.apple.com/DTDs/PropertyList-1.0.dtd">
<plist version="1.0">
<dict>
	<key>DropSSDT</key>
	<string>Yes</string>
	<key>EthernetBuiltIn</key>
	<string>Yes</string>
	<key>Graphics Mode</key>
	<string>1920x1080x32</string>
	<key>IGPEnabler</key>
	<string>Yes</string>
	<key>Kernel</key>
	<string>mach_kernel</string>
	<key>Kernel Flags</key>
	<string>dart=0</string>
	<key>Legacy Logo</key>
	<string>Yes</string>
	<key>Timeout</key>
	<string>2</string>
</dict>
</plist>
- Then add manually (with Text edit) darkwake=8 in
Code:
<key>Kernel Flags</key>
<string>dart=0 darkwake=8</string>Power Management Configuration
Time to load Ivy Bridge Power Management.
A great thread where I learn a lot of stuff about Power Management (PM) is this, if you want to learn, give it a shot!
AppleGraphicsPowerManagement no longer needs optimization! If you want to learn more about that take a look at here.
Now we need to get CPU PM (generating SSDT.aml).
- Download SSDT generation script from here (attached in post n. 1 of that thread) and unzip it
- In Download Folder click just one time on unzipped ssdtPRGen and you'll see ssdtPRGen.command and ssdtPRGen.sh (alias) in your User Folder.
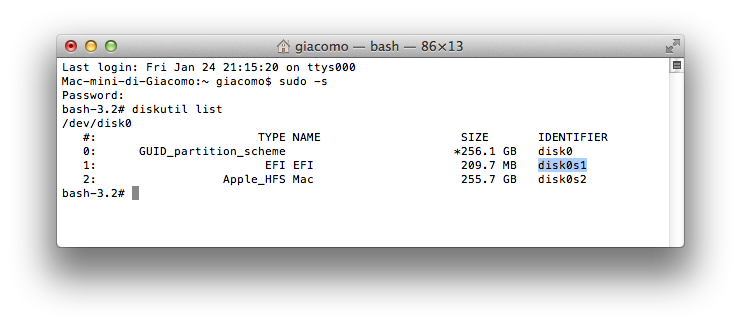
- Click another time on the unzipped ssdtPRGen and a Terminal window will appear asking for your password. Type it (even if you don't see anything actually typing) and press Enter. You should see something like this
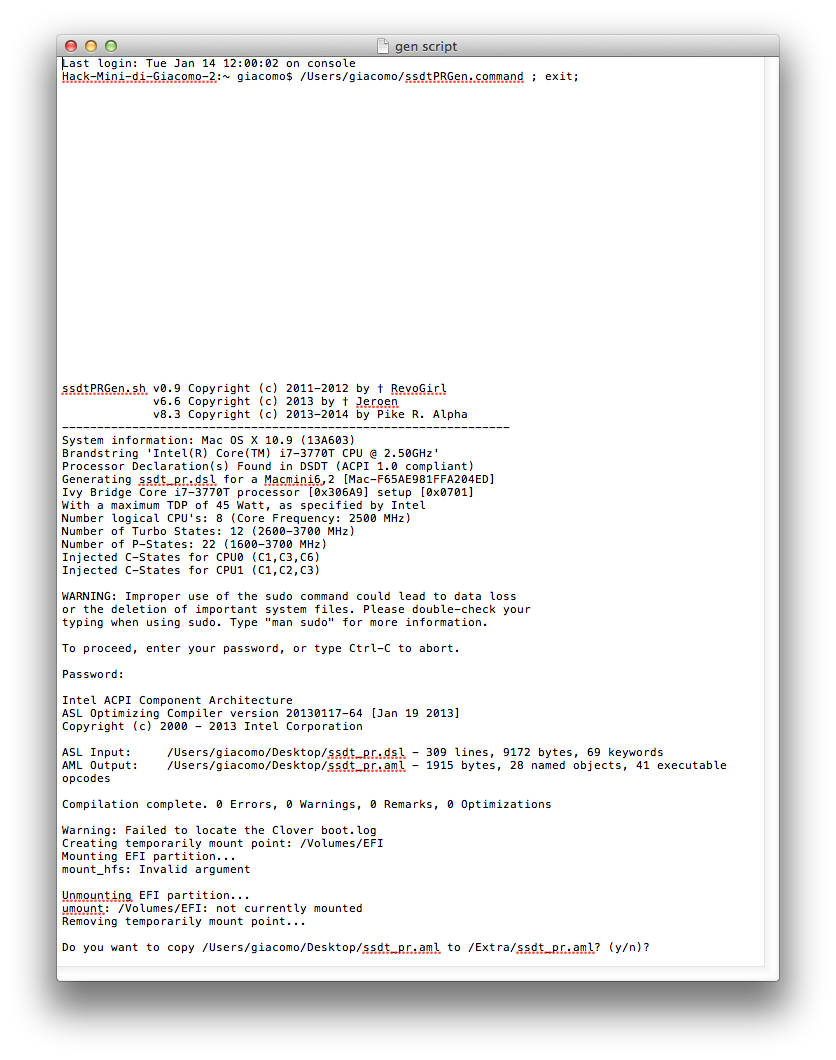 then press y and in your /Extra folder you'll find a file named ssdt_pr.aml. Simply rename it ssdt.aml to get power management for your cpu.
- Open Disk Utility from Application\Utility, select your Mavericks partition and repair permission
- Open Kext Wizard, select your Mavericks partition and re-build cache.
- Reboot
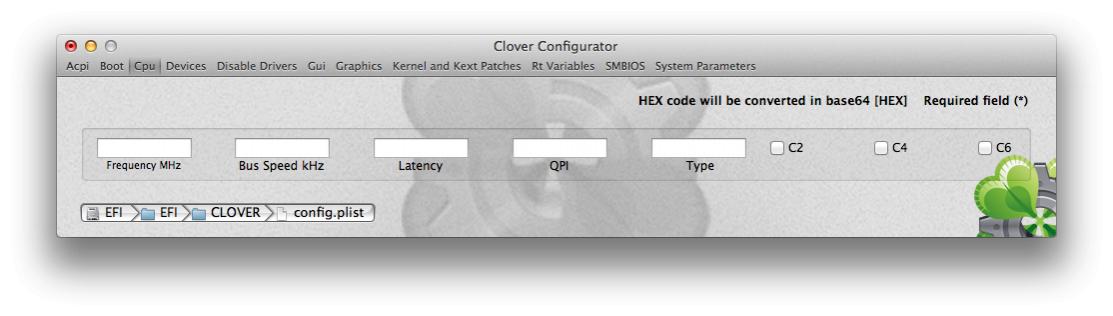
- Open DPCIManager click on P States icon, type your password like this
 then a window showing your cpu speedsteps will appear
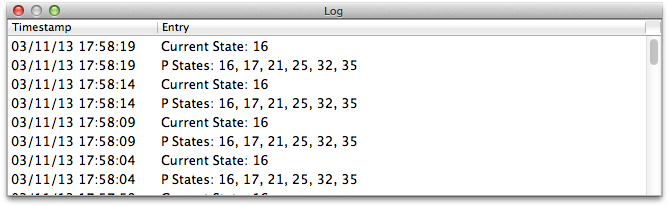 That numbers are the speed steps your cpu is achieving. Power Management is working!
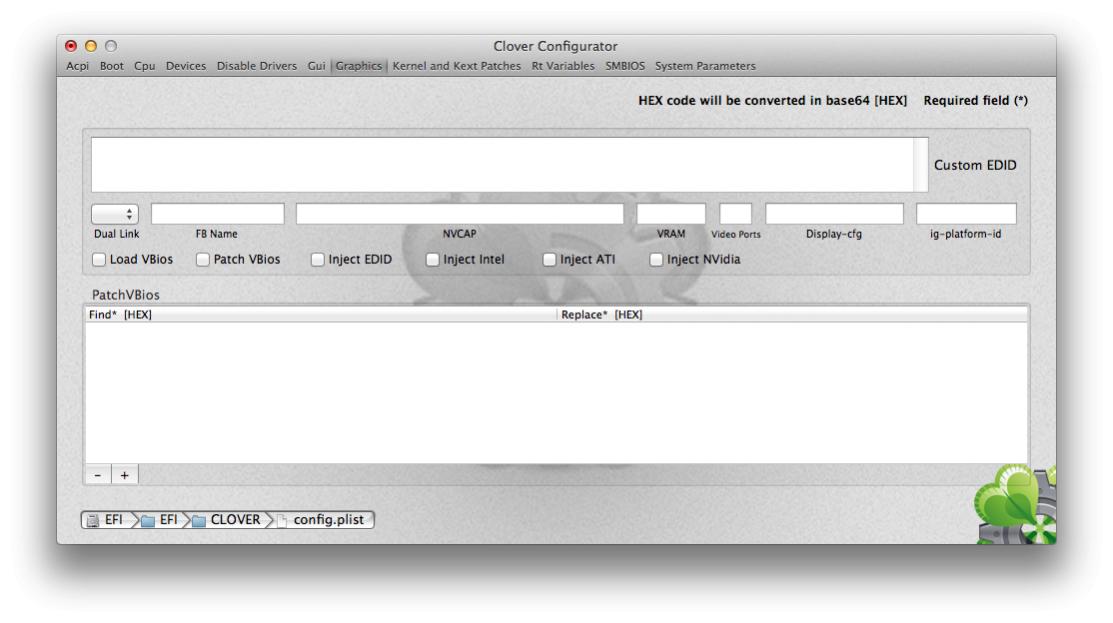
- Now you have to check the right mappature of physical connectors: probably they will be wrong, so you'll need to edit hex codes of AppleIntelFramebufferCapri.kext/Contents/MacOS/AppleIntelFramebufferCapri
- Open IOJones, type display0 in search field (up right corner), select display0 in the left main window and delete display0 in the search field. Scroll up the left side of the window to see where actually your monitor is plugged in. This board has three port: two hdmi (port 0x05 AppleIntelFramebuffer@0, and port 0x06 AppleIntelFramebuffer@1) and a Mini DisplayPort (port 0x07 AppleIntelFramebuffer@2).
 As you can see in the picture above, my display is plugged in the first hdmi port 0x6 near the Ethernet port (port-number 0x6 at the bottom of the right window) showing display0 in AppleIntelFramebuffer@1. Click on that and in the right side of the window check these values
av-signal-type
connector-type
For both HDMI ports correct values are
av-signal-type ----->08 00 00 00
connector-type ---->00 08 00 00
Instead of that, native mappature of AppleIntelFrameBufferCapri shows
av-signal-type ----->02 00 00 00
connector-type ---->00 04 00 00
Of course to check the second hdmi port you have to plug your monitor in it and look for AppleIntelFramebuffer@0 and for Mini DisplayPort find AppleIntelFramebuffer@2
For MiniDisplayPort correct values are
av-signal-type ----->08 00 00 00
connector-type ---->00 04 00 00
To insert the correct values proceed as following:
Thanks to Forum Moderator SJ_UnderWater, who made this, attached to this post you'll find zotacz77hd4k.zip Mavericks, a hex binary patcher based on SJ's open source Patcho, that automatically turn the wrong hex values of AppleIntelFramebufferCapri.kext into the right ones. It uses a self-elevating process, that means no need for terminal nor sudo typing. Simply do the next steps:
- Download zotacz77hd4k Mavericks.zip from attached files down here
- Unzip zotacz77hd4k Mavericks.zip
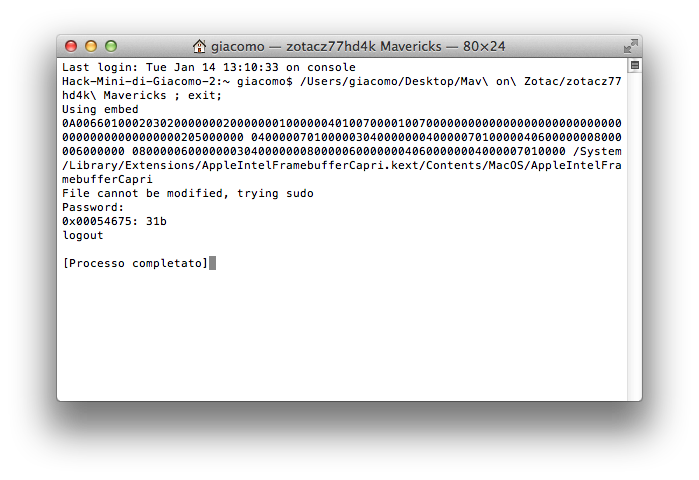
- Double click to unzipped zotacz77hd4k (exec dark grey icon)
- Type your password, press Enter...done!
Something like this
 - Repair Permissions with Disk Utility and rebuild cache with Kext Wizard
- Reboot
Note 1: If Gatekeeper is on you won't be able to double-click, just right-click and choose Open.
Note 2: Save somewhere your edited AppleIntelFramebufferCapri.kext in case of System Update, it could be useful to avoid editing it again!
- Open IOJones and check connectors av-signal-type and connector-type as explained above. Now your values should be correct. Like this
 If you want to do it manually, in post #4 of the original Mountain Lion guide check the red colored steps
- In Download Folder click just one time on unzipped ssdtPRGen and you'll see ssdtPRGen.command and ssdtPRGen.sh (alias) in your User Folder.
- Click another time on the unzipped ssdtPRGen and a Terminal window will appear asking for your password. Type it (even if you don't see anything actually typing) and press Enter. You should see something like this
- Open Disk Utility from Application\Utility, select your Mavericks partition and repair permission
- Open Kext Wizard, select your Mavericks partition and re-build cache.
- Reboot
- Open DPCIManager click on P States icon, type your password like this
- Now you have to check the right mappature of physical connectors: probably they will be wrong, so you'll need to edit hex codes of AppleIntelFramebufferCapri.kext/Contents/MacOS/AppleIntelFramebufferCapri
- Open IOJones, type display0 in search field (up right corner), select display0 in the left main window and delete display0 in the search field. Scroll up the left side of the window to see where actually your monitor is plugged in. This board has three port: two hdmi (port 0x05 AppleIntelFramebuffer@0, and port 0x06 AppleIntelFramebuffer@1) and a Mini DisplayPort (port 0x07 AppleIntelFramebuffer@2).
av-signal-type
connector-type
For both HDMI ports correct values are
av-signal-type ----->08 00 00 00
connector-type ---->00 08 00 00
Instead of that, native mappature of AppleIntelFrameBufferCapri shows
av-signal-type ----->02 00 00 00
connector-type ---->00 04 00 00
Of course to check the second hdmi port you have to plug your monitor in it and look for AppleIntelFramebuffer@0 and for Mini DisplayPort find AppleIntelFramebuffer@2
For MiniDisplayPort correct values are
av-signal-type ----->08 00 00 00
connector-type ---->00 04 00 00
To insert the correct values proceed as following:
Thanks to Forum Moderator SJ_UnderWater, who made this, attached to this post you'll find zotacz77hd4k.zip Mavericks, a hex binary patcher based on SJ's open source Patcho, that automatically turn the wrong hex values of AppleIntelFramebufferCapri.kext into the right ones. It uses a self-elevating process, that means no need for terminal nor sudo typing. Simply do the next steps:
- Download zotacz77hd4k Mavericks.zip from attached files down here
- Unzip zotacz77hd4k Mavericks.zip
- Double click to unzipped zotacz77hd4k (exec dark grey icon)
- Type your password, press Enter...done!
Something like this
- Reboot
Note 1: If Gatekeeper is on you won't be able to double-click, just right-click and choose Open.
Note 2: Save somewhere your edited AppleIntelFramebufferCapri.kext in case of System Update, it could be useful to avoid editing it again!
- Open IOJones and check connectors av-signal-type and connector-type as explained above. Now your values should be correct. Like this
As promised, now we have to take care about Audio.
Until now, each one of us had to patch AppleHDA.kext (if you have dsdt edits) or get HDAEnabler (without edited dsdt), and every system update we had to repatch it.
Now it's time to try a new method. Thanks to PikeRAlpha whom discovered it, and to the great support of Forum Moderator Toleda, here's a "New style of AppleHDA.kext patching".
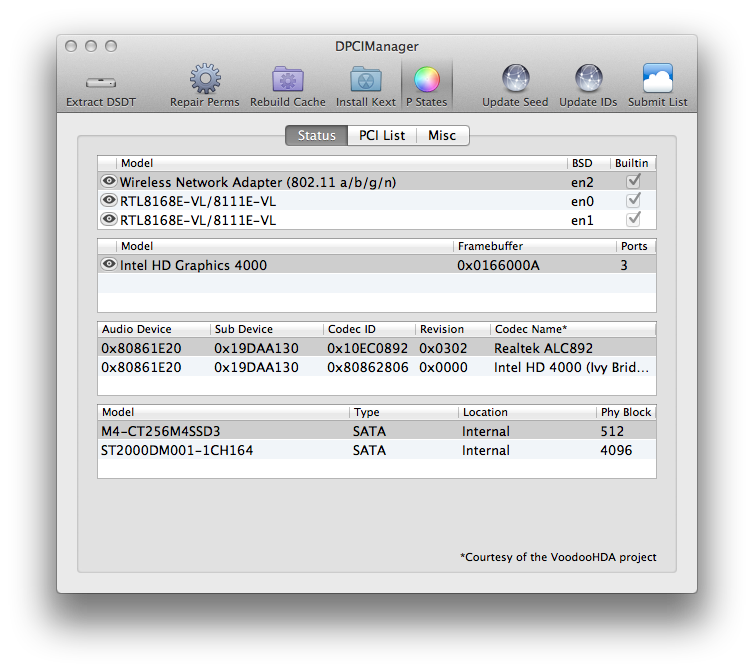
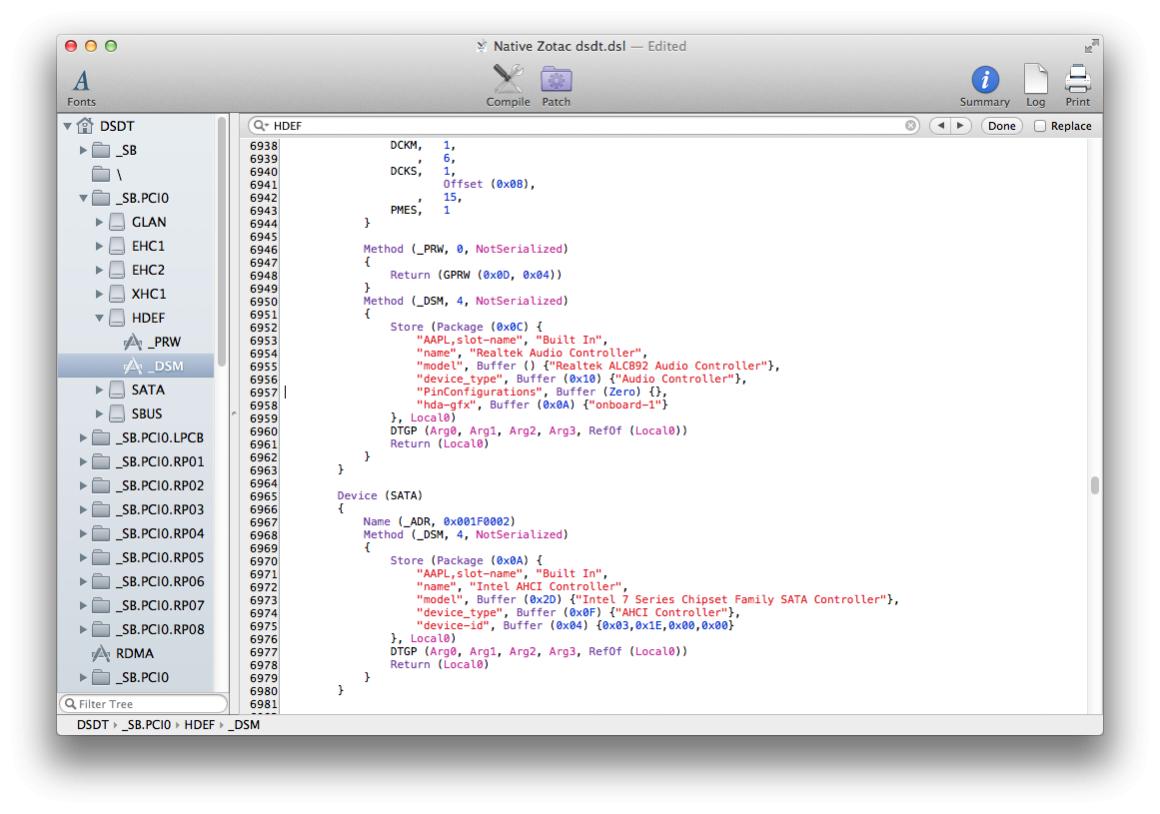
- Find the audio controller of your motherboard (in this case Realtek ALC892)
- Download AppleHDA8Series.sh from Pike's Git-Hub repo (on the right column of the linked page click on Download ZIP)
- In your download folder you'll find now a folder named AppleHDA8Series.sh-master, open and copy AppleHDA8Series.sh on your desktop (step not necessary, you can leave there, just at your convenience)
- Open a Terminal window, drag and drop AppleHDA8Series.sh into it and, if you are using Chameleon or Chimera bootloader, add
the result will be something like this (of course the path will change if you have AppleHDA8Series.sh in any other folder than desktop)
- Press Enter and you'll find this text
of course type your password (even if you don't see anything typing) and press Enter again
- Next step you'll see
Choose the right controller for your motherboard (mine is 5, ALC 892) and press Enter
- Then the script will ask you
I have only HD4000 so I typed y (for yes) and Enter, if you have a discrete card supporting HDMI Audio, type n (for no), Enter, and choose the option 1 (not tested, but I guess it will work) ---> For more info about layout id, see toleda's threads here and here
- The next step asks you to choose the Info.plist. According to Pike's instruction choose 4 and Enter
- Last step, after this message
type y (for Yes) and the system will reboot giving you the Audio.
Note 1: the script generates AppleHDA892.kext in S/L/E, a kext that bypass AppleHDA.kext (so no need to patch anything after System Update!)
Note 2: DSDT edit and AppleIntelFramebufferCapri.kext edit are still mandatory to have proper HDMI Audio
- Download AppleHDA8Series.sh from Pike's Git-Hub repo (on the right column of the linked page click on Download ZIP)
- In your download folder you'll find now a folder named AppleHDA8Series.sh-master, open and copy AppleHDA8Series.sh on your desktop (step not necessary, you can leave there, just at your convenience)
- Open a Terminal window, drag and drop AppleHDA8Series.sh into it and, if you are using Chameleon or Chimera bootloader, add
Code:
-b AppleHDA -b AppleHDAController
Code:
Mac-mini-di-giac:~ giac$ /Users/giac/Desktop/AppleHDA8Series.sh -b AppleHDA -b AppleHDAController
Code:
This script must be run as root!

WARNING: Improper use of the sudo command could lead to data loss
or the deletion of important system files. Please double-check your
typing when using sudo. Type "man sudo" for more information.

To proceed, enter your password, or type Ctrl-C to abort.

Password:- Next step you'll see
Code:
AppleHDA8Series.sh v2.2 Copyright (c) 2013-2014 by Pike R. Alpha
                    patched XML files by Toleda and contributors
----------------------------------------------------------------
The supported Realtek ALC codecs for AppleHDA8Series.sh are:

    [1] Realtek ALC  885 (0x10EC0885 / 283904133)
    [2] Realtek ALC  887 (0x10EC0887 / 283904135)
    [3] Realtek ALC  888 (0x10EC0888 / 283904136)
    [4] Realtek ALC  889 (0x10EC0889 / 283904137)
    [5] Realtek ALC  892 (0x10EC0892 / 283904146)
    [6] Realtek ALC  898 (0x10EC0899 / 283904153)
    [7] Realtek ALC 1150 (0x10EC0900 / 283904256)

Please choose the desired codec for the hardware: [B]5[/B]- Then the script will ask you
Code:
Do you want to use [3] as the layout-id (y/n)? y- The next step asks you to choose the Info.plist. According to Pike's instruction choose 4 and Enter
Code:
Warning: 'MaximumBootBeepVolume' property NOT found (will show a Sound assertion in: system.log)
Looking in /System/Library/Extensions/AppleHDA.kext for the ConfigData
Looking in /System/Library/Extensions/FakeSMC.kext for the ConfigData
Error: ConfigData NOT found!
Downloading https://raw.github.com/toleda/audio_ALC892/master/892.zip ...
  % Total    % Received % Xferd  Average Speed   Time    Time     Time  Current
                                 Dload  Upload   Total   Spent    Left  Speed
100 18162  100 18162    0     0  18485      0 --:--:-- --:--:-- --:--:-- 18476

Unzipping Archive:  /tmp/ALC892.zip
   creating: /tmp/892/
  inflating: /tmp/892/Info-84.plist
  inflating: /tmp/892/Info-85.plist
  inflating: /tmp/892/Info-90.plist
  inflating: /tmp/892/Info-91.plist
 extracting: /tmp/892/layout1.xml.zlib
 extracting: /tmp/892/layout2.xml.zlib
 extracting: /tmp/892/layout3.xml.zlib
  inflating: /tmp/892/Platforms.xml.zlib

The available Info.plist files for the ALC 892 are:

[1] /tmp/892/Info-84.plist
[2] /tmp/892/Info-85.plist
[3] /tmp/892/Info-90.plist
[4] /tmp/892/Info-91.plist

Please choose the matching Info.plist (1/4) [B]4[/B]
Code:
Looking in: /tmp/892/Info-91.plist for the ConfigData
ConfigData for Realtek ALC 892 found!
------------------------------------------------------------
IUccECFHHUAhRx4RIUcfkCFXHCAhVx0QIVceASFXHwEhZxzwIWcdACFnHgAhZx9AIXcc8CF3HQAhdx4AIXcfQCGHHEAhhx2QIYceoCGHH5AhlxxgIZcdkCGXHoEhlx8CIaccUCGnHTAhpx6BIacfASG3HHAhtx1AIbceISG3HwIh5xyQIecdYSHnHksh5x8BIfcc8CH3HQAh9x4AIfcfQCEXHPAhFx0AIRceACEXH0A=
------------------------------------------------------------
Creating AppleHDA892.kext in: /Users/giac
Copying AppleHDA ...
Bin-patching AppleHDA ... Done.
AppleHDA892.kext appears to be loadable (including linkage for on-disk libraries).
Do you want to copy AppleHDA892.kext to: /System/Library/Extensions? (y/n) y
Do you want to reboot now? (y/n)Note 1: the script generates AppleHDA892.kext in S/L/E, a kext that bypass AppleHDA.kext (so no need to patch anything after System Update!)
Note 2: DSDT edit and AppleIntelFramebufferCapri.kext edit are still mandatory to have proper HDMI Audio
A few more steps:
- If Auto Sleep doesn't work follow this steps:
- open terminal and type "pmset -g assertions" (no quotes)
- if you see something like that
you just have to type "launchctl unload -w /System/Library/LaunchAgents/com.apple.helpd.plist".
- type again "pmset -g assertions", and when all numbers are 0 you go on
- Reboot and try Autosleep
- If Safari/Firefox crashes on Flash Player plug-in YouTube videos (mostly with discrete graphic card) follow these steps:
- open terminal and type "pmset -g assertions" (no quotes)
- if you see something like that
Code:
Assertion status system-wide:
PreventUserIdleDisplaySleep 0
PreventSystemSleep 0
PreventUserIdleSystemSleep 0
ExternalMedia 0
DisableLowPowerBatteryWarnings 0
UserIsActive 0
ApplePushServiceTask 0
BackgroundTask 1

lmediamounted"
pid 192(helpd): [0x0000000c00000133] 00:03:06 BackgroundTask named: "com.apple.helpd.sdmbuilding"
you just have to type "launchctl unload -w /System/Library/LaunchAgents/com.apple.helpd.plist".
- type again "pmset -g assertions", and when all numbers are 0 you go on
- Reboot and try Autosleep
- If Safari/Firefox crashes on Flash Player plug-in YouTube videos (mostly with discrete graphic card) follow these steps:
- Choose a web video that gives you this issue (not all videos do that, I believe just those ones that require Flash Player plug-in)
- Don't play it, otherwise the system will probably crash (but you already know that, don't you?)
- Right click on the video and choose settings
- A window like this will appear

- Simply uncheck Enable Hardware Acceleration (my pic is in italian, I guess you'll find it in your system language)
- Close and re-open the browser (Safari/Firefox) and check: hopefully that will do the trick.
That's it.
Please feel free to report bugs, error, and anything that could be useful for this guide and Zotac Z77 ITX users!
Credits
Tonymac for Unibeast method
MacMan for MSRDumper
SJ_UnderWater for MaciASL, Patcho and DPCI Manager
PJALM for the great support and his DSDT patches
samisnake for patched bios info
samisnake for auto sleep info
CodeRush for patched bios
toleda for HDMI audio here and here
toleda for Hex editing work
toleda for SSDT support
flytiger for auto sleep info
rcork for system profiler info
PikeRAlpha and Jeroen for SSDT script
PikeRAlpha for AppleHDA892.kext
minihack for info and DSDTSE patches
miramar for info and patch
Groths for Trim Enabler
Hilbe for IR Receiver installation
MacintoshHealer for great support
Uploaded some pictures
Attachments
Last edited by a moderator:


") )
)