
- Joined
- Dec 21, 2013
- Messages
- 149
- Motherboard
- Gigabyte Z490 Auros Ultra
- CPU
- i9-10850K
- Graphics
- RX 6900 XT
- Mac
- Mobile Phone
Guide to install/migrate from Yosemite to El Capitan with Clover.
What works:
What does not work:
GeekBench Results

Components:
Step 1 - Preliminaries:
Step2 - Before you proceed make the following BIOS settings
Step 3 - Installation
Step 4 - Post Installation
Step 5 - Fixing USB 3.0 (Based on matt77303's "El capitan USB issues - possible fix." thread)
Step 6 - Fix Intermittent Bluetooth:
Step 7 - Fix Corsair H80i Wake From Sleep:
When installing the Corsair H80i one of the steps requires connecting the pump to a USB header. Unfortunately one side effect of this is that your Hackintosh will wake from sleep instantly after it tries to go to sleep.
Note: This will only fix the wake from sleep issue. The Corsair pump and the fans attached to it still will not function as per Windows (in other words they will not increase their rate of spin as the CPU temperature increases!). It is recommended to set a adequate default value (when logged into windows) or to download a program which will control the fans and the pump. See either MacFanControl or HWSensors.
What works:
- Startup
- Shutdown
- Sleep
- Wake from Sleep (via USB)
- USB 2.0 ports
- USB 3.0 ports and external drives
- USB 2.0 ports on Apple LED Display
- Apple LED monitor via mini-Displayport on N760 ITX
- iMessage
- FaceTime
- Bluetooth (using the GMYLE adaptor - note that Bluetooth does not work in the BIOS & Clover boot menus)
- Bluetooth wake from sleep
- Wifi (TP-LINK TL-WDN4800 N900 is detected as a Airport)
- Airdrop (only when using the ethernet connection...)
- Continuity
- Handoff (SMS receiving and sending, answering and making calls)
What does not work:
- iTunes DRM
GeekBench Results
Components:
- Intel Core i5-4670K Haswell Processor
- Gigabyte Z87MX-D3H Socket 1150 Micro ATX Motherboard
- Corsair CML16GX3M2A1600C10 Vengeance Low Profile 16GB (2x8GB) DDR3 1600 Mhz
- GMYLE (TM) Micro USB Bluetooth 4.0 Dongle Dual Mode w/ Low Energy Technology Wireless Adapter (Broadcom BCM20702 chipset)
- TP-LINK TL-WDN4800 N900 Wireless Dual Band PCI Express Adapter
- MSI N760 2GD5 Overclocked ITX PCIe Graphics Card
- Apple Magic Mouse
- Apple Bluetooth Keyboard
Note: Does not work in the Clover Boot Menu or BIOS. You need a backup USB/PS2 Keyboard for that. - Apple 27 Inch Cinema Display (connected via Mini-Displayport)
- Corsair H80i Water Cooler
Step 1 - Preliminaries:
- Ensure that the Z87MX-D3H has the latest F7 BIOS as available from Gigabyte: http://www.gigabyte.com/products/product-page.aspx?pid=4490#bios
- Note you will need access to a MAC to download and create a USB installer
- Ensure that you have a USB or PS/2 keyboard available - unless your USB Bluetooth device works in the BIOS (The GMYLE one does not)
- Create you own El Capitan Installer as per the following TonyMac El Capitan Installation Guide by following Step 1 and Step 2
Step2 - Before you proceed make the following BIOS settings
- Load Optimised Defaults first
- If your CPU supports VT-d, disable it for installation (you can enable it again later - useful for running virtual machines, etc)
- If your system has CFG-Lock, disable it
- If your system has Secure Boot Mode, disable it
- Set OS Type to Other OS
- Set XMP to no in the BIOS for installation. (Can be set back to 'profile1' after installation)
- Set XHCI Mode to "Smart Auto"
- Set Internal Graphics to "Disabled" if you are using a dedicated graphics card
- Ensure Init Display first is set to the PCI slot of your card - assumed to be "PCIe 1 Slot"
- Set XHCI Handoff to "Disabled" - this will disable USB 3.0 - but will ensure all ports work at USB 2.0 speeds for installation - until we fix USB 3.0 later in the guide.
- Set EHCI Handoff to "Disabled" - this will disable USB 3.0 - but will ensure all ports work at USB 2.0 speeds for installation - until we fix USB 3.0 later in the guide.
Step 3 - Installation
- Follow Step 4 of the TonyMac El Capitan Installation Guide
- Note that you should use a USB 2.0 port for the installation as USB 3.0 does not work by default on the GA-Z87MX-D3H
- Note the comment about MaxWell cards and the "nv_disable=1" which should be entered at the Clover boot menu (Does not apply here as I have a Nvidia GTX 760 Card which is not a MaxWell based card)
Step 4 - Post Installation
- Follow Step 5 of the TonyMac El Capitan Installation Guide. Note that you have to boot from the USB installer at this stage - booting from the HDD will not work yet.
- You may use the following example clover config.plist: View attachment ga-z87mx-d3h el capitan config.plist.zip (Note I have blanked out my serial, ROM and MLB values - these should be generated). Alternatively use the one provided in the Clover installation guide.
- Make sure you select the iMac 14,2 definition or "product name" in Clover Configurator.
Note that it is important to not choose a definition at random - but a definition that closely mirrors your Hackintosh hardware with an actual Mac. See the following URL for the relevant iMac models and the following URL for the iMac 14,2 hardware specification which matches my system components. - Make sure you use the "Magic Wand" to create a unique serial number for your Hackintosh. Do not select the first value but try this a few times. Ensure that you have a unique serial and it is not used by an existing Macintosh machine - enter it here: https://selfsolve.apple.com/. If the serial is valid but not already assigned to someone with a a real mac you'll get the follow message (which is what you are after): "We're sorry, the number you have provided cannot be found in our records. Please verify the number and try again".
If you get any other response regenerate the serial - follow the "How to Fix iMessage" guide.
Step 5 - Fixing USB 3.0 (Based on matt77303's "El capitan USB issues - possible fix." thread)
- Note that this fix is specific for this board. If you have another board (e.g. GA-Z97) - refer to matt77303's thread above.
- Update your BIOS settings to set "XHCI Hand-Off" to "Enabled" and "EHCI Hand-Off" to "Enabled" if you have not already done so.
- Download:
- RehabMan's version of MaciASL - https://bitbucket.org/RehabMan/os-x-...atic/downloads
- FakePCIID.kext and FakePCIID_XHCIMux.kext - https://bitbucket.org/RehabMan/os-x-fake-pci-id/downloads/
- Kext Wizard - http://www.insanelymac.com/forum/top...ller-and-more/
- Clover Configurator - http://mackie100projects.altervista.org/download/
- Open Clover Configurator. It will prompt you to mount you EFI directory. Afterwards - ensure you load you existing Clover config.plist file (usually /EFI/EFI/CLOVER/config.plist)

- Add the DSDT Patch Configuration:
- Click the little + icon on the right
- Use "change _OSI to XOSI" as the comment
- Enter "5F4F5349" in the "Find* [HEX]" field
- Enter "584F5349" in the "Replace* [HEX]" field

- Ensure the following configuration options are set in Clover via Clover Configuration
- In the Acpi -> Fixes section untick "FIXUSB"
- In the Devices -> USB section untick "Inject", "Add ClockID", "FixOwnership" and "HighCurrent"
- In the Rt Variables section set your BooterConfig to "0x28" and "CsrActiveConfig" to "0x67"
- Be sure to save you configuration and reboot by pressing the export button

- Launch MaciASL and ensure that the compiler preferences is set to the latest version (5.0 or 5.0A)

- Copy the following into the MaciASL window
Code:DefinitionBlock ("SSDT-XOSI.aml", "SSDT", 1, "hack", "hack", 0x00003000) { // All _OSI calls in DSDT are routed to XOSI... // XOSI simulates "Windows 2012" (which is Windows 8) // Note: According to ACPI spec, _OSI("Windows") must also return true // Also, it should return true for all previous versions of Windows. Method(XOSI, 1) { // simulation targets // source: (google 'Microsoft Windows _OSI') // http://download.microsoft.com/downlo...nACPI_OSI.docx Name(WINV, Package() { "Windows", // generic Windows query "Windows 2001", // Windows XP "Windows 2001 SP2", // Windows XP SP2 "Windows 2006", // Windows Vista "Windows 2006 SP1", // Windows Vista SP1 "Windows 2009", // Windows 7/Windows Server 2008 R2 "Windows 2012", // Windows 8 }) Return (LNotEqual(Match(WINV, MEQ, Arg0, MTR, 0, 0), Ones)) } } //EOF
- Save As "SSDT-XOSI.aml" in "ACPI Machine Language Binary" format in "EFI/Clover/ACPI/patched"

- Open up Kext Wizard and install FakePCIID.kext and FakePCIID_XHCIMux.kext downloaded earlier.

- Reboot.
Note You'll want to enable "Screen Sharing" temporary to be able to log into your machine if anything goes wrong before continuing to the next section of the guide. Otherwise you will not be able to access your machine from within El Capitan. - Fix USB Wake from Sleep
- Reboot your machine and press F4 at the Clover Boot Menu. Clover will write your native DSDT configuration to "EFI/Clover/ACPI/origin". Note that there is no response or notification when pressing F4...
- Once booted, mount your EFI partition and copy your "DSDT.aml" from "EFI/Clover/ACPI/origin/" to your desktop.
- Open the file in MaciASL
- Change the following
toCode:Method(XWAK, ... { ..some code... }
Code:Method(XWAK, ... { Return(0) ..some code... }
- At this point MaciASL will throw two errors and refuse to compile the DSDT. Specifically you will see something the following two error messages:
Code:6645, 6126, syntax error, unexpected PARSEOP_ZERO 11024, 6126, syntax error, unexpected PARSEOP_ARG0
- Open preferences and go to the Sources tab and add the following Patch Source: "http://raw.github.com/RehabMan/Laptop-DSDT-Patch/master".

- Once complete click the Patch icon and you will be presented with a list of patches to apply to the DSDT.
- . Select “[syn] Fix ADBG Error” and once the "Apply" button is no longer greyed out and the details of the patch displayed - click "Apply"

- Click close and click on the "Compile" button. Only the PARSEOP_ZERO error should now display in the Log.
- Repeat the previous step and apply the "[syn] Fix PARSEOP_ZERO Error” patch
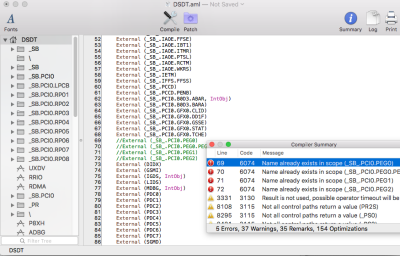
- You will now be presented with the following errors:
Navigate to the relevant lines and comment the entries out as follows:Code:69, 6074, Name already exists in scope (_SB_.PCI0.PEG0) 70, 6074, Name already exists in scope (_SB_.PCI0.PEG0.PEGP) 71, 6074, Name already exists in scope (_SB_.PCI0.PEG1) 72, 6074, Name already exists in scope (_SB_.PCI0.PEG2)
Code://External (_SB_.PCI0.PEG0) //External (_SB_.PCI0.PEG0.PEGP) //External (_SB_.PCI0.PEG1) //External (_SB_.PCI0.PEG2)
- You should now only have warning in the logs and no errors.

- Compile the DSDT. It will be saved in place. Copy it to the "EFI/Clover/ACPI/patched" folder.
- Restart your machine and USB 3.0 should now be working by indicating the device speed is "Up to 5 Gb/sec" (you will need a USB 3.0 High Speed device to verify this)

- Disable screen sharing if it was enabled
Step 6 - Fix Intermittent Bluetooth:
- Download BrcmPatchRAM for Mac OS 10.11 and later provided by RehabMan here: https://bitbucket.org/RehabMan/os-x-brcmpatchram/downloads/
- Install the "BrcmPatchRAM2.kext" and "BrcmFirmwareRepo.kext" using Kext Wizard or your favourite tool. Note the warning about using multiple/the wrong combination of kexts!
- Reboot. You should see something similar to this below to indicate bluetooth is now working properly.
Code:16/04/2016 12:17:41.000 kernel[0]: BrcmPatchRAM2: Version 2.2.3 starting on OS X Darwin 15.4. 16/04/2016 12:17:41.000 kernel[0]: BrcmPatchRAM2: Published new IOKit personality for BrcmFirmwareStore. 16/04/2016 12:17:43.000 kernel[0]: BrcmPatchRAM2: Published new IOKit personality for BrcmPatchRAMResidency. 16/04/2016 12:17:45.000 kernel[0]: BrcmPatchRAM2: [0a5c:21e8]: BrcmPatchRAMResidency does not appear to be available. 16/04/2016 12:17:45.000 kernel[0]: BrcmPatchRAM2: [0a5c:21e8]: BrcmFirmwareStore does not appear to be available. 16/04/2016 12:17:45.000 kernel[0]: BrcmPatchRAM2: [0a5c:21e8]: USB [000272C824D3 v274] "BCM20702A0" by "Broadcom Corp" 16/04/2016 12:17:45.000 kernel[0]: BrcmPatchRAM2: unable to find disabled BrcmFirmwareStore personality. 16/04/2016 12:17:46.000 kernel[0]: BrcmPatchRAM2: unable to find disabled BrcmPatchRAMResidency personality. 16/04/2016 12:17:46.000 kernel[0]: BrcmPatchRAM: Loaded firmware "BCM20702A1_001.002.014.1502.1764_v5860.zhx" from resources. 16/04/2016 12:17:46.000 kernel[0]: BrcmPatchRAM: Decompressed firmware (30360 bytes --> 71148 bytes). 16/04/2016 12:17:46.000 kernel[0]: BrcmPatchRAM: Firmware is valid IntelHex firmware. 16/04/2016 12:17:47.000 kernel[0]: BrcmPatchRAM2: [0a5c:21e8]: Firmware upgrade completed successfully. 16/04/2016 12:17:47.000 kernel[0]: BrcmPatchRAM2: [0a5c:21e8]: Found existing IOKit personality "com.apple.iokit.BroadcomBluetoothHostControllerUSBTransport". 16/04/2016 12:17:47.000 kernel[0]: BrcmPatchRAM2: Processing time 5.815 seconds. 16/04/2016 12:17:47.000 kernel[0]: BrcmPatchRAM2: Version 2.2.3 starting on OS X Darwin 15.4. 16/04/2016 12:17:47.000 kernel[0]: BrcmPatchRAM2: uploadFirmware could not open the device! 16/04/2016 12:17:47.000 kernel[0]: BrcmPatchRAM2: [0a5c:21e8]: Found existing IOKit personality "com.apple.iokit.BroadcomBluetoothHostControllerUSBTransport". 16/04/2016 12:17:47.000 kernel[0]: BrcmPatchRAM2: Processing time 0.48 seconds.
Step 7 - Fix Corsair H80i Wake From Sleep:
When installing the Corsair H80i one of the steps requires connecting the pump to a USB header. Unfortunately one side effect of this is that your Hackintosh will wake from sleep instantly after it tries to go to sleep.
Note: This will only fix the wake from sleep issue. The Corsair pump and the fans attached to it still will not function as per Windows (in other words they will not increase their rate of spin as the CPU temperature increases!). It is recommended to set a adequate default value (when logged into windows) or to download a program which will control the fans and the pump. See either MacFanControl or HWSensors.
- The fix is to deactivate USB wake from sleep. This implies that you will only be able to wake your Hackintosh with the power button or a device connected to the PS/2 port (mouse/keyboard).
- Download RehabMan's version of MaciASL as per step 5 and ensure that "http://raw.github.com/RehabMan/Laptop-DSDT-Patch/master" is added as a patch source.
- Mount your EFI partition and open your existing "DSDT.aml" in "/Volumes/EFI/Clover/ACPI/patched" folder.
- Apply the DSDT with the "[usb] USB_PRW 0x0D (instant wake)" patch.
- You may be will now be presented with the following errors:
Code:
69, 6074, Name already exists in scope (_SB_.PCI0.PEG0)
70, 6074, Name already exists in scope (_SB_.PCI0.PEG0.PEGP)
71, 6074, Name already exists in scope (_SB_.PCI0.PEG1)
72, 6074, Name already exists in scope (_SB_.PCI0.PEG2)- Navigate to the relevant lines and comment the entries out as follows:
Code:
//External (_SB_.PCI0.PEG0)
//External (_SB_.PCI0.PEG0.PEGP)
//External (_SB_.PCI0.PEG1)
//External (_SB_.PCI0.PEG2)- Compile the DSDT and ensure the up to date version is placed in the "/Volumes/EFI/Clover/ACPI/patched" folder.
- Reboot (Note: Remember to enable screen sharing in case you have inadvertently disabled USB and you need to rescue your Hackintosh).
Attachments
Last edited:
