- Joined
- Jan 22, 2011
- Messages
- 12
- Motherboard
- OSX Lion
- CPU
- i5 2400
- Graphics
- GT 9500
- Mac
- Classic Mac
- Mobile Phone
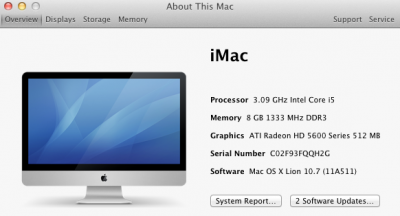
Well, I have done it - clean Lion install from USB Bootable Lion
About This Mac.png
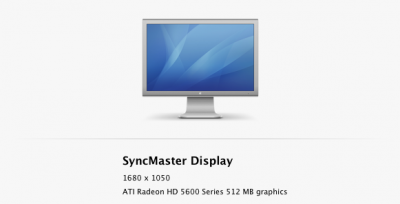
About This Mac - Displays.png
BUILD:
MBO: Gigabyte GA H67M UD2H B3 1.1 (F4)
CPU: i5 2400
GPU: Asus EAH5670 512MD5
MEM: Corsair XMS3 2x4GB
HDD: Samsung SpinPoint F3 500GB
OPT: Sony Optiarc
PSU: SeaSonic SS-400FL (400W, Fanless)
CAS: Fractal Design - Define R3
everything above just works")
And the procedure is:
1. Download DSDT for the MBO from http://www.tonymacx86.com/dsdt.php - it works great.
2. follow to the sentence iBoot + Multibeast guide from 10.6.3 retail install disc. Exception: Don't update OS, just run MultiBeast with Custom DSDT + Realtek Network Driver (you need it for 10.6.8 update download)
http://tonymacx86.blogspot.com/2010/04/iboot-multibeast-install-mac-os-x-on.html
3. Restart - Again with iBoot - don't mind the resolution at this moment
4. Run Update Helper
5. Restart
6. Install 10.6.8 Combo Update, Run MultiBeast with the settings as below
7. Restart - voila! There it is, 10.6.8 ready for AppStore and Lion
Now you can put all the memory you have (no need to leave it on 4GB max), and HDD's, and no need to have the install HDD on blue Gigabyte's SATA port!
8. Follow to the sentence Tony's guide for xMove+Lion, step 1 (don't need to go further! )
)
9. Get 8GB USB Drive
10. Visit SStreet's guide to make a bootable Lion Installer USB drive - The most easy way, and efficient, and great in it's simplicity (I love KISS approach - thanks a lot SStreet! )
)
http://www.tonymacx86.com/viewtopic.php?f=169&t=27054
11. Follow steps 1-6, except running MultiBeast (it didn't worked for me), but put MultiBeast and DSDT to USB Drive (it will be the easiest way to put them on Desktop once you get to Lion)
Don't mind if USB size is 7.66GB after partitioning - that's normal (some kind of hidden EFI partition)
12. Restart and hit DEL to get to BIOS settings, put USB HDD as a 1st boot device, Save&Exit BIOS
13. Install Lion on HDD at your wish (you'll notice the full resolution display with 5670) - full clean install after partitioning HDD (for the sake of this guide, I'll name it LION OS)
After install procedure it will restart, and leave it on USB HDD as 1st device, as you will have to "Press any key" to get to Chimera boot options once it started to boot!
14. In Chimera boot options, choose LION OS as startup disc
15. Wait for Lion to start, enter your data, and here you are…
16. open USB Drive and put MultiBeast and DSDT on Desktop, start MultiBeast and use settings as are below on screenshot
MB Settings - Lion.png
17. Restart - and everything works! (well, don't know for HDMI as I don't use it)
Thanks a lot Tony, MacMan, and all other ppl here…
Special thanks goes to SStreet for guide to make USB bootable for Lion install
About This Mac.png
About This Mac - Displays.png
BUILD:
MBO: Gigabyte GA H67M UD2H B3 1.1 (F4)
CPU: i5 2400
GPU: Asus EAH5670 512MD5
MEM: Corsair XMS3 2x4GB
HDD: Samsung SpinPoint F3 500GB
OPT: Sony Optiarc
PSU: SeaSonic SS-400FL (400W, Fanless)
CAS: Fractal Design - Define R3
everything above just works
And the procedure is:
1. Download DSDT for the MBO from http://www.tonymacx86.com/dsdt.php - it works great.
2. follow to the sentence iBoot + Multibeast guide from 10.6.3 retail install disc. Exception: Don't update OS, just run MultiBeast with Custom DSDT + Realtek Network Driver (you need it for 10.6.8 update download)
http://tonymacx86.blogspot.com/2010/04/iboot-multibeast-install-mac-os-x-on.html
3. Restart - Again with iBoot - don't mind the resolution at this moment
4. Run Update Helper
5. Restart
6. Install 10.6.8 Combo Update, Run MultiBeast with the settings as below
7. Restart - voila! There it is, 10.6.8 ready for AppStore and Lion
Now you can put all the memory you have (no need to leave it on 4GB max), and HDD's, and no need to have the install HDD on blue Gigabyte's SATA port!
8. Follow to the sentence Tony's guide for xMove+Lion, step 1 (don't need to go further!
9. Get 8GB USB Drive
10. Visit SStreet's guide to make a bootable Lion Installer USB drive - The most easy way, and efficient, and great in it's simplicity (I love KISS approach - thanks a lot SStreet!
http://www.tonymacx86.com/viewtopic.php?f=169&t=27054
11. Follow steps 1-6, except running MultiBeast (it didn't worked for me), but put MultiBeast and DSDT to USB Drive (it will be the easiest way to put them on Desktop once you get to Lion)
Don't mind if USB size is 7.66GB after partitioning - that's normal (some kind of hidden EFI partition)
12. Restart and hit DEL to get to BIOS settings, put USB HDD as a 1st boot device, Save&Exit BIOS
13. Install Lion on HDD at your wish (you'll notice the full resolution display with 5670
) - full clean install after partitioning HDD (for the sake of this guide, I'll name it LION OS)After install procedure it will restart, and leave it on USB HDD as 1st device, as you will have to "Press any key" to get to Chimera boot options once it started to boot!
14. In Chimera boot options, choose LION OS as startup disc
15. Wait for Lion to start, enter your data, and here you are…
16. open USB Drive and put MultiBeast and DSDT on Desktop, start MultiBeast and use settings as are below on screenshot
MB Settings - Lion.png
17. Restart - and everything works! (well, don't know for HDMI as I don't use it)
Thanks a lot Tony, MacMan, and all other ppl here…
Special thanks goes to SStreet for guide to make USB bootable for Lion install