- Joined
- May 11, 2012
- Messages
- 84
- Motherboard
- ga-h77-ds3h ga-z77n-wifi 1155
- CPU
- i3-2105 i5-3570k
- Graphics
- gigabite radeon hd 6670
- Mac
- Classic Mac
- Mobile Phone
And now something a little different
This is my third apple case mod. I built a G3 about 4 months ago
and just last month a G5.
As all of us have done, I've read over and over all the great modding being done here and else where on the web, and we see things that really get our attention.
I have noticed that we all have our strengths and weaknesses when it come to a build,some are more experienced at metal work some can jump right into the electronics and go to town [scary very scary]. A lot has to do with what tools we have to work with. With the right tools things are easy but if you don't have the one you need it can still be done but the work around can be painful or with the right attitude just make it that much more satisfying when it is accomplished.
Why I got into building a Hackintosh.
I've been playing with operating systems since dos5 well commodore 64 if that counts.
dos,windows,Beos,linux,and now Apple.
So 6 months ago I started reading about Macs and wanted to try one out. The only problem was all my systems were AMD and were getting long in the tooth, so to my rational mind {not my wife's LOL} it was time to build a new system the tonymac86 way. YES O YES!!!
In a week or so {after much tonymac studying} and by the swift work of NEW EGG I was on my way to Mac school.
So after the parts came in 3 or 4 hours later my new computer was up and running, Not with Lion that would take a while but Windows 8, Windows 8 you scream in disbelief,well the logic is clear, it's free and I can make sure all the parts are working before I start playing with OSX Lion.
One thing you may have noticed I said built in 4 hours and I mean it, you just bolt the parts together and you're up and running it's fun but it's just a quick fix for a computer junky!!! But now comes the true build to make a intel Mac into a G3,G5 or Mac Pro case, it takes time and you have to make parts not just bolt it together but truly make brackets and back plates and mother board trays and and O the joy!!!
Now lets get to the build
As I was going over the many howtos and then started my own G5 build, what you read and then start to hear in your own head is make it clean don't cut or add any more than needed.
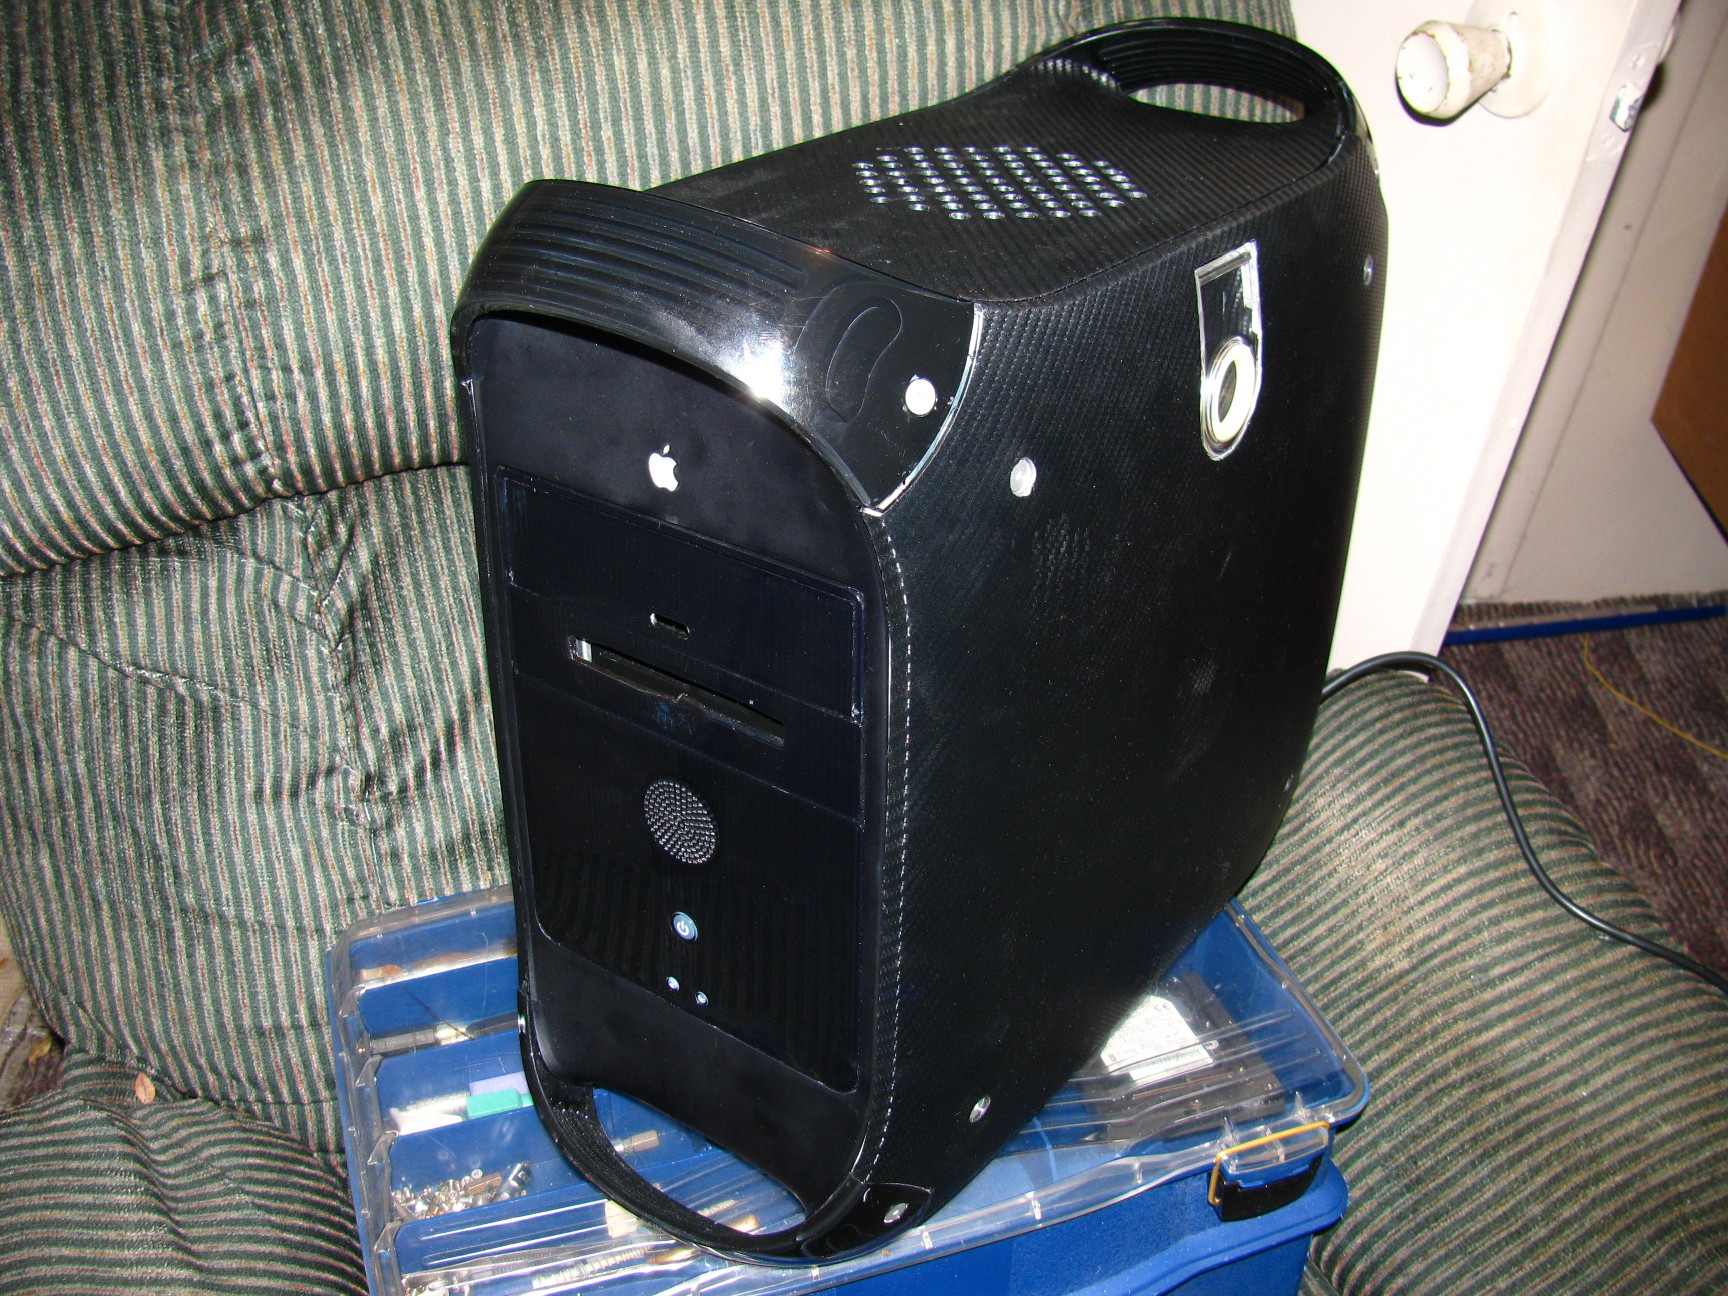
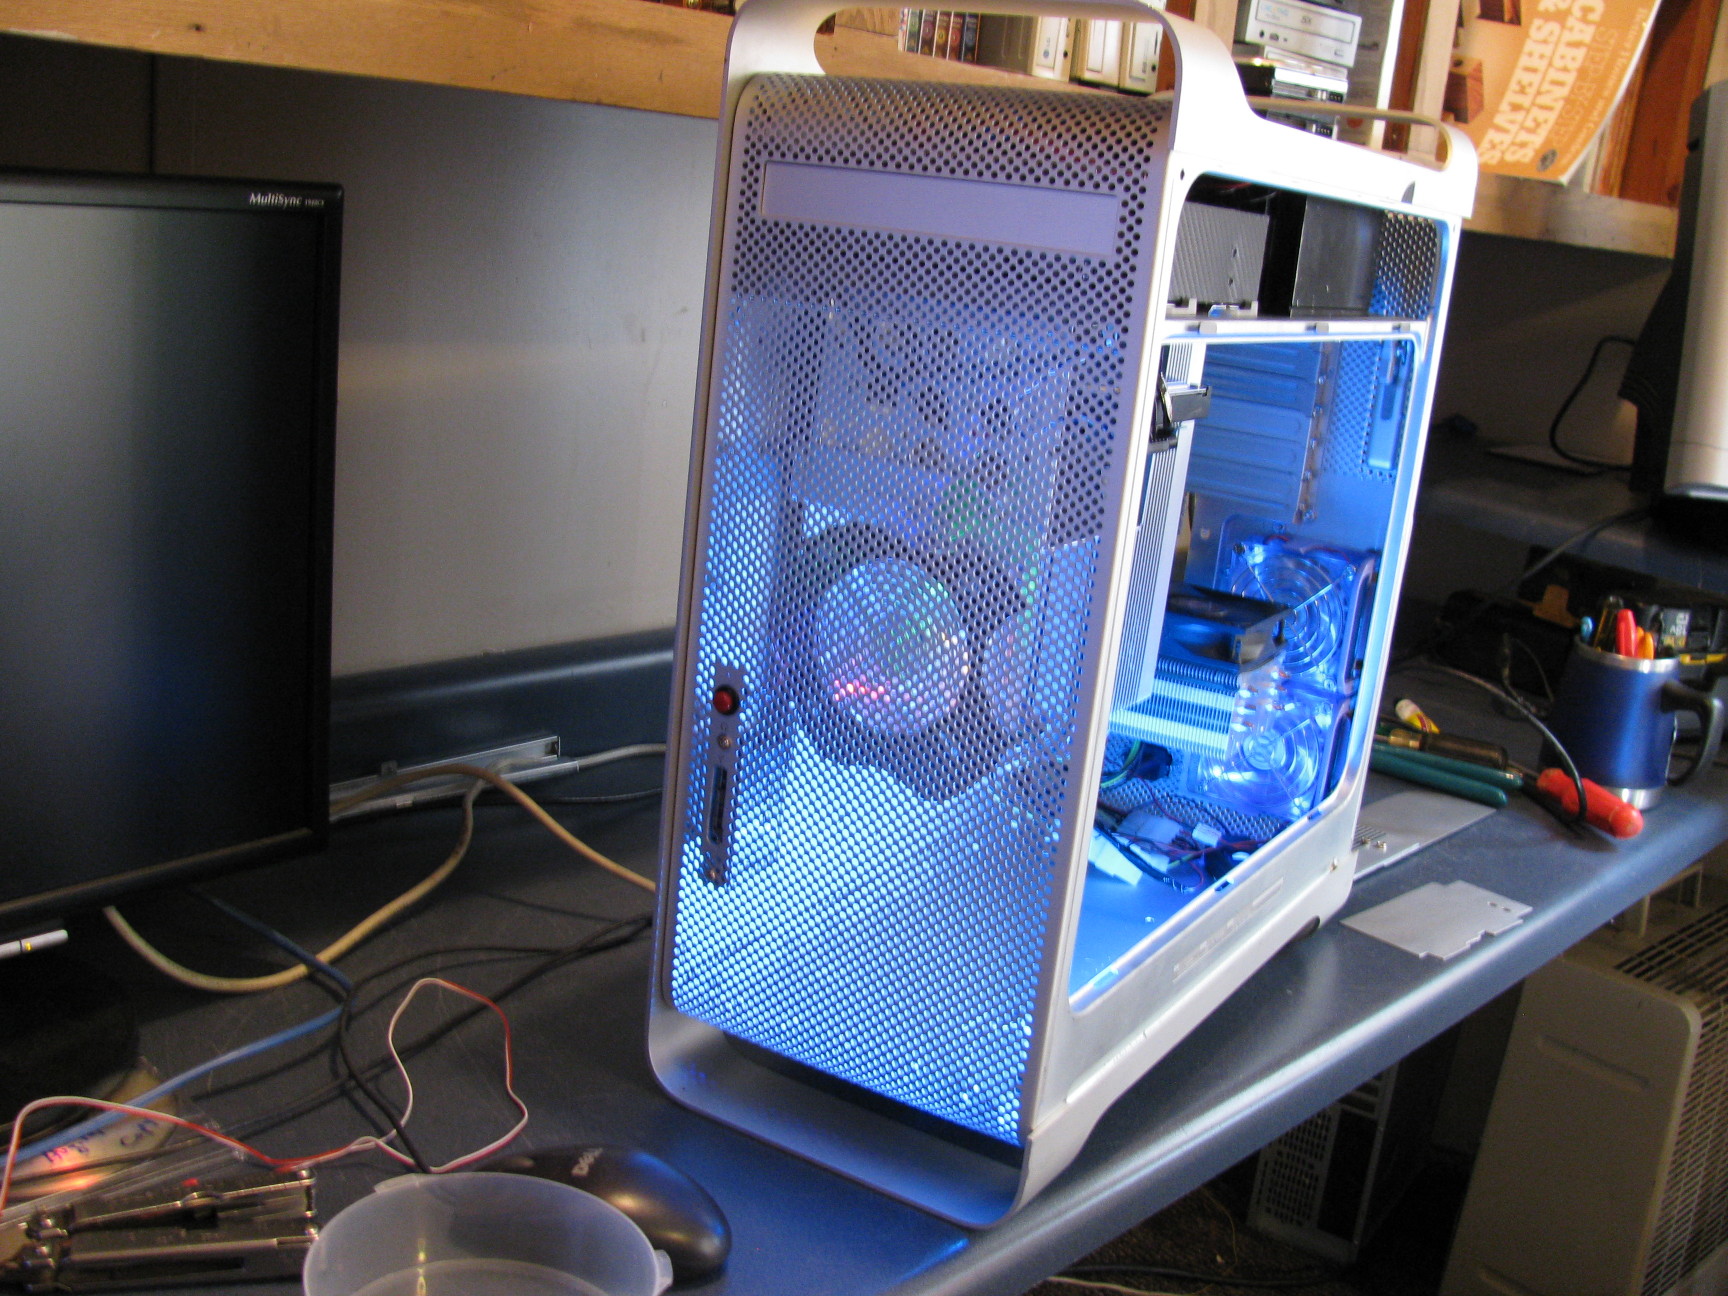
So for my third build, I got to thinking there is nothing cleaner than the front of the case, what would it take to use the front as the back, It would have no fan holes no other bays. I looked and looked but I could not find the pictures on the web to tell me if it could be inner changeable or a major pain.
The plan was to get a G5 and Mac Pro case and put the Mac Pro as the front and top the G5 would be the back and bottom. when I got the cases the Pro had a bent foot, so I changed my plan and used the G5 as the front. This worked out better getting my cases from Gainsaver you don't get any of the extras parts {and those parts aren't cheap if you buy them out right} just the case for $15 to $30 {$8 shipping} not bad. To use two cases to make one wouldn't be cheap other wise.
It turns out the two half's will bolt up nicely,just have to drill out a few of the bolt holes because the G5 and Pro have a different shelf lay out.
While I was still in the planning stage I became intrigued by the Mini builds and noticed that the mini boards would fit sideways in the case Like 7 1/2" This is major, I mean major!!!
One cool thing about building the case this way, you could have a window on both sides, full size {no windows yet but we'll see}
I hope I've made it clear what I was up to, Maybe some pictures will help.
 I tried to use the holes already in the case.
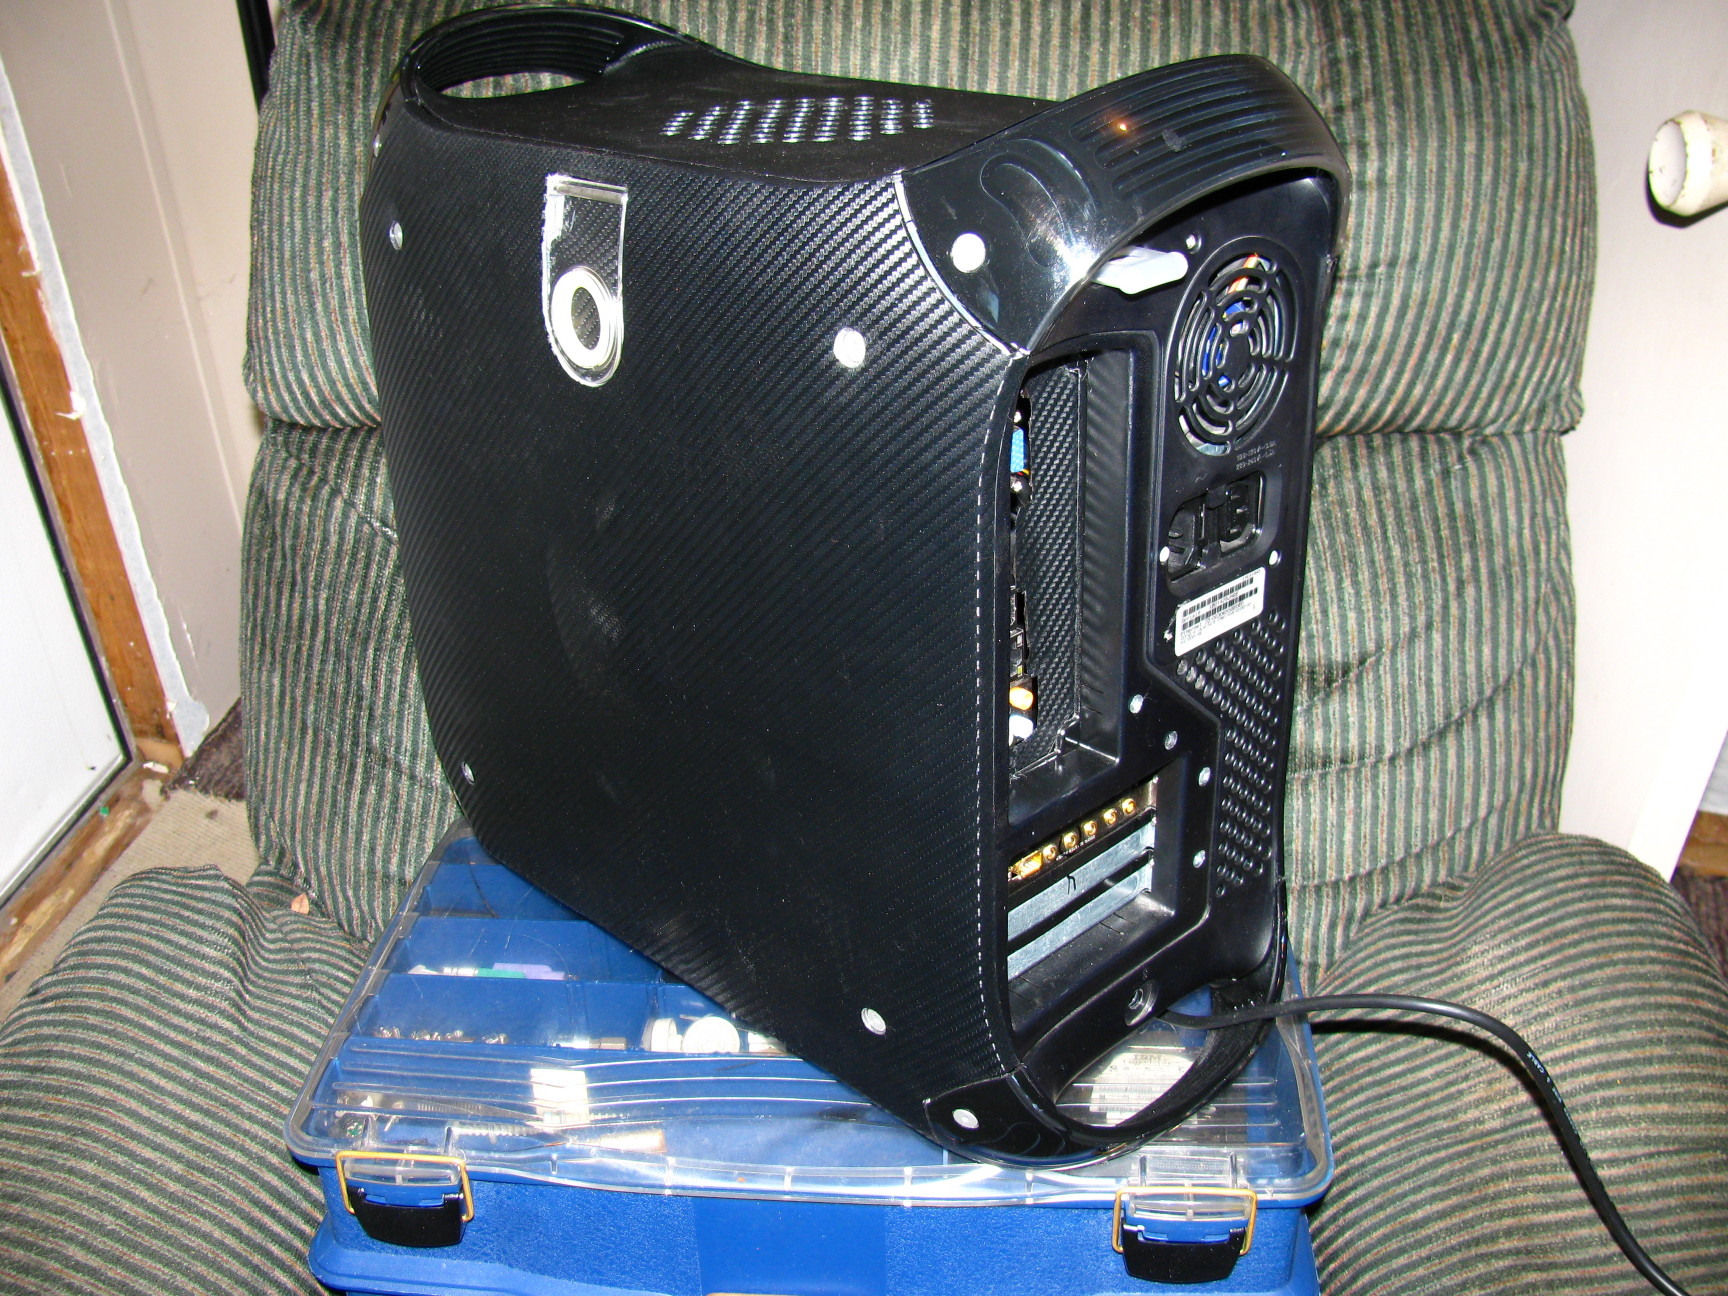
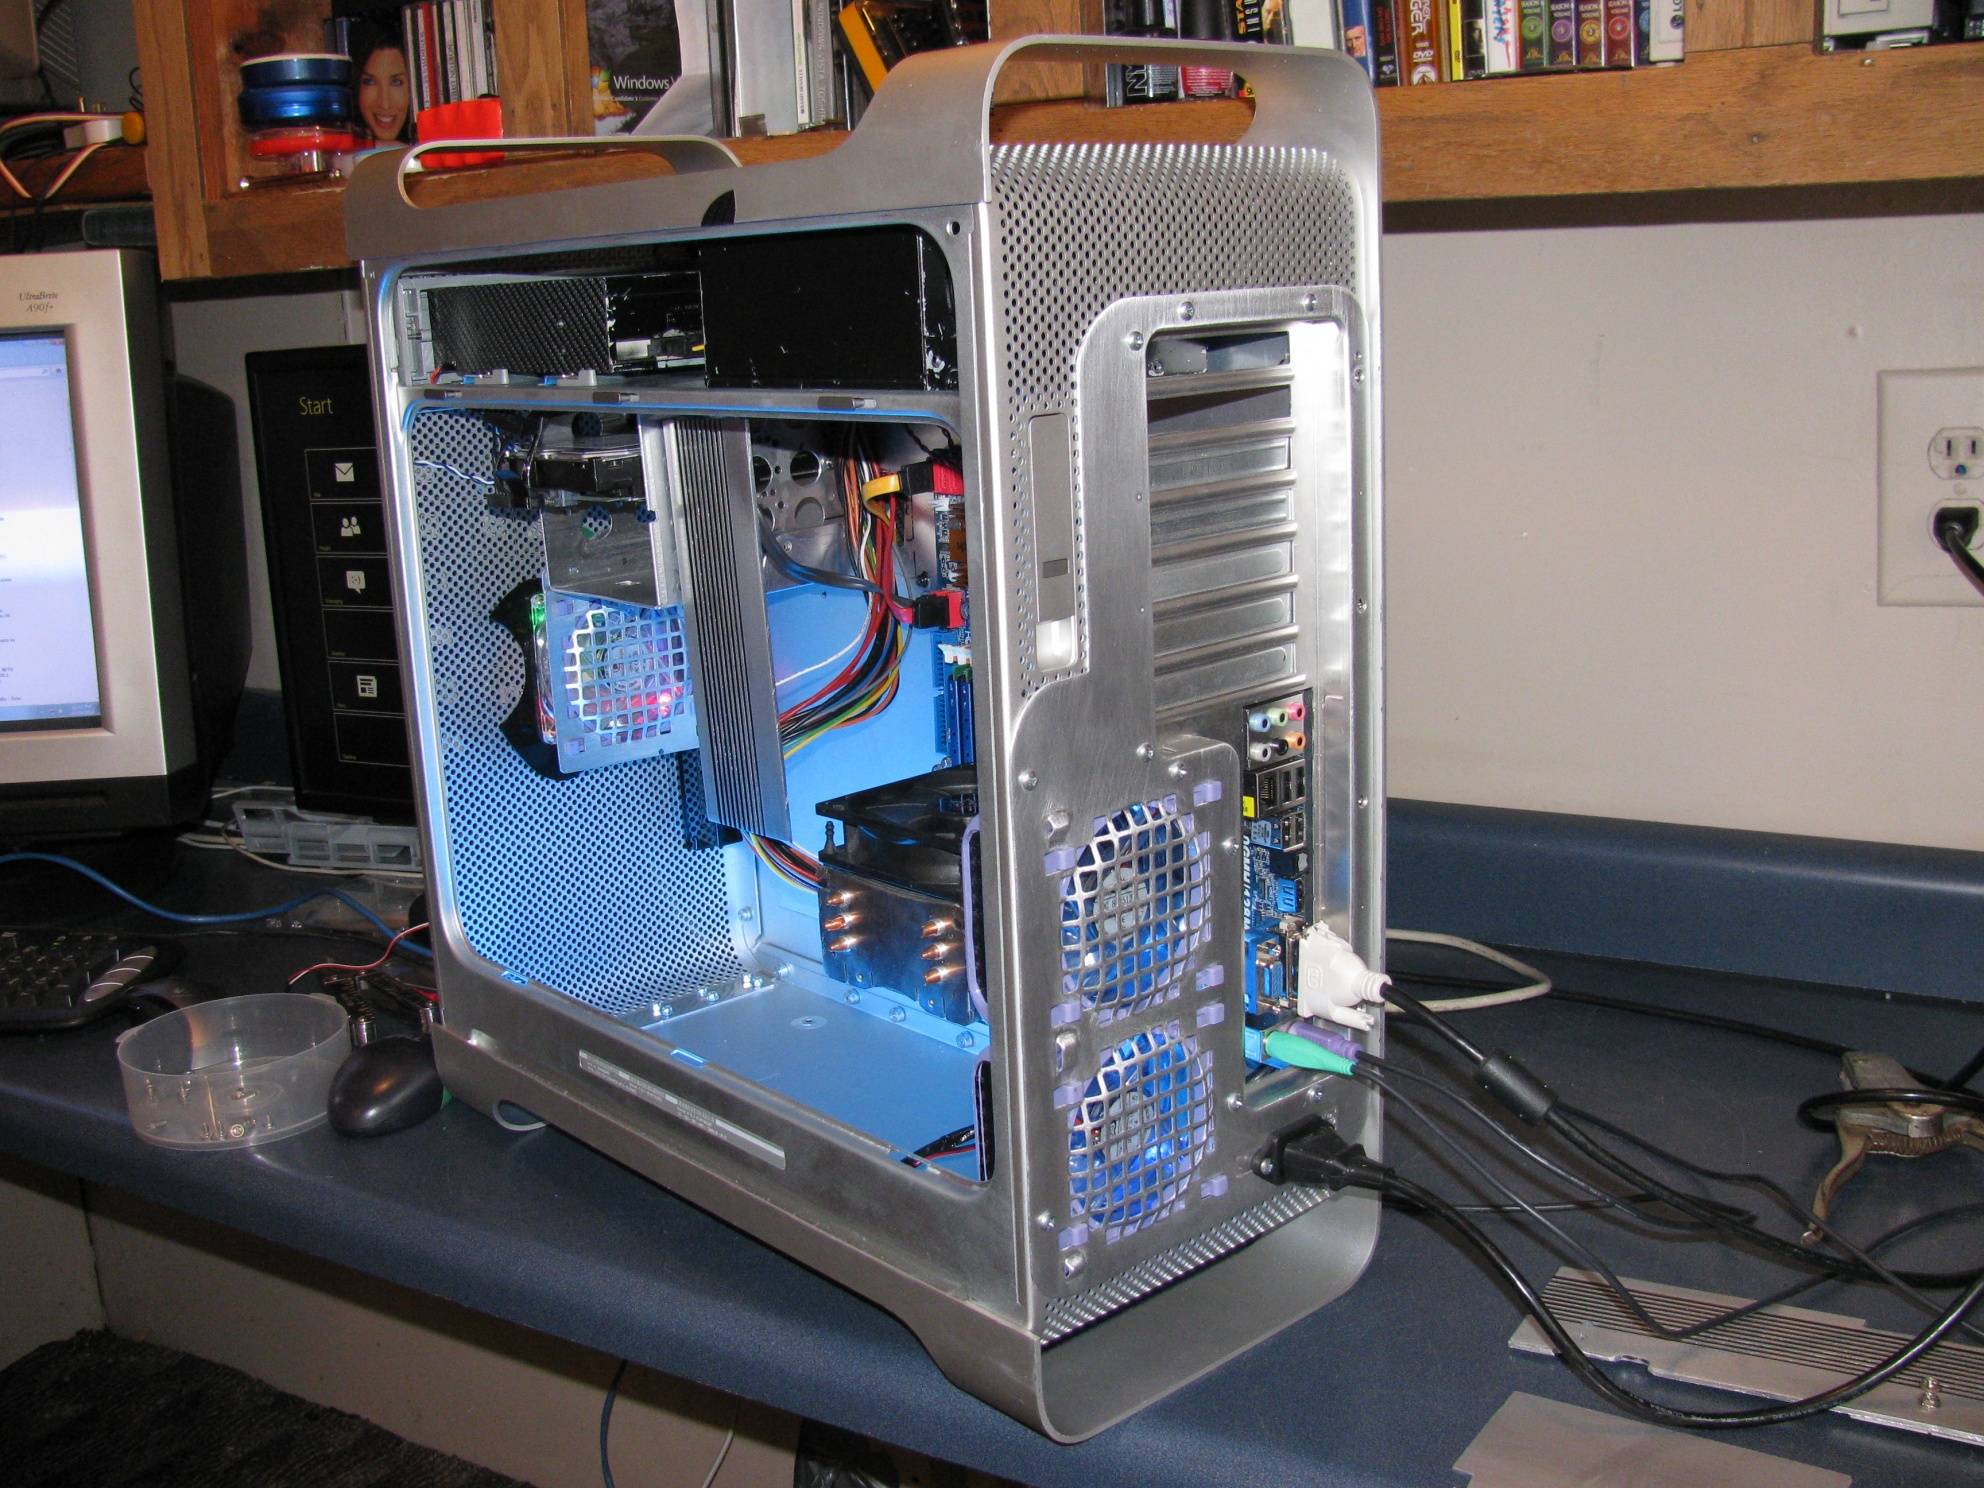
You may notice a small bolt sticking out at the left a crossed from power plug pull this and the door unlocks no latch. It is now in the unlock position when closed it is up against the back.
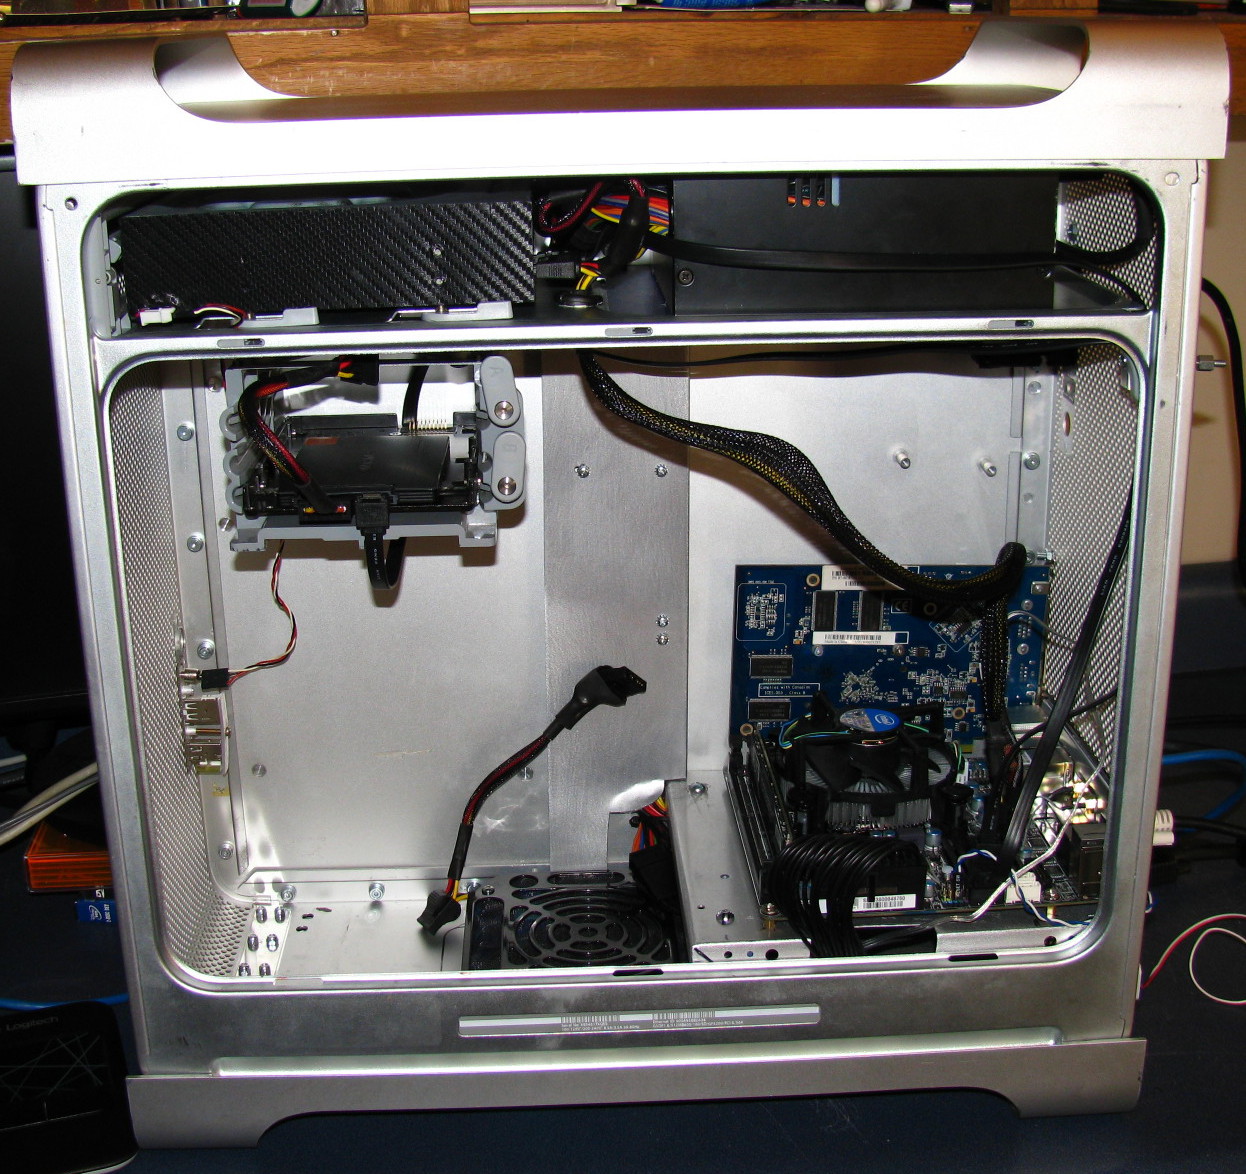
I'm kind of upset, I didn't plan on a graphic card but was having trouble with out it so there it is.
I'm going to put some fan switches or something to use up those holes in the back, will wait till I put the water cooler in to see what I need.
The little red wire at the bottom left plugs into a switch on my desk so no reaching to turn the computer on.
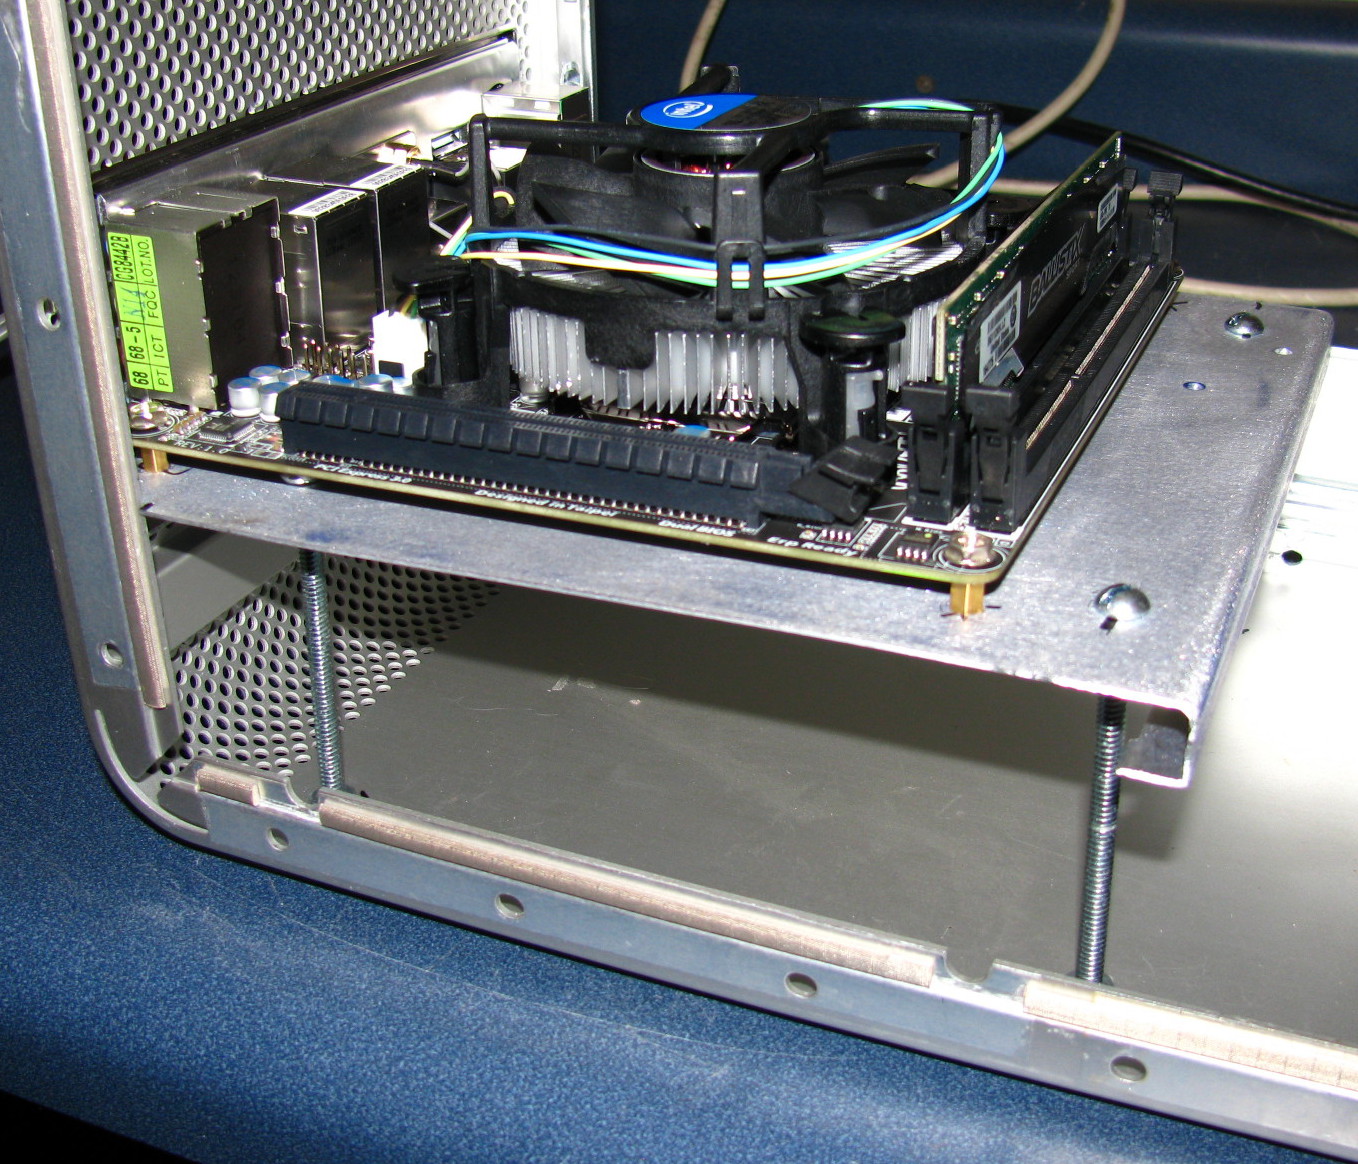
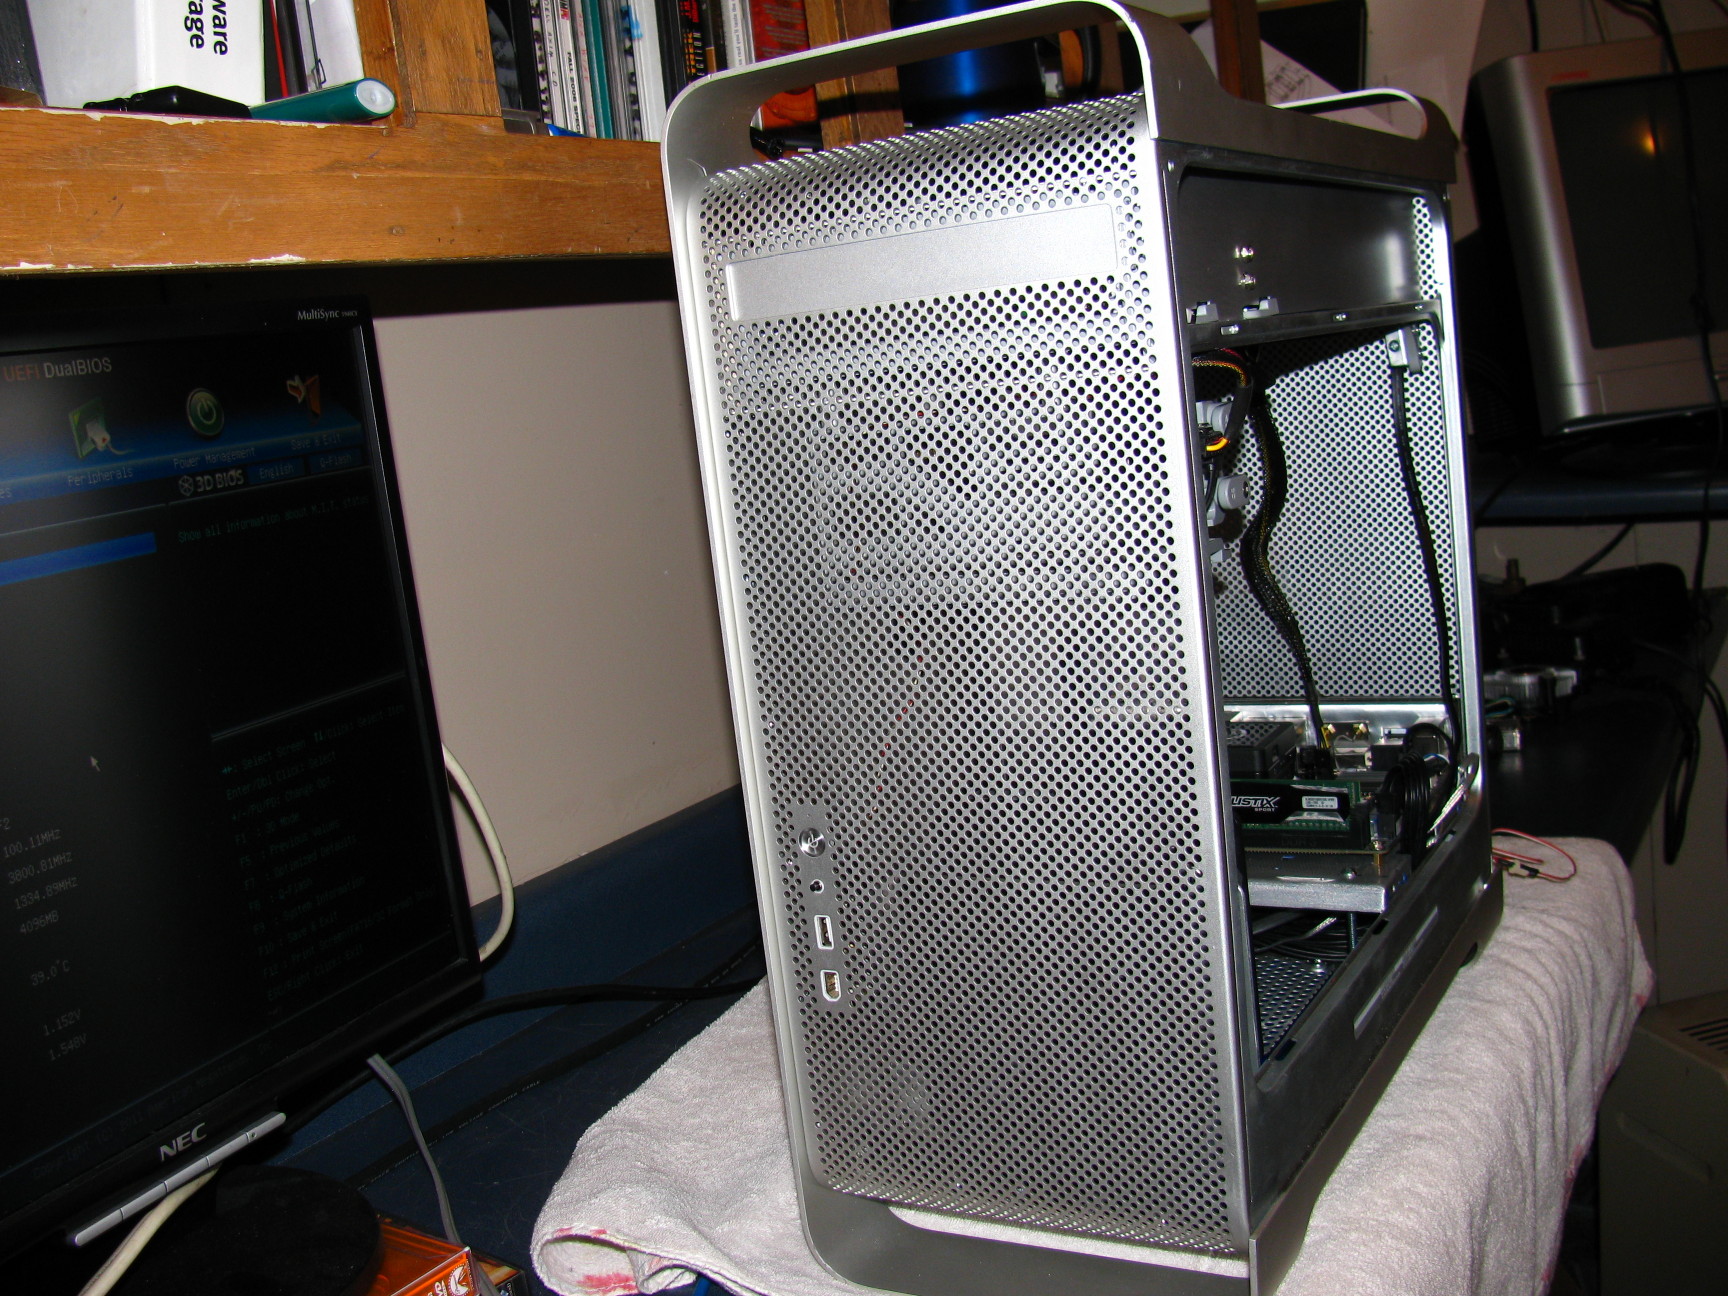
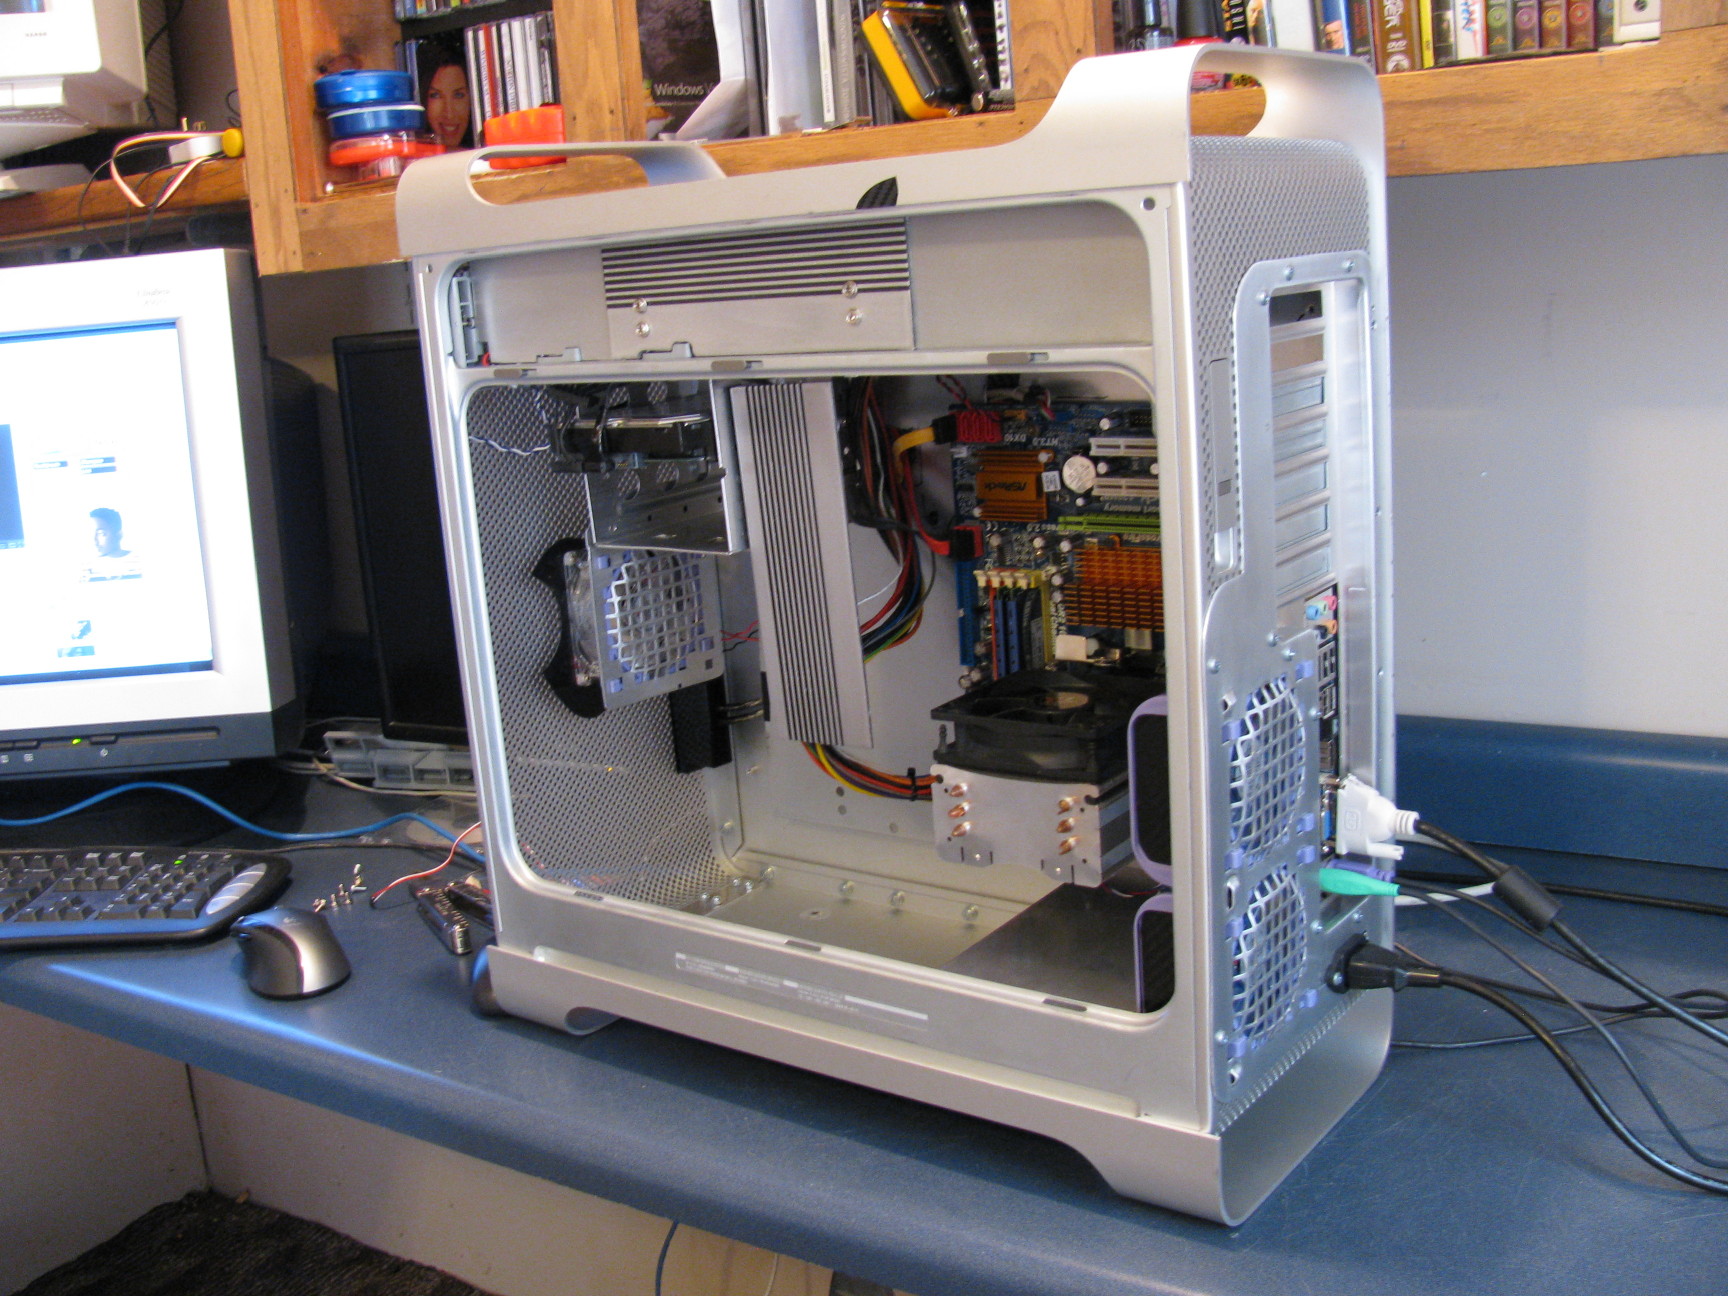
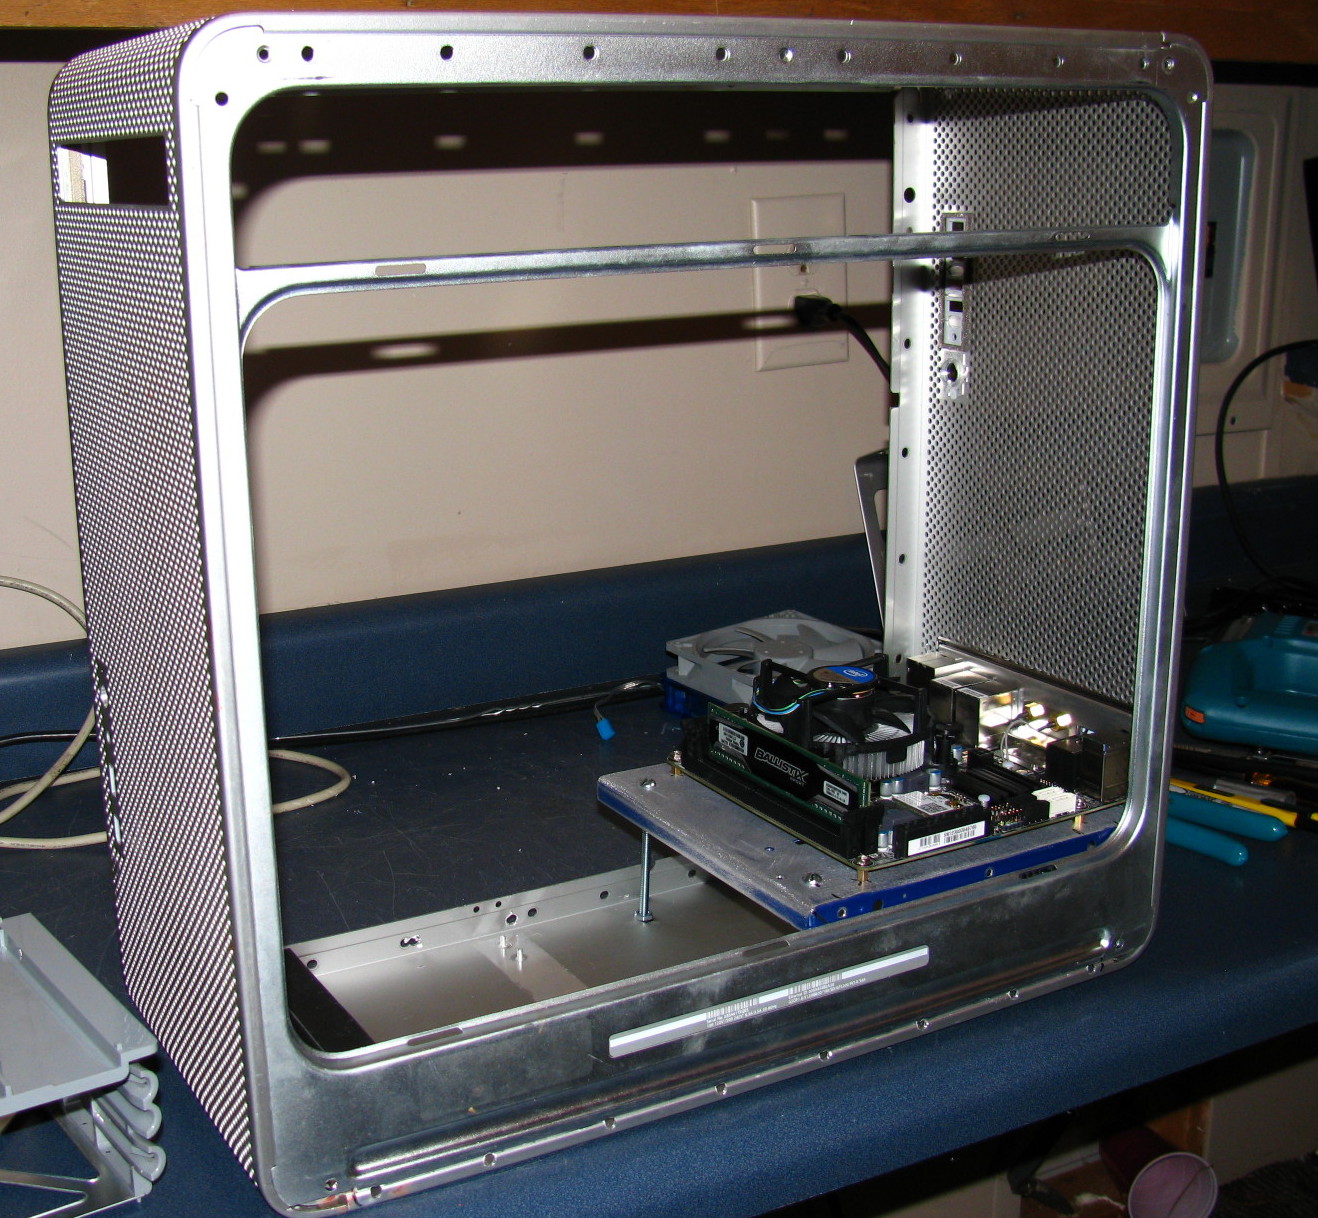
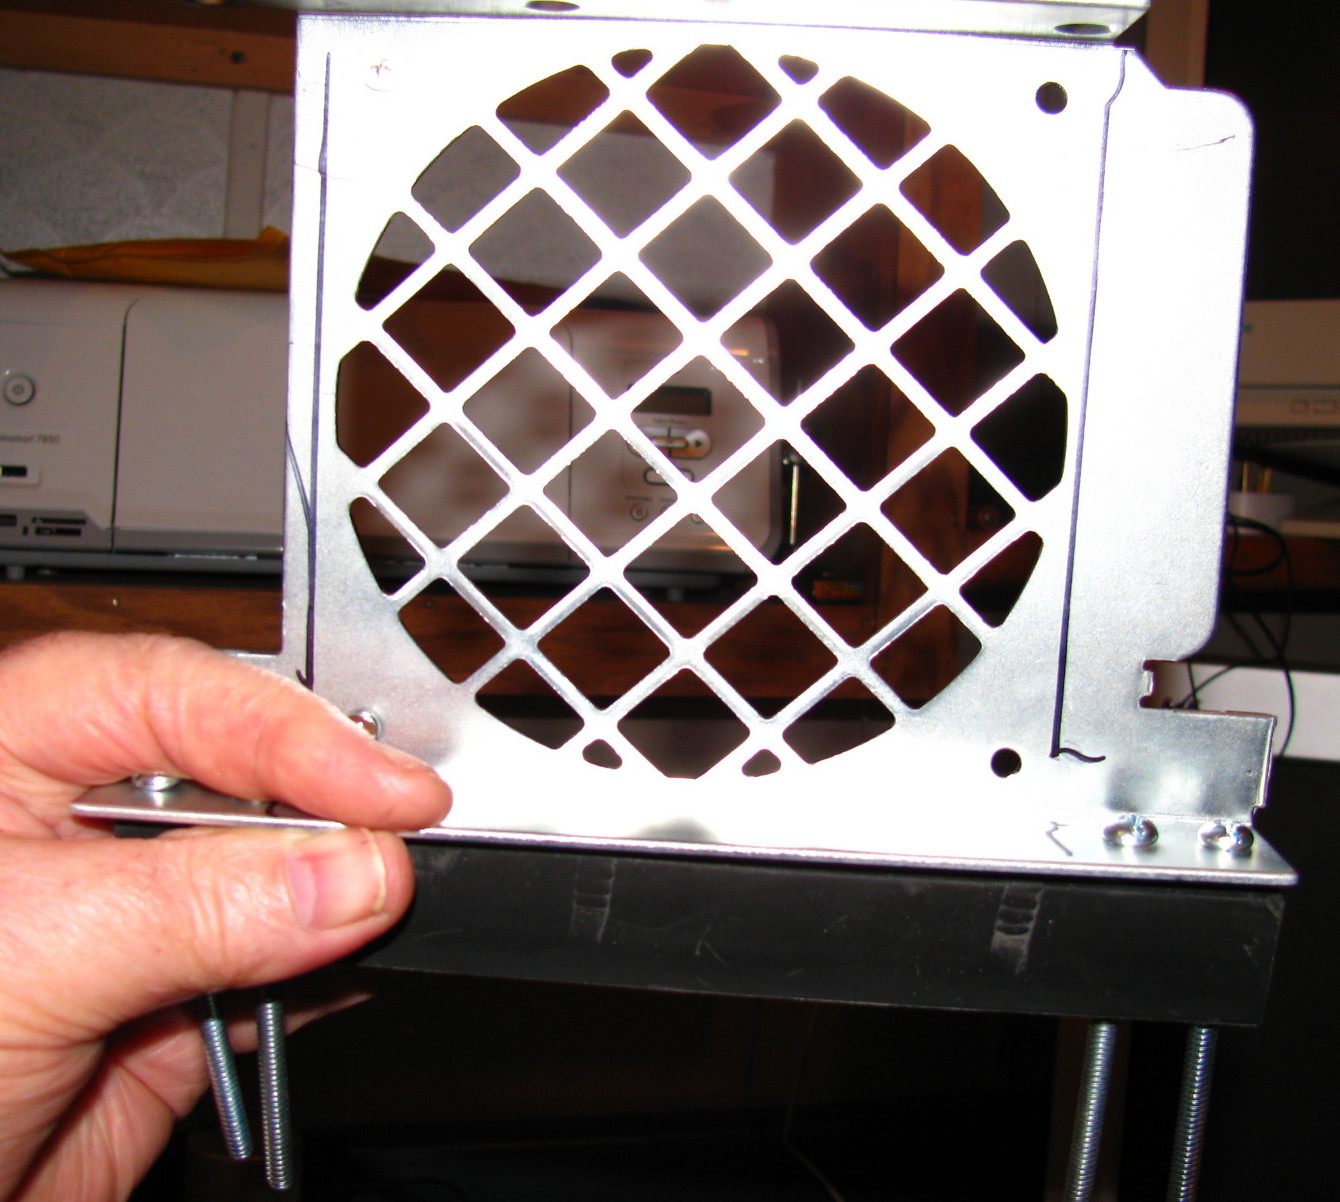
I put legs on the mother board tray to get it even with the dvd opening.
I still need to hide one power cord but didn't want to cut it to extend so waiting on cord.
You can just see the shield I made to hide the power cord, the short one will also go under it when I get the extension.
I used the mb stand offs to mount the shield. Plan out your stand off removals, they come in handy later in the build. i used them to mount my shield but now the shield can be used to hold or mount something else.
One more thing about stand off removal. Breaking them off the back of case works out fine but in a few cases there are stand offs on the top of the case. Don't try to break these off, the metal on top is thinner and will show up as marks on the out side of the case. I just drilled down through the stand off all most to the base and left it. just needed clearance for power supply so won't be seen.
Here you can see there the holes will need to be drilled out for the side cover.
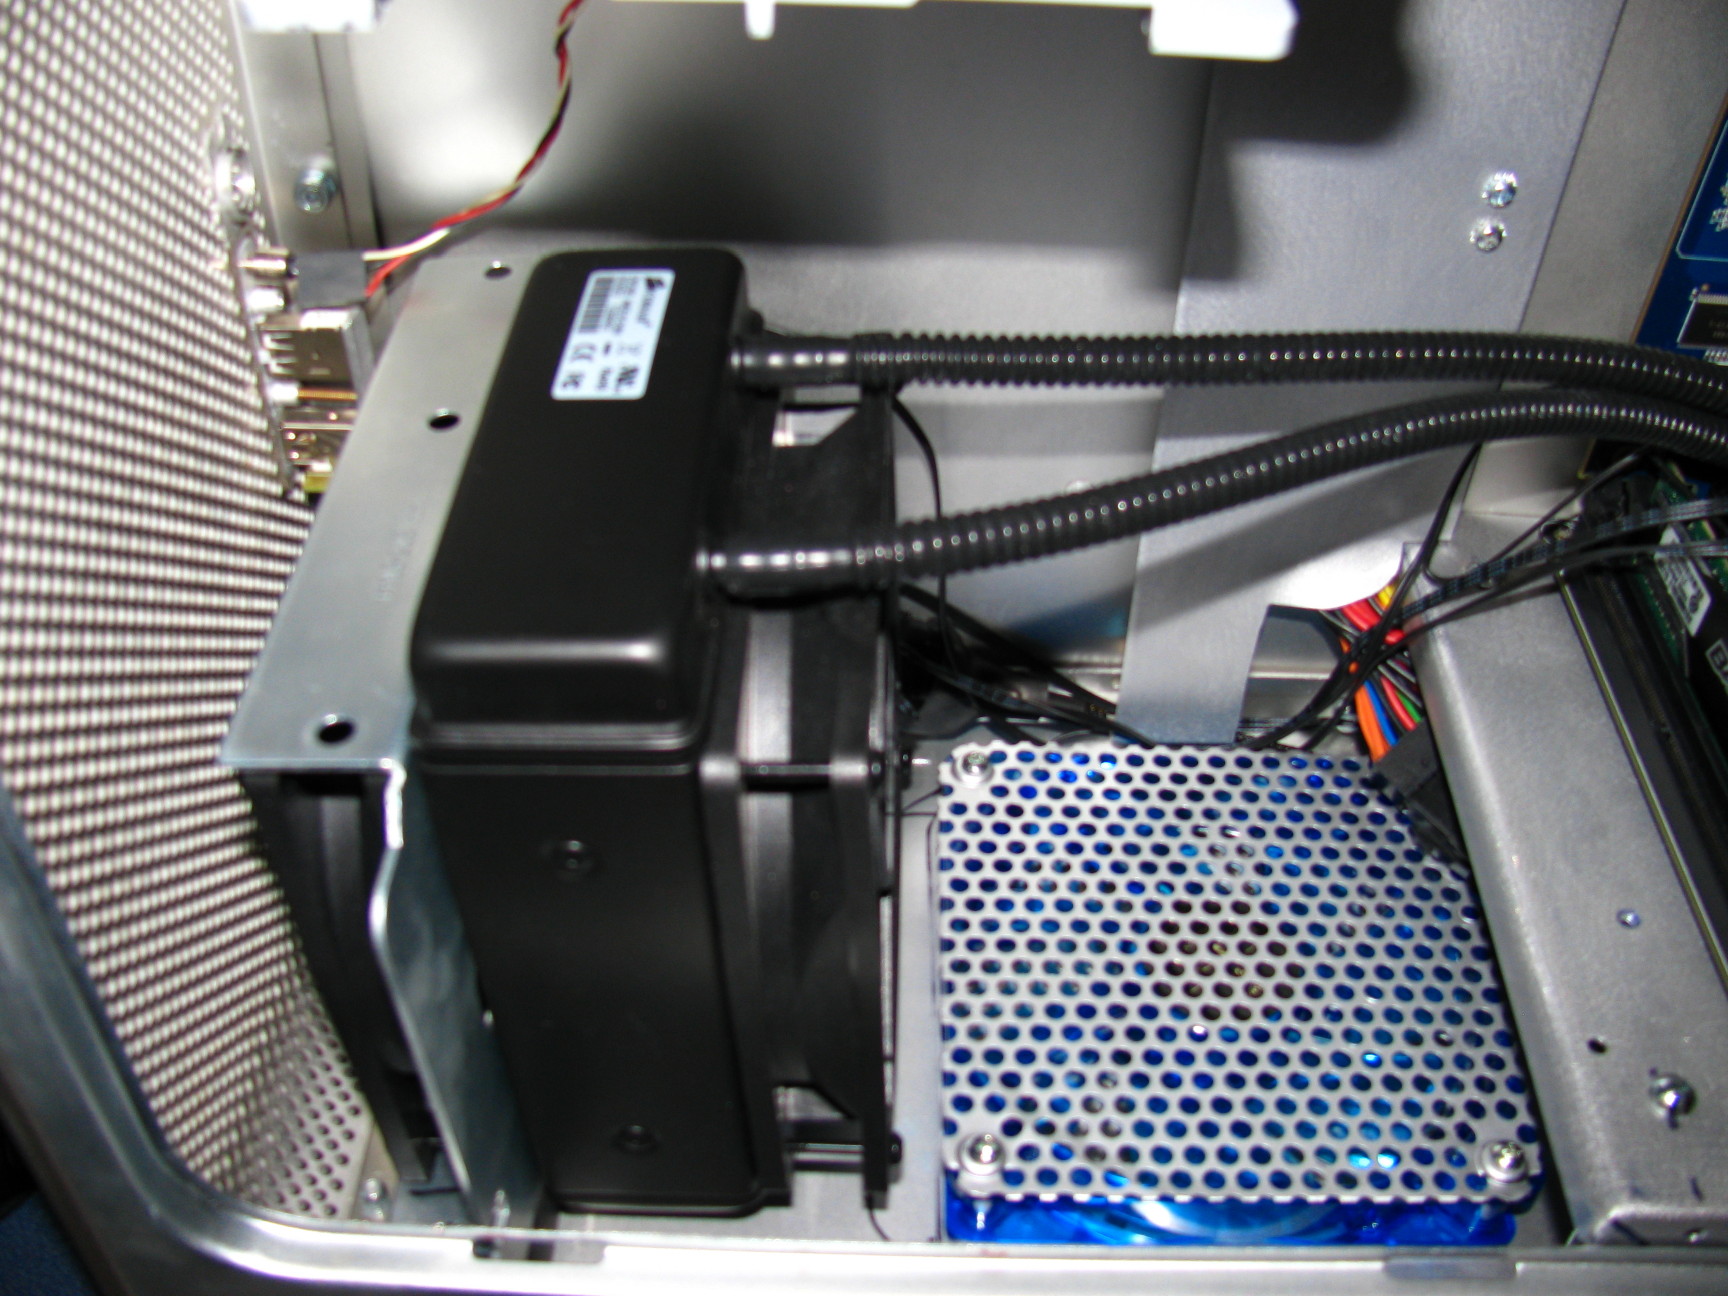
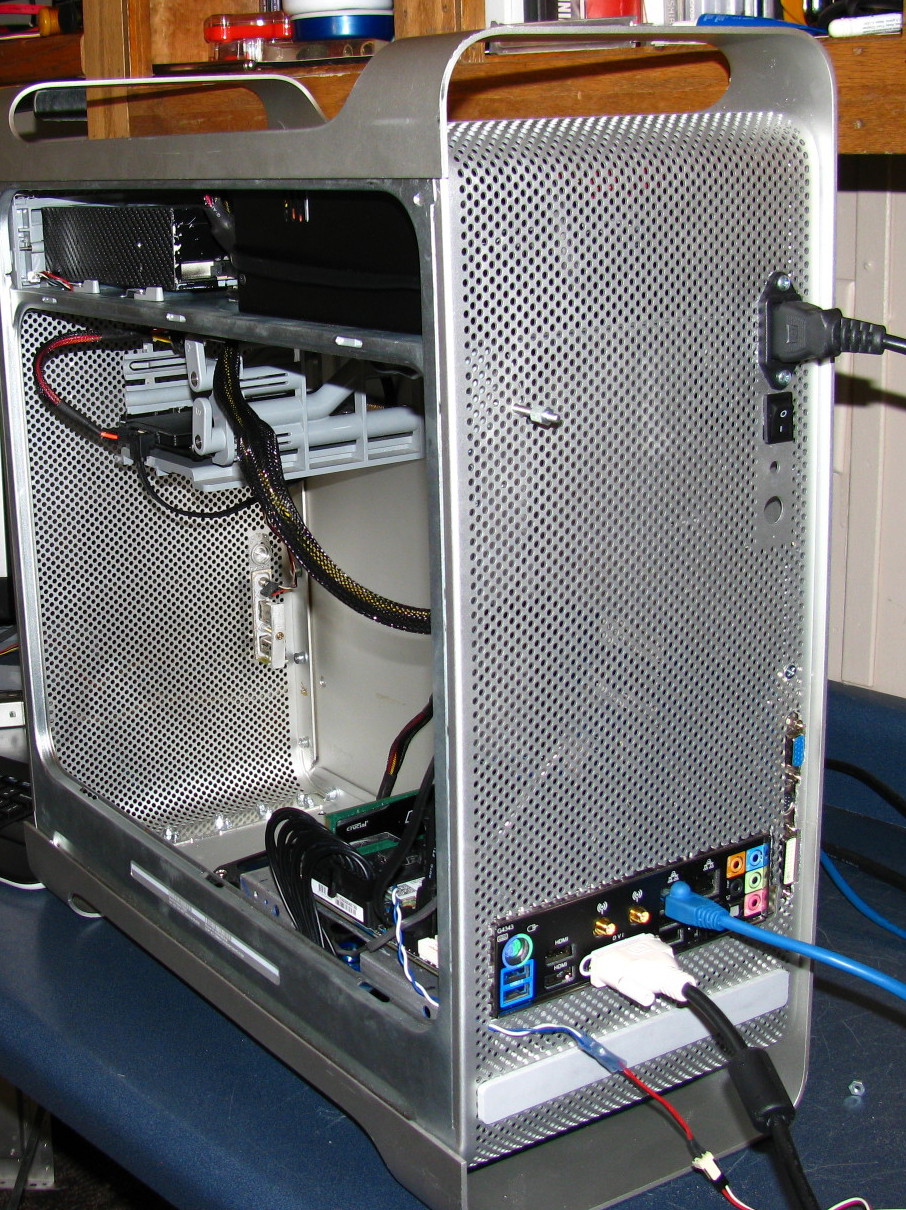
The Pro case gave me just what I needed to mount up my radiator and fans, there was a thick rubber thingee in the bottom of the case and a great steel fan bracket at the top that was for the power supply fan, bolt it to the bottom of the case and I'm home free.

and here you can see how I did my fake usb and switch on the front, the wire is for the dvd.
What needed doing
bolt the two case halves together {some drilling needed to get the main case to match back up}
Build mother board tray with legs
Cut out back for i/o shield using top dvd slot {Back is Mac Pro remember}
cover other dvd slot {could be useful for add ons later}
hole for power supply {on top shelf}
make new door latch mechanism {keep it simple and clean}
make extension cord and plugin for power also put in power supply switch on back {use holes that were for usb and power}
put dvd on top shelf
make fake switch and usb in front {don't uses them never will} but they look like they work.
Put dvd switch on front {the one switch that does work}
cut fan hole in bottom of case
make cover for mother board wires to power supply
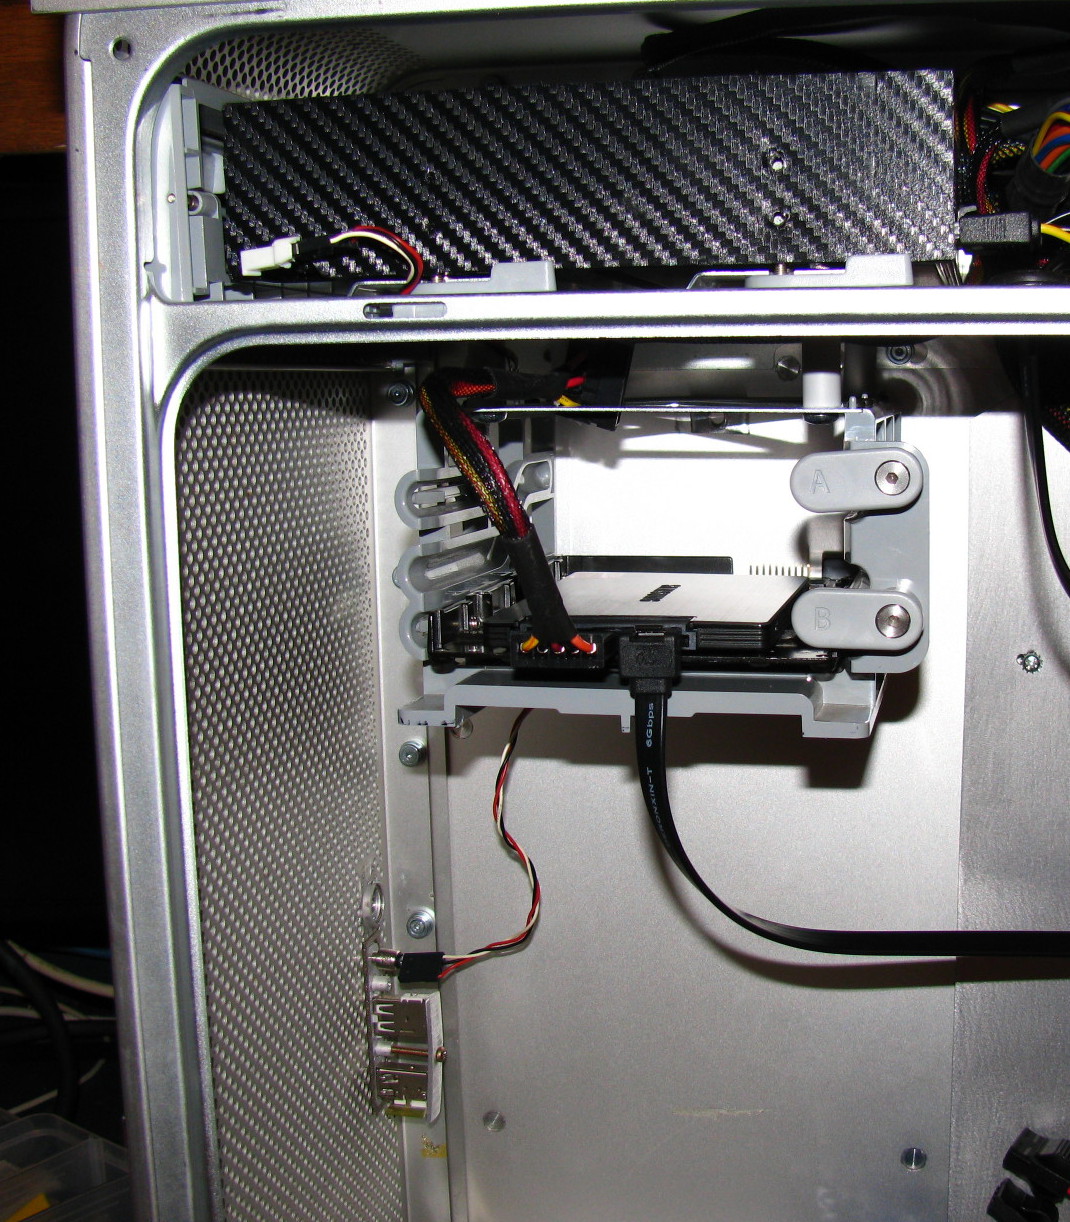
used G5 hard drive cage, bolt under dvd on legs
drill holes in bottom for water cooling bracket {used Mac Pro top self fan bracket just right and heave duty}
I started this build friday Nov.2, 2012 when the cases came in around 2pm
Its now Nov.10 2012 still need to load osx but I need to run windows a few days.
But I now have the answer I needed, it can be done and at least for me I like it.
The parts used
G5 case Mac Pro case From gainsaver.com {Please note the door or side panel is sold separately}
Everything else is New Egg
gigabite ga-z77n-wifi 1155
xclio great power x14s4p3 500w modular
intel core i5-3570k
samsung 830 series 128gb ssd
corsair hydro series h80 water cooler
crucial ballistix sport 8gb
I know this mod is a little different but please be kind and have an open mind
Feed back is always nice so have at it. LOL
Ps My goodness I haven't wrote this much in thirty years. LOL
This is my third apple case mod. I built a G3 about 4 months ago
and just last month a G5.
As all of us have done, I've read over and over all the great modding being done here and else where on the web, and we see things that really get our attention.
I have noticed that we all have our strengths and weaknesses when it come to a build,some are more experienced at metal work some can jump right into the electronics and go to town [scary very scary]. A lot has to do with what tools we have to work with. With the right tools things are easy but if you don't have the one you need it can still be done but the work around can be painful or with the right attitude just make it that much more satisfying when it is accomplished.
Why I got into building a Hackintosh.
I've been playing with operating systems since dos5 well commodore 64 if that counts.
dos,windows,Beos,linux,and now Apple.
So 6 months ago I started reading about Macs and wanted to try one out. The only problem was all my systems were AMD and were getting long in the tooth, so to my rational mind {not my wife's LOL} it was time to build a new system the tonymac86 way. YES O YES!!!
In a week or so {after much tonymac studying} and by the swift work of NEW EGG I was on my way to Mac school.
So after the parts came in 3 or 4 hours later my new computer was up and running, Not with Lion that would take a while but Windows 8, Windows 8 you scream in disbelief,well the logic is clear, it's free and I can make sure all the parts are working before I start playing with OSX Lion.
One thing you may have noticed I said built in 4 hours and I mean it, you just bolt the parts together and you're up and running it's fun but it's just a quick fix for a computer junky!!! But now comes the true build to make a intel Mac into a G3,G5 or Mac Pro case, it takes time and you have to make parts not just bolt it together but truly make brackets and back plates and mother board trays and and O the joy!!!
Now lets get to the build
As I was going over the many howtos and then started my own G5 build, what you read and then start to hear in your own head is make it clean don't cut or add any more than needed.
So for my third build, I got to thinking there is nothing cleaner than the front of the case, what would it take to use the front as the back, It would have no fan holes no other bays. I looked and looked but I could not find the pictures on the web to tell me if it could be inner changeable or a major pain.
The plan was to get a G5 and Mac Pro case and put the Mac Pro as the front and top the G5 would be the back and bottom. when I got the cases the Pro had a bent foot, so I changed my plan and used the G5 as the front. This worked out better getting my cases from Gainsaver you don't get any of the extras parts {and those parts aren't cheap if you buy them out right} just the case for $15 to $30 {$8 shipping} not bad. To use two cases to make one wouldn't be cheap other wise.
It turns out the two half's will bolt up nicely,just have to drill out a few of the bolt holes because the G5 and Pro have a different shelf lay out.
While I was still in the planning stage I became intrigued by the Mini builds and noticed that the mini boards would fit sideways in the case Like 7 1/2" This is major, I mean major!!!
One cool thing about building the case this way, you could have a window on both sides, full size {no windows yet but we'll see}
I hope I've made it clear what I was up to, Maybe some pictures will help.
You may notice a small bolt sticking out at the left a crossed from power plug pull this and the door unlocks no latch. It is now in the unlock position when closed it is up against the back.
I'm kind of upset, I didn't plan on a graphic card but was having trouble with out it so there it is.
I'm going to put some fan switches or something to use up those holes in the back, will wait till I put the water cooler in to see what I need.
The little red wire at the bottom left plugs into a switch on my desk so no reaching to turn the computer on.
I put legs on the mother board tray to get it even with the dvd opening.
I still need to hide one power cord but didn't want to cut it to extend so waiting on cord.
You can just see the shield I made to hide the power cord, the short one will also go under it when I get the extension.
I used the mb stand offs to mount the shield. Plan out your stand off removals, they come in handy later in the build. i used them to mount my shield but now the shield can be used to hold or mount something else.
One more thing about stand off removal. Breaking them off the back of case works out fine but in a few cases there are stand offs on the top of the case. Don't try to break these off, the metal on top is thinner and will show up as marks on the out side of the case. I just drilled down through the stand off all most to the base and left it. just needed clearance for power supply so won't be seen.
Here you can see there the holes will need to be drilled out for the side cover.
The Pro case gave me just what I needed to mount up my radiator and fans, there was a thick rubber thingee in the bottom of the case and a great steel fan bracket at the top that was for the power supply fan, bolt it to the bottom of the case and I'm home free.
and here you can see how I did my fake usb and switch on the front, the wire is for the dvd.
What needed doing
bolt the two case halves together {some drilling needed to get the main case to match back up}
Build mother board tray with legs
Cut out back for i/o shield using top dvd slot {Back is Mac Pro remember}
cover other dvd slot {could be useful for add ons later}
hole for power supply {on top shelf}
make new door latch mechanism {keep it simple and clean}
make extension cord and plugin for power also put in power supply switch on back {use holes that were for usb and power}
put dvd on top shelf
make fake switch and usb in front {don't uses them never will} but they look like they work.
Put dvd switch on front {the one switch that does work}
cut fan hole in bottom of case
make cover for mother board wires to power supply
used G5 hard drive cage, bolt under dvd on legs
drill holes in bottom for water cooling bracket {used Mac Pro top self fan bracket just right and heave duty}
I started this build friday Nov.2, 2012 when the cases came in around 2pm
Its now Nov.10 2012 still need to load osx but I need to run windows a few days.
But I now have the answer I needed, it can be done and at least for me I like it.
The parts used
G5 case Mac Pro case From gainsaver.com {Please note the door or side panel is sold separately}
Everything else is New Egg
gigabite ga-z77n-wifi 1155
xclio great power x14s4p3 500w modular
intel core i5-3570k
samsung 830 series 128gb ssd
corsair hydro series h80 water cooler
crucial ballistix sport 8gb
I know this mod is a little different but please be kind and have an open mind
Feed back is always nice so have at it. LOL
Ps My goodness I haven't wrote this much in thirty years. LOL
Last edited by a moderator:
")