- Joined
- Mar 16, 2014
- Messages
- 160
- Motherboard
- GA-Z170MX-Gaming 5
- CPU
- I7-6700
- Graphics
- GTX 970
- Mac
- Classic Mac
- Mobile Phone
Finally started my FIRST Hackintosh Project.
Thanks to this website I've been able to do quite a bit of research and ready to start my build.
The Apple G4 was one of the best computers I ever owned, purchased new in 1998, it was still running, and until Apple changed processor/architecture ran for a good 10 years! I still miss the User Interface of the old iTunes and iPhotos apps.
The Build Plan - is to have a multi-boot system, having a different hard drive for each OS. Mac OS for all my graphic design work, photography and video editing, and a (yes, can't believe I'm saying this) but Windows primarily to run games I play like Blizzards/WOW etc.

Day 1
Gutting the Tower. I removed pretty much everything, and for whatever reason, cataloged each part.

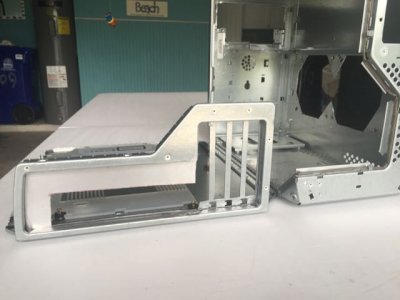
Day 2
All gutted, nice and shiny clean, time to start ordering parts. But first, (based on recommendations from this site) I'm going to do some cardboard cutouts (event though I measured) just to be sure everything fits like I want it.
Day 3-30
I've put together my parts list, need up getting everything else is from Amazon, as a Prime member get all shipping free so saved some big bucks there. Note, I did not order them all at once so I spread the cost over a month of pay checks.
Here's the part list.
Thanks to this website I've been able to do quite a bit of research and ready to start my build.
The Apple G4 was one of the best computers I ever owned, purchased new in 1998, it was still running, and until Apple changed processor/architecture ran for a good 10 years! I still miss the User Interface of the old iTunes and iPhotos apps.
The Build Plan - is to have a multi-boot system, having a different hard drive for each OS. Mac OS for all my graphic design work, photography and video editing, and a (yes, can't believe I'm saying this) but Windows primarily to run games I play like Blizzards/WOW etc.
Day 1
Gutting the Tower. I removed pretty much everything, and for whatever reason, cataloged each part.
Day 2
All gutted, nice and shiny clean, time to start ordering parts. But first, (based on recommendations from this site) I'm going to do some cardboard cutouts (event though I measured) just to be sure everything fits like I want it.
Day 3-30
I've put together my parts list, need up getting everything else is from Amazon, as a Prime member get all shipping free so saved some big bucks there. Note, I did not order them all at once so I spread the cost over a month of pay checks.
Here's the part list.
- Mobo: Gigabyte GA-Z170MX-Gaming 5
- CPU: Intel Core I7-6700 FC-LGA14C 3.40 GHz 8 M Processor Cache 4 LGA 1151
- Graphics: Gigabyte GeForce GTX 970 Overclocked GDDR5, 4GB
- Memory: Corsair Vengeance LPX 16GB (2x8GB) DDR4 DRAM
- Internal Drives: SSD Samsung, HD Western Digital
- Drive SSD Brackets: SNANSHI SSD Bracket 2.5 inch SSD HDD to 3.5 inch Metal Mounting Adapter Bracket Hard Drive Holder for PC SSD (Pack of 2) NOTE: These worked perfect, used them with the original HD catty mount.
- Power Supply: EVGA 700 B1, 80+ BRONZE 700W (fit perfect with my G4 Sawtooth case)
- Wifi Card: TP-LINK N900 2.4GHz or 5GHz up to 450Mbps Wireless Dual Band PCI Express Adapter for Windows NOTE: This worked prefect out of the box with both the Mac and Windows with no drivers required at all which came in handing as back and forth Multibeast, Clover set up and configurations kept enabling and disabling my Ethernet connections.
- USB/HD Audio: E-SDS USB 3.0 2-Port 3.5 Inch Front Panel USB Hub with 1 HD Audio Output Port/1 Microphone Input Port/1 USB 3.1 Type C Port for Desktop [ 20 Pin Connector &Audio Connector &2ft Adapter Cable] NOTE: Since the optical drive wasn't going to fit and I had no use for the old Zip Drive, this fit perfect in that front panel space, not drivers ext. worked out of the box first time.
- Internal System Fans: Corsair Air Series AF120 LED Quiet Edition High Airflow Fans (2) NOTE: I cut out the original vent and cut a second to have two side-by-side fans since I opted not to do a Liquid Cooler. These fit great and are LED so give a nice glow through the outside case (see pg 3) - However I may replace them because they were of the old 3-PIN and my mobo is is 4-PIN (for variable speed controlled fans) so they are hooked up directly to the power supply and always are running while the box is powered up.
- Mobo mounting posts: Hilitchi 240pcs M2 and M3 Brass Spacer Standoff Screw Nut Assortment Kit.
- Jumper Cables: 30CM F/F Breadboard Jumper Wires Kit,80Pin Female to Female Ribbon Cables(2 X 40 Pcs) NOTE: These were perfect to wire up the connectors to the original Mac front panel board for the Power and Reset Button and LED Power light - no splicing, soldering or mess (see pg 3 for diagram). More cables than I need so let me know if need some!
- SATA Cables: RELPER 3pcs Pack 10-inch 26AWG SATA III 6.0 Gbps 7pin Female to Female Data Cable with Locking Latch NOTE: While my mobo came with 4, they were cheap and the end clips broke on a couple, always good to have spare wires/cables for projects like these.
Last edited:

 Can't find any stock that has a hose long enough for what I had in mind. My graphics card is so tall it can't go over the top so needs to snake around. I'm thinking about not doing a liquid cooler at all now. When gaming I rarely play more than a couple of hours at a time, graphics/video rendering is they only other thing that would heat up my box so I think I'll just go with two regular fans.