Contribute
Register

From PC to G5 (ATX)

Status
Not open for further replies.
I am not a fan of cable clutter either.

Your current re-do is very well done and can be a real show piece with a few cable hiding tricks.

My usual approach is to provide some space between the motherboard and mounting surface so that the bulk of the cables can be routed un-seen under the motherboard. Also, I fabricate modesty panels that hide much of the left over cable clutter. ‘

Also, I re-terminate and shorten or lengthen cables as needed for best performance and appearance.

Good modding,
neil

Thank you, Neil. I take compliments from your side very seriously. Sorry my response took so long. Been quite busy lately and did not have time to work on this project. Christmas break is coming however, so things will start rolling again. :)
 
Also, I fabricate modesty panels that hide much of the left over cable clutter. ‘

Which material do you prefer for this creating such a panel? I was thinking about some sort of plastic, since aluminum is not that easy to work with.
 
Which material do you prefer for this creating such a panel? I was thinking about some sort of plastic, since aluminum is not that easy to work with.

In my area there is a chain store called Tap Plastics and they sell sheet plastic cut to size at a very reasonable cost. I use black ABS sheets by choice (2 or 3 mm thick) and ABS solvent glue (from the hardware store, "Plumbers" section). These panels are easy to cut and file to shape, easy to weld with the ABS glue. And I paint the panels as required by the project scheme.

Good modding,
neil
 
So, I'm quite satisfied how to mb tray worked out. The placement of the mb is now a lot cleaner then it used to be.

Like I mentioned, in the beginning of this project I just wanted it to work in this case but now it irritates me that it is such a mess. However I have no clue what to do with the PSU and the HDD's. They are just 'there'.

Any of you have tips / suggestions? It's highly appreciated. :)

In my area there is a chain store called Tap Plastics and they sell sheet plastic cut to size at a very reasonable cost. I use black ABS sheets by choice (2 or 3 mm thick) and ABS solvent glue (from the hardware store, "Plumbers" section). These panels are easy to cut and file to shape, easy to weld with the ABS glue. And I paint the panels as required by the project scheme.

Good modding,
neil

Thanks a lot that's what I will be doing after I am satisfied with the placement of the HDD (tray) and the PSU.

Thanks in advance,

Thij.


EDIT: I think I have got an idea!

How about disassembling my PSU and fitting it in the original G5 PSU, then create (or rip from an old pc) a better bracket for my HDD's and mount it on top of that? If I place it with the cables next to the right side (seen from the back) of my case, I probably hide them with the plastics.

Unfortunately I sold many original parts of the G5, including the PSU. Never done such a thing, but for everything there is a first time. We'll see. :p

This is by far the best solution for a G5 or Mac Pro case mod. In your situation it may be to late if you have not got the original PSU (but you might be able to pick one up on fleabay)

If you choose an Micro ATX motherboard this mod lets you retain the original hard drive cage and centre tray (shortened) to retain the fan mount.

To mod the PSU you must have some electrical skills as electrical seperation must be maintained between the PSU board and the case.

http://www.tonymacx86.com/powermac-g5/183276-latest-g5-conversion-i-could-not-resist.html
 
Update 3

Time for an update! I think this is quite a major one on the way to a neat G5 mod.

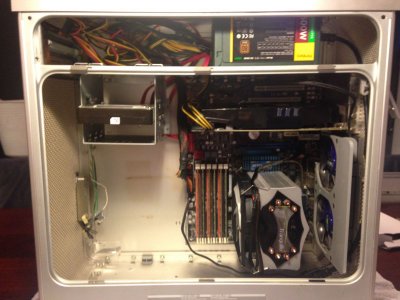
As you can see, I moved the PSU to the top right corner of the case. This solves a LOT of the wiring 'problems' I had. I had to remove the dvd drive, which is not that much of a deal considering the fact I hardly use it anyway... The top shelf is still messy, but I will create a plastic panel which covers the space above the top shelf in the future to hide the cables. Bought an 0.50m extension chord for the PSU.

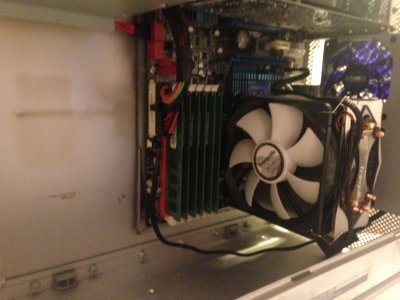
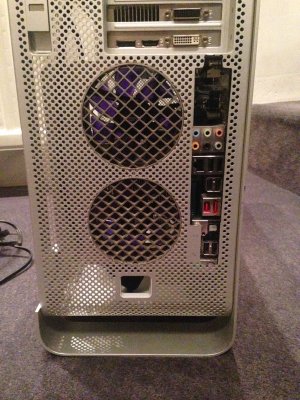
Because I wanted to mount the PSU in the top right corner, I had to lower my motherboard. A few modifications to the backplate made this possible. Had to cut a bit of the back as well, and put the GPU in a different PCI slot.

Also, you can see I bought a CPU cooler, the Tranquillo Rev2. The PC is so much quieter now.


20160312041710-2.jpg20160312041710.jpg20160312041704.jpg


This is definitely not the end result. There are still things such as the front panel cable that can and will be improved. I just take it slow. :)

Though I have a problem...

If I turn on my PC, I get no display at all. The fan of the GPU is spinning, but it's all black. Tried both HDMI and DVI. Might it have something to do with the change of PCI slot? Dust? Will try to clean it up and check the GPU to PCI connection a third time.

Suggestions anyone?

Regards, Thij.

EDIT: Reconnected the GPU and cleaned the PCI slot. Still no display.
 
At first I tried to clear my CMOS. Had no display afterwards. Got nearly every part out of my case to try if it works in a different PC. Turned out every part worked with exception for the MB...

Feared for the worst but after another CMOS reset, it works. Okay. :lolno:
 
Update 4

Small update (in every sense of the word...)!

I have redone the cable for the frontpanel. The cable I used to have looked terrible but was a temporary solution so I could use the front panel while I could not work on my case.

What I did was using the original frontpanel connector, removing all unnecessary wires (I only use the LED and power button, no need for audio/fw/USB). Then I cut an old VGA cable to ~35 cm. Once again, removed all the unnecessary wires but this time from the 'VGA cable' till there were 4 left. After that I soldered the original connector to one side of the cable and the motherboard connectors to the other. Last but not least I applied some heat shrink.

I am very satisfied with the result!

The old 'cable'

IMG_8702.JPG


Work in progress

At this point, the only thing left to do is applying the heat shrink. The unnecessary wires have been removed from the VGA cable already.

IMG_8699.JPG


The result

IMG_8701.JPG


FullSizeRender.jpg


Last edited:
Status
Not open for further replies.
Back
Top